BN68-05357A-01
QUICK START
GUIDE
Welcome to your new Smart TV!
The following instructions cover assembling, connecting, and setting up your new TV. Make
sure you have the accessories listed below.
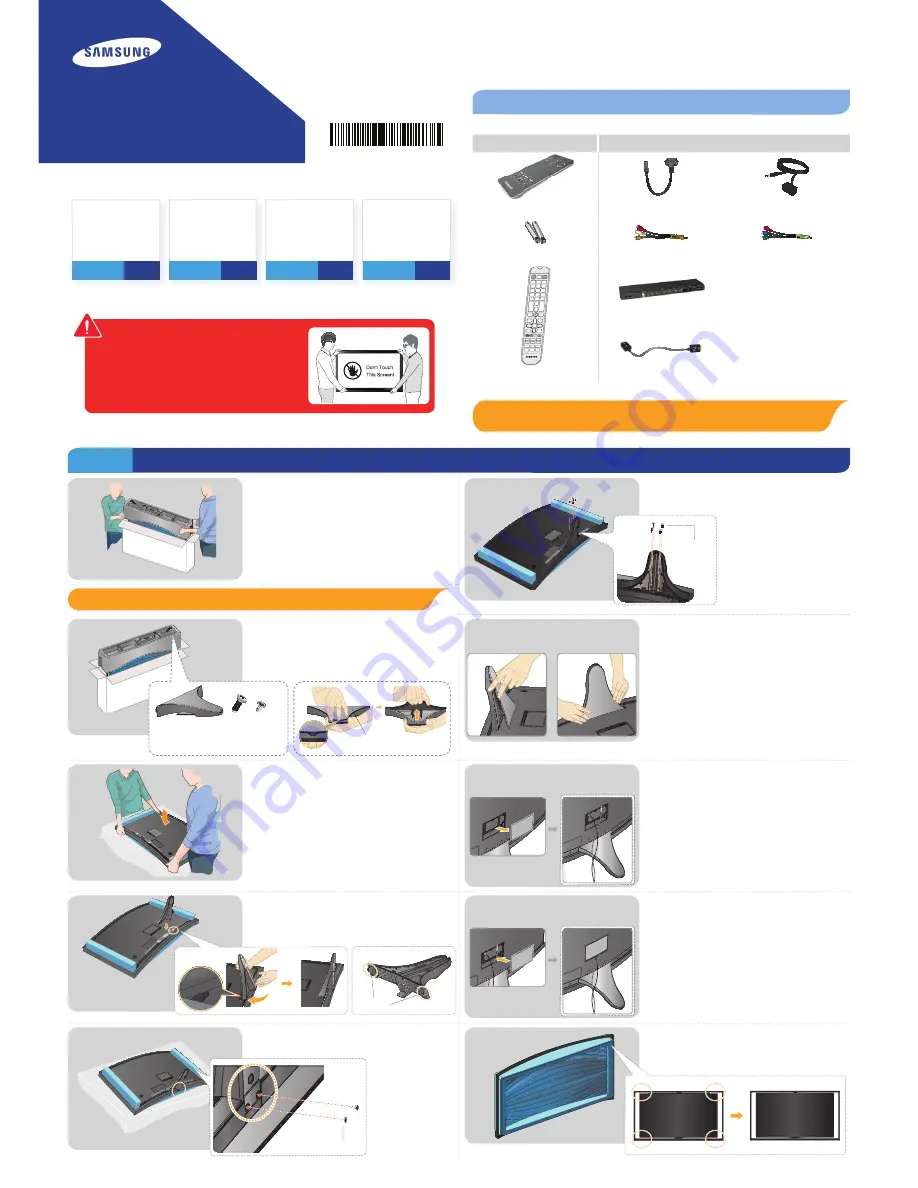
Included in this box
Remote Control
One connect and Cables
Smart Touch Control
Power cord
IR extender
Batteries (AAA x 4)
RCA Adapter x 2
Component adapter
One connect
Remote Control
One connect cable
Also included: User manual, 3D active glasses
Step
1
Attach the TV to
the Stand
Step
2
Connect video
devices
Step
3
Insert the
batteries into the
remote control
Step
4
Power on and
start the initial
setup
Warning: Screens can be damaged
from direct pressure when handled
incorrectly. We recommend lifting the
TV by the edges, as shown.
Step 1
Attach the TV to the Stand
1
Open the package, and remove the cushioning.
6
M4 x L20
Secure the stand to the TV using four screws as
shown in the diagram.
REQUIRED TOOLS: a Phillips head screwdriver and a soft, flat surface larger than the TV
(such as the box).
2
Stand cover
Screws
Stand
M4 x L20 4 pieces
M4 x L10 2 pieces
x 4
x 2
Pull the stand out of the top Styrofoam
cushioning, and make the stand face your body,
as shown in the illustration. Insert a finger
into the groove in the middle and pull it up to
separate the cover from the stand.
7
To replace the stand cover, fix its exterior and
then the interior into the stand. Press both
sides firmly to make sure that it is completely
assembled.
3
Remove the TV from the box. Then, remove
the top and bottom pieces of Styrofoam from
the TV, but keep the screen-protection piece
on. Place the TV down on the the box with the
screen facing down.
8
Remove the port cover, and connect the power
cord to the One Connect.
4
Hook
Tilt the stand to put its hook into the groove on
the back of the TV, and push it, giving it a slight
turn until it is firmly in place.
9
Replace the port cover.
5
M4 x L10
Secure the bottom of the stand to the TV using
two screws.
10
Stand the TV up, and remove the Styrofoam
bumper and the 4 protective pads from the
screen.
S9C


