background image

Monitoring the Battery Charge

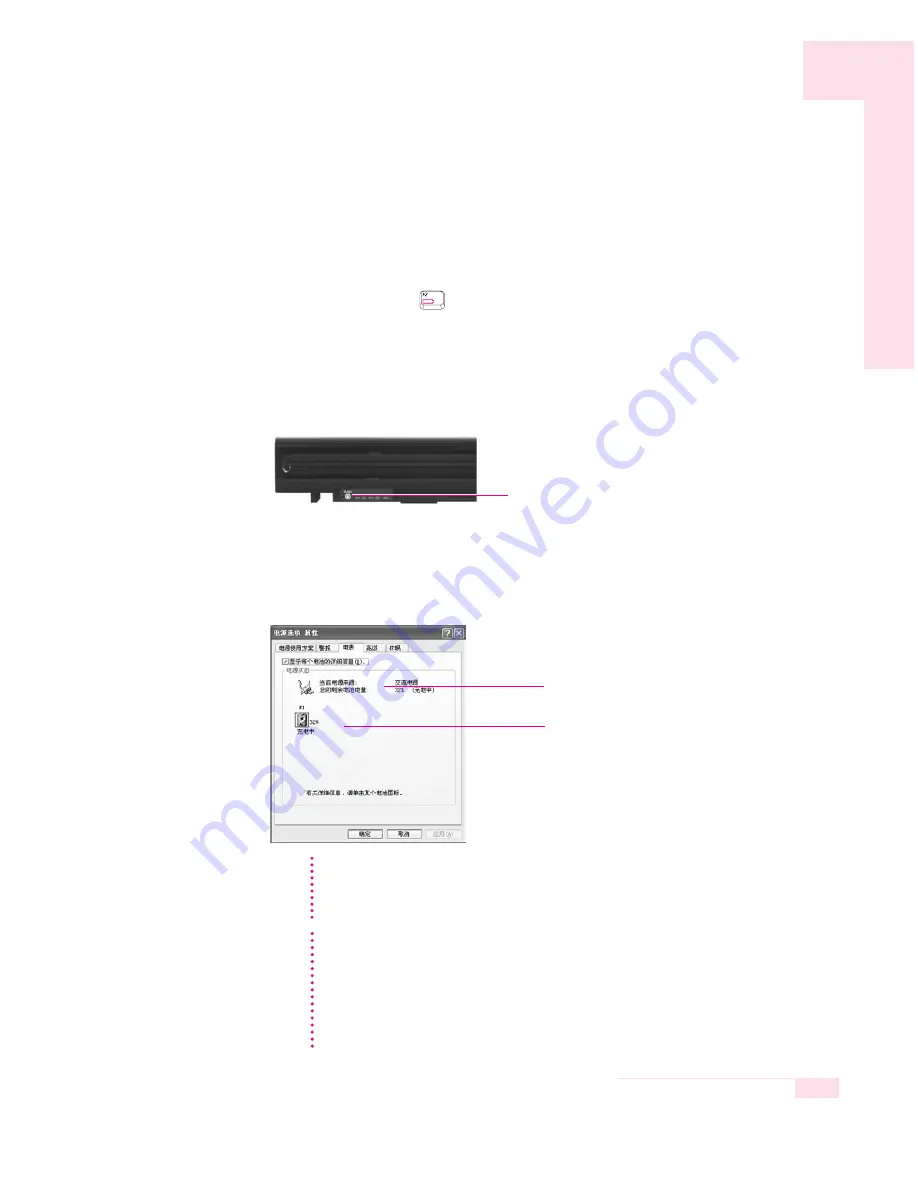
You can view the battery charge status by completing the following procedures. 

Using the shortcut key to view

If you press the <Fn>+<

> key combination on the keyboard, the remaining

battery charge appears on the screen for a while. It appears only when the
Samsung Display Manager program is installed on your computer.

To view on the battery

Press the PUSH button on the battery. The remaining battery charge (%) will be displayed.

To view through the Control Panel

Select Start > Control Panel > Performance and Maintenance > Power Option > Power
Measure tab.
Then you can view the current power source and the current remaining battery charge.

5-5

Chapter 5. System Management 

Remaining Battery Charge

Power supply status

CC

CC

aa

aa

uu

uu

tt

tt

ii

ii

oo

oo

nn

nn

Using the battery

Battery is an expendable supply, so when you use it for a long time, 
the capacity/battery life is shortened. If the battery life time is reduced to under half of
the initial time, we recommend that you purchase a new battery to use.

Battery Warning

You will hear an alarm when the remaining battery charge is under 10%. Connect
the power cable or turn off the computer and install a fully charged battery.
When the remaining battery charge is under 3%, the computer automatically
saves current work and turns off. This may be different according to the settings in

Control Panel > Performance and Maintenance > Power Options
> Alarms

tab.

N

N

N

N

o

o

o

o

tt

tt

e

e

e

e


Slightly press PUSH button.

Содержание R45

Страница 1: ...Manual This manual describes how to use computer as well as information on Windows Internet Upgrade and Troubleshooting R45 The product images may differ from actual product appearance ...

Страница 2: ...puter Use 1 14 2 Introducing Windows Windows XP Basics 2 2 Document Operations 2 7 3 Using The Computer Using the CD Rom Drive 3 2 Using the PC Card Slot 3 7 Using EasyBox 3 8 Using Samsung Update Plus 3 10 Using AVStation premium 3 12 Using AVStation premium Viewer 3 25 Contents The photographs used in this user manual may be somewhat different in shape and color to those of your computer dependi...

Страница 3: ...N 4 7 Using Samsung Network Manager 4 14 Using Network Service 4 21 Using Bluetooth Devices 4 27 5 System Management Managing Power 5 2 Using the Battery 5 4 Upgrading Memory 5 8 Using the Security Lock 5 10 Traveling with the Computer 5 11 6 Customizing your computer Using System Setup 6 2 Configuring the Password 6 4 Changing Booting Priority 6 6 Configuring Resolution and Color Depth 6 7 Using ...

Страница 4: ...ctor 7 2 Restoring the System 7 3 Reinstalling Software 7 5 Re Installing Windows 7 7 Q A 7 10 Appendix System Specifications A 2 Wireless LAN Specifications A 3 Copyright A 4 Safety Instructions A 5 Samsung Notebook Computer Global Warranty ...

Страница 5: ...Getting Started This chapter provides basic information for using this computer System overview and methods for general use are provided Chapter 1 Chapter 1 ...

Страница 6: ...2 Manual Introducing The Computer Front View LCD Panel Keyboard P 1 9 Status Indicators P 1 11 Status Indicators P 1 11 Internet Button Power Button P 1 5 LCD Latch Touchpad Button Touchpad P 1 7 Speaker ...

Страница 7: ...ew 1 3 Chapter 1 Getting Started CD Drive Optional P 3 2 Network LAN Port P 4 4 Monitor Port Fan Vents Modem Port Optional P 4 3 TV Output Port S Video P 6 8 USB 2 0 Port Headphone Jack Microphone Jack PC Card Slot P 3 7 ...

Страница 8: ...e hard disk drive will void your warranty To replace the hard disk drive please contact your nearest Samsung Service Centre 1 4 Manual Rear View Bottom View Battery P 5 4 USB 2 0 Port Battery Latches Memory Compartment P 5 8 Security Lock Port P 5 10 DC In Port HDD Compartment ...

Страница 9: ...ng Off 1 Click the Start button on the Taskbar 2 Select Turn Off Computer 3 Click Turn Off from the Turn Off Computer window 1 5 Chapter 1 Getting Started C C C Ca a a au u u ut t t tii iio o o on n n n If the computer has not turned off properly due to a system error press and hold the power button for more than 4 seconds to turn the system off After doing so when you turn the system on the syste...

Страница 10: ... Create a new account 3 Type a name for the new account and click Next 4 Select the account type and click Create Account The new user account has been created Changing users 1 Click Start Log Off 2 Click Switch User 3 In the Windows Log On window select the desired user name N N N No o o ot t t te e e e To login with an Administrator Account To delete a user account 1 Click on a user account to d...

Страница 11: ... operations Double click Run Function Place a finger on the touchpad move the pointer on the screen to the item to run and quickly tap your finger on the touchpad twice Or double click the left touchpad button 1 7 Chapter 1 Getting Started Touchpad buttons the two buttons below the touchpad provide identical functions to buttons of a mouse Touchpad N N N No o o ot t t te e e e Locking the touchpad...

Страница 12: ... Manual Drag Move Select Drag and drop a part to the required place C C C Ca a a au u u ut t t tii iio o o on n n n Please use the touchpad only with your finger Using sharp devices may damage the touchpad Operating the touchpad or touchpad button while starting your system may increase the time required for starting Windows To utilize the touchpad buttons for other more diverse functions please r...

Страница 13: ... the audio output on and off Turns the wireless LAN on or off Turns the touchpad function on and off You can select Etiquette Mode when you require a quiet operating environment Makes the keypad in the middle of keyboard available Scrolls the screen up and down while the cursor position does not change in some applications Function Standby Gauge Euro CRT LCD Backlit Mute Wireless LAN Touchpad Etiq...

Страница 14: ...Control Key Moves to the screen above or below or moves the cursor to the beginning or end of the sentence Key Function Increases the audio volume Decreases the audio volume Turns the LCD screen brighter Turns the LCD screen dimmer Function Volume Up Volume Down Brightness Up Brightness Down Key Name Key Com binations ...

Страница 15: ...AN function is enabled This light does not operate for the models without wireless LAN Green When the computer is operating on AC power and the battery is fully charged Amber When the computer is operating on AC power and the battery is being charged Off When the computer is operating on battery power Turns on when the computer is turned on Blinks when the computer is in Standby mode Num Lock Caps...

Страница 16: ... the F2 key to enter Setup 2 In the Boot menu change the Bright Mode Control option to User Control 3 Save the settings and exit Setup When using the Battery Manager only the screen brightness set in Custom Mode is maintained To save the battery charge When your computer is operating on battery power adjusting the LCD brightness level to dimmer diminishes the battery power consumption Bad pixels i...

Страница 17: ...sing the Volume Control Program On the taskbar click the Volume icon and adjust the slide bars For advanced volume control options double click the Volume icon and adjust the settings in the Master Volume dialog C C C Ca a a au u u ut t t tii iio o o on n n n When you turn the system on a booting noise may occur ...

Страница 18: ...e the legs naturally If necessary use a cushion to provide extra back support Avoid working postures that require twisting the body or neck Lighting Soft indirect lighting is recommended Position the display panel so that external light does not reflect off the screen Use curtains if necessary Work Habits Take periodic breaks and stretch out stiff muscles regularly Look outside the window or at di...

Страница 19: ...Introducing Windows This chapter provides basic information on using the computer s main operating system Windows Chapter 2 Chapter 2 ...

Страница 20: ... for efficiently computer use Windows XP Tour A tour of the elementary functions provided by Windows XP Click Start Tour Windows XP Or click Start All Programs Accessories Tour Windows XP Click on the topics to find out about important functions of Windows XP Click the Title An explanation will appear on the lower part of the screen ...

Страница 21: ...tart Button Opens the Start Menu Taskbar Displays programs that are currently running Frequently used icons can be placed here Recycle Bin Deleted files or folders end up here Language Bar Enables switching between English other languages text inputs and provides other text input services Start Menu Start Button Taskbar System Tray with Clock Language Bar Recycle Bin Desktop Icons You can directly...

Страница 22: ... and floppy disks It can also be used to search and open files and folders Enables users to configure settings on the computer Provides on line help information on Windows and troubleshooting Enables users to search for information in files or the Internet Runs programs or documents My Computer Control Panel Help and Support Search Run Fixed Items Internet Browser Electronic Mail Program This Fold...

Страница 23: ...ton Maximize Button Minimize Button Double click a shared document or a local disk to view the folders and files in it Folders Files What is a Drive A storage device in which files and folders are saved in and read from What is a Folder A folder is used to group and manage files systematically and may include files in sub folders It is similar to a bookshelf What is a File A file is a document or ...

Страница 24: ...p and support centre before calling the Samsung helpline Click Start Help and Support Related help information appears when a search keyword is entered Displays Help Index Help Topics Troubleshooting Information Connect to Support Center The computer has to be connected to the Internet Computer information can be viewed and the problem can be diagnosed ...

Страница 25: ... documents using WordPad is provided here Creating a New Document 1 Click Start All Programs Accessories WordPad 2 Create and edit your document For more information about WordPad refer to on line Help Saving a Document 1 Select File from the Menu and click Save 2 Click on the Save in field to specify a folder to save the file in enter the name of the file in the File Name field and click Save Sav...

Страница 26: ...n Printing a Document To print a document connect a printer to the computer For more information about connecting and configuring a printer please refer to the printer manual To print a WordPad document 1 Turn on the printer and insert paper 2 Open the WordPad file to print 3 Select File from the Menu and select Print 4 Click Properties adjust the printer options accordingly and click OK 5 In Prin...

Страница 27: ...Using The Computer This chapter investigates various different functions of the computer and provides information on using the related application programs for them Chapter 3 Chapter 3 ...

Страница 28: ...e CD will run automatically 3 2 Manual To eject a CD when the CD drive is out of order or the system is turned off unfold a paper clip and insert the unfolded end of the clip into the hole and press until the CD tray opens N N N No o o ot t t te e e e A CD ROM drive is optional For more detailed product specifications refer to the product catalog N N N No o o ot t t te e e e C C C Ca a a au u u ut...

Страница 29: ...r Running the program the first time displays the set up screen Define the settings according to the instructions displayed on the screen When you complete the settings the following screen appears Features Playlist pane Playback Controls area To view detailed information on how to use Windows Media Player Run Windows Media Player and right click over the Function Taskbar and select Help Windows M...

Страница 30: ...ck OK to play the audio CD To Play a Video CD 1 Insert a video CD into the CD drive 2 When a video window appears double click the MPEGAV folder 3 Double click the DAT file 4 When a warning window appears click the Open with button 5 In the new window click Select Program from List and click OK 6 Select the Windows Media Player and click OK The video will start playing ...

Страница 31: ... If your computer has CD RW functionality you can copy data to a blank CD or create an audio CD 1 Insert a blank CD into the CD RW drive 2 Click Open Writable CD Folder and click OK The CD ROM drive window appears automatically 3 Click Start My Computer ...

Страница 32: ...al CD ROM drive window 2 Click Write Files to CD 1 Drag and drop folders or files to copy My Computer window For more information on copying CDs Click Start Help and Support Enter CD copy in the search field and click the Search button To Burn an Audio CD Run Windows Media Player and right click over the Function Taskbar and select Help Windows Media Player Help from the popup menu Select Using th...

Страница 33: ...o pop it out Push the button again to eject the slot protector To remove PC card a Double click Safely Remove Hardware icon in Taskbar b Select the appropriate PC card and click Stop button c When Safe to remove Hardware window appears click OK d Press Eject button at PC card slot once then the button pops out e Press the projected button to eject the PC card N N N No o o ot t t te e e e C C C Ca ...

Страница 34: ...ults and change the boot sequence Desktop Desktop management features include changing the font size execut ing a magnifier function the start menu settings and managing the quick launch icons on the taskbar Security Here you can configure the security settings supported by Windows XP SP2 You can also change the configuration of the firewall set tings Windows automatic updates and blocking pop ups...

Страница 35: ...ll prevents unauthorized users from gaining access to your system via the network or the Internet 1 Click Start All Programs Samsung EasyBox EasyBox 2 Click Security from the top menu bar 3 Select Windows Firewall Settings from the Security menu on the left 4 Select a firewall level 5 Click Apply Click the User Setting button for advanced features including exceptions and permissions ...

Страница 36: ...rograms Samsung Samsung Update Plus Samsung Update Plus 2 Click Search for and Install Updates and click the Search for Updates button 3 If there are available software or driver updates for your computer the available updates will be listed Select the required updates from the list and click Install Update to start the update If this is the first time you are running the program a window will app...

Страница 37: ...matic update items display By default your computer is configured to automatically search for updates If there is a new update available this is notified in the notification area Click the balloon help icon in the notification area Here you will be able to find the latest available updates To change the automatic update settings click the Custom button in Figure 2 and change the settings Samsung U...

Страница 38: ...sion TV Station is only available for systems supporting the TV function For detailed usage refer to the program help Start and Screen Layout To launch the program select Start All Programs Samsung AVStation premium AVStation premium Alternatively double click the AVStation premium icon on the Desktop MUSIC You can play a music file or an audio CD PHOTO You can view or edit a photograph image and ...

Страница 39: ...EDS Enhanced Digital Sound is a sound quality enhancement technology devel oped by Samsung Electronics You can listen to clearer sound if you enable the EDS function when playing music or video on AVStation premium Station Bar MUSIC Library Register a File MUSIC Menu Bar Playlist Playlist Control Buttons Play Control Buttons Volume Control Play Options EDS Setting Button ...

Страница 40: ...ect Play Audio CD using Samsung AVStation and click the OK button 3 The tracks on the audio CD are displayed in the Playlist and the first track is automatically played N N N No o o ot t t te e e e If an audio CD is already in the CD drive double click the album title in the Audio CD folder of the Library and add the tracks to the Playlist The tracks added to the Playlist are played ...

Страница 41: ... click a music file The file is added to the playlist and played N N N No o o ot t t te e e e Play a Track not registered to the Library Click File Open select a music file to be played and click Open The selected track is registered to the Library and played Creating My Playlist My Playlist is a personal album with which you can collect manage and play your favorite music files For the procedures...

Страница 42: ...n add files folders or search and add files As an example the proce dures to add a folder are described below 1 Click on the Register a File button below the Library and click on Add by Folders 2 Select a folder which included music files and click the OK button The music files in the folder are added to the Library N N N No o o ot t t te e e e The tracks used in AVStation are automatically added ...

Страница 43: ...are described below For the procedures to register image files to the Library refer to P 3 20 1 Move to PHOTO Station and double click on All Images 2 Click on a folder which includes images and the images in the folder are dis played in the Image Viewer window Station Bar PHOTO Library Register a File PHOTO Menu Bar Image Viewer Tab Image Editor Tab Move to a Higher Level Folder Preview Zoom in I...

Страница 44: ...in Full Screen or through a SlideShow Click the Full Screen button or SlideShow button below the Image Viewer window To return to the Image Viewer window press the Esc key or double click on the screen Watching a SlideShow while Listening to Music To watch a SlideShow while listening to music play music from MUSIC Station and run SlideShow Setting an Image as the Background Click the Set as Backgr...

Страница 45: ...ditor screen appears The Image Editor screen consists of an Image Workspace window and 3 Tool tabs 2 Edit the image using the Shape Edit and Effect tools Shape tool Change the shape of an image through cut resize Edit tool Draw a line add some clip art or enter letters Effect tool Apply various effects to an image 3 When finishing editing an image click the Save Edited Image button below the Image...

Страница 46: ...n add files add folders or search and add files As an example the pro cedures to add folders are described below 1 Click the Register a File button below the Library and click on Add by Folders 2 Select a folder which includes image files and click the OK button The image files in the folder are added to the Library N N N No o o ot t t te e e e The image files used in AVStation are automatically a...

Страница 47: ...ed by Samsung Electronics You can view a clearer and sharper picture by enabling the EDI function when watching TV or playing a video on AVStation pre mium However some TV tuners and graphics cards are not supported by EDI For information on EDS Enhanced Digital Sound refer to P 3 13 Station Bar MOVIE Library Register a File MOVIE Menu Bar Video Play window Play Control Buttons Volume Control Capt...

Страница 48: ...the DVD playing software first 1 Launch AVStation premium and insert a DVD title into the DVD drive 2 In the What do you want Windows to do window select Play DVD Video using Samsung AVStation and click the OK button 3 The DVD title is played N N N No o o ot t t te e e e If a DVD title is already in the DVD drive double click the DVD title in the DVD VCD folder of the Library The DVD title is play...

Страница 49: ...to the Library and played Playing a Video File in Full Screen 1 Double click on the current playback screen 2 The video is played in full screen In full screen move the mouse pointer to the bottom of the screen to show the Play Control bar To play at the default screen size press the Esc key or double click on the screen Capturing the Video Screen Click on Capture Current Screen below the Play win...

Страница 50: ...an add files add folders or search and add files As an example the pro cedures to add folders are described below 1 Click the Register a File button below the Library and click Add by Folders 2 Select a folder which includes video files and click the OK button The video files in the folder are added to the Library N N N No o o ot t t te e e e The video files used in AVStation are automatically add...

Страница 51: ...o the AVStation premium Library For the procedures to register files to the Library refer to P 3 16 P 3 20 and P 3 24 The screen figures may differ from actual ones depending on the program ver sion TV Station is only available for systems supporting the TV function Start Exit AVStation premium Viewer Starting Select Start All Programs Samsung AVStation premium AVStation pre mium Viewer from Windo...

Страница 52: ...ne by one or in a SlideShow MOVIE You can play a video DVD or VCD title Settings You can set the Music Photo and Movie settings N N N No o o ot t t te e e e To move to the start screen while using the program Press the ESC key Or move the mouse pointer to the top left in the current screen and click the AVStation icon ...

Страница 53: ...gister files refer to P 3 16 1 Launch AVStation Viewer and click on Music 2 Click on All Music and double click a file in the right pane Playing an Audio CD 1 Launch AVStation Viewer and insert an audio CD into the CD drive 2 In the AVStation Viewer start screen click on Music 3 Double click the Audio CD in the left pane and double click on an album or music file in the right pane The selected mus...

Страница 54: ...O Library one by one and through a SlideShow are described below For the procedures to register image files to the Library refer to P 3 20 1 Launch AVStation Viewer and click on Photo 2 Click on All Images and double click on an image file in the right pane All Images Image File ...

Страница 55: ...n on N N N No o o ot t t te e e e To view an image in Full Sreen or through a SlideShow Click on the SlideShow or Full Screen button below the zoomed in image To return to the previous status in SlideShow or Full Screen press the Esc key or double click on the screen ...

Страница 56: ... to the MOVIE Library are described below Refer to P 3 24 1 Launch AVStation Viewer and click the Movie 2 Click on All Movies and double click a movie file in the right pane The movie file is played N N N No o o ot t t te e e e Showing the Play Control window Press the space bar or move the mouse pointer The Play Control window appears at the bottom All movies movie File ...

Страница 57: ...he Computer Playing a DVD 1 Launch AVStation Viewer and insert a DVD title into the DVD drive 2 In the AVStation Viewer start screen click on Movie 3 Click on DVD VCD and double click on the DVD title The DVD title is played ...

Страница 58: ...3 32 Manual ...

Страница 59: ...Connecting to the Internet This chapter provides instructions on connecting to the Internet Chapter 4 Chapter 4 ...

Страница 60: ...tion network service such as ADSL and VDSL Service has to be applied for and received from a High speed communication network service provider Receiving Internet service may require support from specific devices Contact the service provider for details Option 3 Connecting using a wired LAN Use a LAN cable that is already installed in your office or building Option 4 Connecting using a wireless LAN...

Страница 61: ... 2 To connect the modem to the Internet and use e mail you have to apply to an Internet Service Provider ISP for an Internet service For more account information please contact your ISP Ask your ISP about Internet fees and the disconnection procedure If the Internet connection is not disconnected properly additional telephone charges may incur N N N No o o ot t t te e e e ...

Страница 62: ...Panel 3 Select Network and Internet Connections in the Control Panel window 4 Click Network Connections in the Network and Internet Connections window 5 In the Network Connections window point the mouse pointer to Local Area Network and click the right touchpad button Select Properties from the popup menu that appears 6 In the General tab of the Local Area Connection Properties window check that t...

Страница 63: ...ss automatically on the General tab 9 Once all of the information is entered in the Internet Protocol TCP IP Properties window click OK to finish 4 5 Chapter 4 Connecting to the Internet Check the driver Select Internet Protocol TCP IP Click Properties In the above screen necessary network components can be added by clicking the Install button N N N No o o ot t t te e e e IP addresses and other in...

Страница 64: ...ction press the right button of the touchpad and then select Properties 2 Select the Internet Protocol TCP IP item and then click Properties 3 In the Alternate Configuration tab click User configured and then enter the appropriate values for the following IP address Subnet mask Default gateway Preferred and alternate DNS server Preferred and alternate WINS server 4 When the configuration has been ...

Страница 65: ...or ad hoc The description in this section refers to the Atheros Network Connection hereafter referred to as an 802 11BG card device A wireless LAN card is optional The model of the wireless LAN card is determined by the relevant product To view the installed wireless LAN card click Start Control Panel Performance and Maintenance System Hardware tab Device Manager The wireless LAN connection settin...

Страница 66: ...s Enter the Network Key in the window and then click the Connect button Now when Connected in AP is displayed and you can access the network For more detailed information such as the network key encryption key ask your network administrator N N N No o o ot t t te e e e Checking the connection status Move the mouse pointer over the Wireless Network Connection icon on the taskbar and the connection ...

Страница 67: ... can share the Internet by accessing another computer connected to the Internet See P 4 17 Sharing Internet Access You can connect by completing the following steps Step 1 Set up a computer to computer network on a computer Step 2 Connect to the configured computer from other computers Step 1 Setting up a computer to computer network 1 Right click on the Wireless Network Connection icon on the tas...

Страница 68: ...network name e g samsung and unselect The key is provided for me automatically Enter the encryption key in the Network key field and click OK To prevent a network connection from an unauthorized user it would be better to configure a network key encryption key A network key consists of 5 13 alphanumeric characters e g magic or of 10 26 hexadecimal numbers a hexadecimal number is represented by num...

Страница 69: ...4 11 Chapter 4 Connecting to the Internet 7 Check that the configured network name e g samsung is in the Preferred networks item and click OK Now your wireless network setup has been completed ...

Страница 70: ...c key in the network key box and click Connect When connected to the wireless network the system displays Connected in the selected network of the Network Connection window If the network key is not configured in Connecting to computer to computer networks peer to peer or ad hoc on P 4 9 just click Connect without any keystrokes N N N No o o ot t t te e e e Checking the connection status Move the ...

Страница 71: ...5 Enter a profile name to be used for the connection select a security setting for the AP to be connected in the Security window 6 Click OK and then click on OK again in the Profile Management window If the profile is created the created profile is displayed in the list below the Profile Management tab and the wireless connection is made using the corresponding profile The network authentication t...

Страница 72: ...ou can diagnose the network status You can diagnose the network status when the network is not properly connected Using the Network This section describes the procedures to connect to the Internet by setting up a network The setting up procedures include the procedures to add a printer to the network Setting Up a Network 1 To use a wired LAN connect the LAN cable to the LAN port To use a wireless ...

Страница 73: ...ternet Select either Wired LAN or Wireless LAN Setting up the IP Address To allocate an IP address automatically DHCP select Get IP Automatically To use a static IP address unselect Get IP Automatically and enter an IP address For IP address information ask your network administrator N N N No o o ot t t te e e e To not add a printer select No Default Printer and then click the Finish button When t...

Страница 74: ...kbar and click View Available Wireless Networks 2 Select an available wireless network e g SAMSUNG and click the Connect button For information on available wireless LAN APs ask your network administrator 3 The network key security key input window appears If a network key has been set for the wireless LAN AP enter the network key and click the Connect button For the network key information ask yo...

Страница 75: ...1 which connect the sharing server and the Internet through a wired LAN and connect the sharing server and the sharing client through a wireless LAN are described below Sharing Server A computer with 2 LAN interfaces that provide a function to share Internet Access Sharing Client A computer that uses the Internet by connecting to a sharing server without itself having a direct connection to the In...

Страница 76: ...t button 8 When the Printer Setting window appears click Finish For the printer setup procedures refer to Setting Up a Network on page 4 15 When the Shared Server setting is completed set up the shared client Determine whether to use a firewall Select a device Set an IP address To protect against external intrusion attempts using a firewall is recommended For more information on selecting a device...

Страница 77: ...e completed you can use the Internet on the shared client To connect through a wireless LAN select Internet Sharing Wireless To connect through a wired LAN select Internet Sharing Wired N N N No o o ot t t te e e e To connect through a wireless LAN enter the wireless connection name e g Samsung you entered in the sharing server If you have set a network key security key for the sharing server ente...

Страница 78: ...work Manager 2 Select Diagnose Status from the Manage menu 3 The Network Connections figure window appears Click the Start button to start the network diagnosis 4 When the diagnosis is complete out of order devices are marked by the exclamation mark icon For detailed device status read the description in the lower part of the window ...

Страница 79: ...aring of files and folders on a computer Step 2 Accessing shared files and folders from another computer Network services are provided for the computers that are connected to the network through wired or wireless network connections See Pages 4 4 4 7 Configuring Network Environment Settings N N N No o o ot t t te e e e C C C Ca a a au u u ut t t tii iio o o on n n n When a file or folder is shared...

Страница 80: ...are this folder on the network enter the share name and click OK The file and folder sharing configuration has been completed It has the same security effect as that of the Network Setup Wizard This screen does not appear if Internet Sharing Network Wizard has been installed in the computer to computer wireless network environment N N N No o o ot t t te e e e C C C Ca a a au u u ut t t tii iio o o...

Страница 81: ...lick Start My Computer Under Other Places click My Network Places in your computer 2 Click View workgroup computers and click the desired computer to access the shared file If your computer is a member of another workgroup 1 Click Other Places Microsoft Windows Network 2 Click the desired workgroup 3 Click the desired computer to display the shared files or folders N N N No o o ot t t te e e e ...

Страница 82: ...e printer sharing in the computer connected to the printer Step 2 Add and use the shared printer in other computers on the network Step 1 Configuring Printer Sharing 1 From the computer connected to the printer click Start Printers and Faxes 2 Right click the printer you want to share and click Sharing 3 Select Share this printer enter a share name for the shared printer and click OK ...

Страница 83: ...nt computer that wants to use the shared printer click Start Printers and Faxes 2 Click Add a printer 3 In the Add Printer Wizard click Next 4 Select A network printer or a printer attached to another computer and click Next 5 Select Browse for a printer and click Next 6 Select the workgroup or computer select the desired printer and click Next If you cannot find the desired printer try again afte...

Страница 84: ...for Do you want to use this printer as a default printer and click Next 9 Click Finish 10 When the printer sharing configuration has been completed the shared printer appears in the Printers and Faxes window Now you can print using the shared printer even if your computer is not directly con nected to a printer ...

Страница 85: ...ansmission You can exchange files between 2 Bluetooth devices You can exchange files with other computers mobile phones PDAs etc Network Access You can connect to another computer with the Bluetooth function as you access a wireless LAN in Ad Hoc mode or connect to the Internet through an AP or Internet Connecting Sharing Server Network Access through a Phone Connection You can connect to the Inte...

Страница 86: ...Start Using Bluetooth from the pop up menu 2 Click the Next button to start setting up N N N No o o ot t t te e e e In the setting up steps enter a device name to be displayed in the Bluetooth Manager program Enter a Name in the Computer Name field and select Laptop for the Computer Type field Also a step appears for selecting the services to be provided by your Bluetooth device for other Bluetoot...

Страница 87: ... the operation continue the installation 3 If the driver installation is complete the next step proceeds which searches for nearby Bluetooth devices Since you do not have to search while setting up click the Skip button and finish the settings 4 When the settings are complete the Bluetooth icon menu of the notification area changes as shown in the figure ...

Страница 88: ...h devices Bluetooth Help Bluetooth Help provides detailed procedures on using Bluetooth functions Click on My Bluetooth Settings on the Desktop and press the F1 key Help N N N No o o ot t t te e e e Select Start Help and Support Networking and the Web Networking Wireless networking Bluetooth devices wireless to view Windows Help ...

Страница 89: ... folders between Bluetooth computers are described below 1 On the computer that is sending a file hereafter Computer A right click the Bluetooth icon in the notification area and select Quick Connection File Transmission Search for Device 2 In the Select Device window click on a computer to be connected hereafter Computer B ...

Страница 90: ...N Code E g same numbers on both Bluetooth devices to make a connection 4 After a short while the Bluetooth PIN Code required dialog box appears on Computer B enter the code that you have entered in Step 3 above 5 If the Bluetooth PIN code requested notification window appears on the bot tom right taskbar click on the window enter the Bluetooth PIN code and click the OK button 6 The file transmissi...

Страница 91: ... on the device to connect to mouse keyboard joystick or headset Some devices have a button to turn on the Bluetooth function so refer to the corresponding device manual 2 Double click on the My Bluetooth Settings icon on the Desktop 3 If the My Bluetooth Settings window appears click on View Devices within Coverage If the device to connect to appears click on the device E g mouse N N N No o o ot t...

Страница 92: ...reception sound related functions and serial port function you can connect with only one Bluetooth device Using the network connection or file transmission function multiple Bluetooth devices can be connected However since connecting with multiple devices may slow down the data rate or make the connection unstable connecting with one device at a time is recommended The Bluetooth function of a Blue...

Страница 93: ...System Management This chapter provides information on efficient computer management Chapter 5 Chapter 5 ...

Страница 94: ...he hard disk and turns the computer off Pressing the Power button restores the computer to the previous working status Press Power button to use computer again in Standby Mode or Hibernation Mode You can also reserve Turning Computer Off Maximum Power Saving Mode Hold Mode etc by selecting System Computer Scheduling in the EasyBox program See P 3 8 If you change the power settings in the Battery M...

Страница 95: ...Power Options and select the Advanced tab Configure the Power button function Configuring the function of the fn key combination C C C Ca a a au u u ut t t tii iio o o on n n n When the Power button is configured to put the system into Power Saving Mode manually shutting down the computer requires the Power button to be pressed and held for more than 4 seconds ...

Страница 96: ...xes the battery automatically C C C Ca a a au u u ut t t tii iio o o on n n n Precautions Use only chargers specified in the User Manual Never heat the battery pack put it near or in a fire or use at a temperature higher than 60 C as this may cause fire Never cause a short circuit between the battery pack terminals or disassemble the battery pack Carefully read and follow the precautions printed o...

Страница 97: ...g battery charge 5 5 Chapter 5 System Management Remaining Battery Charge Power supply status C C C Ca a a au u u ut t t tii iio o o on n n n Using the battery Battery is an expendable supply so when you use it for a long time the capacity battery life is shortened If the battery life time is reduced to under half of the initial time we recommend that you purchase a new battery to use Battery Warn...

Страница 98: ...e are optimized Maximum Performance Mode This mode is appropriate for conditions that require maximum system performance Therefore the battery usage time may be reduced in this mode Custom Mode In this mode a user can configure a detailed configuration to save the battery usagetime You can adjust the LCD brightness the system standby time the screen color quality and the graphic mode values Decrea...

Страница 99: ...stem Setup 3 Select Smart Battery Calibration in the Boot Menu and press Enter to start The Battery Calibration function is activated and the battery is discharged forcibly This operation requires 3 5 hours depending on the battery capacity and the remaining battery charge 4 When the calibration process is complete and the battery is completely discharged connect the AC power adaptor to fully rech...

Страница 100: ...tom of the system 2 Push the memory module tabs outward to pop the memory module outward Pull the module out at an angle of about 30 5 8 Manual Before replacing the memory module turn the system off completely and remove the battery Do not replace the memory module when the system is in Rest Mode When using memory in dual channel using memory of the same specification the same capacity and manufac...

Страница 101: ...y and slide it into the slot at a 30 angle 4 Push the memory module in until the module clicks into place If the memory module is not fixed completely push the module while pressing the memory module tabs outward 5 Close and fix the memory module compartment cover using a screwdriver ...

Страница 102: ...lic place The locking device needs to be purchased separately The shape and methods of use may differ depending on the manufacturer Please refer to the manual provided with the security lock for proper use Fix the Kensington lock cable to a fixed object and connect the cable to the Anti theft port at the rear of the system ...

Страница 103: ... a bag designed for notebook PCs and hand carry the computer Allow the computer and disks to pass through security X rays but do not pass the computer and disks through metal detectors Do not use the computer during take off and landing Make sure the eject button of PCMCIA card slot is locked Please follow the instruction of the corresponding facilities regarding the use of wireless devices wirele...

Страница 104: ...5 12 Manual ...

Страница 105: ...Customizing your computer This chapter provides information how to use the system setup customizinig screen settings Chapter 6 Chapter 6 ...

Страница 106: ...ppears press F2 3 The initial System Setup screen will appear in a moment Sub Menu Press enter to display sub menu Setup Menu Help Displays help information on the current selected item Tab Shift Tab or Enter selects field System Time 10 21 53 System Date 02 01 2006 Primary Master XXXXX MB Secondary Master CD ROM DVD Cpu Type Intel R Celeron R M Processor Cpu Speed X XX GHz Total Memory XXX MB Slo...

Страница 107: ...ys Displays the Help window Exits the current sub menu or opens the Exit menu Moves between menus Selects a field or opens a sub menu Saves changes and exits System Setup Moves up and down between fields Changes the value of the current field Restores default values For more information on System Setup menus or options please refer to Help on the right side of the screen N N N No o o ot t t te e e...

Страница 108: ...u can restrict system access to autho rized users only 1 Select the Security menu in the System Setup To enter into System Setup see Page 6 2 2 On the Set Supervisor Password item press Enter 3 Enter a password press Enter re enter the password for confirmation and press Enter again 4 When a message confirming the password configuration appears in the Setup Notice window press Enter Do not lose or...

Страница 109: ... password to delete press Enter e g supervisor password 2 Enter the current configured password and press Enter 3 Leave the New Password and Confirm New Password field empty and press Enter to deactivate the password Before configuring a user password a supervisor password must have been con figured Users can start the system with their user password but cannot enter into the System Setup Deactiva...

Страница 110: ...vice Priority item 3 Use the key to move to the Hard Drive item and press F6 key until it is at the very top 4 Press F10 to save the changed configuration and exit System Setup Now you can boot the system with the hard disk drive as the first booting device 6 6 Manual Boot Options DVD CD ROM Drive Removable Devices Hard Drive Select system boot options Boot Device Priority NumLock Off Enable Keypa...

Страница 111: ...Start Control Panel Appearance and Themes Change the screen resolution 2 Make changes on the Settings tab of the Display Properties dialog 3 When you have completed configuration click Apply To change the number of colors displayed on a monitor select an appropriate color quality To change your screen resolution move the slider to select an appropriate resolution You can view the graphics chipset ...

Страница 112: ...f the system To connect a TV connect the TV to the TV output port of the system 2 If you press the Fn key combination once the Samsung Display Manager screen appears where you can select a screen Whenever you press the F4 key while pressing the Fn key selection moves to the next item Select a mode LCD Notebook Screen CRT External Monitor Screen LCD CRT Notebook External Monitor Screen TV TV Screen...

Страница 113: ...the TV output port of the system See P 6 8 Connecting to a TV 2 Press touchpad right button on the desktop click Properties and then click the Settings tab 3 Click the monitor 2 icon select the Extend my Windows desktop onto this monitor check box and then click Apply 4 When you have completed this click OK on the left of the Troubleshoot button The primary display device the LCD is indicated as 1...

Страница 114: ...LCD and drag it to the secondary display device 2 The window moves to the secondary display device N N N No o o ot t t te e e e When you use Dual View configuring the LCD as the Primary monitor is recommended N N N No o o ot t t te e e e C C C Ca a a au u u ut t t tii iio o o on n n n If the screen of the secondary display device is displayed at 640x480 pixels with 256 colors change the settings t...

Страница 115: ...ge When you first run Norton AntiVirus the Norton AntiVirus Configuration window pops up If you complete the configuration and your computer connect to network you can download and install the latest updates via the network When the live update is done virus scanning starts automatically To stop scanning click on Stop If you didn t configure the Norton AntiVirus program a security alert icon appea...

Страница 116: ...6 12 Manual ...

Страница 117: ...Recovering the Computer This chapter provides recovery procedures using the System Recovery CD when the computer is not operating properly Chapter 7 Chapter 7 ...

Страница 118: ...the screen OneClick Diagnosis You can diagnose problems affecting the system con nections and system operations via one click User Diagnosis You can select the necessary diagnostic items and diagnose system problems System Recovery Launches the Restoring the System function of Windows XP P 7 3 3 When the system diagnosis is completed the diagnostic result appears If problems are found click the Cu...

Страница 119: ...ignificant system events such as when a program or a driver is installed You can also decide when to create your own restore points The procedures to create your own restore point are described below 1 Click Start All Programs Accessories System Tools System Restore 2 Select Create a restore point and than click Next 3 In the Restore point description box type a name to identify the restore point ...

Страница 120: ...computer has been restored to the selected restore point Undoing the last restoration The procedures to undo a restoration are described below 1 Click Start All Programs Accessories System Tools System Restore 2 Select Undo my last restoration and click Next 3 Confirm the restoration information to undo and click Next System Restore shuts down Windows and starts undoing the restoration 4 After the...

Страница 121: ...drivers or programs that are not currently installed on your computer from the system software media provided All necessary components are installed using the factory defaults Minimum Installation This displays the components driver Windows programs etc that if not installed may cause problems with the system performance You can install only required components Custom Installation You can customiz...

Страница 122: ...e main window of the System Software Media Standard Installation is recommended 2 The system is scanned to display the drivers and programs that need to be installed 3 Click OK The drivers and programs are automatically installed as factory defaults 4 When done restart the system ...

Страница 123: ...he keyboard After a while the Samsung Recovery Solution Start screen appears 3 Read the instructions on the Start screen and click the Start button to install Windows C C C Ca a a au u u ut t t tii iio o o on n n n Please backup your hard disk drive Samsung Recovery Solution formats your hard disk drive before installing Windows Therefore please backup important data onto a separate storage device...

Страница 124: ...nd click the Start button 4 2 The Confirmation window appears Confirm the selected Windows version and click the Yes button If the Select Windows version language screen appears instead of the Windows installation screen The Select Windows version screen may appear if you have formatted your hard disk drive Select a Windows version according to the following procedures N N N No o o ot t t te e e e...

Страница 125: ...ons from the System Software Media need to be installed Windows cannot be used without them N N N No o o ot t t te e e e For more information about the procedures to use the System Software Media refer to the descriptions of P 7 5 Re Installing Software If the System Software Media consists of 2 CDs When the installation of the first CD is complete the Windows registration screen appears See Step ...

Страница 126: ...ing Mode is configured into the Power button press and hold for more than 4 seconds to shut the system off When the system is turned on after such manual shutdown Scandisk will run to check errors in the system Q2The system freezes during program operation A1 There is an error with the program currently being used Press the Ctrl Alt and Delete keys simultaneously and click End Task in the Windows ...

Страница 127: ...g Fn keys screen is not displayed properly A Press Fn keys once again If the same problem continues it means the projector cannot support the resolu tion Lower the resolution to 1024 x 768 Q5 After connecting to a TV some programs such as Debug Mem etc do not run in full screen MS DOS mode A If a TV is used as the display device some programs such as Debug Mem etc may not run properly in full scre...

Страница 128: ...t function or pressed a wrong key while using the computer For Intel Graphics press the Ctrl Alt Direction Key rotate 0 degrees rotate 270 degrees rotate 180 degrees rotate 90 degrees to return to the original orientation For other graphics cards use the rotation mode of the Advanced menu supported by the corresponding graphics card company Sound Related Q1 How to install and uninstall the sound d...

Страница 129: ...s of the sound driver are automatically installed Installing the Sound Driver after a Windows XP Reinstallation If you install the sound driver after reinstalling Windows XP the Add Hardware Wizard Modem Device window may appear during the sound driver installa tion This happens because the High Definition Audio KB888111 Hotfix which has been installed on your system has changed the settings to se...

Страница 130: ...ing the system or reinstalling the driver You have to exit all programs using modem in the advance of diagnostics of the modem Q2 I cannot make a call using an extension line A In general the dial tone of a PABX or a digital phone switching system is not a continuous one unlike that of a trunk line Therefore the modem may not make a call because the modem mistakes the dial tone from a PABX or a di...

Страница 131: ...ephone plug may differ according to the country you have to purchase and use the appropriate telephone plug for that particular country Q4 How do I receive a fax while the system is in power saving mode Rest mode A To receive a fax in Standby Mode you have to set it up as follows 1 The automatic fax reception function of the fax program needs to be activated For more information refer to the corre...

Страница 132: ...est mode is activated when there is no received signal use the system after disabling Wake On LAN function If you turn the power off when Wake On LAN is disabled the LAN LED con tinues to be lit up Connecting wired LAN while using wireless LAN may not execute Wake On LAN function Configure wireless LAN to Disable to use Wake On LAN function 1 Click on My Network Place View network connections on t...

Страница 133: ...er Network adapters Wireless LAN adapter If there is a yellow exclamation mark If a warning message apears install the driver again using the System Software Media A4 Referring to A2 of Q3 check that the network bridge configuration is correct Q2 The signal strength is excellent but I cannot connect to the network Even if the signal strength is excellent the network connection may not operate prop...

Страница 134: ...ork Connections Check if the wireless LAN is turned on A2 Verify whether the same network key encryption key has been entered in both the AP and the computer The network key is an encryption key for encrypting data transmitted between the AP and the computer It is recommended setting the network key manually Check the AP Settings For the AP settings refer to the User s Guide provided by the AP man...

Страница 135: ...rted by some types of APs but may cause compatibility problems It is recommended using a static IP Since static channel selection is more reliable than auto channel selection it is recommended setting a static channel Q5 In the Windows XP Available wireless networks window the Wireless Network Connection is displayed as Not Available A1 Check if the wireless LAN is turned on A2 Check if there is a...

Страница 136: ...cted through the com puter to computer Ad Hoc network All of the computers to be connected through a computer to computer Ad Hoc network should be configured so that their IP addresses are within the same subnet range If the TCP IP Settings are configured to DHCP the address is automatically configured to an address within the subnet IP range This will take about 2 3 minutes If the IP address is c...

Страница 137: ...s of the AP in the wireless network settings If the Use IEEE 802 1x authentication in this network option is selected deselect the option on the Authentication tab For more detailed information about authentication server ask your network administrator A3 If the AP is configured to Use network authentication Shared Key If the AP is configured to authentication shared mode all computers to be con n...

Страница 138: ...Protocol IEEE 802 1x v2 2 1 0 appears in the Local Area Connection Properties window A The AEGIS Protocol is a security authentication protocol that is automatically installed when ACU is installed and does not affect the operation of other pro grams ...

Страница 139: ... program disables the function of Fn Q4 While playing a game pressing the Fn keys does not work or the screen is not properly displayed A Some games and 3D application programs may change the display device control Therefore pressing the Fn keys may terminate the running program or may display an abnormal screen Press the Fn keys before launching a program and do not press them while running the p...

Страница 140: ...creen resolution to 1024x768 and the color quality to 16 bit Q8 Game play is not displayed smoothly on the screen A For 3D games the texture data for the 3D screen display is saved to the system memory If there is insufficient system memory the data is saved to the hard disk drive and loaded to memory when required This operation may temporarily stop displaying the picture on the screen In this ca...

Страница 141: ...er Manage security settings for 2 In the Privacy tab of Internet Properties click on Settings from Block pop ups 3 Enter a URL to want to allow pop ups into Address of Web site to allow and click on Add 4 You will find that the entered address is added to the allowed sites list The next time you connect to the Web site you will see pop ups appearing When you need to re block a permitted site selec...

Страница 142: ...dows Firewall If you want to add a program to Programs and Services click on Add Program and select it A2 Set up Windows Automatic Updates This automatically downloads and installs critical updates via the Internet to keep your computer up to date 1 Click on Automatic Updates in Start Control Panel Security Center Manage security settings for 2 From general tab of Automatic Updates window select A...

Страница 143: ...s program that your computer is able to identify Check the following programs which Windows can detect and select one from the list A list of anti virus programs that Windows can detect Symantec Norton Anti Virus NetworkAssociates McAfee TrendMicro ComputerAssociates Panda Kaspersky Ahnlabs AhnLab The list is subject to change Visit the Microsoft Web site www microsoft com regularly to check the l...

Страница 144: ...indows A Windows XP SP2 and Windows Sever 2003 SP1 Standard Server cannot display memory exceeding 4GB due to license and driver compatibility problem Even if the memory capacity is displayed as 3GB in your system information 4GB mem ory is recognized normally by the system ...

Страница 145: ...Appendix System specifications software types and safety instructions are provided here Appendix Appendix ...

Страница 146: ... Modem RJ 11 Optional LAN RJ 45 Monitor TV Out S Video DC Jack Security Lock Port Dimensions mm 329 8 x 271 x 29 7 35 9 W x D x H LCD 15 XGA 1024x768 Weight 2 7 Kg Battery Lithium Ion smart battery 6 Cells or 9 Cells Operation Environment Temperature for custody 5 40 C for operation 10 32 C Humidity for custody 5 90 for operation 20 80 Operation Voltage 100 240VAC Frequency 50 60Hz Output Power 60...

Страница 147: ...X RF Specifications RF Band 2 4 GHz Support Channels Channels allowed per country Device Transceiver Modulation Scheme 11b mode DSSS CCK 11g Mode OFDM Standard Output Power MAX 10 mW Transmission Rate 11g mode 54 48 36 24 18 12 9 6 Mbps 11b mode 11 5 5 2 1 Antenna Type 2ea internal antennas main and aux The data rate may differ from the real data transmission rate 11g mode is supported only when d...

Страница 148: ...m Celeron are registered trademarks of Intel Corporation Microsoft MS DOS and Windows are registered trademarks of Microsoft Corporation Memory Stick and are trademarks of Sony Corporation All other product or company names mentioned herein are registered trademarks of their respective companies This product incorporates copyright protection technology that is protected by method claims of certain...

Страница 149: ... in product damage or cause fires Use grounded power outlets designed for computers A grounded power outlet prevents electric shock from electricity leakage Set up the system away from magnetic objects Contents of the hard disk drive may be deleted or the color of the monitor may be permanently distorted Dispose of moisture reducing agents and plastic packaging properly Consumption of moisture red...

Страница 150: ...ing in resetting the computer may cause disk or data damage Execution of delete DEL or format FORMAT commands by mistake may cause loss of data Virus infection may cause unrecoverable loss of data An abrupt power cut during program operation may cause disk or data damage Moving the computer or impacts to the computer during hard disk operation may cause data loss or bad sectors on the hard disk Be...

Страница 151: ...ters as the system may be damaged Do not touch the power strip with wet hands There is a danger of electric shock Place the computer away from heat devices such as heaters It may damage the system or cause fires Clean with cleaners specifically for computers Do not use benzene paint thinner or alcohol to clean the computer It may dam age the product ...

Страница 152: ...16 Maetan 3Dong Yeongtong Gu Suwon City Gyeonggi Do Korea Tel 82 1588 3366 E mail Computervoc sec samsung com U S A InteliSol 1001 NE Loop 820 Dock 5 Forth Worth TX 76131 U S A Tel 1 817 230 5293 FAX 1 817 230 5045 E mail SamsungPC Support intelisol com Canada HINET 425 Superior BLVD 4 Mississauga Ontario L5T 2W5 Canada Tel 1 905 565 1211 FAX 1 905 565 1911 Homepage hinet bellnet ca United Kingdom...

Страница 153: ...Customer Service Center General Enquiry Hotline 2862 6001 Technical Support Hotline 2862 6406 E mail service sehk samsung com Web Site http www samsung com hk ...

Отзывы: