background image

English - 55

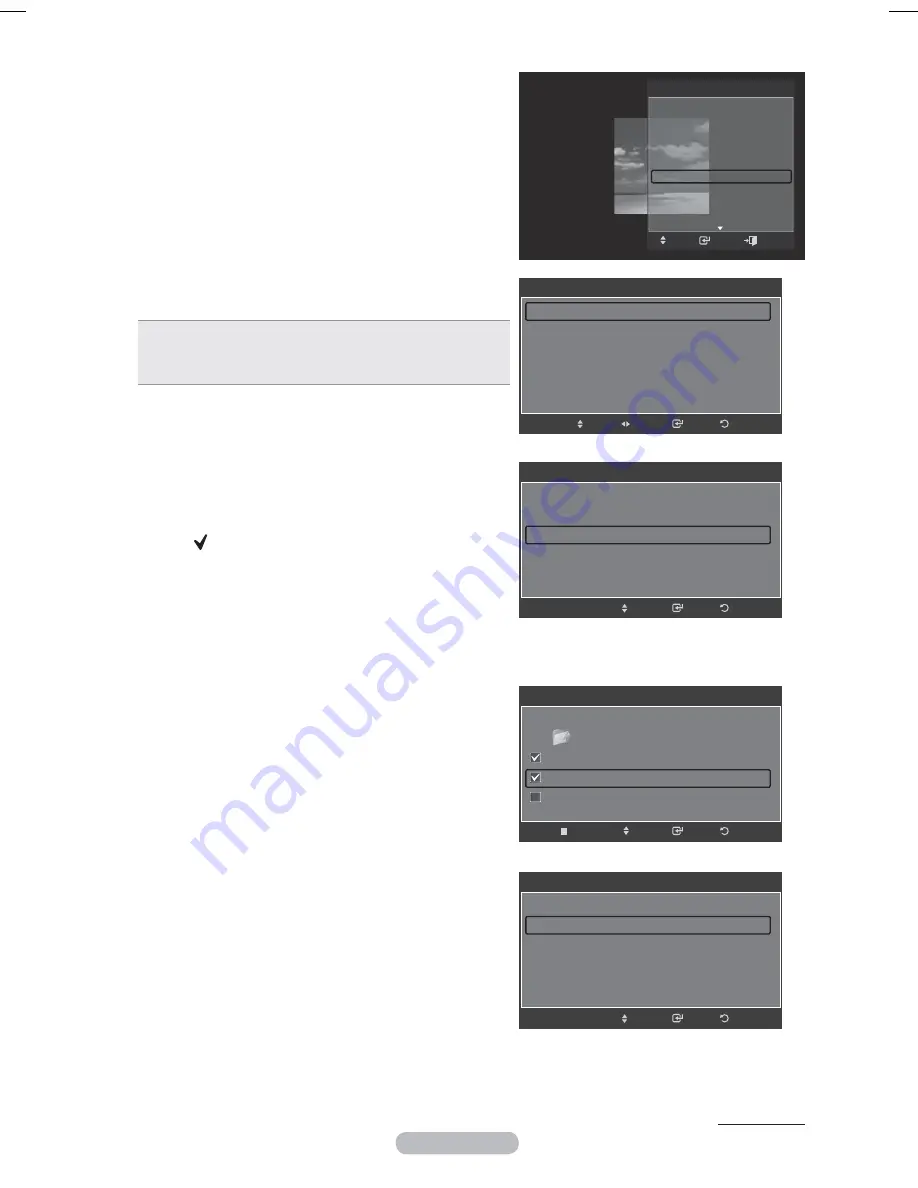
Background Music Setting

You can set the background music.
Press the ▲ or ▼ button to select 

Background Music 

Setting

, then press the 

ENTER

 button.

¯

  If you turn off the 

Background Music

, even if the 

Background Music Settings

 have been set up, the 

background music will not be played.

¯

  Loading music files is needed to change 

BGM Mode

Play music files in music category to load.

¯


Background Music setting

 menu is displayed.

Press the ◄ or ► button to select the desired 

BGM 

(Background music) mode. (Shuffle, Selected file, Mood)

• 

Shuffle

: Plays music file in random order.

• 

Selected file

: Plays a selected music file.

• 

Mood

: Plays music file of a particular mood only.

¯


Selecting the background music file


 Set 

BGM Mode

 to 

Selected file

 in the 

Background 

Music Settings

 menu.


 Press the ▲ or ▼ button to select 

Selected Music 

File

, then press the 

ENTER

 button.


 Press the ▲ or ▼ button to select a music file, then 
press the yellow button.


 The ( ) mark appears to the left of the selected music.


 Repeat the above operation to select multiple music files.

 Press 

the 

ENTER

 button.

¯


Selecting the background music file mood 


 Press the ◄ or ► button to set 

BGM Mode

 to Mood. 


 Press the ▲ or ▼ button to select 

BGM Mood

. Then 

press ◄ or ► button to select the desired BGM 
mood. Press the 

ENTER

 button.

BGM Mode

 option: 

Energetic

Rhythmical

Sad, Exc iting

Calm


¯

   Wiselink identifies the mood of the music files and 

groups them accordingly be analyzing the music 
files on the USB device.

Picture Mode

You can set the Picture mode. (Refer to page 27)

Sound Mode

You can set the Sound mode. (Refer to page 32)

Information

The photo file information including the order of the file in 
the current directory, the name, the size, the resolution, the 
date modified and the path is displayed. (Refer to page 50)

Remove Safely

You can remove the device safely from the TV.
Press the ▲ or ▼ button to select 

Remove Safely

, then 

press the 

ENTER

 button.

The 

Safely removing USB device.

 message appears and 

then the 

USB device can now be safely removed from TV.

 appears.

Remove the USB device from the TV.

Continued...

Tools

Stop Slide Show

Rotate

Zoom

Slide Show Speed  : 

Normal

Background Music  : 

Off

Background Music Setting

Picture Mode 

:  Standard

Sound Mode 

:  Custom

Information

Background Music Setting

BGM 

Mode 

◄ Shuffle ►

BGM Mood 

Calm

Select Music File

Return

Enter

Adjust

Move

Background Music Setting

BGM Mode 

Selected file 

BGM Mood 

Calm

Select Music File

Return

Enter

Move

Background Music Setting

Return

Enter

Move


Select 

../Music/ 2 

File(s) 

Selected 


  Music

   01-glen_hansard_and_marketa_irglova-fallin...

   02-marketa_irglova_and_glen_hansard-if_yo...

   05-glen_hansard-lies


Background Music Setting

BGM Mode 

Mood 

BGM 

Mood 

◄ Calm ►

Select Music File

Return

Enter

Move

Enter

Move

 Exit

3\URSH3%1$LQGE

Содержание PS50A676T1M

Страница 1: ... Min 08 25 08 65 65 0 15 Min www samsung com GERMANY 01805 SAMSUNG 726 7864 0 14 Min www samsung com HUNGARY 06 80 SAMSUNG 726 7864 www samsung com ITALIA 800 SAMSUNG 726 7864 www samsung com KAZAKHSTAN 8 10 800 500 55 500 www samsung kz KYRGYZSTAN 00 800 500 55 500 LATVIA 800 7267 www samsung com lv LITHUANIA 8 800 77777 www samsung lt LUXEMBURG 0035 0 2 261 03 710 www samsung com be NETHERLANDS ...

Страница 2: ...xels will have no impact on the performance of the product Avoid operating the TV at temperatures below 5 C 41 F A still image displayed too long may cause permanent damage to the PDP Panel Watching the PDP TV in 4 3 format for a long period of time may leave traces of borders displayed on the left right and centre of the screen caused by the difference of light emission on the screen Playing a DV...

Страница 3: ...gs 27 Configuring Detailed Settings on the Picture 28 Picture Options 29 Resetting the Picture Settings to the Factory Defaults 31 Sound Control Sound Features 32 Selecting the Sound Mode depending on the model 34 Connecting Headphones Sold separately 34 Function Description Time Features 35 Language Change PIN Parental Lock Subtitle Teletext Language Preference Light Effect Melody Entertainment En...

Страница 4: ... Component Cables Audio Cables PC Cable Scart Cable PC Audio Cable HDMI Cable HDMI DVI Cable Ferrite Core Power Cord S Video Component The ferrite cores are used to shield the cables from interference When connecting a cable open the ferrite core and clip it around the cable near the plug Using the Stand Base Two or more people should carry the PDP Never lay the PDP on the floor because of possibl...

Страница 5: ...en menu use the buttons as you would use the and buttons on the remote control 4 Press to change channels In the on screen menu use the buttons as you would use the and buttons on the remote control 5 Power Indicator Blinks and turns off when the power is on and lights up in stand by mode 6 POWER Press to turn the TV on and off 7 Remote Control Sensor Aim the remote control towards this spot on th...

Страница 6: ...devices such as VCR DVD video game device or video disc players Input Output Specification Connector Input Output Video Audio L R RGB Video Audio L R EXT 1 Only TV or DTV output is available EXT 2 Output you can choose 5 DIGITAL AUDIO OUT OPTICAL Connect to a Digital Audio Component 6 AUDIO OUT AUDIO R L Connect RCA audio signals from the TV to an external source such as Audio equipment 7 SERVICE ...

Страница 7: ...nsert CI Common Interface card into the slot refer to page 40 When CI Card isn t inserted in some channels Scramble Signal is displayed on the screen The pairing information containing a telephone number CI CARD ID Host ID and other information will be displayed in about 2 3 minutes If an error message is displayed please contact your service provider When the channel information configuration has...

Страница 8: ...ttery usage time Previous channel Next channel Previous channel Available source selection Displays the main on screen menu This function enables you to view and play photo JPEG and audio files MP3 from an external device See page 46 JPEG 56 MP3 a Returns to the previous menu b Exit the on screen menu c Picture size selection d Use this when connecting a SAMSUNG DMA Digital Media Adapter device th...

Страница 9: ...ff on the front of the television or press the POWER button on the remote control to switch the television on The channel that you were watching last is re selected automatically If you have not yet stored any channels no clear picture appears Refer to Storing Channels Automatically on page 14 or Storing Channels Manually on page 15 If the television is initially powered on several basic customer ...

Страница 10: ...ome is displayed 4 Press the or button to select Store Demo or Home Use then press the ENTER button The message to check the connected status of the antenna is displayed The default selection is Home Use We recommend setting the TV to Home Use mode for the best picture in your home environment Store Demo mode is only intended for use in retail environments If the unit is accidentally set to Store ...

Страница 11: ... message Enjoy your viewing is displayed When you have finished press the ENTER button Even if the ENTER button is not pressed the message will automatically disappear after several seconds If you want to reset this feature 1 Press the MENU button to display the menu 2 Press the or button to select Setup then press the ENTER button 3 Press the ENTER button again to select Plug Play 4 Enter your 4 ...

Страница 12: ...quired Using the TOOLS Button You can use the TOOLS button to select your frequently used functions quickly and easily The TOOLS menu changes depending on which external input mode you are viewing 1 Press the TOOLS button The Tools menu will appear 2 Press the or button to select a menu then press the ENTER button 3 Press the ENTER buttons to display change or use the selected items For a more det...

Страница 13: ...l source to be edited then press the ENTER button 5 Select the required device by pressing or then press the ENTER button Available device names VCR DVD Cable STB Satellite STB PVR STB AV Receiver Game Camcorder PC TV IPTV Blu Ray HD DVD Digital Media Adapter 6 Press the EXIT button to exit Input Source List Edit Name Edit Name Ext 1 Ext 2 AV S Video Component PC HDMI1 Enter Return Move Edit Name ...

Страница 14: ...tal channels Analogue Analogue channels Scans for all channels with active broadcast stations and stores them in the TV s memory If you want to stop Auto Store press the ENTER button The Stop Auto Store message will be displayed Select Yes by pressing the or button then press the ENTER button 5 Press the EXIT button to exit When there is a locked channel by Channel Lock setting PIN input screen ap...

Страница 15: ...lect the required sound standard Channel When you know the number of the channel to be stored Press the or button to select C Air channel or S Cable channel Press the button then press the or button to select the required number You can also select the channel number directly by pressing the numeric buttons 0 9 If there is abnormal sound or no sound re select the sound standard required Search Whe...

Страница 16: ... Guide Scroll forwards quickly 24 hours Mini Guide Display previous page quickly BLUE Exit the guide INFO INFO button for the detailed information Channel Number Running Time Status Bar Parental Level Video Quality Information HD SD Sound Modes Subtitle or Teletext languages of Subtitle or Teletext and brief summary of the highlighted programme are included on the detailed information will be appe...

Страница 17: ...om Enlarges or shrinks a channel number Yellow Select Selects multiple channel lists Option Displays the Delete or Add Add to Favourite or Delete from Favourite Lock Timer Viewing Edit Channel Name Sort Edit Channel Number Select All Deselect All or Auto Store menu The Options menus may differ depending on the situation A gray colored channel indicates the channel has been deleted The Add menu onl...

Страница 18: ...nner A channel must be deleted before it can be added back to the Added Channels list To Add Restore a channel back to the Added Channel List follow steps 1 3 above press the or button to select a channel to add the press the TOOLS button Press the ENTER button to select Add Press the CH LIST button on the remote control to bring up the channel lists Channel Mini Guide Default Guide Mini Guide Cha...

Страница 19: ...e or button to select Add to Favourite then press the ENTER button The symbol will be displayed and the channel will be set as a favourite 7 To cancel your favourite channel selection press the TOOLS button when a favourite channel is selected Press the or button to select Delete from Favourite then press the ENTER button The channel is deleted from Favourites and the mark disappears Press the EXI...

Страница 20: ... to confirm a viewing reservation refer to page 21 Only memorized channels can be reserved You can set the channel month day year hour and minute directly by pressing the number buttons on the remote control Press the CH LIST button on the remote control to bring up the channel lists Digital Program Guide and Viewing Reservation When a digital channel is selected and you press the button the Progr...

Страница 21: ...elect OK then press the ENTER button The viewing reservation has been canceled Press the EXIT button to exit Programmed Menu Change Info Select to change a viewing reservation Cancel Schedules Select to cancel a viewing reservation Information Select to view a viewing reservation Select All Deselect All You can select or Deselect all channel in the channel list Press the CH LIST button on the remo...

Страница 22: ...hannel Number Digital 1 Press the MENU button Press the or button to select Channel then press the ENTER button Press the or button to select Channel List then press the ENTER button 2 Select the channel number that you wish to edit by pressing the or button repeatedly then press the TOOLS button 3 Press the or button to select Edit Channel Number then press the ENTER button 4 Then you can edit th...

Страница 23: ...ress the ENTER button 7 Select the number of the programme to which the channel is to be moved by pressing the or button Press the ENTER button The channel is moved to its new position and all other channels are shifted accordingly 8 Repeat steps 4 to 7 until you have moved all the channels to the required programme numbers 9 Press the EXIT button to exit Channel Mini Guide Default Guide Mini Guid...

Страница 24: ...press the TOOLS button 3 Press the or button to select Auto Store then press the ENTER button For further details on setting up options refer to page 14 When there is a locked channel by Channel Lock setting PIN input screen appears refer to page 25 Setting the Channel Mode You can display either the added channels list or the favourite channels list when the CH LIST button on the remote control i...

Страница 25: ...s unlocked and the lock icon mark also disappears The default PIN number of a new TV set is 0 0 0 0 Fine Tuning Analogue Channels Use fine tuning to manually adjust a particular channel for optimal reception 1 Press the MENU button to display the menu Press the or button to select Channel then press the ENTER button 2 Press the or button to select Fine Tune then press the ENTER button 3 Press the ...

Страница 26: ...g an Analogue channel this function can be selected Viewing Signal Information You can get information about the signal status 1 Press the MENU button to display the menu Press the or button to select Channel then press the ENTER button 2 Press the or button to select Signal Information then press the ENTER button 3 Press the EXIT button to exit If the signal status is poor the No Signal message i...

Страница 27: ...splay the menu 2 Press the ENTER button to select Picture 3 Press the ENTER button again to select Mode 4 Select the required mode by pressing the or button then press the ENTER button Available modes Dynamic Standard Movie The settings values may vary depending on the input source 5 Press the EXIT button to exit Choose Dynamic for viewing the TV during the day or when there is bright light in the...

Страница 28: ... to the most natural colour tone based on program sources Native Native Colour Space offers deep and rich colour tone Custom Adjusts the colour range to suit your preference see Customizing the Colour Space Customizing the Colour Space Colour Red Green Blue Yellow Cyan Magenta Adjusts the Colour range to suit your preference Colour is available when Colour Space is set to Custom Press the or butto...

Страница 29: ...button Press the or button to move the picture Reset Press the or button to select Reset then press the ENTER button You can initialize the setting With the HDMI Just Scan picture size depending on the AV devices the screen may be cut off or a specific colour appears on the screen For an HDMI 1080p connection of 24 25 30 50 and 60 Hz and for a Component 1080p connection of 50 and 60Hz only the inp...

Страница 30: ... can view the difference in the visual quality DNIeTM Digital Natural Image engine This feature brings you more detailed image with 3D noise reduction detail enhancement contrast enhancement and white enhancement New image compensation Algorithm gives brighter clearer more detailed image to you DNIeTM technology will fit every signal into your eyes This function is available only in Dynamic mode H...

Страница 31: ...images on the screen by changing the colour of pixels to white Use this function when there are remaining after images or symbols on the screen especially when you displayed a still image on the screen for a long time Scrolling This function helps remove after images on the screen by moving all the pixels on the PDP according to a pattern Use this function when there are remaining after images or ...

Страница 32: ...internal television speakers It is fully compatible with all multichannel formats Easy Setting 1 Press the TOOLS button on the remote control 2 Press the or button to select SRS TS XT 3 Press the or button to select Off or On 4 Press the EXIT or TOOLS button to exit Audio Language You can change the default value for audio languages Displays the language information for the incoming stream While v...

Страница 33: ...rate speakers cancel the internal amplifier The MUTE buttons do not operate when the TV Speaker is set to Off When TV Speaker is set to Off you can operate only Audio Language Audio Format Audio Description Sound Select in PIP mode Sound Reset in digital TV mode and Sound Reset in analogue TV mode in Sound menu TV s Internal Speakers Audio Out Optical L R Out to Sound System TV AV S Video Componen...

Страница 34: ...d mono If the receiving conditions deteriorate listening will be easier if the mode is set to Mono If the stereo signal is weak and automatic switching occurs switch to Mono This function is only available in Analogue TV mode Connecting Headphones Sold separately You can connect a set of headphones to your set if you wish to watch a TV program without disturbing other people in the room When you i...

Страница 35: ...s the EXIT or TOOLS button to exit Timer 1 Timer 2 Timer 3 You can set the On Off timers so that the television will switch on or off automatically at the time you select You must set the clock first Press the or button to select the required item below Press the or button to adjust to the setting satisfied On Time Select hour minute and Inactivate Activate To activate timer with the setting satis...

Страница 36: ... user The on screen menu will instruct you to assign a PIN code you can change it later if necessary 1 Enter your 4 digit PIN by using the numeric buttons 0 9 2 Press the ENTER button to select Parental Rating 3 Press the or button to select an appropriate restriction then press the ENTER button The symbol is indicated While is selected press the ENTER button to block or unblock the category Allow...

Страница 37: ...V according to the situation Use it for saving power or when the LED dazzles your eyes Off The blue LED is always off In Standby The blue LED lights while in Standby mode and it turns off when your TV is turned on Watching TV The blue LED lights when watching TV and it turns off when your TV is turned off Always The blue LED always lights Set the Light Effect to Off to reduce the power consumption...

Страница 38: ...cture Sub Picture Component HDMI1 HDMI2 DVI HDMI3 HDMI4 PC TV Ext1 Ext2 AV Source You can select a source of the sub picture Size You can select a size of the sub picture If main picture is in PC and Component mode Size is not available Position You can select a position of the sub picture In Double mode Position cannot be selected Channel You can select a channel of the sub picture only when the ...

Страница 39: ...The TV will turn off and turn on automatically after completing the firmware upgrade Please check the firmware version after the upgrades are complete When software is upgraded video and audio settings you have made will return to their default factory settings We recommend you write down your settings so that you can easily reset them after the upgrade BY Channel Upgrades the software using the b...

Страница 40: ...p then press the ENTER button 3 Select the Common Interface by pressing the or button then press the ENTER button CI Menu This helps the user select an item from the CAM supported menu Press the ENTER button The options of the selected menu are displayed Press the or button to select the required option then press the ENTER button Application Info This contains information on CAM inserted in the C...

Страница 41: ...use on the Windows Desktop then click on Properties The Display Properties will be displayed 2 Click on Settings tab then set the Display Mode with reference to the Display Modes Table You do not need to change the Colours settings 3 Click on Advanced A new settings dialog box will be displayed 4 Click on the Monitor tab then set the Screen refresh rate with reference to the Display Modes Table Se...

Страница 42: ...9 75 000 60 317 72 188 75 000 60 004 70 069 75 029 60 020 75 025 60 015 60 000 25 175 31 500 31 500 40 000 50 000 49 500 65 000 75 000 78 750 108 000 135 000 85 500 162 000 CVT 1920 x 1080RB 66 587 59 934 138 500 HDMI DVI Input Mode Resolution Horizontal Frequency kHz Vertical Frequency Hz Pixel Clock Frequency MHz Sync Polarity H V VESA 640 x 480 800 x 600 1024 x 768 1280 x 1024 1360 x 768 1600 x...

Страница 43: ...incoming PC video signal The values of fine coarse and position are adjusted automatically Easy Setting 1 Press the TOOLS button on the remote control 2 Press the or button to select Auto Adjustment then press the ENTER button AutoAdjustment in progress Please Wait Mode Standard Cell Light 7 Contrast 95 Brightness 45 Sharpness 20 AutoAdjustment ScreenAdjustment Detailed Settings Picture Brightness...

Страница 44: ...Fine then press the ENTER button 2 Press the or button to adjust the screen quality vertical stripes may appear or the picture may be blurry Press the ENTER button Position Adjust the PC s screen positioning if it does not fit the TV screen 1 Adjust the position by pressing the button 2 Press the ENTER button Image Reset You can replace all image settings with the factory default values Sharpness ...

Страница 45: ...he remote control and enter the WISELINK screen again MTP Media Transfer Protocol is not supported The file system only supports FAT16 32 The NTFS file system is not supported Certain types of USB Digital camera and audio devices may not be compatible with this TV Wiselink only supports USB Mass Storage Class devices MSC MSC is a Mass Storage Class Bulk Only Transport device Examples of MSC are Thum...

Страница 46: ...s Photo files saved on an USB memory device Photo List 1 Press the W LINK button on the remote control to display the WISELINK menu 2 Press the or button to select Photo then press the ENTER button This menu only shows files whose file extension is jpg Files of other formats such as bmp or tiff will not be displayed Photo files are displayed Press the Play ENTER button to start the Slide Show When...

Страница 47: ... 6 Item Selection Information Shows the number of photos that are selected by pressing the Yellow button 7 Help Items Red Device button Selects a connected device Green Favorites Setting button Changes the favorites setting for the selected photo Press this button repeatedly until the relevant value appears Yellow Select button Selects photos from the photo list Selected photos are marked with a s...

Страница 48: ...W or FF button 3 Press the TOOLS button Press the or button to highlight Play Current Group 4 Press ENTER button to play the the selected group of photo files from the sublist Timeline Sorts photos by time It sorts and shows photos by date It sorts by year and month from the earliest photo 1 Select Timeline as the sorting standard in the Photo List 2 Press the or buttons to select from the sublist...

Страница 49: ...e or button to select Play Current Group 4 Press ENTER to play the selected group of photo files from the sublist Changing the composition information 1 Select Composition as the sorting standard in the Photo List and press the or button to select a photo Changing the information of multiple files Press the or button to select the desired photo in the Photo list Then press the yellow button Repeat t...

Страница 50: ...of photo files from the sublist Changing the Favorites setting 1 Press the or button to select the desired photo in the Photo list Changing the information of multiple files Press the or button to select the desired photo in the Photo list Then press the yellow button Repeat the above operation to select multiple photos The mark appears to the left of the selected photo 2 Press the Green button repe...

Страница 51: ...ss the or button to select Delete then press the ENTER button The Selected Files Delete this file message appear 4 Press the or button to select OK then press the ENTER button The photo is deleted When a read only file is deleted the Read only file s Delete the files message appear If you select Cancel the deletion is cancelled 5 To exit WISELINK mode press the W LINK button on the remote control ...

Страница 52: ...e remote control to start slide show Slide show function information icon Displayed at the top left of the screen Icon Current OSD Function Photo SlideShow Photo Slide Show is in progress Photo Pause You can pause a SlideShow and Music by pressing the pause ENTER button on the remote control during a Slide Show To resume the SlideShow press the play ENTER button on the remote control again Continu...

Страница 53: ... function information icon is displayed at the top right of the screen Icon Current OSD Function Rotating 0 This rotates a photo to its original position Rotating 90 This rotates a photo by 90 degrees Rotating 180 This rotates a photo by 180 degrees Rotating 270 This rotates a photo by 270 degrees 0 90 180 270 Viewing a photo 1 Press the W LINK button on the remote control to display the WISELINK ...

Страница 54: ...photo Slide Show Speed You can select the slide show speed Press the or button to select Slide Show Speed Press the or button to select the desired option Normal Fast Slow You can select the Slide Show speed only during a slide show Background Music If you set Background Music On the background music will be played when viewing photos one by one or in a Slide Show Press the or button to select Bac...

Страница 55: ...R button BGM Mode option Energetic Rhythmical Sad Exciting Calm Wiselink identifies the mood of the music files and groups them accordingly be analyzing the music files on the USB device Picture Mode You can set the Picture mode Refer to page 27 Sound Mode You can set the Sound mode Refer to page 32 Information The photo file information including the order of the file in the current directory the...

Страница 56: ... 6 Help Items Red Device button Selects a connected device Green Favorites Setting button Changes the favorites setting for the selected music Press this button repeatedly until the relevant value appears Yellow Select button Selects music files from the music list Selected music files are marked with a symbol on the left button Jumps to the previous sorting group Jumps to the next sorting group T...

Страница 57: ...the selected group of music files from the sublist Artist Sorts music files by the artist It sorts the music file by artist in alphabetical order 1 Select Artist as the sorting standard in the Music List 2 Press the or button to select from the sublist of files grouped by artist To move a file on the previous next group press the REW or FF button to move to the previous next group 3 Press the TOOLS...

Страница 58: ...files by the genre 1 Select Genre as the sorting standard in the Music List 2 Press the or button to select from the sublist of files grouped by genre To move a file on the previous next group press the REW or FF button to move to the previous next group 3 Press the TOOLS button 4 Press the or buttons to select Play Current Group 5 Press ENTER button to play the selected group of music files from t...

Страница 59: ...ile on the previous next group press the REW or FF button to move to the previous next group 3 Press the TOOLS button 4 Press the or buttons to select Play Current Group 5 Press ENTER button to play the selected group of music files from the sublist Preference Sorts music files by preference Favorite You can change the music files preferences 1 Select Preference as the sorting standard in the Music ...

Страница 60: ... information including the order of the file in the current directory the name the size the date modified and the path is displayed 1 Press the or button to select the desired photo in the Music list 2 Press the TOOLS button 3 Press the or button to select Information then press the ENTER button The information on the selected file appears Press the INFO button to viewing the information Name 014 ...

Страница 61: ...he remote control Playing the music group 1 Press the W LINK button on the remote control to display the WISELINK menu 2 Press the or button to select Music then press the ENTER button To move a file on the previous next group press the REW or FF button to move to the previous next group 3 Press the or button to select the desired music file 4 Press the TOOLS button 5 Press the or button to select...

Страница 62: ...le repeatedly Off Doesn t play back repeatedly 4 To exit WISELINK mode press the W LINK button on the remote control Music function information icon Displayed at the top left of the screen Icon Current OSD Function Music Repeat When all music fi les in the folder or the selected file are repeated Repeat Mode is On Music One When all music fi les in the folder or the selected file are played once R...

Страница 63: ...fore the screen saver appears Press the or button to select Screen Saver Run Time Press the or button to select 1 min 3 min or 5 min Information Select to viewing the information of the connected device Press the or button to select Information then press the ENTER button Remove Safely You can remove the device safely from the TV Refer to page 52 To exit WISELINK mode press the W LINK button on th...

Страница 64: ...ur TV and Digital Audio Input on the receiver Connect only one receiver You can listen to 5 1 channel sound through the home theatre s speakers Otherwise you can only listen to 2 channel stereo sound in other cases Make sure to connect the Digital Audio IN Optical of the home theatre and the TV correctly to listen to TV sound through the home theatre However you cannot listen to sound from the BD ...

Страница 65: ...ress the or button to select a particular device and press the ENTER button It is switched to the selected device Only when you set Anynet HDMI CEC to On in the Application menu the Device List menu appears 3 If you cannot find a device you want press the or button to select Searching Connections then press the ENTER button The meassage Configuring Anynet connection is displayed When searching dev...

Страница 66: ...ause Device with built in Tuner After switching to the device when you are watching a TV programme P button Audio Device When a Receiver is activated button MUTE button The Anynet function only works when the remote control is set to TV The REC button works only while in the recordable state You cannot control Anynet devices using the buttons on the side of the TV You can control Anynet devices on...

Страница 67: ...remote control Anynet doesn t work at a certain condition Searching channels When connecting or removing the HDMI 1 3 cable please make sure to search devices again or restart your TV Check if the Anynet Function of Anynet device is set on I want to start Anynet Check if the Anynet device is properly connected to the TV and check if the Anynet HDMI CEC is set to On in the Anynet Setup menu Press t...

Страница 68: ...ded and can be selected by pressing the coloured buttons Press one of them corresponding to the required The page is displayed with other coloured information that can be selected in the same way To display the previous or next page press the corresponding coloured button 6 teletext on mix Press to activate teletext mode after selecting the channel providing the teletext service Press it twice to ...

Страница 69: ...nt page number or search indications Date and time Text Status information FASTEXT information Teletext information is often divided between several pages displayed in sequence which can be accessed by Entering the page number Selecting a title in a list Selecting a coloured heading FASTEXT system Press the TV DTV button to exit from the teletext display ...

Страница 70: ...han the standard dimension as they may cause damage to the inside of the TV set For wall mounts that do not comply with the VESA standard screw specifications the length of the screws may differ depending on their specifications Do not use screws that do not comply with the VESA standard screw specifications Do not use fasten the screws too strongly this may damage the product or cause the product...

Страница 71: ...n arrow button when no OSD is displayed on the TV screen the Adjustment screen appears Press the INFO button to reset Press the or button to select Yes then press the ENTER button The position is initialized to the default setting 3 Press the blue button Press the and buttons to select a save mode from either Position1 Position2 or Position3 in order to save the current position To not save the cu...

Страница 72: ...he Red Position 1 Green Position 2 or Yellow Position 3 buttons If you adjust the positon after moving to a pre set position the position display will disappear For installation refer to the Installation Manual provided with the wall mount For product installation and the installation and moving of the wall mount make sure to consult a specialized installation company This installation manual is t...

Страница 73: ...et Blurred or snowy picture distorted sound Check the direction location and connections of your aerial This interference often occurs due to the use of an indoor aerial Remote control malfunctions Replace the remote control batteries Clean the upper edge of the remote control transmission window Check that the and ends of the batteries are inserted correctly Check that the batteries are drained S...

Страница 74: ...h stand 1240 x 766 x 96 mm 1240 x 836 x 320 mm 1418 x 866 x 100 mm 1418 x 928 x 345 mm Weight Body With stand 39 2 kg 43 5 kg 58 8 kg 64 0 kg Environmental Considerations Operating Temperature Operating Humidity Storage Temperature Storage Humidity 10 C to 40 C 50 F to 104 F 10 to 80 non condensing 20 C to 45 C 4 F to 113 F 5 to 95 non condensing This device is a Class B digital apparatus Design a...

Страница 75: ...This page is intentionally left blank ...

Страница 76: ...or human health from uncontrolled waste disposal please separate this from other types of wastes and recycle it responsibly to promote the sustainable reuse of material resources Household users should contact either the retailer where they purchased this product or their local government office for details of where and how they can take this item for environmentally safe recycling Business users ...

Страница 77: ...ongée peut endommager définitivement l écran PDP Visionner pendant longtemps le téléviseur à plasma en format 4 3 risque de laisser apparaître des traces de bordures sur la gauche sur la droite et au centre de l écran Ces traces sont dues à la différence de luminosité sur l écran Lire un DVD ou un jeu vidéo sur console risque de provoquer un effet similaire sur l écran Les dommages provoqués par l...

Страница 78: ...es paramètres d image 27 Réglage des détails de l image 28 Options d image 29 Restauration des paramètres d image par défaut 31 Réglage du son Fonctions audio 32 Sélection du mode Son en fonction du modèle 34 Branchement du casque vendu séparément 34 Description des fonctions Fonctions d horloge 35 Langue Modifier PIN Verrouillage parental Sous titres Langue Télétexte Préférence Effet lumineux Mélo...

Страница 79: ...ants Câbles audio Câble PC Câble SCART Câble audio PC Câble HDMI Câble HDMI DVI Tore magnétique cordon d alimentation S Vidéo composants Le blindage magnétique sert à protéger les câbles des interférences Lors de la connexion d un câble ouvrez le blindage magnétique et rabattez le autour du câble près de la prise Utilisation de la base support L écran à plasma doit être soulevé par plusieurs perso...

Страница 80: ...ême façon que les boutons et de la télécommande 4 C P Permet de changer de canal Dans le menu affiché à l écran utilisez les boutons C P de la même façon que les boutons et de la télécommande 5 Témoin d alimentation Clignote et s éteint lorsqu il est sous tension et s allume en mode Veille 6 Bouton Marche Arrêt Permet d allumer et d éteindre le téléviseur 7 Capteur de la télécommande Dirigez la té...

Страница 81: ...s pour périphériques tels que des magnétoscopes des lecteurs DVD des consoles de jeux vidéo ou des lecteurs de vidéodisques Spécifications entrée sortie Connecteur Entrée Sortie Vidéo Audio G D RGB Vidéo Audio G D EXT 1 Seule la sortie TV ou DTV est disponible EXT 2 Sortie que vous pouvez sélectionner 5 DIGITAL AUDIO OUT OPTICAL A connecter à un composant audio numérique 6 AUDIO OUT AUDIO R L Conn...

Страница 82: ... et vidéo S Vidéo ou Vidéo pour périphériques externes tels qu un caméscope ou un magnétoscope 5 Prise casque Vous pouvez brancher un casque si vous souhaitez regarder la télévision sans déranger les autres personnes présentes dans la pièce L utilisation prolongée d un casque à un niveau sonore élevé peut endommager l ouïe 8 HDMI IN 1 2 3 Aucune connexion audio supplémentaire n est nécessaire pour...

Страница 83: ...n de la pile Canal précédent Canal suivant Canal précédent Sélection de la source disponible Affiche le menu principal à l écran Cette fonction vous permet d afficher des photos JPEG et d écouter des fichiers audio MP3 à partir d un périphérique externe Voir page 45 JPEG 55 MP3 a Revient au menu précédent b Permet de quitter le menu affiché à l écran c Sélection de la taille de l image d Utilisez ...

Страница 84: ...é en façade du téléviseur ou sur le bouton POWER de la télécommande pour allumer le téléviseur Le dernier programme que vous avez regardé est automatiquement sélectionné Si vous n avez encore mémorisé aucune chaîne aucune image nette n apparaît Reportez vous à la section Mémorisation automatique des canaux page 14 ou à la section Mémorisation manuelle des canaux page 15 Lorsque le téléviseur est a...

Страница 85: ...bouton ou pour sélectionner Enr démo ou Util domicile puis appuyez sur le bouton ENTER Un message s affiche vous demandant de vérifier l état de connexion de l antenne La sélection par défaut est Util domicile Nous vous recommandons de régler le téléviseur sur le mode Util domicile pour une meilleure qualité d image dans votre environnement personnel Le modeEnr démo n est prévu que pour un usage e...

Страница 86: ...erminé appuyez sur le bouton ENTER Même sans appuyer sur le bouton ENTER le message disparaît automatiquement après quelques secondes Si vous souhaitez changer le réglage de ce paramètre 1 Appuyez sur le bouton MENU pour afficher le menu 2 Appuyez sur le bouton ou pour sélectionner Configuration puis appuyez sur le bouton ENTER 3 Appuyez de nouveau sur le bouton ENTER pour sélectionner le mode Plu...

Страница 87: ... le bouton SOURCE de la télécommande Pour regarder à nouveau les programmes de télévision appuyez sur le bouton TV DTV et sélectionnez le numéro de chaîne désiré Utilisation du bouton TOOLS Vous pouvez utiliser le bouton TOOLS pour sélectionner simplement et rapidement les fonctions que vous utilisez le plus souvent Le menu OUTILS change en fonction du mode d entrée externe affiché 1 Appuyez sur l...

Страница 88: ...Sélectionnez le périphérique désiré en appuyant sur le bouton ou puis appuyez sur le bouton ENTER Noms de périphérique disponibles magnétoscope DVD décodeur câble décodeur satellite décodeur magnétoscope numérique récepteur AV console de jeu caméscope PC téléviseur télévision IP Blu Ray HD DVD Digital Media Adapter 6 Appuyez sur le bouton EXIT pour quitter le menu Entrée Liste Source Modif Nom Mod...

Страница 89: ...ogique chaînes analogiques Cherche toutes les chaînes avec des stations de diffusion actives et les enregistre dans la mémoire du téléviseur Si vous voulez arrêter la mémorisation automatique appuyez sur le bouton ENTER Le message Arrêter Mémorisation Auto s affiche Sélectionnez Oui en appuyant sur le bouton ou puis appuyez sur le bouton ENTER 5 Appuyez sur le bouton EXIT pour quitter le menu Lors...

Страница 90: ...e bouton ou pour sélectionner la norme audio désirée Canal si vous connaissez le numéro du canal à mémoriser Appuyez sur le bouton ou pour sélectionner C canal hertzien ou S canal câblé Appuyez sur le bouton puis sur le bouton ou pour sélectionner le numéro de votre choix Vous pouvez également sélectionner le numéro de canal directement en appuyant sur le pavé numérique 0 à 9 S il n y a aucun son ...

Страница 91: ...4 heures Mini Guide permet d afficher la page suivante JAUNE Guide complet permet d avancer de 24 heures Mini Guide permet d afficher la page précédente BLEU Quitter le guide INFO INFO permet d afficher les informations détaillées Numéro de canal durée du programme barre d état niveau de contrôle parental informations sur la qualité vidéo HD SD modes sonores sous titres ou Télétext langue des sous...

Страница 92: ...culer entre TV Radio Donn autre et Tous Vert Zoom Agrandit ou réduit une chaîne Jaune Sélection Sélectionne des listes de chaînes TOOLS Option Affiche le menu Supprimer ou Ajouter Ajouter aux favoris ou Supprimer des favoris Verrouil Ecoute programmée Modifi nom du chaîne Tri des canaux Modifi numéro chaîne Sélectionner tout Désélectionner tout ou Mémorisation Auto Les options de menus peuvent dif...

Страница 93: ...e chaîne au menu Tous les canaux Une chaîne doit être supprimée avant de pouvoir être rajoutée à la liste des Chaînes ajoutées Pour ajouter restaurer une chaîne à la liste des Chaînes ajoutées suivez les étapes 1 à 3 ci dessus appuyez sur le bouton ou pour sélectionner une chaîne à ajouter puis appuyez sur le bouton TOOLS Appuyez sur le bouton ENTER pour sélectionner Ajouter Appuyez sur le bouton ...

Страница 94: ...uyez sur le bouton ou pour sélectionner Ajouter aux favoris puis appuyez sur le bouton ENTER Le symbole s affiche et la chaîne est définie comme favorite 7 Pour annuler la sélection d une chaîne favorite appuyez sur le bouton TOOLS après avoir sélectionné une chaîne favorite Appuyez sur le bouton ou pour sélectionner Supprimer des favoris puis appuyez sur le bouton ENTER La chaîne est supprimée de...

Страница 95: ...s en suivant la même procédure Pour des informations sur la façon de valider une réservation reportez vous à la page 20 Seules des chaînes mémorisées peuvent être réservées Vous pouvez régler directement la chaîne le mois le jour l heure et les minutes à l aide du pavé numérique de la télécommande Appuyez sur le bouton CH LIST de la télécommande pour afficher les listes de chaînes Guide des progra...

Страница 96: ...bouton ou pour sélectionner OK puis appuyez sur le bouton ENTER La réservation est annulée Appuyez sur le bouton EXIT pour quitter le menu Menu Programmé Modifier infos permet de modifier une réservation Annuler programmations permet d annuler une réservation Information permet d afficher le détail d une réservation Tout sélectionner Tout désélectionne vous pouvez sélectionner ou désélectionner to...

Страница 97: ...u Modification d un numéro de chaîne numérique 1 Appuyez sur le bouton MENU Appuyez sur le bouton ou pour sélectionner Canal puis appuyez sur le bouton ENTER Appuyez sur le bouton ou pour sélectionner Liste des chaînes puis appuyez sur le bouton ENTER 2 Sélectionnez le numéro de chaîne à modifier en appuyant plusieurs fois sur le bouton ou puis appuyez sur le bouton TOOLS 3 Appuyez sur le bouton o...

Страница 98: ...yez sur le bouton ENTER 7 Sélectionnez le numéro du programme à attribuer à la chaîne en appuyant sur le bouton ou Appuyez sur le bouton ENTER La chaîne est déplacée vers sa nouvelle position et toutes les autres chaînes sont replacées en conséquence 8 Répétez les étapes 4 à 7 jusqu à ce que vous ayez déplacé toutes les chaînes aux numéros de programme de votre choix 9 Appuyez sur le bouton EXIT p...

Страница 99: ... l option Verrouillage de chaîne l écran de saisie du code PIN s affiche reportez vous à la page 25 Réglage du gestionnaire de chaînes Vous pouvez afficher soit la liste des chaînes ajoutées soit la liste des favoris lorsque vous appuyez sur le bouton CH LIST de la télécommande 1 Appuyez sur le bouton MENU Appuyez sur le bouton ou pour sélectionner Canal puis appuyez sur le bouton ENTER Appuyez sur...

Страница 100: ...aut d un nouveau téléviseur est réglé sur 0 0 0 0 Syntonisation précise des chaînes analogiques Utilisez la syntonisation précise pour régler manuellement une chaîne spécifique en vue d une réception optimale 1 Appuyez sur le bouton MENU pour afficher le menu Appuyez sur le bouton ou pour sélectionner Canal puis appuyez sur le bouton ENTER 2 Appuyez sur le bouton ou pour sélectionner Réglage fin p...

Страница 101: ...a fonction LNA amplifie le signal télévisé dans une zone où il est faible Un préamplificateur à faible bruit augmente le signal d arrivée 1 Appuyez sur le bouton MENU pour afficher le menu 2 Appuyez sur le bouton ou pour sélectionner Canal puis appuyez sur le bouton ENTER 3 Appuyez sur le bouton ou pour sélectionner LNA puis appuyez sur le bouton ENTER 4 Sélectionnez Arrêt ou Marche en appuyant su...

Страница 102: ...Appuyez sur le bouton ENTER pour sélectionner Image 3 Appuyez à nouveau sur le bouton ENTER pour sélectionner Mode 4 Sélectionnez le mode désiré en appuyant sur le bouton ou puis appuyez sur le bouton ENTER Modes disponibles Dynamique Standard ou Cinéma 5 Sélectionnez l option désirée en appuyant sur le bouton ou puis appuyez sur le bouton ENTER 6 Lorsque vous êtes satisfait de la configuration ap...

Страница 103: ...onction des sources Natif l espace de couleur natif offre une nuance de couleur profonde et riche Personnalisé Règle la gamme des couleurs selon la préférence Personnalisation de l espace de couleur Couleur Rouge Vert Bleu Jaune Cyan Magenta Permet de régler la gamme de couleurs en fonction de vos préférences Le paramètre Couleur est disponible lorsque Espace de couleur est réglé sur Personnalisé ...

Страница 104: ... pour sélectionner Réinitialiser puis appuyez sur le bouton ENTER Permet de réinitialiser le réglage En fonction des périphériques AV l écran peut être tronqué ou une couleur spécifique peut apparaître à l écran avec le format d image HDMI Scan uniquement Pour une connexion HDMI 1080p de 24 25 30 50 et 60 Hz et pour une connexion Composant 1080p de 50 et 60 Hz seule la source d entrée est prise en...

Страница 105: ... de qualité d affichage DNIeTM Digital Natural Image engine Cette fonction vous offre une image plus détaillée tout en permettant une réduction de bruit 3D et une amélioration des détails des contrastes et des blancs Le nouvel algorithme de compensation d images vous offre une image plus lumineuse plus claire et plus détaillée La technologie DNIeTM adaptera tous les signaux à votre vue quels qu il...

Страница 106: ...er les images résiduelles à l écran en modifiant la couleur des pixels pour les faire devenir blancs Utilisez cette fonction lorsque des images résiduelles ou des symboles apparaissent à l écran en particulier lorsqu une image fixe reste affichée à l écran pendant une longue période Défilement cette fonction contribue à supprimer les images résiduelles à l écran en déplaçant tous les pixels sur l ...

Страница 107: ...S TruSurround XT Arrêt Marche Le TruSurround XT est une technologie SRS brevetée qui remédie au problème de la lecture du contenu d un disque multicanal 5 1 sur deux haut parleurs Le TruSurround produit un son surround virtuel captivant via n importe quel système de lecture à deux haut parleurs dont les haut parleurs intégrés au téléviseur Il s adapte parfaitement à tous les formats multicanaux Ré...

Страница 108: ...e le signal de modulation est faible TV Speaker Arrêt Marche Pour entendre le son par l intermédiaire d enceintes séparées désactivez l amplificateur interne Les boutons et MUTE ne fonctionnent pas lorsque l option TV Speaker est réglée sur Arrêt Lorsque l option TV Speaker est réglée sur Arrêt vous ne pouvez utiliser que l entrée DTV Langue audio Format audio Description audio Sélection du son en...

Страница 109: ... sous tension le mode est préréglé automatiquement soit sur DUAL I soit sur Stéréo en fonction de la transmission en cours Réglages simple 1 Appuyez sur le bouton TOOLS de la télécommande 2 Appuyez sur le bouton ou pour sélectionner Dual I II 3 Appuyez sur le bouton ou pour sélectionner l option de votre choix Type de programme Indication à l écran NICAM Stéréo Programme normal Audio standard Mono...

Страница 110: ...r le menu Minuteur 1 Minuteur 2 Minuteur 3 Vous pouvez régler les minuteries ON OFF de sorte que le téléviseur soit mis sous hors tension à une heure définie Vous devez préalablement régler l horloge Appuyez sur le bouton ou pour sélectionner l élément désiré ci dessous Appuyez sur le bouton ou pour accéder au réglage voulu Mise en marche sélectionnez les heures et les minutes ainsi que Désactiver...

Страница 111: ... Le menu à l écran vous de mandera d attribuer un code PIN vous pouvez le changer ultérieurement si nécessaire 1 Entrez votre code PIN à quatre chiffres à l aide du pavé numérique 0 à 9 2 Appuyez sur le bouton ENTER pour sélectionner Classement parental 3 Appuyez sur le bouton ou pour sélectionner la restriction appropriée puis appuyez sur le bouton ENTER Le symbole apparaît à l écran Tandis que e...

Страница 112: ...l énergie ou si la LED fatigue vos yeux Désactivé la LED bleue est toujours éteinte En veille la LED bleue est allumée en mode veille et éteinte quand le téléviseur est sous tension En marche la LED bleue est allumée quand vous regardez la télévision et éteinte quand le téléviseur est hors tension Toujours la LED bleue est toujours allumée Réglez Effet lumineux sur Arrêt pour réduire la consommati...

Страница 113: ...DVI HDMI 3 HDMI4 PC TV Ext1 Ext2 AV Source Vous pouvez sélectionner la source de l image secondaire Format Vous pouvez sélectionner la taille de l image secondaire Si l image principale est en modePC et Composant l option Format n est pas disponible Position Vous pouvez sélectionner la position de l image secondaire En mode Double l option Position ne peut pas être sélectionnée Canal Vous pouvez s...

Страница 114: ... s éteint et se rallume automatiquement après la fin des mises à niveau Veuillez vérifier la version du micrologiciel après la fin des mises à niveau Une fois le logiciel mis à niveau les paramètres vidéo et audio que vous aviez définis reprennent leur valeur par défaut d usine Nous vous recommandons de noter vos réglages afin de pouvoir les rétablir facilement après une mise à niveau Canal Met à ...

Страница 115: ...puyez sur le bouton ENTER 3 Sélectionnez Interface commune en appuyant sur le bouton or puis appuyez sur le bouton ENTER Menu CI Ce menu permet de sélectionner un élément du menu pris en charge par le module CAM Appuyez sur le boutonENTER Les options du menu sélectionné s affichent Appuyez sur le bouton ou pour sélectionner l option désirée puis appuyez sur le bouton ENTER Infos sur l application ...

Страница 116: ...ows puis sur Propriétés L écran Propriétés de Affichage apparaît 2 Cliquez sur l onglet Paramètres puis réglez le mode d affichage en vous reportant au tableau des modes d affichage Il est inutile de modifier les paramètres Couleurs 3 Cliquez sur Avancé Une nouvelle boîte de dialogue de configuration s affiche 4 Cliquez sur l onglet Écran puis réglez la Fréquence d actualisation du moniteur en vou...

Страница 117: ... 004 70 069 75 029 60 020 75 025 60 015 60 000 25 175 31 500 31 500 40 000 50 000 49 500 65 000 75 000 78 750 108 000 135 000 85 500 162 000 CVT 1920 x 1080RB 66 587 59 934 138 500 Entrée HDMI DVI Mode Resolution Fréquence horizontale kHz Fréquence verticale Hz Fréquence d horloge pixels MHz Polarité synchronisée H V VESA 640 x 480 800 x 600 1024 x 768 1280 x 1024 1360 x 768 1600 x 1200 31 469 37 ...

Страница 118: ...uement au signal vidéo PC Les valeurs des paramètres Réglage précis Réglage de base et Position sont définies automatiquement Réglage simple 1 Appuyez sur le bouton TOOLS de la télécommande 2 Appuyez sur le bouton ou pour sélectionner Réglage automatique puis appuyez sur le bouton ENTER Ajustement automatique en cours Attendez s il vous plait Mode Standard Luminosité des cellules 7 Contraste 95 Lu...

Страница 119: ...e de base ou Réglage précis puis appuyez sur le bouton ENTER 2 Appuyez sur le bouton ou pour régler la qualité de l écran il se peut que des bandes verticales apparaissent ou que l image soit floue Appuyez sur le bouton ENTER Position Réglez la position de l écran du PC si elle n est pas adaptée à l écran du téléviseur 1 Réglez la position à l aide des boutons 2 Appuyez sur le bouton ENTER Réiniti...

Страница 120: ... USB risque de se poser Avant de connecter l appareil au téléviseur sauvegardez vos fichiers afin d éviter qu ils ne soient endommagés ou que des données ne soient perdues SAMSUNG ne saurait en aucun cas être tenu responsable de la perte de données ou de l endommagement d un fichier de données Ne déconnectez pas le périphérique USB en cours de chargement MSC prend en charge les fichiers MP3 et JPE...

Страница 121: ... 2 Appuyez sur le bouton ou pour sélectionner WISELINK puis appuyez sur le bouton ENTER Le menu WISELINK s affiche Appuyez sur le bouton W LINK de la télécommande pour afficher le menu WISELINK Appuyez plusieurs fois sur le bouton SOURCE de la télécommande pour sélectionner USB puis appuyez sur le bouton ENTER 3 Appuyez sur le bouton rouge puis sur le bouton ou pour sélectionner l unité de stockage ...

Страница 122: ...rouge pour sélectionner un périphérique 6 Informations de sélection Indique le nombre de photos sélectionnées en appuyant sur le bouton Jaune 7 Options d aide Bouton rouge Périph Sélectionne un périphérique connecté Bouton vert Favoris Modifie le réglage des favoris pour la photo sélectionnée Appuyez à plusieurs reprises sur ce bouton jusqu à ce que la valeur souhaitée s affiche voir page 51 Bouton ...

Страница 123: ...ans la liste secondaire des fichiers groupés par mois Pour passer au groupe suivant précédent appuyez sur le bouton Retour arrière ou Avance rapide 3 Appuyez sur le bouton TOOLS Appuyez sur le bouton ou pour sélectionner Lire gp act 4 Appuyez sur le bouton ENTER pour lire le groupe de fichiers photo sélectionnés dans la liste secondaire Date Trie les photos par date Trie et affiche les photos par dat...

Страница 124: ...chiers groupés par composition Pour passer au groupe suivant précédent appuyez sur le bouton Retour arrière ou Avance rapide 3 Appuyez sur le bouton TOOLS Appuyez sur le bouton ou pour sélectionner Changer gp 4 Appuyez sur le bouton ENTER pour lire le groupe de fichiers photo sélectionnés dans la liste secondaire Modification des informations de composition 1 Sélectionnez Compo comme ordre de tri d...

Страница 125: ...yez sur le bouton Retour arrière ou Avance rapide 3 Appuyez sur le bouton TOOLS Appuyez sur le bouton ou pour sélectionner Lire gp act 4 Appuyez sur le bouton ENTER pour lire le groupe de fichiers photo sélectionnés dans la liste secondaire Modification du paramètre Favori 1 Appuyez sur le bouton ou pour sélectionner la photo voulue dans la Liste des photos Modification des informations de plusieurs...

Страница 126: ...ler la suppression est annulée 5 Pour quitter le mode WISELINK appuyez sur le bouton W LINK de la télécommande Vous ne pouvez pas retirer les fichiers en lecture seule de la sélection Vous ne pouvez pas récupérer un fichier photo supprimé Affichage des informations sur le PC Affiche des informations sur les fichiers photo dont l ordre du fichier dans le répertoire actuel le nom la taille la résolution l...

Страница 127: ... seront utilisés pour le diaporama Si vous avez sélectionné des fichiers seuls ces fichiers seront utilisés pour le diaporama Lecture du groupe actuel 1 Appuyez sur le bouton ou pour sélectionner un ordre de tri Mois Date Couleur Compo Dossier Préf 2 Appuyez sur le bouton ou pour sélectionner la photo voulue dans la Liste des photos Pour passer au groupe suivant précédent appuyez sur le bouton Retou...

Страница 128: ... ENTER Rotat Vous pouvez faire pivoter les images lorsque vous êtes en mode Plein écran Appuyez sur le bouton ou pour sélectionner Rotat puis appuyez sur le bouton ENTER Appuyez plusieurs fois sur le bouton ou pour faire pivoter la photo à l angle voulu Chaque fois que vous appuyez sur le bouton la photo pivote successivement à 270 180 90 et 0 Chaque fois que vous appuyez sur le bouton la photo pi...

Страница 129: ...fier la vitesse de défilement du diaporama Appuyez sur le bouton ou pour sélectionner Vitesse du diaporama Appuyez sur le bouton ou pour sélectionner l option de votre choix Rapide Lent Normal Vous ne pouvez sélectionner la vitesse du diaporama que pendant sa diffusion Fond musical Si vous définissez Fond musical sur Marche le fond musical sera lu lors de l affichage de photos individuelles ou en diap...

Страница 130: ...r le bouton ou pour sélectionner Fond musical Appuyez sur le bouton ou pour sélectionner l humeur de fond musical souhaitée Appuyez sur le bouton ENTER Options du mode BGM fond musical Energique Rhytmique Triste Enivrante Calme WISELINK identifie l humeur des fichiers musicaux et les regroupe en conséquence en analysant les images qui se trouvent sur le périphérique USB Mode Image Vous pouvez définir...

Страница 131: ...ton rouge Périph Sélectionne un périphérique connecté Bouton vert Favoris Modifie le réglage des favoris pour la musique sélectionnée Appuyez plusieurs fois sur ce bouton jusqu à ce que la valeur voulue apparaisse voir page 60 Bouton jaune Sélection Sélectionne des fichiers musicaux dans la liste de musiques Les fichiers musicaux sélectionnés sont marqués d un symbole à leur gauche Bouton Passe au gr...

Страница 132: ...ez sur le bouton TOOLS 4 Appuyez sur le bouton ou pour sélectionner Lire gp act 5 Appuyez sur le bouton ENTER pour lire le groupe de fichiers musicaux sélectionnés dans la liste secondaire Artiste Trie les fichiers musicaux par artiste Les fichiers musicaux sont triés par ordre alphabétique de l artiste 1 Sélectionnez Artiste comme ordre de tri dans la liste des musiques 2 Appuyez sur le bouton ou po...

Страница 133: ...r actuel sont mises à jour et le fichier est déplacé vers le nouveau groupe Options Ambiance Energique Rhytmique Triste Enivrante Calme Non classé Genre Trie les fichiers musicaux par genre 1 Sélectionnez Genre comme ordre de tri dans la liste des musiques 2 Appuyez sur le bouton ou pour sélectionner des fichiers dans la liste secondaire des fichiers groupés par genre Pour passer au groupe suivant pré...

Страница 134: ...dans la liste secondaire Modification du paramètre Favori 1 Appuyez sur le bouton ou pour sélectionner la musique voulue dans la liste des musiques Modification des informations de plusieurs fichiers Appuyez sur le bouton ou pour sélectionner la musique voulue dans la liste des musiques Appuyez ensuite sur le bouton jaune Répétez l opération ci dessus pour sélectionner plusieurs musiques La marque s ...

Страница 135: ...de Vous ne pouvez pas retirer les fichiers en lecture seule de la sélection Vous ne pouvez récupérer les fichiers musicaux supprimés Affichage des informations Affiche des informations sur les fichiers musicaux dont l ordre du fichier dans le répertoire actuel le nom la taille la date de modification et le chemin d accès 1 Appuyez sur le bouton ou pour sélectionner la musique voulue dans la liste des mus...

Страница 136: ...es informations relatives au temps de lecture ne figurent pas au début du fichier 4 Pour quitter le mode WISELINK appuyez sur le bouton W LINK de la télécommande Lecture d un groupe de musiques 1 Appuyez sur le bouton W LINK de la télécommande pour afficher le menu WISELINK 2 Appuyez sur le bouton ou pour sélectionner Music puis appuyez sur le bouton ENTER Pour passer au groupe suivant précédent appu...

Страница 137: ...étition est défini sur Marche Musique Une fois Lorsque tous les fichiers musicaux du dossier ou le fichier sélectionné sont lus une fois Le mode Mode Répétition est défini sur Arrêt Musique Lecture Pause Lorsque vous appuyez sur le bouton Lecture Pause ENTER de la télécommande pendant la lecture Lecture répétée 1 Pendant la lecture d un fichier appuyez sur le bouton TOOLS 2 Appuyez sur le bouton ou pou...

Страница 138: ...i éco écran Sélectionnez cette option pour définir le délai avant l activation de l écran de veille Appuyez sur le bouton ou pour sélectionner Délai éco écran Appuyez sur le bouton ou pour sélectionner 1 min 3 min ou 5 min Information Affiche les informations de l appareil connecté Appuyez sur le bouton ou pour sélectionner Information puis appuyez sur le bouton ENTER Retrait sécurisé Vous pouvez re...

Страница 139: ... le son du téléviseur via le système Home Theater veillez à relier correctement la prise Digital Audio IN optique du système Home Theater au téléviseur Il est toutefois impossible d écouter le son de l enregistreur BD envoyé au système Home Theater via le téléviseur en mode 5 1 car le téléviseur ne peut produire que du son stéréo 2 canaux Reportez vous à la documentation du système Home Theater Po...

Страница 140: ... La liste des appareils Anynet connectés au téléviseur s affiche Si l appareil désiré est introuvable appuyez sur le bouton rouge pour chercher des appareils 2 Appuyez sur le bouton ou pour sélectionner un appareil puis appuyez sur le bouton ENTER Vous passez ainsi à l appareil sélectionné Le menu Liste d appareils n apparaît que si Anynet HDMI CEC est activée dans le menu Application 3 Si l appar...

Страница 141: ...P Appareil audio Lorsque le récepteur est activé Bouton Bouton MUTE La fonction Anynet n est utilisable que quand la télécommande est réglée en mode TV Le bouton REC ne fonctionne que lorsque l appareil est dans un état où l enregistrement est possible Il est impossible de commander les appareils Anynet à l aide des boutons sur le côté du téléviseur Les appareils Anynet ne peuvent être commandés q...

Страница 142: ...ditions Recherche de canaux Lorsque vous branchez ou de retirez le câble HDMI 1 3 veillez à relancer une recherche de périphérique ou à redémarrer votre téléviseur Vérifiez que la fonction Anynet du périphérique Anynet est activée Je veux démarrer Anynet Assurez vous que l appareil AV est bien connecté au téléviseur et assurez vous que la fonction Anynet HDMI CEC est réglée sur Marche dans le menu...

Страница 143: ...vent être sélectionnés à l aide des boutons de couleur de la télécommande Appuyez sur le bouton correspondant à la fonctionnalité requise La page s affiche ainsi que d autres informations en couleur pouvant être sélectionnées de la même manière Pour afficher la page précédente ou la page suivante appuyez sur le bouton de couleur correspondant 6 télétexte activé mix Permet d activer le mode Télétex...

Страница 144: ...ns de recherche Date et heure Texte Informations sur l état Informations FASTEXT Les informations télétexte sont souvent réparties sur plusieurs pages qui s affichent l une après l autre Ces pages sont accessibles en entrant le numéro de page sélectionnant un titre dans une liste sélectionnant un en tête de couleur système FASTEXT Appuyez sur le bouton TV DTV pour quitter l affichage télétexte ...

Страница 145: ...vis plus longues que la dimension standard car elles pourraient endommager l intérieur du téléviseur Pour les fixations murales non conformes aux caractéristiques des vis VESA standard la longueur des vis peut varier selon leurs caractéristiques N utilisez pas de vis non conformes aux caractéristiques des vis VESA standard Ne serrez pas trop les vis cela pourrait endommager le produit ou provoquer...

Страница 146: ...ctuer une réinitialisation Appuyez sur le bouton ou pour sélectionner Oui puis appuyez sur le bouton ENTER La position est initialisée sur le réglage par défaut 3 Appuyez sur le bouton bleu Appuyez sur les boutons et pour sélectionner un mode d enregistrement parmi Position1 Position2 et Position3 afin d enregistrer la position actuelle Si vous ne souhaitez pas enregistrer la position actuelle app...

Страница 147: ...nction du modèle Au moyen des 6 vis permettant de solidariser la base support et le moniteur fixez fermement le moniteur à la base support L aspect extérieur de votre téléviseur peut différer de celui présenté à l image Si vous fixez le téléviseur au mur fermez le couvercle 1 de la pièce de connexion de la base support à l aide des deux vis Avertissement Fixez fermement le socle au téléviseur avan...

Страница 148: ...t les branchements de votre antenne Cette interférence est souvent due à l utilisation d une antenne intérieure Dysfonctionnements de la télécommande Remplacez les piles de la télécommande Nettoyez la partie supérieure de la télécommande fenêtre de transmission Vérifiez que les pôles et des piles sont orientés correctement Vérifiez si les piles ne sont pas déchargées L écran est noir et le témoin ...

Страница 149: ...36 x 320 mm 1418 x 866 x 100 mm 1418 x 928 x 345 mm Poids Corps Avec pied 39 2kg 43 5kg 58 8 kg 64 0 kg Considérations environnementales Température de fonctionnement Humidité au cours du fonctionnement Température de stockage Humidité sur le lieu de stockage 10 C à 40 C 50 F à 104 F 10 à 80 sans condensation 20 C à 45 C 4 F à 113 F 5 à 95 sans condensation Ce périphérique est un appareil numériqu...

Страница 150: ...Cette page est laissée intentionnellement en blanc ...

Страница 151: ... à la santé humaine veuillez le séparer des autres types de déchets et le recycler de façon responsable Vous favoriserez ainsi la réutilisation durable des ressources matérielles Les particuliers sont invités à contacter le distributeur leur ayant vendu le produit ou à se renseigner auprès de leur mairie pour savoir où et comment ils peuvent se débarrasser de ce produit afin qu il soit recyclé en ...

Отзывы: