background image

74

Ⅵ. TROUBLESHOOTING

Содержание Pro 815

Страница 1: ......

Страница 2: ...COVER_1 ASSEMBLY 34 6 FRONT COVER_2 ASSEMBLY 36 7 BACK COVER ASSEMBLY 38 8 TOP COVER ASSEMBLY 40 9 SHOEBASE_1 ASSEMBLY 42 10 SHOEBASE_2 ASSEMBLY 44 11 OTHERS ASSEMBLY 46 12 PACKING ITEM_1 48 13 PACKING ITEM_2 50 Ⅳ ADJUSTMENT 1 DIGITAL CAMERA SERVICE 53 2 Adjustment items by changed parts 5 9 Ⅴ PATTERN DIAGRAM 1 PARTS ARRANGEMENT FOR EACH PCB ASS Y 1 MAIN_TOP 63 2 MAIN_BOTTOM 64 3 POWER_TOP 65 4 PO...

Страница 3: ...to the CCD 81 4 Defect related to the Charging 8 2 5 Defect related to the Flash 84 6 Defect related to the POP UP 85 7 Defect related to the Card 87 8 Defect related to the Mode dial 89 9 Defect related to the Audio 90 10 Defect related to the USB AV and DC Jack 91 Ⅶ SERVICE INFORMATION 92 ...

Страница 4: ...lent Auto 50 100 200 400 High Speed Mode Up to max ISO 400 automatically Auto Auto Red eye reduction Fill in Slow sync Slow sync Red eye reduction Flash off Flash compensation 2EV 1 3EV steps Wide 0 7 6 0m ISO 100 Tele 1 5 3 0m ISO 100 Recharging Time Approx 5 sec ExternalFlash optional SEF 42A DC 6V 4 x AA Alkaline Sharpness Soft Normal Vivid Effect Normal B W Sepia Negative Contrast adjust Satur...

Страница 5: ... Superfine 15 Fine 29 Normal 42 3 2 RAW TIFF Superfine 17 Fine 32 Normal 46 16 9 RAW TIFF Superfine 20 Fine 38 Normal 54 M1 RAW TIFF Superfine 27 Fine 50 Normal 71 M2 RAW TIFF Superfine 54 Fine 94 Normal 124 S1 RAW TIFF Superfine 111 Fine 169 Normal 205 S2 RAW TIFF Superfine 292 Fine 450 Normal 548 These figures are measured under Samsung s standard conditions and may vary depending on shooting co...

Страница 6: ...E 2000 ME XP Mac OS 10 0 or later Application Digimax Master Digimax Reader The world s longest 1 built in 15X zoom 28mm wide angle and 15X ultra high zoom capability The world s largest 1 digital camera LCD 3 5 TFT with 235K Pixels The world s largest capacity 1 lithium ion battery 7 4V 1900mAh The world s first 1 top TFT LCD for waist level shooting 1 44 wide type High Speed mode suppressing cam...

Страница 7: ...2 Image size 3 Self timer Remote control 4 Metering 5 Battery status 6 High speed shutter mode Camera shake warning 7 Voice memo 8 Contrast 9 Saturation 10 Image quality 11 Sharpness 12 Focus Lock 13 Focus mode Recording Mode 3 Rear LCD Finder LCD Top LCD ...

Страница 8: ...osure compensation 17 Flash power compensation 18 Date imprint 19 Flash 20 Macro 21 White balance 22 ISO 23 Aperture value F2 2 24 Shutter speed 1 2000 25 Colour space 27 Number of available shots remaining 25 28 Exposure lock 29 Auto focus frame 30 Spot zone Recording mode 26 ...

Страница 9: ...er speed 1 1600 4 Camera shake warning 5 Exposure lock 6 Aperture value F2 2 7 Saturation 8 Sharpness 9 Image size 10 Image quality 11 Number of shots remaining 25 12 Drive mode 13 Metering 14 Battery status 15 Macro 16 Focal length 28mm 1 Recording mode ...

Страница 10: ...10 Ⅰ SPECIFICATION 17 Focus lock Focus mode 18 Contrast 19 Compensation indicator 20 Flash power compensation 21 Self timer 22 White balance 23 Flash ...

Страница 11: ...scription Icon 1 Image size 2 Metering 3 Battery status 4 Date 2005 07 01 5 Time 13 00 PM 6 Contrast 7 Saturation 8 Quality 9 Sharpness 10 Focal Length 28mm 11 Exposure compensation 12 Flash 13 Macro 14 White balance Play back mode ...

Страница 12: ...PECIFICATION No Description Icon 1 Play mode 2 Battery status 3 Remote control 15 ISO 16 Aperture value F2 2 17 Shutter speed 1 30 18 Colour space 19 Play mode 20 Folder name and Stored image number 100 0009 ...

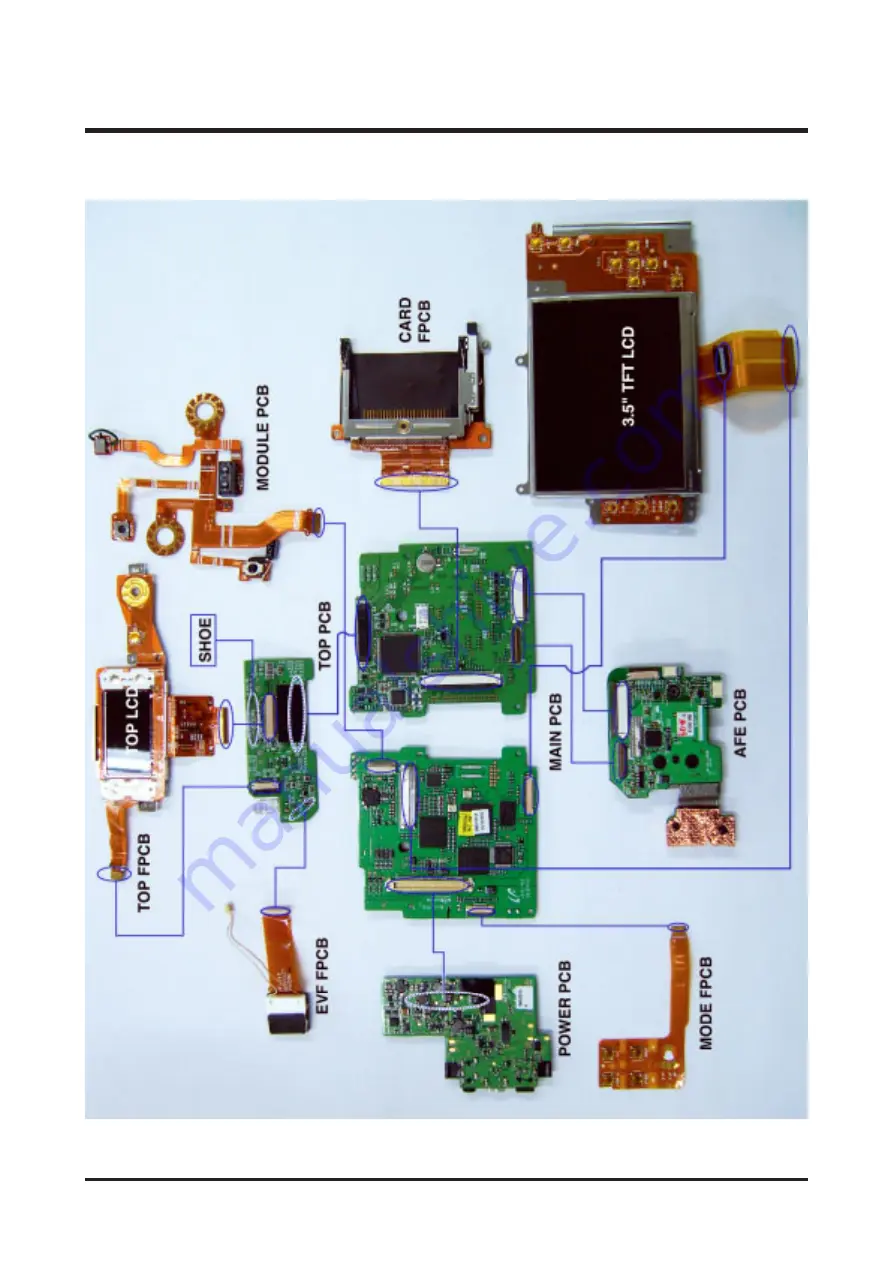
Страница 13: ...13 Ⅰ SPECIFICATION 4 CONNECTION DIAGRAM Ⅰ 사 양 ...

Страница 14: ...us lamp Microphone Lens 5 IDENTIFICATION OF FEATURES Side Left Side Right High Speed shutter HS button Remote control sensor Flash Focus area selection AF A button Focus mode selection button Speaker Connector cover Memory card slot cover Pop up flash OPEN button Flash compensation button AF lock AF L button Front Side Left Right ...

Страница 15: ...hoe Flash status lamp ISO button Metering button Zoom ring Zoom scale indicator Focus ring EVC Exposure Value Compensation ring Shutter button Drive button Mode dial Speaker Power button Power lamp Self timer button Hot shoe cap Top ...

Страница 16: ...ector cover SCENE Delete button Rear Jog dial JOG 2 Strap eyelet AE Lock AE L button Thumbnail button Card in use lamp Digital zoom Enlargement button Memory card slot cover 5 function button Play mode button Connectors Memory card slot DC in port USB connector port AV port Memory card eject lever Memory card slot Back ...

Страница 17: ...17 Ⅰ SPECIFICATION Battery chamber cover lock Tripod socket Diopter adjustmentring Battery chamber Battery chamber Battery holder Bottom ...

Страница 18: ...lete Click the Finish button 3 The Software License Agreement window for DirectX will be displayed If you agree to this select I accept the agreement and click Next button the window will then move to the next step If you disagree select I do not accept the agreement and click Cancel button The installation program will be cancelled ...

Страница 19: ... if you click the Finish button The screen shot of step 5 can can be different from the illustration depending on the system requirements 6 A window where you can choose the program you want to install will appear Click the Install button If you select Exit at step 6 the application program installation will be cancelled 4 A window will open Click the Next N button ...

Страница 20: ... 7 a window for installing Digimax Reader will be displayed 7 The Digimax Master installation window will be displayed as shown alongside Click the Next button 9 A destination selection window will open Click Next To copy the files to another folder click Browse and choose a folder you want ...

Страница 21: ...to choose another folder click Browse and choose a folder you want 12 Digimax Master installation is successfully completed Click the Finish button to install Digimax Reader The screen shot of step 12 can be different from the illustration depending on the system requirements 11 Click Install I button and Digimax Master starts installing ...

Страница 22: ...installation program will be cancelled 13 A window will be displayed as shown alongside Click the INSTALL button If you click the Manual button instructions instructions for using Digimax reader will be displayed Click the EXIT button and the Digimax reader installation will be cancelled and a window for restarting the computer will appear 14 A window will open Click the Next button ...

Страница 23: ...lick the OK button 17 Digimax Reader Installation is completed The system will not reboot even if the Yes I want to restart the computer now option is selected The screen shot of step 17 can be different from the illustration depending on the system requirements 16 A destination selection window will open Click the Next button To copy the files to another folder click Browse and choose a folder yo...

Страница 24: ...he camera to PC via the USB cable 24 Ⅱ INSTALLATION 20 Turn the camera power on The Found New Hardware Wizard will open and the computer will recognise the camera If your OS is Windows XP an image viewer program will open If the download window of Digmax Master opens after starting Digimax Master the camera driver was setup successfully ...

Страница 25: ... If you connect the camera to the PC before installing the camera driver the Found New Hardware Wizard will open In this case cancel the Found New Hardware Wizard and disconnect the camera Install the camera driver and connect the camera to the PC again Should the computer not find the camera driver after installation please try one or more of the following measures 1 Delete the camera driver and ...

Страница 26: ...26 Ⅲ EXPLODED VIEW AND PART LIST 1 6 1 7 1 8 1 9 1 8 1 4 1 10 1 2 1 5 1 1 1 3 1 MAIN_1 ASSEMBLY ...

Страница 27: ...28 Ⅲ EXPLODED VIEW AND PART LIST 2 15 2 10 2 10 2 10 2 13 2 14 2 16 2 7 2 6 2 5 2 4 2 9 2 3 2 1 2 8 2 2 2 11 2 12 2 MAIN_2 ASSEMBLY ...

Страница 28: ...30 Ⅲ EXPLODED VIEW AND PART LIST 3 4 3 5 3 6 3 6 3 7 3 1 3 3 3 2 3 MAIN_3 ASSEMBLY ...

Страница 29: ...32 Ⅲ EXPLODED VIEW AND PART LIST 4 24 4 20 4 8 4 11 4 11 4 8 4 6 4 4 4 10 4 12 4 16 4 22 4 21 4 17 4 18 4 19 4 23 4 15 4 13 4 14 4 25 4 3 4 5 4 2 4 2 4 26 4 1 4 2 4 7 4 9 4 BODY ASSEMBLY ...

Страница 30: ...34 Ⅲ EXPLODED VIEW AND PART LIST 5 16 5 11 5 20 5 20 5 2 5 4 5 20 5 20 5 17 5 18 5 17 5 18 5 1 5 3 5 19 5 7 5 9 5 8 5 10 5 6 5 13 5 12 5 13 5 15 5 21 5 14 5 5 5 FRONT COVER_1 ASSEMBLY ...

Страница 31: ...36 Ⅲ EXPLODED VIEW AND PART LIST 6 18 6 19 6 5 6 12 6 5 6 9 6 17 6 16 6 15 6 8 6 7 6 11 6 10 6 14 6 6 6 4 6 2 6 3 6 1 6 13 6 22 6 21 6 23 6 20 Double tape location 6 FRONT COVER_2 ASSEMBLY ...

Страница 32: ...38 Ⅲ EXPLODED VIEW AND PART LIST 7 19 7 14 7 1 7 2 7 3 7 4 7 5 7 15 7 16 7 17 7 18 7 27 7 23 7 22 7 25 7 26 7 24 7 9 7 8 7 12 7 10 7 6 7 11 7 13 7 7 7 20 7 21 7 28 7 BACK COVER ASSEMBLY ...

Страница 33: ...40 Ⅲ EXPLODED VIEW AND PART LIST 8 9 8 7 8 1 8 9 8 9 8 6 8 5 8 4 8 17 8 16 8 18 8 19 8 20 8 20 8 20 8 15 8 3 8 2 8 8 8 14 8 13 8 10 8 24 8 11 8 12 8 12 8 13 8 21 8 23 8 22 8 TOP COVER ASSEMBLY ...

Страница 34: ...42 Ⅲ EXPLODED VIEW AND PART LIST 9 8 9 15 9 5 9 10 9 9 9 3 9 4 9 6 9 7 9 2 9 1 9 11 9 14 9 13 9 12 9 12 9 SHOEBASE_1 ASSEMBLY ...

Страница 35: ...XPLODED VIEW AND PART LIST 10 10 10 9 10 7 10 5 10 4 10 12 10 10 10 25 10 20 10 14 10 20 10 20 10 22 10 1 10 8 10 6 10 23 10 18 10 21 10 17 10 19 10 16 10 13 10 15 10 11 10 24 10 2 10 3 10 SHOEBASE_2 ASSEMBLY ...

Страница 36: ...39 11 28 11 29 11 25 11 12 11 5 11 13 11 7 11 15 11 16 11 8 11 10 11 11 11 14 11 9 11 3 11 1 11 2 11 24 11 18 11 37 11 37 11 36 11 35 11 32 11 38 11 38 11 40 11 41 11 30 11 31 11 34 11 19 11 20 11 21 11 22 11 17 11 26 11 27 11 4 11 23 11 33 11 OTHERS ASSEMBLY ...

Страница 37: ...48 Ⅲ EXPLODED VIEW AND PART LIST 12 PACKING ITEM_1 12 10 12 12 12 1 12 2 12 9 12 4 12 5 12 8 12 3 12 6 12 14 12 13 12 11 ...

Страница 38: ...50 Ⅲ EXPLODED VIEW AND PART LIST Ⅲ EXPLODED VIEW AND PART LIST 13 PACKING ITEM_2 13 1 13 12 13 5 13 6 13 7 13 8 13 2 13 10 13 9 13 11 13 3 13 4 ...

Страница 39: ...AD92 00222A TOP PCB ASSY 1 O 2 5 Q7211079701A AD81 03413A TOP LCD HOLDER 1 O 2 6 Q0704011101A AD81 00196A SEC LCD 1 O 2 7 Q7011052102A AD81 02783A TOP LCD PRESSURE 1 O 2 8 Q9008088501A AD92 00223A CARD FPCB ASSY 1 O 2 9 Q7103003003A AD81 03048A STRAP R 1 O 2 10 Q9611173007 6002 001419 SCREW 5 X 2 11 Q4101032501A AD81 00807A LENS FPCB 1 O 2 12 Q4101032301A AD81 00806A CCD FPCB 1 O 2 13 Q9761173507 ...

Страница 40: ...R ASSY 1 O 4 17 Q7217344602B AD81 08317A CARD DOOR 1 O 4 18 Q7017045403B AD81 02979A CARD DOOR PLATE 1 O 4 19 Q7017047501B AD81 02985A CARD DOOR GUIDE PLATE 1 O 4 20 Q6003047701A 6003 001674 SCREW 1 X 4 21 Q7411116801A AD81 05331A CARD DOOR HINGE 1 O 4 22 Q6107062701A AD81 07585A CARD DOOR SPRING 1 O 4 23 Q7011052002A AD81 07610A BATTERY LOCK SPRING 1 O 4 24 Q9761172507 6003 001686 SCREW 5 X 4 25 ...

Страница 41: ...01690 SCREW 3 X 6 6 Q7217341902A AD81 08296A AF WINDOW 1 O 6 7 Q6107044603A AD81 07983A RELEASE BUTTON SPRING 1 O 6 8 Q7217342202A AD81 04348A RELEASE BUTTON 1 O 6 9 Q7308015402A DNA GRIP 1 X 6 10 Q7217341801A AD81 04347A REMOCON WINDOW F 1 O 6 11 Q7217350901A AD81 08320A REMOCON WINDOW S 1 O 6 12 Q7409145101A AD81 07622A BUTTON WASHER 1 X 6 13 Q7409191701A AD81 05027A MAIN CONDENSER TAPE 1 O 6 14...

Страница 42: ...A MAIN LCD HOLDER 1 O 7 19 Q9761173007 6003 001687 SCREW 7 X 7 20 Q7217343703A AD81 04357A EYEPIECE WINDOW 1 O 7 21 Q7308015502A AD81 04696A EYEPIECE RUBBER 1 O 7 22 Q7409210501A AD81 05084A MAIN LCD TAPE C 2 O 7 23 Q7409195601A AD81 05042A EYEPIECE WINDOW TAPE 2 O 7 24 Q7409192101A DNA EYEPIECE TAPE_A 1 X 7 25 Q7409195601A AD81 05042A EYEPIECE WINDOW TAPE 2 X 7 26 Q7409192202A DNA EYEPIECE TAPE_B...

Страница 43: ...982A STROBO LOCK LEVER ASSY 1 O 9 4 Q6107061802A AD81 07584A LOCK SPRING 1 O 9 5 Q9611172007 6003 001683 SCREW 1 X 9 6 Q3301001601A AD33 00065A SOLENOID 1 O 9 7 Q7214088103B AD81 08233A SOLENOID COVER 1 O 9 8 Q6003047502B 6003 001706 SCREW 1 X 9 9 Q7014005201A AD81 02914A SHOE BASE B 1 O 9 10 Q4101032201A AD81 00805A STROBO MAIN FPCB 1 O 9 11 Q7214087802A AD81 08231A SHOE BASE A 1 O 9 12 Q74111182...

Страница 44: ...7594A STROBO POP UP SPRING 1 O 10 25 Q9761173007 6003 001687 SCREW 2 X 11 1 Q7217344904C AD81 04365A BATTERY COVER 1 O 11 2 Q7217345004B AD81 08319A BATTERY OPEN LEVER 1 O 11 3 Q7017045203A AD81 02977A BATTERY LOCK CAM 1 O 11 4 Q6107061601A AD81 07583A LOCK CONVERSION SPRING 1 O 11 5 Q7017045301A AD81 02978A BATTERY PLATE 1 O 11 6 Q6003042601A 6003 001701 SCREW 5 X 11 7 Q7211079804A AD81 03414A SP...

Страница 45: ...ULE COVER 1 O 11 37 Q9001106101A AD97 13764A JOG DIAL ASSY 2 O 11 38 Q7011051503A AD81 08029A JOG1 PLATE 2 O 11 39 Q9761173007 6003 001687 SCREW 2 X 11 40 Q3001000201A AD81 00519A SPEAKER 1 O 11 41 Q7409194801A AD81 08413A SPEAKER SHIELD SPONGE 1 O 12 1 Q6901214301A AD81 02391A HOOD INNER PAD 1 O 12 2 Q6901214401A AD81 02392A CABLE INNER PAD 1 O 12 3 Q7409199901A AD63 02577A STRAP 1 O 12 4 Q901005...

Страница 46: ...UIDE_DIGIMAX H1_DUT 1 X Q6806277701A DNA Q GUIDE_DIGIMAX H1_POR 1 X Q6806277801A AD81 01959A Q GUIDE_DIGIMAX H1_SWE 1 O Q6806277901A DNA Q GUIDE_DIGIMAX H1_DEN 1 X Q6806278001A DNA Q GUIDE_DIGIMAX H1_FIN 1 X Q6806278101A DNA Q GUIDE_DIGIMAX H1_RUS 1 X Q6806278201A DNA Q GUIDE_DIGIMAX H1_CHI S 1 X Q6806278301A DNA Q GUIDE_DIGIMAX H1_TUR 1 X Q6806278401A DNA Q GUIDE_DIGIMAX H1_IND 1 X Q6806278501A D...

Страница 47: ... O Q6807010903C 6801 001650 WARRANTY CARD_RUS 1 O Q6807011301B AD81 02236A WARRANTY CARD_TSOE CHINA 1 O Q6807009502E 6801 001647 CARD_PRODUCT MEXICO 1 O Q6807012101A 6801 001656 WARRANTY CARD_IRAN 1 O Q6901214601A AD81 02393A G T BOX_DIGIMAX_H1_KOR 1 O Q6901214701A AD81 02394A G T BOX_DIGIMAX_H1_EXP AUS USA CAN 1 O 13 10 Q6904027401A AD81 02591A POUCH_CAMERA 1 O Q6804092801A DNA SALES POINT TAG_PR...

Страница 48: ... problems 2 Checking the camera Checking the camera with priority given to the exact problems to find overall malfunctions 3 Repairing the camera Repair the camera malfunctions found at the step 2 4 Inspection After repairing the camera inspect all of the camera functions The illustrations may be different from the real display in accordance with the camera model 1 Checking the camera and Inspecti...

Страница 49: ... XP 3 Driver CD by camera models S W CDs for installing a camera driver 4 USB HUB For using all kinds of USB cable at a time 5 USB cable by camera models For checking file transference upload and download by camera models 6 Chart for checking colors For checking color and image resolution before or after camera repair 7 TV MONITOR For checking video output and whether NTSC PAL can be selected 8 Me...

Страница 50: ...r keeping various camera parts and disassembled camera parts 5 Anti electricity mat For repairing table made from anti electricity material 6 Soldering sponge For removing solder 7 Air pump For removing various kinds of dust 8 LIGHT BOX Color temperature 5100 9 POWER SUPPLY 7 5V 2 0A 10 Soldering iron Soldering iron that can select temperature 11 Tester Portable tester that can test AC DC Ω ect 12...

Страница 51: ...ipments have to be arranged No Device Description 1 AE TESTER For tuning AE and STROBE 2 AWB LIGHT For checking and tuning AWB SOURCE BOX 3 COLOR chart For checking AWB and color of images 4 AF chart For tuning AF 5 Chart for checking resolution For checking image resolution 6 TRIPOD ...

Страница 52: ... check whether the images play back on the external monitor 6 Check whether the green LED is blinking SAMSUNG LOGO is on and the start up sound sounds Check the L and FINE icon on the LCD monitor Check whether the AE function is correct at the low light and high light condition Check whether the beep sounds on the recording and movie clip mode The beep can be sounded in the microphone part Check t...

Страница 53: ...s frame 15 Check whether the mode dial is rotated with the equal force Check whether each camera mode can be recognized correctly 16 Check whether there are unclear part dim part noticeable flare noise ghost image and smear 17 Check whether all images are deleted 18 Check whether the NO IMAGE message is displayed on the LCD monitor Check whether the LARGE FINE icon and 0018 number are displayed Ch...

Страница 54: ...Equipments for adjustment Equipments AE TESTER AE TESTER can test upto LV 16 7 POWER SUPPLY 7V 2A Chart Focus chart Gray chart 2 How to check the FIRMWARE VERSION 1 Turn on the camera 2 Use the AC ADAPTER or fully charged battery PROCESS MAIN STROBO BARREL CCD CODE PCB PCB ASS Y FIRMWARE UPGRADE CCD DEFECT CELL 6 FOCUS ADJ 2 SHUTTER CLOSE TIME ADJ 7 FLASH ADJ 13 BATTERY LEVEL 5 OB SETTING 15 BURNI...

Страница 55: ... de e 0 0 1 1 C Co on nf fi ir rm m v ve er rs si io on n 2 2 R Re es se et t A Al ll l i in n f fa ac ct to or ry y m mo od de e 3 3 M Mi ic co om m m mo on ni it to or ri in ng g 4 4 U Up pg gr ra ad de e f fi ir rm mw wa ar re e 5 5 U Up pg gr ra ad de e B Bo oo ot t L Lo oa ad de er r 6 6 D De eb bu ug g m me en nu u D DS SP P F FI IR RM MW WA AR RE E V VE ER RS SI IO ON N D DE EV V S ST TE EP...

Страница 56: ...of data stored in the memory will be deleted You must backup the data before updating The firmware file name must be H1_MAIN elf and use the AC ADAPTOR or fully charged battery 1 Connect the AC ADAPTOR and insert a CF CARD that has the firmware And then turn on the camera 3 Menus for developer will display To update the firmware select 4 Upgrade firmware and press the OK button ...

Страница 57: ...el lo op pe er r m mo od de e 1 1 C Co on nf fi ir rm m v ve er rs si io on n 2 2 R Re es se et t A Al ll l i in n f fa ac ct to or ry y m mo od de e 3 3 M Mi ic co om m m mo on ni it to or ri in ng g 0 0 4 4 U Up pg gr ra ad de e f fi ir rm mw wa ar re e 5 5 U Up pg gr ra ad de e B Bo oo ot t L Lo oa ad de er r 6 6 D De eb bu ug g m me en nu u D DS SP P F FI IR RM MW WA AR RE E U UP PD DA AT TE E...

Страница 58: ...63 Ⅴ PATTERN DIAGRAM 1 PARTS ARRANGEMENT FOR EACH PCB ASS Y 1 MAIN_TOP ...

Страница 59: ...64 Ⅴ PATTERN DIAGRAM 2 MAIN_BOTTOM ...

Страница 60: ...65 Ⅴ PATTERN DIAGRAM 3 POWER_TOP ...

Страница 61: ...66 Ⅴ PATTERN DIAGRAM 4 POWER_BOTTOM ...

Страница 62: ...67 Ⅴ PATTERN DIAGRAM 5 STROBO_TOP ...

Страница 63: ...68 Ⅴ PATTERN DIAGRAM 6 STROBO_BOTTOM ...

Страница 64: ...69 Ⅴ PATTERN DIAGRAM 7 AFE_TOP ...

Страница 65: ...70 Ⅴ PATTERN DIAGRAM 8 AFE_BOTTOM ...

Страница 66: ...71 Ⅴ PATTERN DIAGRAM 9 TOP ...

Страница 67: ...72 Ⅴ PATTERN DIAGRAM 10 TOP ...

Страница 68: ...or and Card Door S W 3 Check the assembling condition of CCD FPCB and MAIN PCB 1 Check the assembling condition of Main PCB and Card FPCB 2 Check the condition of Q1 in the Main PCB When an incorrect CF CARD is inserted Q1 may be damaged It causes camera malfuction If the comsumption of current comes down from 200 to 0mA After inserting the CF CARD the camera can t operate Main parts of the Power ...

Страница 69: ...74 Ⅵ TROUBLESHOOTING ...

Страница 70: ...nt comes down from 200mA to 0mA after turning on the camera Door Switch BATTERY L W Check the connection of JOG FPCB and MAIN PCB If the F1 FUSE is damaged there is no the consumption of current 0mA after turning on the camera Q5 If the Q5 is damaged the camera can t be turned on ...

Страница 71: ...ncorrect CF CARD is inserted Q1 may be damaged It cause camera malfunction If the assembling condition of CCD FPCB and LENS FPCB is bad the current comes down from 200mA to 0mA and the camera can t operate LENS F PCB CCD F PCB Q1 ...

Страница 72: ...is displayed on the external monitor it is CCD related error Refer to the Defect related to the CCD MAIN PCB error Check whether an image is displayed on the TOP EVF LCD Check the connection of each LCD 1 Check the connection of the 3 5 LCD FPCB 2 Check the connection of the TOP LCD FPCB 3 Check the connection of the EVF FPCB If an LCD has problem refer to the troubleshooting of each LCD YES YES Y...

Страница 73: ... TROUBLESHOOTING The TOP LCD is whitened The LCD FPCB is torn Check the assembling condition of TOP LCD FPCB Check the assembling condition of the 3 5 TFT LCD FPCB Check the assembling condition of EVF FPCB ...

Страница 74: ...smebling error of Shutter F PCB on the AFE PCB When the L1 and D1 on the TOP PCB has error or LCD Driver IC pattern No 25 26 has short circuit EVF noise will be happend EVF noise Cause Solution Assembling error of Shutter F PCB LCD Driver IC The C34 has error there is a noise on the TOP LCD ...

Страница 75: ... 2 If an image is displayed check the parts of LCD and LCD FPCB 3 If an image is not displayed the MAIN PCB has error 4 If the connection has no problem but no image is display the CCD has error Shutter error CCD error FOCUS error Play back error Images are not displayed Pattern is cut off caused by assmebling error of Shutter F PCB on the AFE PCB Assembling error of Shutter F PCB ...

Страница 76: ...tion of CCD FPCB and LENS FPCB Check the assembling condition of Shutter FPCB and short of pattern Check the assembling condition of AFE PCB and Shutter FPCB As for the PRO 815 when the AFE PCB is changed CCD alignment must be done The CCD aligned Total Barrel Ass y of service part that has assembled AFE PCB and Barrel Ass y is supplied YES YES NO NO NO DO NOT TOUCH A screw for CCD Alignment If th...

Страница 77: ...in Condenser L W 2 Check the condition of parts of Main Condeser 1 Check the condition of the Transformer T2 2 Check the condition of the Q12 1 Check the assembling condition of Shoe Ass y Strobe FPCB and Top PCB 2 Check the connection of Strobe PCB and Strobe FPCB Check the parts on the Strobe PCB Check the connection of the Shoe and Top PCB Change the Strobe PCB YES NO Main condenser ...

Страница 78: ...83 Ⅵ TROUBLESHOOTING Check the connection of Strobe PCB and Strobe FPCB Main Condenser L W U11 T2 Transformer Q15 IGBT Q11 Q12 ...

Страница 79: ...g 1 Check the assembly condition of Shoe Ass y Strobe FPCB and Top PCB 2 Check the connection of Strobe PCB and Strobe FPCB Check the condition of Trig Coil Check the condition of IGBT Q15 Check the connection of Shoe and Top PCB Change the Strobe PCB NO YES Trig Coil How to check the Q15 IGBT 1 2 3 4 about 4 7KΩ 1 2 3 5 6 7 8 and 4 5 6 7 8 hundreds of KΩ1 2 3 5 6 7 8 and 4 5 6 7 8 hundreds of MΩ ...

Страница 80: ...assembling condition of Strobe Lock Lever and Solenoid There is short circuit between the Solenoid and Shoe Plate 1 There is short circuit between the Solenoid and Shoe Plate 2 Check the Strobe Detect SW Switch error Short circuit of around the SW When the camera is turned on the flash POP UP unit is opened After pop up the flash unit it can t be closed Check the assembling condition of POP UP spr...

Страница 81: ...and Strobe F PCB Check the Strobe Detect SW Check the soldering condition of Solenoid Check the assembling condition of Strobe Lock Lever and Solenoid There is short circuit between the Solenoid and Shoe Plate Check the assembling condition of Pop up Spring ...

Страница 82: ...heck the condition of Q1 on the Main PCB When an incorrect CF card is inserted Q1 may be damaged It causes camera malfunction 1 Check the condition of Card Pin 2 Check the soldering condition of Card FPCB 3 Check whether thc Card FPCB is torn or not Check the connection of card F PCB When the camera is turned on after inserting the card camera can t operate Check the condition of Card F PCB Change...

Страница 83: ...88 Ⅵ TROUBLESHOOTING Check the assembling condition of Card FPCB and Main PCB Check the Card Pin soldering condition and tear of FPCB DO NOT WASH ...

Страница 84: ...ion of Swiches dirt of Mode dial contactor Check the assembling condition of Top F PCB and Top PCB Check the breakage modification or dirt of Contactor switch Check the Mode dial Contact switch NO YES YES NO Check the assembling condition of Top F PCB and Top PCB Check the modification of Mode dial contactor modification of Top FPCB pattern and dirt ...

Страница 85: ... soldered be careful of breakage by a high temperature Check the condition of parts of speaker and microphone Check the soldering condition of speaker and L W of microphone Check the condition of around the U19 U20 U19 AUDIO AMP U20 AUDIO CODEC Check the parts of Main PCB U19 Top side U20 Bottom side SPK L MIC L MIC R SPK R ...

Страница 86: ...ed to the USB AV and DC jack Check the condition of jacks on the Power PCB Check the assembling condition of Power PCB and Main PCB USB JACK DC JACK AV JACK Check the assembling condition of Power PCB and Main PCB AV JACK USB JACK DC JACK ...

Страница 87: ...eful of below caution F PCB type CCD IR CUT PCB type CONTACT type When assembling the F PCB to the CONNECTOR by using pincette be careful of tearing and hooking Be careful of the handprinting while handling them Using the pincette which has soft tip The spot will be shown by using normal alchol when cleaning them Do the repairing where is no dust Wearing the band which cuts off the electric curren...

Страница 88: ...sassemble the CARD F PCB 6 Disassemble the MIDDLE COVER ASS Y 7 Disassmble the MAIN PCB 8 Disassemble the BATTERY COVER ASS Y 9 Disassemble the BARREL ASS Y 10 Disassemble the SUB PCB ASS Y 11 Disassemble the LCD Assembly is the opposite way of disassembly When you assemble the camera make sure that the FRONT COVER should be assembled first The order of disassembly ...

Страница 89: ...94 Ⅶ SERVICE INFORMATION 1 Remove the screws a X 1 b X 1 2 Remove the screws c X 1 d X 1 b screw is located under the GRIP 3 Remove the screws located under the camera body e X 4 b a c d e ...

Страница 90: ...emble the camera as shown The battery cover must be opened 5 When disassembling the Back cover remove the LCD F PCB and R BACK F PCB from connector carefully 6 Disassemble the Top cover When disassembling remove the TOP F PCB carefully ...

Страница 91: ...ICE INFORMATION 8 Disassemble the Power PCB When disassembling take care of MAIN PCB and CONNECTOR f BAT BAT STROBO 7 To disassemble the Power PCB remove the screws and L W f X 2 6 Back cover is disassembled BAT ...

Страница 92: ...CE INFORMATION g h 9 To disassemble the Card F PCB remove the screws g X 2 10 Disassemble the Card F PCB In this case take care of a point fixed with a double stick tape 11 Remove the Card F PCB from the Main PCB ...

Страница 93: ...s and Side F PCB i X 4 Remove the speaker and microphone L W 15 To disassemble the TOP LCD remove TOP LCD PRESSURE When disassembling the LOCK part use the tweezers i SIDE F PCB j 14 To disassemble the finder remove screws j X 4 SPK_R MIC_L MIC_R MIC_R SPK_L SPK_L MIC_L SPK_R ...

Страница 94: ...r disassembling the LCD PRESSURE remove the screws on the LCD BOLDER k X 2 17 After removing the LCD PRESSURE from the LCD HOLDER 18 Disassemble the TOP PCB from the MAIN PCB When disassembling take care of the MAIN PCB and TOP PCB k ...

Страница 95: ...Disassemble the finder with TOP PCB 20 Disassemble the CCD F PCB Condenser connected with the Main PCB and Lens F PCB condeser 21 The Main PCB is disassembled To disassemble the Barrel remove the screws l X 4 CCD F PCB LENS F PCB l ...

Страница 96: ...101 Ⅶ SERVICE INFORMATION 22 Remove the screws on the Tripod m X 2 n X 2 23 Disassemble the Bottom cover and Tripod 24 Disassemble the Barrel n m ...

Страница 97: ...102 Ⅶ SERVICE INFORMATION 25 To disassemble the Side cover remove the screws o X 2 26 Disassemble the Side cover 27 To disassemble the Front cover remove the screws p X 4 o p ...

Страница 98: ...103 Ⅶ SERVICE INFORMATION 28 Disassemble the Barrel holder plate 29 To disassemble the Body and Front cover remove the screws q X 4 30 Disassemble the Body and Front cover q ...

Страница 99: ...4 Ⅶ SERVICE INFORMATION 31 Disassemble the Shoe spring from the Shoe Shoe Shoe spring How to disassemble Lift up the front of the Shoe spring and push it back 32 Push aside the Shoe spring and disassemble ...

Страница 100: ...105 Ⅶ SERVICE INFORMATION 33 To disassemble the Shoe ass y remove the screws r X 2 34 Remove the screws on the front of the Shoe ass y s X 2 35 Disassemble the Shoe ass y r s ...

Страница 101: ...106 Ⅶ SERVICE INFORMATION 36 Remove the Main Condenser L W 37 Disassemble the Shoe ass y 38 After disassembing the Shoe ass y White Purple ...

Страница 102: ...MI SHEET Q7409208801A BARREL HOLDER PLATE TAPE Q7409194601A SHUTTER EMI SHEET Q7409209701A SENSOR EMI SHEET Q7409209601A AFE PCB EMI SHEET Q7490209001A AF MOTOR EMI SHEET Q7409208801A SHUTTER EMI SHEET Q7409209701A MICOM EMI SHEET Q7409209501A AFE SUB PCB TAPE Q7409209801A AFE SUB COPPER TAPE Q7490210001A ...

Страница 103: ...108 Ⅶ SERVICE INFORMATION 3 POWER PCB ASS Y BATTERY SUB CONTACT TAPE X 2 Q7409167501A 4 FINDER ASS Y EVF EMI SHEET Q7409209101A ...

Страница 104: ...109 Ⅶ SERVICE INFORMATION 5 BARREL HOLDER PLATE BARREL HOLDER PLATE TAPE Q7409194601A 6 BODY BODY TAPE A Q7409195801A AF MOTOR EMI SHEET X 2 Q7409208801A ...

Страница 105: ...ERVICE INFORMATION STROBO WITE TAPE Q7409193001A AF MOTOR EMI SHEET X 2 Q7409208801A SENSOR EMI TAPE Q7409209601A JOG FPCB EMI TAPE A Q7409209201A JOG FPCB EMI TAPE B Q7409209301A BODY COPPER TAPE Q7409209901A ...

Отзывы: