background image

English - 7

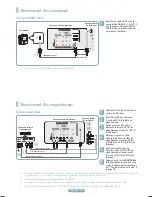
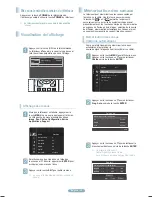
1


Débrancher le câble ou l’antenne à 

l’arrière du téléviseur.

2

Brancher le câble ou l’antenne 

à l'entrée ANT IN à l’arrière du 

magnétoscope.

3


Reliez au moyen d’un câble 

d’antenne la borne ANT OUT du 

magnétoscope et la borne ANT IN 

du téléviseur.

4


Relier au moyen d’un câble 

vidéo la prise de sortie vidéo du 

magnétoscope et la prise AV IN 1 

[Y/VIDEO] ou AV IN 2 [VIDÉO] du 

téléviseur.

5


Raccorder les câbles audio 

entre les sorties AUDIO OUT du 

magnétoscope et les entrées AV 

IN 1(ou AV IN 2) [R-AUDIO-L] du 

téléviseur.

6


Appuyez sur la touche 

SOURCE

 de 

la télécommande jusqu’à que vous 

voyiez le signal du boîtier décodeur 

(voir "Pour sélectionner la source" à 

la page 10).

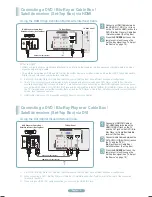
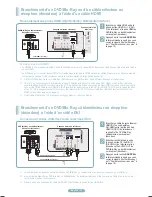
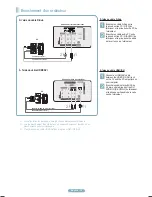
1


Brancher un câble HDMI entre la 

prise d'entrée HDMI IN (1, 2(DVI), 3 

) du téléviseur et la prise HDMI du 

DVD/Blu-Ray ou du câblosélecteur 

ou récepteur (décodeur).

Branchement d’un magnétoscope

Branchement Vidéo

   Si le magnétoscope est un modèle “mono” (non stéréo), relier les prises d’entrée audio droite et gauche du téléviseur au moyen d’

un connecteur en Y (non fourni). Il est également possible de brancher le câble à la prise “R”.

  Le panneau arrière de chaque magnétoscope est différent.

  Lors du branchement d’un magnétoscope, les couleurs du câble et de la borne de branchement doivent correspondre.

  La couleur de la prise d’entrée AV IN 1 [Y/VIDEO] (vert) ne correspond pas à la couleur du câble vidéo (jaune).

Using an HDMI Cable

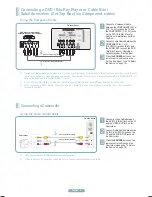
  Each Camcorder has a different back panel configuration.

Branchement d’un caméscope

3

4

5

or

Panneau latéral  

du téléviseur

Panneau arrière du téléviseur

Câble HDMI (non fourni)

Caméscopes

Panneau arrière du

magnétoscope

Panneau latéral  

du téléviseur

Câble vidéo (non fourni)

Câble audio (non fourni)

Panneau arrière du téléviseur

Câble d’antenne (non fourni)

2144B.indb   17

2009-03-10   오후 6:48:35

Содержание PN50B540S3F

Страница 1: ...07660 0511 Samsung Electronics Canada Inc Customer Service 55 Standish Court Mississauga Ontario L5R 4B2 Call center hours of operation Mon Sun 9AM 12AM EST www samsung com register 1 POWER IN 2 AUDI...

Страница 2: ...o quickly select frequently used functions 9 UP DOWN LEFT RIGHT ENTER Use to select on screen menu items and change menu values 0 INFO Press to display information on the TV screen COLOR BUTTONS Use t...

Страница 3: ...ltimedia interface is an interface that enables the transmission of digital audio and video signals using a single cable The difference between HDMI and DVI is that the HDMI device is smaller in size...

Страница 4: ...Satellite receiver Set Top Box has a different back panel configuration When connecting a DVD Blu Ray Player or Cable Box Satellite receiver Set Top Box match the color of the connection terminal to...

Страница 5: ...e a mono non stereo VCR use a Y connector not supplied to connect to the right and left audio input jacks of the TV Alternatively connect the cable to the R jack If your VCR is stereo you must connect...

Страница 6: ...DTV air signal the TV will send out 5 1 channel sound to the Home theater receiver When the source is a digital component such as a DVD and is connected to the TV via HDMI only 2 channel sound will be...

Страница 7: ...ct a 3 5 mm Stereo plug to 2RCA cable between the DVI AUDIO IN R AUDIO L jack on the TV and the Audio Out jack of the sound card on your computer Connecting a PC Each PC has a different back panel con...

Страница 8: ...y the menu Press the or button to select Channel then press the ENTER button Press the or button to select Auto Program then press the ENTER button Press the or button to select an antenna connection...

Страница 9: ...ton Press the EXIT button to exit You can select the type of picture which best corresponds to your viewing requirements Press the MENU button to display the menu Press the ENTER button to select Pict...

Страница 10: ...pecific types of video input Your satellite receiver may have its own set of screen sizes as well In general though you should view the TV in 16 9 mode as much as possible Press the MENU button to dis...

Страница 11: ...l High visual quality If the original production method is analog The digital program displayed on the screen is originally an analog program which has been converted to digital The visual quality is...

Страница 12: ......

Страница 13: ...660 0511 Samsung Electronics Canada Inc Customer Service 55 Standish Court Mississauga Ontario L5R 4B2 Centre d appel heures de service du lundi au dimanche de 9 h 12 h HNE www samsung com global regi...
Страница 14: ...iliser ces touches partir de la liste des canaux WISELINK etc MEDIA P Media Play Lecture m dia Cette fonction vous permet de visualiser des photographies et d couter des fichiers musicaux depuis un ap...

Страница 15: ...DMI La HDMI est une interface multim dia haute d finition qui permet la transmission de signaux num riques audio et vid o l aide d un seul c ble La diff rence entre les interfaces HDMI et DVI r side d...

Страница 16: ...de sortie AUDIO OUT du DVD Blu Ray ou du c blos lecteur ou r cepteur d codeur Appuyez sur la touche SOURCE de la t l commande jusqu que vous voyiez le signal du bo tier d codeur voir Pour s lectionner...

Страница 17: ...du DVD Blu Ray ou du c blos lecteur ou r cepteur d codeur Branchement d un magn toscope Branchement Vid o Si le magn toscope est un mod le mono non st r o relier les prises d entr e audio droite et g...

Страница 18: ...es de verre Un syst me transmet des signaux audionum riques sous forme d ondes lumineuses le format S PDIF par le biais d un conducteur en verre Branchement d un syst me audionum rique La diffusion au...

Страница 19: ...o 2RCA de 3 5 mm entre la prise d entr e DVI AUDIO IN R AUDIO L du t l viseur et la prise de sortie audio de la carte son de l ordinateur Branchement d un ordinateur La configuration du panneau arri...

Страница 20: ...touche MENU pour afficher le menu Appuyer sur la touche ou pour s lectionner Cha ne suivie de la touche ENTER Appuyer sur la touche ou pour s lectionner Prog Auto suivie de la touche ENTER Appuyer sur...

Страница 21: ...er Oui suivie de la touche ENTER Appuyer sur la touche EXIT pour quitter Il est possible de choisir le type d image qui correspond le plus ses exigences Appuyer sur la touche MENU pour afficher le men...

Страница 22: ...onner au mieux avec des types d entr es vid o particuli res Votre r cepteur satellite peut galement offrir ses propres tailles d cran En r gle g n rale toutefois il est conseill d utiliser le mode 16...

Страница 23: ...es varie La qualit des images des canaux peut varier en fonction du mode de diffusion analogique ou num rique Si la m thode de production d origine est num rique Qualit visuelle sup rieure Si la m tho...

Страница 24: ...ress CANADA 1 800 SAMSUNG 7267864 www samsung com ca Samsung Electronics Canada Inc Customer Service 55 Standish Court Mississauga Ontario L5R 4B2 Canada Samsung Electronique Canada Inc Service la Cli...

Отзывы: