background image

42

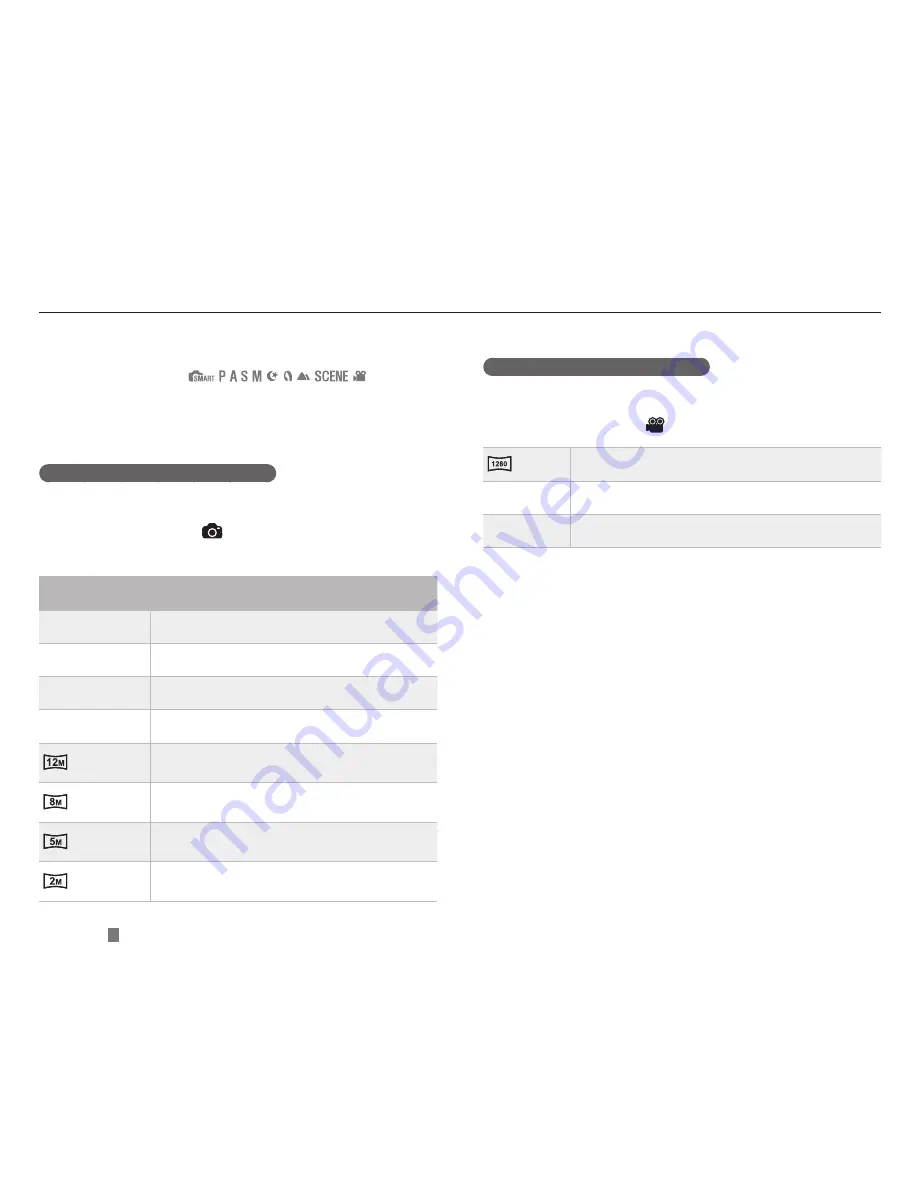
Setting a resolution 

To capture the high level of detail and excellent image quality in your 
picture or video, it is a good idea to set the resolution to the highest 
setting. The main drawback is that the file size becomes relatively big.

  Setting the resolution of picture  

1

  In Shooting mode, press 

[MENU]

.

2

 Select

 Shooting 1 

(

1


Photo Size


 an 

option.

Picture size 

(display ratio)

Proper use

14

M

4592 x 3056 

(3:2)

When developing in the maximum size of A1

10

M

3872 x 2592 

(3:2)

When developing in the maximum size of A2

6

M

3008 x 2000 

(3:2)

When developing in the maximum size of A3

2

M

1920 x 1280 

(3:2)

When developing in the maximum size of A5  

4592 x 2584 

(16:9)

When outputting to HDTV or developing in 
the A1 size (16:9)

3872 x 2176 

(16:9)

When outputting to HDTV or developing in 
the A3 size (16:9)

3008 x 1688 

(16:9)

When outputting to HDTV or developing in 
the A4 size (16:9)

1920 x 1080 

(16:9)

When outputting to HDTV or developing in 
the A5 size (16:9) 

  Setting the resolution of video  

1

 Press 

[MENU]

 in the video shooting mode.

2

 Select

 Shooting 1 

(

1


Movie Size


 an option.

1280  

(16:9)

When outputting to HDTV

640

640  

(4:3)

When outputting to normal TV

320

320  

(4:3)

When uploading and using on the web

Setting the resolution and quality

The function can be set directly by pressing [

Fn

] in the shooting mode.

Содержание NX10

Страница 1: ...d usage instructions for your camera Please read this manual thoroughly User Manual NX10 Click a topic Quick reference Contents Basic functions Basic shooting Extended shooting functions Playback Editing Camera settings menu Appendixes ...

Страница 2: ...allowed Moving parts and accessories may present physical dangers as well Prevent damage to subjects eyesight Do not use the flash in close proximity closer than 1 m 3 ft to people or animals Using the flash too close to your subject s eyes can cause temporary or permanent damage Handle and dispose of batteries and chargers with care Use only Samsung approved batteries and chargers Incompatible batt...

Страница 3: ...to very cold or very hot temperatures below 0º C 32º F or above 40º C 104º F Extreme temperatures can reduce the charging capacity of your batteries and can cause memory cards to malfunction Prevent batteries from making contact with metal objects as this can create a connection between the and terminals of your battery and lead to temporary or permanent battery damage Prevent memory cards from ma...

Страница 4: ...he OpenSourceInfo pdf in the provided CD ROM Copyright information Microsoft Windows and the Windows logo are registered trademarks of the Microsoft Corporation HDMI the HDMI logo and the term High Definition Multimedia Interface are trademarks or registered trademarks of HDMI Licencing LLC QuickTime and QuickTime logo are trademarks or registered trademarks of Apple Computer Inc used under licence...

Страница 5: ...de dial The diagram below shows the status has been changed to Directional Keys in the User s Manual When explaining the steps needed for navigating the menu the up down left and right directional arrows are shown below Ex Executing the Play mode The user can check saved pictures and movies 1 Press Show most recently saved files 2 Check the following pictures sequentially by using Adjusting the exp...

Страница 6: ...ay when selecting a menu or option within the step Example Select Shooting 1 1 Quality represents select Shooting 1 1 and then Quality Comment explaining symbols Abbreviations used in this manual Abbreviations Explanation AF Auto Focus Auto focus BKT Bracketing Bracketing DPOF Digital Print Order Format Printing order mark EV Exposure Value Exposure value OIS Optical Image Stabilization Optical im...

Страница 7: ...ife Background the objects around the subject Composition the combination of a subject and background Subject Subject Background Background Composition Composition Exposure Brightness The amount of light that enters your camera determines the exposure You can alter the exposure with shutter speed aperture value and ISO speed By altering the exposure your photos will be darker or lighter Normal exp...

Страница 8: ...ing 112 Taking photos of people mode Beauty Shot 46 Red eye reduction 55 Face Detection AF 62 Taking photos at night or in the dark mode 44 Flash setting options 54 ISO speed setting 58 Taking action photos mode 41 Continuous Burst shooting 71 Taking photos of text insects or flowers mode Close up shot 38 Using the White Balance 66 Adjusting the exposure brightness ISO speed setting 58 Adjusting ex...

Страница 9: ...ing your camera correctly 31 Image stabilization 31 Half pressing the shutter button 31 Preventing your subject from being out of focus 32 Setting the automatic manual focus function 33 Zooming 33 Optical Image Stabilization OIS 34 Using the OIS in the menu option 35 Depth preview 36 Basic shooting 37 Using the Smart Auto mode 38 Using the Program mode 39 Using the Aperture Priority Shutter Priori...

Страница 10: ...rately 57 Adjusting the ISO sensitivity 58 Focusing methods 59 Changing the Focusing methods 59 AF Priority 59 Using the AF assist light 60 Changing the focus area 60 Setting the focus of the selected area 61 Face detection 62 Normal face detection 62 Self portrait face detection 63 Brightness and color adjustment of picture 64 Adjusting the exposure brightness 64 Exposure adjustment 64 Changing t...

Страница 11: ...our computer 91 For Windows users 91 For Mac users 94 Using Samsung Master 95 Using the Samsung RAW Converter 96 Correcting the exposure 97 Handling the JPEG TIFF files as you edit RAW files 98 Saving the RAW files into JPEG or TIFF format 98 Printing photos with a photo printer PictBridge 99 Camera settings menu 100 Camera settings menu 101 Sound 102 Display 102 Normal setup 1 103 Normal setup 2 104...

Страница 12: ...tions for shooting Unpacking 13 Title and role of each part 14 Preparations before shooting 18 Turning on the power and initialization 23 Option menu selection method 26 Setting the display and sound 28 Simple picture taking method 30 Tips for getting a clearer photo 31 ...

Страница 13: ...products For more information about optional items see Accessories optional items p 120 Camera Body cap eye cup Hot shoe cover included USB cable AD39 00174A Battery AD43 00192A Strap AD63 04468A Software installation CD including user s manual AD46 00298A Quick Start Manual AD68 04529A Charger AD44 00157A AC power cable AD81 00681A ...

Страница 14: ...e mode button p 71 Diopter adjustment dial p 16 Use the green button The following setup values are initialized if the button is pushed once in the standby state for shooting Program shift Detailed setup of picture wizard Fine tuning of white balance Color Temp setting value Adjusting the colors of screen menu Timer Flash EV When selecting or setting AF shift the changed focus area to the center B...

Страница 15: ... cover p 19 Playback button p 77 Tripod mount Use of eye sensor Because the eye sensor enables the automatic conversion between the display and the electronic view finder EVF the shooting information is shown on the viewfinder of the camera as soon as the user uses the viewfinder Do not overlap the eye sensor with your hands or other materials Memory card slot Status lamp p 16 Memory card cover ME...

Страница 16: ...ar view Eye cup Removal of Eye cup When the camera is shipped the eyecup is attached to the viewfinder Push the Eye cup up as shown in the figure for removal Eyesight adjustment dial Status lamp In the case of saving a picture or shooting a movie this shows the operating status of the camera by blinking the status indicator lamp Blinking When saving photos recording movies being read by a computer...

Страница 17: ...ervice center to check the models compatible for use This user manual was prepared based on the SAMSUNG 18 55mm F3 5 5 6 OIS lens Please refer to the lens user manual for more information about the lens Lens contacts Lens hood mount Zoom ring Lens mount connecting point OIS switch p 34 AF MF switch p 33 Focus ring p 32 Lens ...

Страница 18: ...arging status Red Charging Green Fully charged Turned off or Yellow Charging error To remove the battery from the charger lift slightly in the direction of the arrow Please use designated charger or batteries for proper use SAMSUNG is not responsible for any accident that may occur from using a product other than designated NSER 1 2 N E T AC power code CHARGE INSERT Charging lamp Charger ...

Страница 19: ...Installing the battery When taking out the battery slightly pull down on the lock lever The battery may then be removed 2 Lock lever 1 Open by pushing in the direction of the arrow 3 Close by pushing down in the direction of the arrow ...

Страница 20: ...rd you can remove it by slightly pushing in the direction of insertion Please do not remove the memory card or battery while the status indicator lamp is blinking It may cause loss or data or product damage 1 3 2 After checking the direction of metal terminal you can insert the memory card ...

Страница 21: ...nting or dismounting the lens while the camera is powered off is desirable to ensure the stable operation of the lens SAMSUNG is not responsible for any accident damage or trouble caused by using other company s lens The body cap protects the product from scratch or dust while transporting Changing lenses should be made in an environment clean of foreign particles Foreign particles within the body...

Страница 22: ...22 Preparations before shooting Connecting the strap By connecting the strap to the body the user can conveniently carry the camera ...

Страница 23: ... press 2 Press to set desired language option and then press The screen appears in the language selected 3 Press to select Date and then press 4 Press to set desired date and then press MENU OK 2 Date Time Zone Time Language 2009 1 1 00 00 English Date Time MENU OK 2 Date Time Zone Time Language 2009 1 1 00 00 English Date Time MENU OK 2 Date Time Zone Time Language 2009 1 1 00 00 English Date Tim...

Страница 24: ...g time press Press again to disable 8 Press to save 9 Press to select Time and then press 10 Set desired time by pressing and then press 11 Press MENU to finish setting MENU OK 2 Date Time Zone Time Language 2009 1 1 00 00 English Date Time Exit Change MENU 2 Time Zone T DST Back Turning on the power and initialization ...

Страница 25: ...rea Flash Flash light adjustment Color space Smart range OIS Voice recording Fader Wind Cut C Shooting option display right Drive mode Timer AF mode White balance White balance adjustment ISO Metering option Picture wizard The display shows the icons for the currently selected option 15 F3 5 0001 A C AEL AFL 12 00AM 2010 01 01 B 12 00 12 00AM A AM AM AM 15 F3 5 0001 AEL AEL AFL AFL 2010 01 01 2010...

Страница 26: ...priority mode this allows you to quickly adjust the desired shutter speed Example Using the dial in the S mode 1 Set the mode dial to S 2 Adjust the shutter speed by turning the dial The aperture value is set automatically according to the shutter speed being set Option menu selection method When pressing MENU you can select a desired option or menu by pushing or The user can return to the state o...

Страница 27: ...the Fn button on the body of camera 3 Select Flash by using the or dial 4 Press 5 Set the flash menu option by using the or dial 6 Press 7 Set the amount of flash light by using the or dial This allows adjusting the amount of flash light up to 2 levels 8 Align your subject in the frame and half press Shutter to focus 9 Press Shutter to take a photo Option menu selection method Fill in Display the lev...

Страница 28: ...except for shooting mode shutter speed aperture value exposure number of available shots battery information Playback mode Display the meta information for shooting Display the RGB histogram currently selected option and date set Display the information regarding to shutter speed aperture value ISO file in play and total number of files saved Viewing the function descriptions of menu 1 In the Shooti...

Страница 29: ...bright picture The height of graph is related to the color information and the graph gets higher if a specific color is distributed more Insufficient exposure Relevant exposure Excessive exposure Setting the sound The user can set the sound that is made when manipulating the camera 1 In Shooting or Playback mode press MENU 2 Select Setup2 2 Sound System Volume an option Off No signal sound is made w...

Страница 30: ...alf press Shutter to focus 4 Press Shutter to take a photo Simple picture taking method The user can take a picture conveniently by minimizing the need of user setup Please refer to the Tips for getting a clearer photo p 31 to take a clear picture Press to see the saved images on the screen AR Green Focus is set Red Focus is not set MA 0001 0001 ...

Страница 31: ...tically In order to check in advance whether the focus of composition is set appropriately please use the half shutter function If you press the shutter half way down the focus and exposure will be adjusted automatically for getting a clearer photo Showing the shutter speed and aperture value being set Focus frame If green take the picture by pressing the Shutter If red either change the compositi...

Страница 32: ...mage the focus can be adjusted more accurately Preventing your subject from being out of focus Please try to use the focus lock function Adjust the focus by using the half shutter function where the focus can be made easily Then simply press the Shutter button after moving the camera to a desired composition Keep pressing and holding down the half shutter until you actually make a photo shot Under...

Страница 33: ...ing you can enlarge telephoto angle or reduce wide angle the size of an image by changing the focal length value of the camera lens Adjust it to the desired size and take the picture 1 Turn the zoom ring to the left right after checking the focus to the subject According to the changed focal length the subject may appear enlarged or reduced 2 Half press Shutter to focus 3 Press Shutter to take a p...

Страница 34: ...aking pictures the user can accurately focus pictures since this function minimizes camera shaking Before applying OIS After applying OIS Using the OIS switch of lens The OIS function can be used only in the case that the lens in use has the OIS function To use this function please set OIS to ON ...

Страница 35: ...due to a circumstance like night shooting When the battery capacity is not sufficient When having a close up shot When using a tripod please disable the OIS function since the image can be shaken due to the vibration of OIS function If the camera is shocked when taking a picture the display can be shaken In this case the camera may operate normally if the camera is powered off and on again Since th...

Страница 36: ...cific subject there is a range in which objects closer and further away will also be in focus This focused range is called the depth of field The wider the wide angle lens the higher the aperture value the greater the depth of field For example the aperture stop f 11 is higher than f 2 8 Current position of the subject Current position of the subject 10 meters 6 meters 4 meters 2 meters 1 meters 10 m...

Страница 37: ...lecting a mode and how to record a video Using the Smart Auto mode 38 Using the Program mode 39 Using the Aperture Priority Shutter Priority or Manual mode 40 Using the Night Portrait Landscapee mode 44 Using the Scene mode 45 Recording a Movie 47 ...

Страница 38: ...s Close up shot for the subject with various colors Close up portrait shot After fixing to a fixture like tripod proceed with the shot under the condition that the subject does not move for a while Taking pictures under the condition that the subject moves much 3 Half press Shutter to focus 4 Press Shutter to take a photo When the camera does not detect the shooting environment the camera takes the ...

Страница 39: ... focus 4 Press Shutter to take a photo What is the program shift method If this function is used desired shutter speed and aperture value can be selected while maintaining the same brightness The shutter speed and aperture value are changed as in the following rules The available aperture numbers for exposure setting is different depending on the lens model Dial direction Changing the exposure val...

Страница 40: ...ate shutter speed 1 Rotate the mode dial to A 2 Rotate the dial to adjust the aperture value 3 Set options For a list of options refer to Extended shooting functions p 49 4 Align your subject in the frame and half press Shutter to focus 5 Press Shutter to take a photo Aperture value The aperture value of a lens can be adjusted to control the amount of light reaching the image sensor When opening t...

Страница 41: ...and half press Shutter to focus 5 Press Shutter to take a photo Shutter speed Shutter speed is the length of time the shutter is open You can enjoy many interesting effects by adjusting the shutter speed A low shutter speed blurs motion on the image You can feel the speed in the picture when the low shutter speed is used for a shot A fast shutter speed is essential for capturing the movement A fas...

Страница 42: ...ded shooting functions p 49 5 Align your subject in the frame and half press Shutter to focus 6 Press Shutter to take a photo Using the Aperture Priority Shutter Priority or Manual mode EV button Dial In case of P program S shutter priority or A aperture priority mode the display is shown in red for each part beyond the range of expousre P mode The red sign is shown for the shutter speed and apert...

Страница 43: ...ge stabilization at the time of taking pictures in the bulb exposure mode it is recommended to use a reliable tripod or shutter release purchased separately If you use a long shutter speed the time taken to save images gets longer as well This is not a problem of the product and you do not need to replace the battery When taking pictures for a long time by using the bulb shot function we recommend...

Страница 44: ...ape mode This mode can be useful when a clear focus for a natural landscape is needed 1 Rotate the mode dial to 2 Align your subject in the frame and half press Shutter to focus 3 Press Shutter to take a photo Using the Night Portrait Landscape mode In the night mode it is recommended to use a tripod shutter release or Timer function to minimize camera shaking purchased separately In the portrait ...

Страница 45: ... frame and half press Shutter to focus 4 Press Shutter to take a photo MENU OK 1 Beauty Shot When the camera is set to standby mode while the mode dial is set to you can directly select a desired scene by pressing Fn Using the Scene mode Since an appropriate option is set in advance by the scene the shot can be taken conveniently by selecting a scene appropriate for the situation Back Set ...

Страница 46: ...one appear lighter 6 Select Shooting3 3 Face Retouch 7 Set options Select a higher setting to make skin tone appear lighter 8 Align your subject in the frame and half press Shutter to focus 9 Press Shutter to take a photo MENU OK 3 1 2 1 1 2 3 Face Tone Face Retouch Level 1 Level 2 Level 3 MENU OK 3 1 2 1 1 2 3 Face Tone Face Retouch Level 1 In the Beauty Shot mode AF area is set to Face Detection...

Страница 47: ...am The aperture value is adjusted automatically Aperture Priority Set the aperture value by using the dial before taking the movie To fade out the screen You can make the movie screen darker or brighter gradually in recording by using the fader function 1 In Shooting mode press MENU 2 Select Shooting3 3 Fader Off Fader function not used In Scene gradually gets brighter when recording starts Out Sc...

Страница 48: ... in shooting a movie the image stabilizer sound can be recorded When the capacity of one file in recording exceeds 4GB the movie recording will be stopped automatically In this case the recording can be continued by starting new recording When formatting a memory card it is always recommended to format by using this camera When the format is run in other product or PC it is possible to damage image...

Страница 49: ... can enjoy more customized pictures and movies Setting the resolution and quality 50 Using the timer function 53 Taking a picture in the dark place 54 Focusing methods 59 Face detection 62 Brightness and color adjustment of picture 64 Changing the shooting method 71 Special effect photo retouching 73 Key Mapping 75 ...

Страница 50: ...eloping in the maximum size of A3 2M 1920 x 1280 3 2 When developing in the maximum size of A5 4592 x 2584 16 9 When outputting to HDTV or developing in the A1 size 16 9 3872 x 2176 16 9 When outputting to HDTV or developing in the A3 size 16 9 3008 x 1688 16 9 When outputting to HDTV or developing in the A4 size 16 9 1920 x 1080 16 9 When outputting to HDTV or developing in the A5 size 16 9 Setti...

Страница 51: ... image and RAW file at the same time Setting the quality of movie The recorded movies are saved as normal or high quality 1 In Shooting mode press MENU 2 Select Shooting1 1 Quality an option Normal Set normal quality HQ Set high quality The RAW file format images are saved without loss of data and the photo size is set to 14M 4592 x 3056 only Although the settings such as white balance contrast satu...

Страница 52: ...educes noise that may occur when setting a high speed ISO 3200 Long Term NR This function reduces noise when setting a long exposure over 4 seconds In this case it requires additional processing time equal to the shutter speed needed in taking the picture Setting the resolution and quality When the Noise reduction function is disabled there might be a noise in the recorded picture ...

Страница 53: ...sing the dial or You can select the timer setting in the range of 2 30 seconds 5 The shot is taken automatically after the time being set has passed by pressing Shutter Using the timer function The function can be set directly by pressing in the shooting mode To cancel the self timer function press one more time or press Shutter MENU 2 Timer Reset Back ...

Страница 54: ...ash The amount of flash light is adjusted automatically according to the exposure in the surrounding environment Auto The flash light operates automaticaly in the dark place Auto Red The flash light operates automaticaly and prevents the red eye effect Fill in Always operates the flash light The brightness of flash light is automatically controlled Fil in Red Always operates the flash light and prevents...

Страница 55: ...of action is remained clearly since the flash will burst light immediately upon shutter opening Since the flash bursts the light at a later time when having used the 2nd Curtain option the picture expresses the last image of the subject clearly Ball moving direction Ball moving direction Use of early 1st Curtain option Use of 2nd Curtain option Taking a picture in a dark place By using the red eye fi...

Страница 56: ...justing the amount of flash light is not available for some shooting modes When an external flash unit has the flash control function the light control value of external flash is applied when connecting to the camera If the distance from the subject is quite close when taking images by using the built in flash part of the images may appear dark as the lens is interfered with the flash light Please check...

Страница 57: ...e exposure value of surrounding area 2 Auto The flash is burst out automatically in the dark place 3 Auto Red This prevents the red eye effect that may occur at the time of shooting 4 Fill in The flash always bursts light when taking picture 5 Fill in Red Always operates the flash light and prevents the red eye effect 6 1st Curtain Burst the flash light immediately after the opening of shutter 7 2nd C...

Страница 58: ...ing the ISO value This reduces the degree of camera shaking with faster shutter speed 1 In Shooting mode press MENU 2 Select Shooting 1 1 ISO an option Taking a picture in a dark place The higher ISO speed you select the more image noise you may get When the noise reduction function is used the noise caused by the high sensitive ISO 3200 can be reduced The available ISO setting options may differ ...

Страница 59: ...s a shot regardless of the focus On This takes a shot only if the focus is set correctly when pressing the shutter Even though the focus is set correctly in the state of half shutter the shot would not be taken if the focus is not set correctly at the time of pressing the shutter fully By using the control level of AF MF the focus can be adjusted manually When there is no AF MF switch on the lens ...

Страница 60: ...a an option Selection AF The focus is set appropriately for the selected area Multi AF Shows all the places that the focus is set correctly in the display Face Detection AF Shows the areas that the focus is correctly set in the display Self Portrait AF When the sound effect is heard at the time of self shot you can check the position of the subject s face The selectable option may differ by the sh...

Страница 61: ... MENU to return to the previous mode 4 In Shooting mode press 5 Press to move the focus area 6 Adjust the size of focus area by using the dial 7 Align your subject in the frame and half press Shutter to focus 8 Press Shutter to take a photo MENU OK 2 1 1 1 2 3 AF Mode AF Area AF Priority Drive Metering Flash 3 Focusing methods Back Set Selection AF Multi AF Face Detection AF Se f Portrait AF AF Zo...

Страница 62: ...e subject is too far When it is too bright or dark When the subject is not facing to the front When part of the face is hidden by an object like sunglasses When one makes a large facial expression When the ight or backlight shown on the face is not uniform Depending on the Picture Wizard option the subject s face may not be recognized The options may differ depending on the shooting mode This func...

Страница 63: ...ot the focal distance is fixed to make a close up shot possible 1 In Shooting mode press MENU 2 Select Shooting 2 2 AF Area Self Portrait AF 3 Press Shutter if having an info sound of shooting Check the focus of the subject in shooting mode Face detection ...

Страница 64: ...nt 1 In Shooting mode press MENU 2 Select User setup 1 EV Step an option 1 3 Change the exposure level by 1 3 step 1 2 Change the exposure level by 1 2 step When fixing and using the exposure value being set it may be excessively bright or dark according to the shooting environment Please take a picture by adjusting the exposure value appropriate for the shooting environment When it is difficult to ...

Страница 65: ...rtrait shot where there is a strong backlight When the subject is not located in the center of the display the subject can appear to be too bright or too dark Center weighted This calculates the amount of light in the center portion of the shot and reflects the result over the entire image This is suitable when the area of the subject is large when compared to the overall composition of the portrai...

Страница 66: ...camera Daylight Suitable for outdoor shot on a clear day Cloudy Suitable for shadows on a cloudy day Fluorescent White Daylight fluorescent lamp sutable especially for the white fluorescent light with the color temperature of about 4200K Fluorescent NW Daylight fluorescent lamp sutable especially for the daylight fluorescent lighting with the color temperature of about 5 000K Fluorescent Daylight Dayl...

Страница 67: ... shot is taken after setting the composition of white paper filled in full frame an appropriate white balance value is set according to the measured light source 1 In Shooting mode press MENU 2 Select Shooting 1 1 1 White Balance 3 After selecting Custom Set press Fn 4 After setting the composition to show only the white paper press Shutter Brightness and color adjustment of picture White paper MEN...

Страница 68: ...using the dial or 5 Press to save What is color temperature Color temperature refers to the temperature that has expressed the color change of light in the absolute temperature K This can express cold sense with the rising color temperature and warm sense with the falling color temperature Clear sky Fluorescent_H Cloudy Daylight Fluorescent_L Halogen lamp Incandescent bulb Candle light Brightness ...

Страница 69: ...or regular images sRGB standards for International standard of color space established by the IEC International Electrotechnical Commission This is defined from color space for PC monitors and is also used as the standard color space for Exif Adobe RGB is the color space recommended by Adobe Systems Inc for commercial printing and has wider range of color reproduction than sRGB Adobe RGB covers mos...

Страница 70: ...In Shooting mode press MENU 2 Select Shooting 3 3 Smart Range an option When the smart range is set the ISO 100 option can not be used The Smart range function is not available in some shooting modes and it may automatically operate while using the and shooting options The function can be set directly by pressing Fn in the shooting mode Brightness and color adjustment of picture ...

Страница 71: ... BKT When the shutter is pressed the camera will take 3 consecutive shots the original and 2 more with dfferent white balance settings P Wiz BKT When the shutter is pressed the camera wll take 3 consecutive shots all three wll have different picture wizard settings The options may differ depending on the shooting mode WB BKT and P Wiz BKT is the function that corrects the image after taking a shot...

Страница 72: ...osure interval BKT Order Set the shooting orders BKT Area Set the exposure steps WB BKT Set When using the WB BKT function this allows setting the adjusted interval of white balance value Example MG 3 adjusts the Magenta value of 3 steps minus or plus P Wiz BKT Set When using the picture wizard BKT function this allows setting the shot order MENU OK 3 BKT Set AE BKT Set WB BKT Set P Wiz BKT Set AB...

Страница 73: ...l Calm Classic 1 In Shooting mode press MENU 2 Select Shooting 1 1 Picture Wizard an option 3 Adjust the detailed items of picture wizard that were selected by using You can control the color saturation sharpness and contrast 4 Set to a desired value The option can be set directly by pressing the button of camera in the shooting mode MENU Vivid Color 0 0 0 Saturation Sharpness Contrast Exit Move ...

Страница 74: ... save images in 3 different ways 1 In Shooting mode press MENU 2 Select Shooting 1 1 Picture Wizard Custom an option 3 Adjust the Picture Wizard value by using You can control the color saturation sharpness and contrast 4 Set to a desired value MENU Custom1 Color 0 0 0 Saturat on Sha pness Contrast Exit Move ...

Страница 75: ...lance Setting to Optical Preview executes the depth preview function of current aperture value What is AEL function The auto exposure lock AEL and auto focus lock AFL functions of the camera are the functions that maintain the settings until the shooting is completed by remembering the exposure value and focus when pushing the AEL button of camera Reaction of the half shutter release when the AEL ...

Страница 76: ...earn how to connect your camera to your computer photo printer TV or HDTV Play picture movie 77 Picture editing 85 Viewing files on a TV or HDTV 89 Transferring files to your computer 91 Using the Samsung RAW Converter 96 Printing photos with a photo printer PictBridge 99 ...

Страница 77: ...hoto playback The display information appears by pressing DISP in the play mode 1 RAW file indicator 2 File that includes development info 3 Protected file 4 File no 5 Meta value of taken picture 6 Shutter speed info 7 Aperture value 8 ISO setup value info 9 File in play total no of files taken battery information Play picture movie 00004 00009 1 250 F5 1 100 SO 100 0001 Mode Metering Flash Focal Len...

Страница 78: ...rmation Descriptions about movie playback 1 Volume control display 2 Protected file 3 File no 4 Meta value of movie taken 5 Fast forward 6 Total play time of selected file 7 Current play time 8 Rewind Play picture movie OK WWaWW WXaWW 100 0001 1280 X 720 2010 01 01 Video size Date 3 4 1 7 6 5 8 2 00004 00009 1 40 F3 5 100 ISO 0 0 4592 X 3056 2010 01 01 R G B 1 2 3 4 Y 18mm Play Capture ...

Страница 79: ... 5 Press to return to the previous Converting into the thumbnail view Since several files can be shown on one display files can be searched quickly To have a thumbnail view of 9 images press two times or press three times to have a thumbnail view of 20 images Press to cancel Play picture movie Executing the smart album or changing the category upon execution the time may be delayed according to the ...

Страница 80: ...mode Deleting one picture You can delete only one picture by selecting a desired file 1 After selecting the file to be deleted in the play mode press 2 From the popup window select Yes Deleting selected file 1 After selecting the file to be deleted in the play mode press 2 From the popup window select Multiple Delete 3 After selecting a file to be deleted press To cancel your selection press again 4 Pr...

Страница 81: ...ical frame by rotating them automatically while in playing 1 In Playback mode press MENU 2 Select Playback Auto Rotate On High Light This informs the excessively bright part from the image taken 1 In Playback mode press MENU 2 Select Playback High Light On Play picture movie If the photo shot is taken when the direction of the camera was aimed at the bottom the direction of the image can be differ...

Страница 82: ... play without setting an option execute the step 4 Images Select the pictures to be shown in the slide show All View all the saved pictures in the slide show Date See the pictures taken on a specific date in the slide show Select Select pictures and see them in the slide show Effect Select the scene changing effect between pictures In order not to use the changing effect select the off option Inter...

Страница 83: ...ress Pause Play Press the button View a movie While a movie is being played back you are able to select and cut a desired part of the scene 1 After selecting a desired movie in the play mode press 2 Enjoy movie Rewind Press Pause Play Press Fast rewind Press Volume control Turn the dial to the left right Stop Press Play picture movie OK WWaW WXaWW WXaWW 100 0001 Pause Stop ...

Страница 84: ...tate Cutting part of a movie 1 Press in the play mode 2 Select the start point to cut by pressing while playing a movie 3 Select the end point of cutting by pressing 4 From the popup window press Yes Play picture movie The resolution of captured image is the same as the movie resolution The captured file is saved by using the different file name The cut file is saved by using a different file name ...

Страница 85: ...t Resize 3 Select desired image resolution The edited file is saved by using the different file name Rotating 1 After selecting a desired picture in the play mode press MENU 2 Select Image Edit Rotate 3 Select a desired rotation state The resolution to be changed will be limited according to the resolution of original picture Depending on the size of the picture when you rotate the original the new ...

Страница 86: ...le Selecting picture style allows you to express various moods of emotion in your picture 1 After selecting a desired picture in the play mode press MENU 2 Select Playback Image Edit Photo Style Selector 3 Set to a desired option Face retouching 1 After selecting a desired picture in the play mode press MENU 2 Select Playback Image Edit Face Retouch 3 Set to a desired option The level of face reto...

Страница 87: ...l Printing all Reset Initializing the standard print option 3 When having made the selections press Fn after selecting the picture and number of copies to be printed by using the dial When having selected all press to select the number of copies to be printed and then press The entered print info can only be used for the digital printer or digital picture printing shop that supports the digital pr...

Страница 88: ... option 6 When having selected the select option select the picture to be printed and press Fn after selecting the print size by using the dial When having selected all press and select the print size Then select the print size and press Index printing 1 Press MENU Playback DPOF Index in the playback mode 2 From the popup window press Yes Picture editing The designated print size can only be appli...

Страница 89: ...ection between TV and the camera by using the A V cable 3 Make sure the TV and camera are turned on and select the video output mode of TV 4 View the videos and pictures by using the buttons of camera body On some TVs digital noise may occur or part of an image may not appear Images may not appear centered on the TV screen depending on your TV settings You cannot capture photos or videos while the...

Страница 90: ...ble the user can connect the camera to an HDTV using the Anynet CEC method The Anynet CEC functions allows you to control connected devices using the TV remote control In the case that the HDTV supports Anynet CEC the power of the TV is automatically turned on when used in conjunction with the caemra When connecting to HDTV by using the HDMI cable it is not possible to take a picture movie When co...

Страница 91: ...nded Microsoft Direct X 9 0C or later Programs contained on the CD Program Purpose Samsung Master Edit photos and videos QuickTime Player 7 6 View videos H 264 MPEG 4 AVC files on a PC Samsung RAW Converter Convert RAW files into the desired file format Adobe Reader View the user manual Using a self assembled PC or a PC and OS that are not supported may void your warranty The programs may not work pr...

Страница 92: ...mplete the installation and restart your computer Transferring files to your PC Once you connect the camera to your PC the camera will be recognised as a removable drive 1 Connect your camera to your PC with the USB cable You must plug the end of the cable with the correct connection port in your camera If the cable is reversed it may damage your files The manufacturer is not responsible for any los...

Страница 93: ...the USB cable for Windows 2000 Vista is similar 1 It the status lamp on your camera is blinking it means the data transfer is in progress Please wait until the status lamp stops blinking 2 Click on the tool bar at the bottom right of your PC screen 3 Click the pop up message 4 Remove the USB cable Transferring files to your computer If the Folder Type is set to Date the folder name appears as XXX_M...

Страница 94: ...r When using the USB cable make sure to match the connection parts of the USB and the camera If the cable is reversed it may damage your files The manufacturer is not responsible for any loss of data Please use only the accessories that SAMSUNG provides The manufacturer takes no responsibility for any loss of files or damage that may result from the use of other manufacturer s product Requirements f...

Страница 95: ...for downloaded files Click to download the selected files Thumbnails of files click an image to download Using the Samsung Master Interface No Description Toolbar Menus Click for more information about the program Click to enlarge or reduce the thumbnails in the list Change the mode View mode Edit mode for photos Edit mode for videos Preview information about the selected file The photos in the select...

Страница 96: ...edit functions are listed below Ì Menu bar Í Image editing tools Exposure bias Compensates the exposure value White balance Adjusts the white balance value Color Adjusts the color of the image Tone Changes the color tone Sharpness Noise reduction Adjusts the sharpness Development Previewing is available for the final output Highlight controller Adjusts the saturation and highlights of the selected ...

Страница 97: ...esult whichever you change first The following images show how you can change the exposure to the image using the Samsung RAW Converter You can adjust the exposure by using the menu option as shown in the picture You can see the changed results in the histogram windows as shown images Original image P Mode Aperture f 8 Shutter Speed 1 15sec ISO 100 Changed image after correcting the exposure Origin...

Страница 98: ...AW Converter You can adjust the contrast by using the menu option as shown in the picture Saving the RAW files into JPEG or TIFF format You can save the RAW files into JPEG or TIFF format using the Samsung RAW Converter 1 Choose the image you want to edit and then select File F Development 2 Select the type of file as JPEG or TIFF and then click Save S The selected file is saved as JPEG or TIFF format...

Страница 99: ...onfiguring print settings MENU Ex t Print 2 1 Images Size Layout Type Qual ty Date One Photo Auto Auto Auto Auto Auto Images Select whether to print the current photo or all photos Size Specify the size of the print Layout Create thumbnail prints Type Select the type of paper Quality Set the printing quality Date Set to print the date File Name Set to print the name of the file Reset Reset the print...

Страница 100: ...Camera settings menu The camera use environment can be set to a desired state by using the setup menu Camera settings menu 101 ...

Страница 101: ...the previous mode Camera settings menu The camera use environment can be set to a desired state by using the setup menu MENU OK 2 1 2 1 1 3 Quickview Display Adjust Display Save Power Save Date Time Sound 1sec 3min 1min 3 Setup menu items MENU OK 2 Sound System Volume AF Sound Button Sound Medium On On Exit Change Exit Change ...

Страница 102: ...ness setting and color Display Brightness Depending on whether the user uses the screen or the viewfinder the display brightness can be adjusted by using the Auto Brightness Adjust the brightness of screen Display Color Depending on whether the user uses the screen or the viewfinder the display color can be adjusted by using the Display Save This allows setting the power off time of display Off 0 5m...

Страница 103: ... for Dec For example the image taken by setting Jan 01 sRGB is saved in 0101xxxx jpg File Number This sets the method of designating file number Series Reset The folder name that has taken pictures for the first time becomes 100PHOTO and the filename will be SAM_0001 when the color space is sRGB The filename number is increased by 1 in the range of SAM_0001 SAM_9999 The folder number is increased by 1...

Страница 104: ...ving connection to a computer TV or printer playing a slide show or movie Date Time This sets to indicate the date and time that has taken a picture Type Date Time Zone Time Imprint The date and time are shown on the lower right side of the picture in play When printing a picture the date may not be printed appropriately from certain manufacturer or printer model Environment setup menu Default val...

Страница 105: ...EC the play function of camera can be controlled with the TV remote controller p 90 On The play function of camera can be controlled with the TV remote controller Off The play function of camera can NOT be controlled with the TV remote controller HDMI Size The resolution on an HDTV can be changed when using an HDMI cable In case of NTSC method Auto 1080i 720p 480p In case of PAL method Auto 1080i ...

Страница 106: ... error messages specifications and maintenance tips Error messages 107 Camera maintenance 108 Before contacting a service center 112 Camera specifications 115 Lens specifications 119 Accessories optional items 120 Index 122 ...

Страница 107: ...charge the battery Memory Full Delete unnecessary files or insert a new memory card No Image File Take photos or insert a memory card that has some photos Check the lens Check whether dust or foreign substances between Lens contacts and Lens mount index Remove either dust or foreign substances if dirt or foreign substances are appeared Please be care for avoid getting dirt foreign substances inside...

Страница 108: ...sure to dust can occur in everyday use of camera For example replacing the lens may get dust in the camera s image sensor This product has the sensor cleaning function that removes the dust of sensor when executing this menu P 105 Dust in the image sensor may remain after executing the sensor cleaning function In that case please contact to the service center When using the dust blower do not inse...

Страница 109: ...ns These capacities are based on a 1GB SD card Size Super Fine Fine Normal RAW RAW SF RAW F RAW N Photos 14M 3 2 142 278 408 35 28 31 32 10M 3 2 197 382 724 32 34 36 6M 3 2 322 615 1128 36 38 39 2M 3 2 738 1334 2238 41 42 43 12M 16 9 168 328 630 30 33 35 8M 16 9 234 454 860 34 36 37 5M 16 9 381 727 1334 38 39 40 2M 16 9 872 1573 2638 42 43 43 Burst 1201 2092 3320 Size HQ Normal Movies 30fps 1280 1...

Страница 110: ...ox 150 min Battery life Shooting mode Number of photos Photos Approx 200 min Approx 400 photos Videos Approx 130 min The figures above are measured by Samsung s standards and may differ depending on actual usage The shooting time may change depending on the shooting environment and shot interval Several videos were recorded in succession to determine the total recording time Camera maintenance ...

Страница 111: ...duct for long time in the carpet comforter or electronic mattress Do not leave the product turned on where the air cannot be circulated Be careful about the battery slot not to be connected with accessories like necklace coin key watch and so on Use only authentic manufacturer recommended Lithium ion replacement batteries Do not try to disassemble or poke with a sharp object pin Do not apply a har...

Страница 112: ... your pocket Using the flash or recording videos depletes the battery quickly Recharge if needed Batteries are consumable parts that must be replaced over time Get a new battery if the battery life is diminishing quickly Cannot take photos There is no space on the memory card Delete unnecessary files or insert a new card Format the memory card p 103 The memory card is defective Get a new memory card...

Страница 113: ... If the camera is shaken while shooting the photo may be blurry Use the tripod to avoid possible camera shake Make sure that the lens is clean If not clean the lens p 108 The colors in the photo do not match the actual scene An incorrect white balance can create unrealistic color Select the proper white balance option to suit the light source p 66 The photo is too bright Your photo is overexposed ...

Страница 114: ...ssion may be interrupted by static electricity Disconnect the USB cable and connect it again Your computer cannot play videos The codec installed in your computer may not be compatible with the video files you want to play Use QuickTime Player or install Codec Pack Full Using QuickTime Player 7 6 1 Install QuickTime Player 7 6 which supports MP4 H 264 MPEG 4 AVC 2 Play videos using QuickTime Player...

Страница 115: ... PenTile Live view Field of view Approx 100 Specification Viewfinder Type EVF Resolution VGA 640x480 921k dots equiv Field of View Approx 100 Magnification Approx 0 86x APS C 50mm 1m 1 Eyepoint About 20 2mm Diopter Adjustment Approx 4 0 2 0m 1 Focusing Type Contrast AF Focusing point Selection 1point Free selection Multi Normal 15points Close Up 35points Face Detection Max 10faces Modes Single AF Con...

Страница 116: ... 1sec step Remote controller Wired SR9NX01 Optional Specification Flash Type TTL Auto Pop up flash Modes Smart Flash Auto Auto Red eye reduction Fill in Fill in Red eye reduction 1st Curtain 2nd Curtain OFF Guide Number 11 at ISO 100 Angle of View Coverage 28mm wide angle Equivalent to 35mm Sync Speed Less than 1 180sec Flash Compensation 2 2EV 0 5EV step External Flash Samsung External Flash availa...

Страница 117: ...080 RAW 14M 4592x3056 Quality Super fine Fine Normal RAW Format SRW Color Space sRGB Adobe RGB Specification Movie Format MP4 H 264 Compression Movie H 264 Sound AAC Movie Clip With Audio or without Audio user selectable recording time 25 minutes Image size 1280x720 640x480 320x240 Frame rate 30fps Sound Mono Sound Movie Editing Still Image Capture Time Trimming Image Play Type Single image Thumbnai...

Страница 118: ...n Normal 66min 320x240 High Quality 145min Normal 210min These figures are measured under the Samsung standard Specification Direct Printing PictBridge Interface Digital Output Connector USB 2 0 HI SPEED Video output NTSC PAL user selectable HDMI 1 3 1080i 720P 576P 480P External Release Yes DC power input connector DC 9 0V 1 5A 100 240V Power Source Type Rechargeable battery BP1310 1300mAh Charger ...

Страница 119: ... 2 75 9 28 7 31 4 8 0 Aperture F2 Min F22 Number of Blades 7 Circular Aperture Diaphragm F3 5 5 6 Min F22 Number of Blades 7 Circular Aperture Diaphragm F4 5 6 Min F22 Number of Blades 7 Circular Aperture Diaphragm Mount Type Samsung NX Mount Samsung NX Mount Samsung NX Mount Optical Image Stabilizer No Yes Yes Minimum Focus Distance 0 25m Ğ 0 28m Ğ 0 98m Ğ Maximum Magnification Approx 0 16X Approx...

Страница 120: ...tal and SDHC Secure Digital High Capacity may be used A V cable The camera can be connected to an external device by using an A V cable Shutter release This product minimizes the possible shaking of camera when taking pictures by using a tripod or taking pictures at a low shutter speed Adaptor The power needed in the camera can be supplied by connecting to a power socket using this adaptor ...

Страница 121: ...SEF 20A or SEF 42A can be purchased for your various shooting experience HDMI Cable You can view high quality and uncompressed photos or videos on an HDMI High Definition Multimedia Interface using the optional HDMI cable Battery pack Battery pack can be purchased separately The image of components or optional parts can differ from that of actual products Please refer to the user s manual of option...

Страница 122: ...tions 118 D Direction keys 5 Diopter adjustment dial 16 Display type 28 Depth of field 36 Depth Preview 36 Deleting a file 80 Display 102 Date Time 104 E Eye sensor 15 Eye cup 16 EV button 42 External flash 58 Error message 107 F Fn 27 Flash popup button 54 Focusing methods 59 Face detection 62 File protection 80 Face retouching 86 Format 103 File name 103 File number 103 Folder type 103 Firmware upd...

Страница 123: ...ect 7 Status lamp 16 Strap 22 Sound 29 Smart Auto mode 38 Shutter Priority mode 41 Shutter speed 41 Scene mode 45 Setting the flash option 54 Single AF 59 Selection AF 60 Self portrait face detection 63 Spot metering 65 Smart range 70 Shooting method 71 Smart album 79 Slide show 82 Samsung Master 95 Samsung Raw Converter 96 System volume 102 Sensor cleaning 105 T Title and role of each part 14 Turn...

Страница 124: ...an be determined by turning the equipment off and on the user is encouraged to try to correct the interference by one or more of the following measures Reorient or relocate the receiving antenna Increase the distance between the equipment and receiver Connect the equipment into an outlet on a circuit different from that to which the receiver is connected Consult the dealer or an experienced radio ...

Страница 125: ......

Страница 126: ...functions and features of your device Please read the Quick Start Manual and User Manual carefully to ensure safe and correct use For more information refer to the User Manual included on the supplied CD ROM Quick Start Manual NX10 FOR TECHNICAL SUPPORT PLEASE CALL 1 800 SAMSUNG 726 7864 ...

Страница 127: ... all local regulations U when disposing of used batteries Never place batteries or cameras on or in heating devices U such as microwave ovens stoves or radiators Batteries may explode when overheated Handle and store your camera carefully and sensibly Do not allow your camera to get wet liquids can cause serious U damage Do not handle your camera with wet hands Water damage to your camera can void...

Страница 128: ... with a soft clean debris free lens cloth Allow only qualified personnel to service your camera Do not allow unqualified personnel to service the camera or attempt to service the camera yourself Any damage that results from unqualified service is not covered by your warranty Ensure maximum battery and charger life Overcharging batteries may shorten battery life After charging U is finished disconnect ...

Страница 129: ... mode dial The diagram below shows the status has been changed to Directional Keys in the User s Manual When explaining the steps needed for navigating the menu the up down left and right directional arrows are shown below Ex Executing the Play mode The user can check saved pictures and movies 1 Press U Ü ÃÌ ÀiVi Ì Þ Ã Ûi w ià 2 Check the following pictures sequentially by using Adjusting the expo...

Страница 130: ...ay when selecting a menu or option within the step Example Select Shooting 1 1 Quality represents select Shooting 1 1 and then Quality Comment explaining symbols Abbreviations used in this manual Abbreviations Explanation AF Auto Focus Auto focus BKT Bracketing Bracketing DPOF Digital Print Order Format Printing order mark EV Exposure Value Exposure value OIS Optical Image Stabilization Optical im...

Страница 131: ...nimal or still life Background 噝 the objects around the subject Composition 噝 the combination of a subject and background Subject Background Composition Exposure Brightness The amount of light that enters your camera determines the exposure You can alter the exposure with shutter speed aperture value and ISO speed By altering the exposure your photos will be darker or lighter Normal exposure Overe...

Страница 132: ... your subject from being out of focus 27 Setting the automatic manual focus function 28 Zooming 28 Optical Image Stabilization OIS 29 Using the OIS in the menu option 29 Depth preview 30 Using the Smart Auto mode 31 Using the Program mode 32 Using the Aperture Priority Shutter Priority or Manual mode 33 Using the Aperture Priority mode 33 Aperture value 33 Using the Shutter Priority mode 34 Shutte...

Страница 133: ...shooting method and timer setup 54 Special effect photo retouching 55 Picture wizard 55 Finding more about the extended shooting function 56 Play picture movie 58 Viewing pictures in the play mode 58 View files in the smart album by category 60 Converting into the thumbnail view 60 File protection 61 Deleting a file 61 Enlargement reduction 62 View a movie 63 Transferring files to your computer 65 Fo...

Страница 134: ...0192A Strap AD63 04468A Software installation CD including user s manual AD46 00298A Quick Start Manual AD68 04529A Charger AD44 00157A AC power cable AD81 00681A The image of components or optional parts can differ from that of actual products For more information about optional items see Accessories optional items CD ROM User manual page 120 ...

Страница 135: ... adjustment dial Green button Drive mode button Use the green button The following setup values are initiaized if the button is pushed once in the standby state for shooting Program shift Detailed setup of picture wizard Fine tuning of white balance Color Temp setting value Adjusting the colors of screen menu Timer Flash EV When selecting or setting AF shift the changed focus area to the center Br...

Страница 136: ...tton Tripod mount Use of eye sensor Because the eye sensor enables the automatic conversion between the display and the electronic view finder EVF the shooting information is shown on the viewfinder of the camera as soon as the user uses the viewfinder Do not overlap the eye sensor with your hands or other materials MENU button Memory card slot Status lamp Memory card cover Eye sensor ...

Страница 137: ... view Eye cup Removal of Eye cup When the camera is shipped the eyecup is attached to the viewfinder Push the Eye cup up as shown in the figure for removal Eyesight adjustment dial Status lamp In the case of saving a picture or shooting a movie this shows the operating status of the camera by blinking the status indicator lamp U Blinking When saving photos recording movies being read by a computer...

Страница 138: ... models compatible for use U This user manual was prepared based on the U SAMSUNG 18 55mm F3 5 5 6 OIS lens Please refer to the lens user manual for more information about the lens Lens contacts Lens hood mount Zoom ring Lens mount connecting point OIS switch AF MF switch Focus ring Lens For more detailed information refer to the CD ROM User manual ...

Страница 139: ...arging status Red Charging Green Fully charged Turned off or Yellow Charging error To remove the battery from the charger lift slightly in U the direction of the arrow Please use designated charger or batteries for proper U use SAMSUNG is not responsible for any accident that may occur from using a product other than designated INSERT 1 2 AC power cord CHARGE INSERT Charging lamp Charger ...

Страница 140: ...Installing the battery When taking out the battery slightly pull down on the lock lever The battery may then be removed 2 Lock lever 1 Open by pushing in the direction of the arrow 3 Close by pushing down in the direction of the arrow ...

Страница 141: ... you can remove it U by slightly pushing in the direction of insertion Please do not remove the memory card or battery U while the status indicator lamp is blinking It may cause loss or data or product damage After checking the direction of metal terminal you can insert the memory card 1 2 3 ...

Страница 142: ...mounting the lens while the camera is powered off is desirable to ensure the stable operation of the lens SAMSUNG is not responsible for any accident damage or trouble caused by using other company s lens The body cap protects the product from scratch or dust while transporting Changing lenses should be made in an environment clean of foreign particles Foreign particles within the body or lens of ...

Страница 143: ...18 Preparations before shooting Connecting the strap By connecting the strap to the body the user can conveniently carry the camera ...

Страница 144: ...guage option and then press U i ÃVÀii i ÀÃ Ì i Õ i Ãi iVÌi 3 Press to select Date and then press 4 Press to set desired date and then press MENU Exit Change OK 2 Date Time Zone Time Language 2009 1 1 00 00 English Date Time MENU OK 2 Date Time Zone Time Language 2009 1 1 00 00 Eng ish Date Time Exit Change MENU OK 2 Date Time Zone Time Language 2009 1 1 00 00 Eng ish Date Time Exit Change Turning ...

Страница 145: ... again to disable 8 Press to save 9 Press to select Time and then press 10 Set desired time by pressing and then press 11 Press MENU to finish setting MENU OK 2 Date Time Zone Time Language 2009 1 1 00 00 Eng ish Date Time Exit Change MENU 2 Time Zone London GMT 00 00 2009 01 01 01 10 AM Back DST Turning on the power and initialization ...

Страница 146: ...tting 0001 Possible no of shots Battery information Displays no insertion of memory card Warning of camera shake 12 00AM 2010 01 01 Time date and year info Focus indicator Spot metering area AF zone Histogram Grid display B Shooting option display left Size Movie size Image quality Movie quality Focus area Flash Flash light adjustment Color space Smart range OIS Voice recording Fader Wind Cut C Sh...

Страница 147: ...the shutter speed priority mode this allows you to quickly adjust the desired shutter speed Example Using the dial in the S mode 1 Set the mode dial to S 2 Adjust the shutter speed by turning the dial U i iÀÌÕÀi Û Õi à ÃiÌ ÕÌ Ì V Þ VV À Ì the shutter speed being set Option menu selection method When pressing MENU you can select a desired option or menu by pushing or The user can return to the stat...

Страница 148: ... the Fn button on the body of camera 3 Select Flash by using the or dial 4 Press 5 Set the flash menu option by using the or dial 6 Press 7 Set the amount of flash light by using the or dial U à Üà ÕÃÌ Ì i Õ Ì v y Ã Ì Õ Ì Ó levels 8 Align your subject in the frame and half press Shutter to focus 9 Press Shutter to take a photo Option menu selection method F ll in Flash 2 1 1 2 0 2 1 1 2 0 Display th...

Страница 149: ...on regarding to shutter speed U aperture value ISO file in play and total number of files saved Setting user display You can set or remove the shooting information display 1 Press MENU in the shooting mode 2 Select User setup 1 User Display an option About histogram Histogram refers to the graph that shows the brightness distribution of picture This represents a dark picture if the graph is inclined...

Страница 150: ...s Shutter to focus 4 Press Shutter to take a photo Simple picture taking method The user can take a picture conveniently by minimizing the need of user setup Please refer to the Tips for getting a clearer photo U p 26 to take a clear picture Press U to see the saved images on the screen SMART WHI E Green Focus is set Red Focus is not set SMART 0001 0 1 ...

Страница 151: ...er function If you press the shutter half way down the focus and exposure will be adjusted automatically for getting a clearer photo Showing the shutter speed and aperture value being set Focus frame If green take the U picture by pressing the Shutter If red either change U the composition or adjust the focus again since the focus is not correctly set To avoid the blurring effect of U camera shake...

Страница 152: ...ormal screen in the state of adjusted focus Preventing your subject from being out of focus Under the following circumstances it may be difficult to get your subject in focus when Please try to use the focus lock function Adjust the focus by using the half shutter function where the focus can be made easily Then simply press the Shutter button after moving the camera to a desired composition Keep p...

Страница 153: ...ing you can enlarge telephoto angle or reduce wide angle the size of an image by changing the focal length value of the camera lens Adjust it to the desired size and take the picture 1 Turn the zoom ring to the left right after checking the focus to the subject According to the changed focal length the subject may appear enlarged or reduced 2 Half press Shutter to focus 3 Press Shutter to take a p...

Страница 154: ...ll in the following U cases When taking a picture while tracing a moving object When a big vibration occurs beyond the range of stab lization When the shutter speed is too slow due to a circumstance like night shooting When the battery capacity is not sufficient When having a close up shot When using a tripod please disable the OIS function since U the image can be shaken due to the vibration of OI...

Страница 155: ...t there is a range in which objects closer and further away will also be in focus This focused range is called the depth of field The wider the wide angle lens the higher the aperture value the greater the depth of field For example the aperture stop f 11 is higher than f 2 8 Current position of the subject Current position of the subject 10 meters 6 meters 4 meters 2 meters 1 meters 10 meters 6 met...

Страница 156: ... for the subject with various colors Close up portrait shot After fixing to a fixture like tripod proceed with the shot under the condition that the subject does not move for a while Taking pictures under the condition that the subject moves much 3 Half press Shutter to focus 4 Press Shutter to take a photo When the camera does not detect the shooting U environment the camera takes the picture with ...

Страница 157: ...us 4 Press Shutter to take a photo What is the program shift method If this function is used desired shutter speed and aperture value can be selected while maintaining the same brightness The shutter speed and aperture value are changed as in the following rules The available aperture numbers for exposure setting is different depending on the lens model Dial direction Changing the exposure value L...

Страница 158: ...r speed 1 Rotate the mode dial to A 2 Rotate the dial to adjust the aperture value 3 Set options U À ÃÌ v Ì Ã ÀiviÀ Ì º ÝÌi i Ã Ì functions CD ROM User manual page 49 4 Align your subject in the frame and half press Shutter to focus 5 Press Shutter to take a photo Aperture value The aperture value of a lens can be adjusted to control the amount of light reaching the image sensor When opening the a...

Страница 159: ...alf press Shutter to focus 5 Press Shutter to take a photo Shutter speed Shutter speed is the length of time the shutter is open You can enjoy many interesting effects by adjusting the shutter speed A low shutter speed blurs motion on the image You can feel the speed in the picture when the low shutter speed is used for a shot A fast shutter speed is essential for capturing the movement A faster s...

Страница 160: ...ÝÌi i Ã Ì functions CD ROM User manual page 49 5 Align your subject in the frame and half press Shutter to focus 6 Press Shutter to take a photo Using the Aperture Priority Shutter Priority or Manual mode EV button Dial U V Ãi v À À à ÕÌÌiÀ À À ÌÞ À iÀÌÕÀi priority mode the display is shown in red for each part beyond the range of expousre P mode The red sign is shown for the shutter speed and ape...

Страница 161: ...ape mode This mode can be useful when a clear focus for a natural landscape is needed 1 Rotate the mode dial to 2 Align your subject in the frame and half press Shutter to focus 3 Press Shutter to take a photo Using the Night Portrait Landscape mode In the night mode it is recommended to use a tripod shutter release or Timer function to minimize camera shaking purchased separately In the portrait ...

Страница 162: ... frame and half press Shutter to focus 4 Press Shutter to take a photo MENU OK 1 Beauty Shot When the camera is set to standby mode whle the mode dial is set to you can directly select a desired scene by pressing Fn Using the Scene mode Since an appropriate option is set in advance by the scene the shot can be taken conveniently by selecting a scene appropriate for the situation Back Set ...

Страница 163: ...one appear lighter 6 Select Shooting3 3 Face Retouch 7 Set options Select a higher setting to make skin tone appear lighter 8 Align your subject in the frame and half press Shutter to focus 9 Press Shutter to take a photo MENU OK 3 1 2 1 1 2 3 Face Tone Face Retouch Level 1 Level 2 Level 3 MENU OK 3 1 2 1 1 2 3 Face Tone Face Retouch Level 1 Level 1 Level 2 Level 3 In the Beauty Shot mode AF area ...

Страница 164: ...ecord the voice 7 Press Shutter to start recording 8 Press Shutter again to stop recording Pause while recording a movie By using the pause function you can shoot only desired scenes into one file without generating several movie files To pause during the recording press To continue on recording press U again When taking a movie the frame speed is fixed at 30 fps U 30 frames sec While shooting a movi...

Страница 165: ... case the recording can be continued by starting new recording When formatting a memory card it is always U recommended to format by using this camera When the format is run in other product or PC it is possible to damage images or to cause a change in the capacity of memory card If the camera lens is removed while recording a movie U the recording will be interrupted Do not change the lens while ...

Страница 166: ...aperture value when taking a movie Program Aperture Priority 47 To fade out the screen You can make the movie screen darker or brighter gradually in recording by using the fader function Off In Out In Out 47 Using the Wind Cut By using the wind noise removal function you can remove some surrounding noise in addition to the wind noise Off On 48 Default value Finding more about the basic shooting fu...

Страница 167: ...eloping in the maximum size of A3 2M 1920 x 1280 3 2 When developing in the maximum size of A5 4592 x 2584 16 9 When outputting to HDTV or developing in the A1 size 16 9 3872 x 2176 16 9 When outputting to HDTV or developing in the A3 size 16 9 3008 x 1688 16 9 When outputting to HDTV or developing in the A4 size 16 9 1920 x 1080 16 9 When outputting to HDTV or developing in the A5 size 16 9 Setti...

Страница 168: ...e at the same time Setting the quality of movie The recorded movies are saved as normal or high quality 1 In Shooting mode press MENU 2 Select Shooting 1 2 Quality an option Normal Set normal quality HQ Set high quality U i 7 w i v À Ì ià Ài à Ûi Ü Ì ÕÌ Ãà v Ì and the photo size is set to 14M 4592 x 3056 only The RAW file format allows saving the original image without data loss Athough the setting...

Страница 169: ...sing the dial or U 9 Õ V Ãi iVÌ Ì i Ì iÀ ÃiÌÌ Ì i À i v Ó H Îä seconds 5 The shot is taken automatically after the time being set has passed by pressing Shutter Using the timer function The function can be set directly by pressing in the shooting mode To cancel the self timer function press one more time or press Shutter MENU 2 Timer Reset 10 2 30 Back ...

Страница 170: ...perate SMART Smart Flash The amount of flash light is adjusted automatically according to the exposure in the surrounding environment Auto The flash light operates automatically in the dark place Auto Red The flash light operates automatically and prevents the red eye effect Fill in U Ü Þà iÀ ÌiÃ Ì i y Ã Ì U The brightness of flash light is automaticaly controlled Fill in Red Always operates the flash ...

Страница 171: ...ivity The ISO sensitivity as the film sensitivity established by the international standards organization ISO represents the degree of reaction when camera receives light Since it reacts more sensitively with greater ISO value a natural shot can be obtained in a dark place by raising the ISO value This reduces the degree of camera shaking with faster shutter speed 1 In Shooting mode press MENU 2 Se...

Страница 172: ...sh light U ÕÃÌ Ì i Õ Ì v y Ã Ì Ã Ì Û L i for some shooting modes U 7 i iÝÌiÀ y Ã Õ Ì Ã Ì i y à V ÌÀ function the light control value of external flash is applied when connecting to the camera U v Ì i ÃÌ Vi vÀ Ì i ÃÕL iVÌ Ã µÕ Ìi V Ãi when taking images by using the built in flash part of the images may appear dark as the lens is interfered with the flash light Please check the distance between camera...

Страница 173: ...hat the focus is set correctly in the display Face Detection AF Shows the areas that the focus is correctly set in the display Self Portrait AF When the sound effect is heard at the time of self shot you can check the position of the subject s face U Þ ÕÃ Ì i V ÌÀ iÛi v AF MF the focus can be adjusted manually U 7 i Ì iÀi Ã É ÃÜ ÌV Ì i i Ã Ì i v VÕà can be adjusted manually in the AF mode by selec...

Страница 174: ...ss MENU to return to the previous mode 4 In Shooting mode press 5 Press to move the focus area 6 Adjust the size of focus area by using the dial 7 Align your subject in the frame and half press Shutter to focus 8 Press Shutter to take a photo MENU OK 2 1 1 1 2 3 AF Mode AF Area AF Prior ty Drive Metering Flash 3 Focus change Back Set Selection AF Mu ti AF Face Detection AF Se f Portrait AF AF Zoom...

Страница 175: ...Ûi Ü i When the subject is too far When it is too bright or dark When the subject is not facing to the front When part of the face is hidden by an object like sunglasses When one makes a large facial expression When the light or backlight shown on the face is not uniform Depending on the Picture Wizard option the subject s face may not be recognized U i Ì Ã Þ vviÀ i i Ì i shooting mode U Ã vÕ VÌ V...

Страница 176: ...se up shot possible If the face is detected in the center it rings a sound to take a shot 1 In Shooting mode press MENU 2 Select Shooting 2 2 AF Area Self Portrait AF 3 Press Shutter if having an info sound of shooting The face is positioned in the center with the info sound ringing Face detection ...

Страница 177: ...3 Press the Shutter button to take a picture U When the exposure value is set it may be excessively bright or dark depending on the shooting environment Adjust and take a picture by changing the exposure value appropriate for the environment U 7 i Ì Ã vwVÕ Ì Ì Õ i À À Ìi Û Õi of exposure please set the detailed setting of AE BKT successive shots of exposure increase decrease This takes 3 pictures ...

Страница 178: ...able for outdoor shot on a clear day Cloudy Suitable for shadows on a cloudy day Fluorescent White Daylight fluorescent lamp suitable especially for the white fluorescent light with the color temperature of about 4200K Fluorescent NW Daylight fluorescent lamp suitable especially for the daylight fluorescent lighting with the color temperature of about 5 000K Fluorescent Daylight Daylight fluorescent la...

Страница 179: ...darker and the last one step ighter WB BKT When the shutter is pressed the camera will take 3 consecutive shots the original and 2 more with different white balance settings P Wiz BKT When the shutter is pressed the camera will take 3 consecutive shots all three wil have different picture wizard settings U i Ì Ã Þ vviÀ i i Ì i Ã Ì i U WB BKT and P Wiz BKT is the function that corrects the image af...

Страница 180: ... mode press MENU 2 Select Shooting 1 1 Picture Wizard an option 3 Adjust the detailed items of picture wizard that were selected by using U 9 Õ V V ÌÀ Ì i V À Ã ÌÕÀ Ì Ã À iÃÃ contrast 4 Set to a desired value U i Ì V Li ÃiÌ ÀiVÌ Þ LÞ ÀiÃÃ Ì i button of camera in the shooting mode MENU Vivid Color 0 0 0 Satu ation Sha pn ss Con ast Exit Move ...

Страница 181: ...ing an external flash unit SEF 20A or SEF 42A 57 Focus change AF priority shot The AF priority function is the function that the shutter does not work if the focus is not set appropriately when the user sets the focus manually Off On 59 AF assist light You can use the auto focus function more accurately in the dark place by using the AF lamp Off On 60 Finding more about the extended shooting functi...

Страница 182: ...usting the color temperature 68 Color space This allows setting the color space to use sRGB Adobe RGB 69 Smart range This smoothly corrects the loss of bright part that can occur due to the differences in the shading of picture Off On 70 Changing the shooting method Detailed bracket setup The details for the exposure white balance and picture wizard of bracket shot can be set AE BKT Set WB BKT Set...

Страница 183: ...yback The display information appears by pressing DISP in the play mode 1 RAW file indicator 2 File that includes development info 3 Protected file 4 File no 5 Meta value of taken picture 6 Shutter speed info 7 Aperture value 8 ISO setup value info 9 F le in play total no of files taken battery information Play picture movie 00004 00009 1 250 F5 1 100 ISO 100 0001 4 5 6 7 8 9 3 2 18mm AWB 0 0 4592 X ...

Страница 184: ...al number of files battery information Descriptions about movie playback 1 Volume control display 2 Protected file 3 File no 4 Meta value of movie taken 5 Fast forward 6 Total play time of selected file 7 Current play time 8 Rewind OK 00 00 01 00 100 0001 1280 X 720 2010 01 01 V deo size Date Play picture movie 3 4 1 7 6 5 8 2 0 0 4592 X 3056 2010 01 01 R G B 1 2 3 4 Play Capture 18mm Y ...

Страница 185: ... 5 Press to return to the previous Converting into the thumbnail view Since several files can be shown on one display files can be searched quickly To have a thumbnail view of 9 images press two times or press three times to have a thumbnail view of 20 images Press to cancel Play picture movie Executing the smart album or changing the category upon execution the time may be delayed according to the ...

Страница 186: ... 1 After selecting the file to be deleted in the play mode press 2 From the popup window select Yes Deleting selected file 1 After selecting the file to be deleted in the play mode press 2 From the popup window select Multiple Delete 3 After selecting a file to be deleted press U V Vi Þ ÕÀ Ãi iVÌ ÀiÃÃ Q again 4 Press 5 From the popup window select Yes Deleting all files All the files saved in the memory...

Страница 187: ... desired option U Þ Ü Ì ÕÌ ÃiÌÌ Ì iÝiVÕÌi Ì i step 4 Images Select the pictures to be shown in the slide show U All View all the saved pictures in the slide show U Date See the pictures taken on a specific date in the slide show U Select Select pictures and see them in the slide show Effect U i iVÌ Ì i ÃVi i V ivviVÌ LiÌÜii pictures U À iÀ Ì Ì ÕÃi Ì i V ivviVÌ Ãi iVÌ Ì i off option Interval U i iVÌ...

Страница 188: ... press Pause Play Press the button View a movie While a movie is being played back you are able to select and cut a desired part of the scene 1 After selecting a desired movie in the play mode press 2 Enjoy movie Rewind Press Pause Play Press Fast rewind Press Volume control Turn the dial to the left right Stop Press Play picture movie OK 00 04 01 00 01 00 100 0001 Pause Stop ...

Страница 189: ...ss in the pause state Cutting part of a movie 1 Press in the play mode 2 Select the start point to cut by pressing while playing a movie 3 Select the end point of cutting by pressing 4 From the popup window press Yes Play picture movie U i Àià ÕÌ v V ÌÕÀi i Ã Ì i à i Ã Ì i movie resolution U i V ÌÕÀi w i à à Ûi LÞ ÕÃ Ì i vviÀi Ì w i name U i VÕÌ w i à à Ûi LÞ Õà vviÀi Ì w i i ...

Страница 190: ... Microsoft Direct X 9 0C or later U Programs contained on the CD Program Purpose Samsung Master Edit photos and videos QuickTime Player 7 6 View videos H 264 MPEG 4 AVC files on a PC Samsung RAW Converter Convert RAW files into the desired file format Adobe Reader View the user manual Using a self assembled PC or a PC and OS that are U not supported may void your warranty The programs may not work pr...

Страница 191: ...omplete the installation and restart your computer Transferring files to your PC Once you connect the camera to your PC the camera will be recognised as a removable drive 1 Connect your camera to your PC with the USB cable You must plug the end of the cable with the correct connection port in your camera If the cable is reversed it may damage your files The manufacturer is not responsble for any los...

Страница 192: ... disconnect the USB cable for Windows 2000 Vista is similar 1 It the status lamp on your camera is blinking it means the data transfer is in progress Please wait until the status lamp stops blinking 2 Click on the tool bar at the bottom right of your PC screen 3 Click the pop up message 4 Remove the USB cable Transferring files to your computer U v Ì i iÀ Þ i à ÃiÌ Ì Ìi Ì i v iÀ i i Àà as XXX_MMDD ...

Страница 193: ... downloaded files Click to download the selected files Thumbnails of files click an image to download Using the Samsung Master Interface No Description Toolbar Menus Click for more information about the program Click to enlarge or reduce the thumbnails in the list Change the mode U View mode U Edit mode for photos U Edit mode for videos Preview information about the selected file The photos in the sel...

Страница 194: ...dit functions are listed below U Ì Menu bar Í Image editing tools Exposure bias Compensates the exposure value White balance Adjusts the white balance value Color Adjusts the color of the image Tone Changes the color tone Sharpness Noise reduction Adjusts the sharpness Development Previewing is available for the final output Highlight controller Adjusts the saturation and highlights of the selected...

Страница 195: ...Configuring print settings MENU Ex t Print 2 1 Images Size Layout Type Qua ity Date One Photo Auto Auto Auto Auto Auto Images Select whether to print the current photo or all photos Size Specify the size of the print Layout Create thumbnail prints Type Select the type of paper Quality Set the printing quality Date Set to print the date File Name Set to print the name of the file Reset Reset the prin...

Страница 196: ...e of a picture taken in the backlight mode 86 Picture style You can express various moods of emotional picture by selecting the picture style 86 Face retouching You can retouch the face of portrait shot softly 86 Setting the print options DPOF no of copies index print size The size and number of copies to be printed can be designated for the picture 87 Viewing in TV HDTV Viewing in HDTV You can vi...

Страница 197: ...the previous mode Camera settings menu The camera use environment can be set to a desired state by using the setup menu MENU OK 2 1 2 1 1 3 Quickview Display Adjust Display Save Power Save Date Time Sound 1sec 3min 1min 3 Setup menu items MENU OK 2 Sound System Volume AF Sound Button Sound Medium On On Exit Change Exit Change ...

Страница 198: ...ness setting and color Display Brightness Depending on whether the user uses the screen or the viewfinder the display brightness can be adjusted by using the Auto Brightness Adjust the brightness of screen Display Color Depending on whether the user uses the screen or the viewfinder the display color can be adjusted by using the Display Save This allows setting the power off time of display Off 0 5m...

Страница 199: ...ÉÚ 8888 Li H i É _ADDXXXX JPG Adobe RGB indicating A for Oct B for Nov C for Dec For example the image taken by setting Jan 01 sRGB is saved in 0101xxxx jpg File Number This sets the method of designating file number Series Reset U i v iÀ i Ì Ì Ã Ì i VÌÕÀià v À Ì i wÀÃÌ Ì i LiV ià ää Ì i w i i Ü Li Úäää Ü i the color space is sRGB U i w i i Õ LiÀ à VÀi Ãi LÞ Ì i À i v Úäää H Ú U i v iÀ Õ LiÀ à VÀi ...

Страница 200: ...ÌiÀ Ài V Ì i L ÌÌiÀÞ U Ã Þ Ì Ü À v Û V iVÌ Ì V ÕÌiÀ 6 À À ÌiÀ Þ Ã i Ã Ü À Û i Date Time This sets to indicate the date and time that has taken a picture Type Date Time Zone Time Imprint U i Ìi Ì i Ài Ã Ü Ì i ÜiÀ À Ì Ã i v Ì i VÌÕÀi Þ U 7 i À Ì VÌÕÀi Ì i Ìi Þ Ì Li À Ìi À À Ìi Þ vÀ ViÀÌ Õv VÌÕÀiÀ À À ÌiÀ i Environment setup menu Default value Normal setup 2 2 ...

Страница 201: ...HDMI CEC the play function of camera can be controlled with the TV remote controller CD ROM User manual page 90 On The play function of camera can be controlled with the TV remote controller Off The play function of camera can NOT be controlled with the TV remote controller HDMI Size The resolution on an HDTV can be changed when using an HDMI cable In case of NTSC method Auto 1080i 720p 480p In ca...

Страница 202: ...recharge the battery Memory Full Delete unnecessary files or insert a new memory card No Image File Take photos or insert a memory card that has some photos Check the lens Check whether dust or foreign substances between Lens contacts and Lens mount index Remove either dust or foreign substances if dirt or foreign substances are appeared Please be care for avoid getting dirt foreign substances insi...

Страница 203: ...sing the flash or recording videos depletes the battery quickly Recharge if needed U Batteries are consumable parts that must be replaced over time Get a new battery if the battery life is diminishing U quickly Cannot take photos There is no space on the memory card Delete unnecessary files or insert a new card U Format the memory card p 74 U The memory card is defective Get a new memory card U The ...

Страница 204: ...shooting the photo may be blurry Use the tripod to avoid possible camera shake U Make sure that the lens is clean If not clean the lens CD ROM User manual page 108 U The colors in the photo do not match the actual scene An incorrect white balance can create unrealistic color Select the proper white balance option to suit the light source p 53 The photo is too bright Your photo is overexposed Adjus...

Страница 205: ...ission may be interrupted by static electricity Disconnect the USB cable and connect it again Your computer cannot play videos The codec installed in your computer may not be compatible with the video files you want to play Use QuickTime Player or install Codec Pack Full Using QuickTime 噝 Player 7 6 1 Install QuickTime Player 7 6 which supports MP4 H 264 MPEG 4 AVC 2 Play videos using QuickTime Pla...

Страница 206: ...iew Approx 100 Magnification Approx 0 86x APS C 50mm 1m 1 Eyepoint About 20 2mm Diopter Adjustment À Ý ä H Ó ä 1 Specification Focusing Type Contrast AF Focusing point Selection 1point Free selection Multi Normal 15points Close Up 35points Face Detection Max 10faces Modes Single AF Continuous AF MF AF assist lamp Yes Green LED Shutter Type Electronically controlled vertical run focal plane shutter S...

Страница 207: ...ction Fll in Fil in Red eye reduction 1st Curtain 2nd Curtain OFF Guide Number 11 at ISO 100 Angle of View Coverage 28mm wide angle Equivalent to 35mm Sync Speed Less than 1 180sec Flash Compensation 2 2EV 0 5EV step External Flash Samsung External Flash avalable SEF 42A SEF 20A optional Synchro Flash attachment Hot Shoe Specification Whte Balance Modes Auto Dayight Cloudy Fluorescent W N D Tungste...

Страница 208: ...080 RAW 14M 4592x3056 Quality Super fine Fine Normal RAW Format SRW Color Space sRGB Adobe RGB Specification Movie Format MP4 H 264 Compression Movie H 264 Sound AAC Movie Clip With Audio or without Audio user selectable recording time 25 minutes Image size 1280x720 640x480 320x240 Frame rate 30fps Sound Mono Sound Movie Editing Still Image Capture Time Trimming Image Play Type Single image Thumbnal...

Страница 209: ...min Normal 66min 320x240 High Quality 145min Normal 210min These figures are measured under the Samsung standard Specification Direct Printing PictBridge Interface Digital Output Connector USB 2 0 HI SPEED Video output NTSC PAL user selectable HDMI 1 3 1080i 720P 576P 480P External Release Yes DC power input connector ä6 x ää H Ó ä6 Power Source Type Rechargeable battery BP1310 1300mAh Charger BC131...

Страница 210: ...rcular Aperture Diaphragm F3 5 5 6 Min F22 Number of Blades 7 Circular Aperture Diaphragm F4 5 6 Min F22 Number of Blades 7 Circular Aperture Diaphragm Mount Type Samsung NX Mount Samsung NX Mount Samsung NX Mount Optical Image Stabilizer No Yes Yes Minimum Focus Distance ä Óx H ä Ón H ä n H Maximum Magnification Approx 0 16X Approx 0 22X Approx 0 2X Lens Hood Optional Included Included Filter Size...

Страница 211: ...ent dial 12 Display type 24 Depth Preview 30 Depth of field 30 Deleting a file 61 Display 73 Date Time 75 E Eye sensor 11 Eye cup 12 EV button 35 External flash 56 Error message 77 F Fn 23 Flash popup button 45 Focusing methods 48 Face detection 50 File protection 61 Face retouching 71 Format 74 File name 74 File number 74 Folder type 74 Firmware update 76 H Half shutter 26 HDTV 71 HDMI Size 76 I Ico...

Страница 212: ...to mode 31 Shutter Priority mode 34 Shutter speed 34 Scene mode 37 Self portrait face Setting the flash option 45 Single AF 48 Selection AF 48 detection 51 Shooting method 54 Spot metering 57 Smart range 57 Smart album 60 Slide show 62 Samsung Master 68 Samsung Raw Converter 69 Sound 73 System volume 73 Sensor cleaning 76 T Title and role of each part 10 Turning on the power 19 Tips 26 Timer 54 Thu...

Страница 213: ...Please refer to the warranty that came with your product or visit our website http www samsung com for after sales service or inquiries AD68 04529A 1 0 ...

Страница 214: ...CD ROM Contains S3msung Master sam RAW I QuickTIme Player AdOOe Reader oIcI _ User Manual Sl Q 1IIlOO I ...

Страница 215: ...nity to express your opinion and get a 30 bank check in a certified letter as a token of our gratitude for completing the survey We look forward to hearing from you soon Note Please understand that this survey can be closed without particular notification when the quota 50 persons has been fulfilled Your personal data Name telephone number address and e mail will only be used for the purpose of pa...

Страница 216: ...ausgelaufene BaUerie n Nichtbeachtung der Bedienungsanleitung unzureichende Versandverpackung Eingriffe nicht autorisierter Werkstatten etc entstanden sind Standardinspektionen aul1erer VerschleiB und Oberbeanspruchung untertiegen ebenfalls nicht den Garantiebedingungen 5 Zubeh6rteile die mit diesem Produkt verwendet werden k6nnen Batterieln Trageriemen Taschen etc unterliegen nicht dieser Garanti...

Страница 217: ... P O Box 681 2600 AR Delft Netherlands 726 78640 10eur Min NORWAY Samsung Electronics Nordic AB T 815 56 480 Volisveien 2B N 1366 Lysaker Norway Samsung Electronics Polska Sp z 0 0 T 0 801 1SAMSUNG 172 678 POLAND Centrum Obs ugi Klienta T 48 0 22 607 93 33 Using mobiles F 48 0 22 607 44 48 SAMSUNG ELECTRONICA PORTUGUESA T 80820 SAMSUNG PORTUGAL Porto Salvo Lagos Park Edificio 5B Piso 0 2740 298 Po...

Отзывы: