background image

4-16

Manual

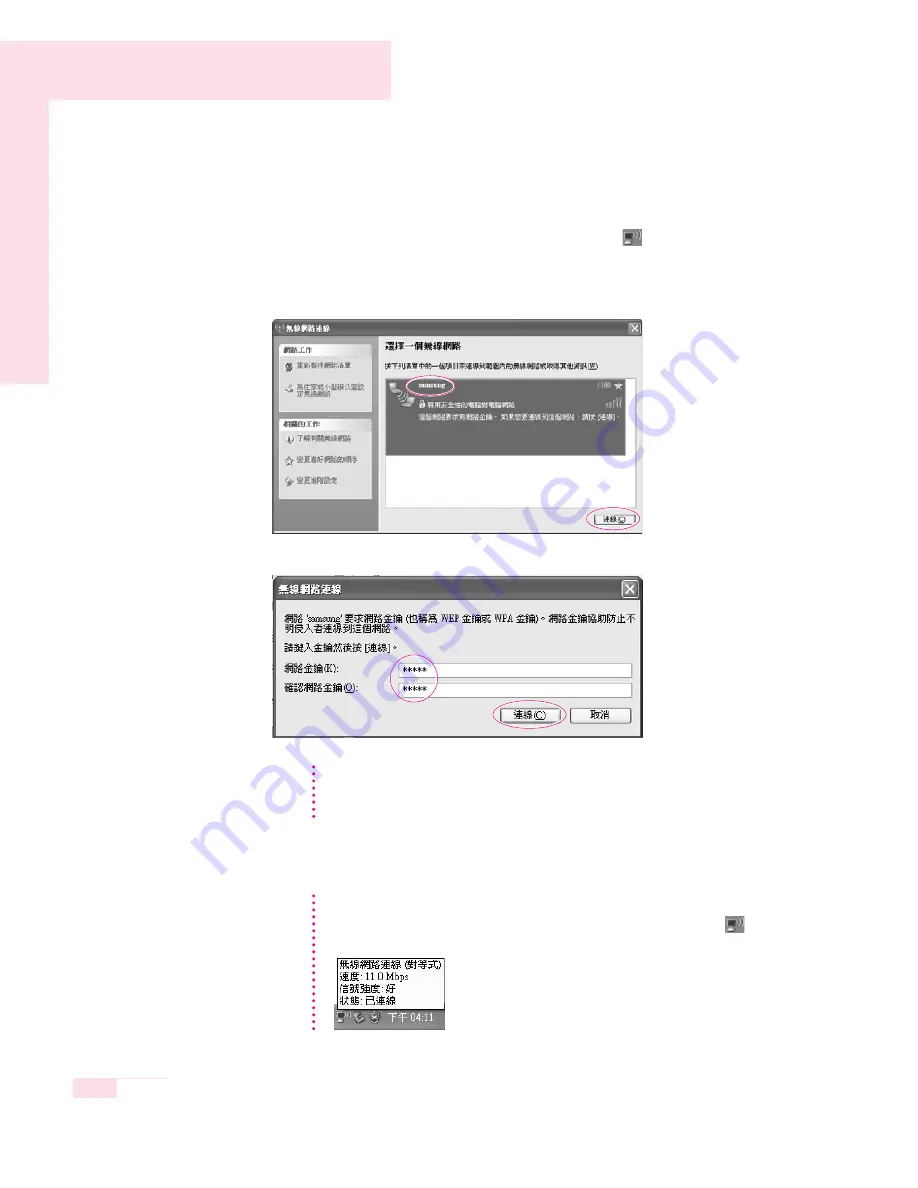
Step 2. Connecting to the configured computer

1. Right-click on the Wireless Network Connection (

) icon on the taskbar,

and select View Available Wireless Networks.

2. Select the wireless network name (e.g. samsung) specified in “Connecting to 

computer-to-computer networks (peer-to-peer or ad hoc)”, and click Connect.

3. Enter a cryptographic key in the network key box and click Connect.

When connected to the wireless network, the system displays Connected in the
selected network of the Network Connection window.

If the network key is not configured in “Connecting to computer-to-computer 
networks (peer-to-peer or ad hoc)” on P. 4-13, just click Connect, without any
keystrokes.

N

N

o

o

t

t

e

e


Checking the connection status. 
Move the mouse pointer over the Wireless Network Connection (

) icon

on the taskbar, and the connection status is displayed.

N

N

o

o

t

t

e

e


Содержание NP-P40

Страница 1: ...osoft Corporation Product names mentioned herein are for identification purposes only and may be trademarks and or registered trademarks of their respective companies Macrovision Statement If your com...

Страница 2: ...be operated only with the type of power source indicated on the rating label Ensure that the electrical outlet you are using to power your equipment is easily accessible in case of fire or short circu...

Страница 3: ...ning the system Unplug the system from the wall outlet and refer servicing to qualified personnel if The power cord or plug is damaged Liquid has been spilled into the system The system does not opera...

Страница 4: ...e requirements for use in the country where you purchased your equipment Power cord sets for use in other countries must meet the requirements of the country where you use the computer For more inform...

Страница 5: ...his time Because the wireless devices which may be embedded into your notebook emit less energy than is allowed in radio frequency safety standards and recommendations manufacturer believes these devi...

Страница 6: ...oval authorities prior to any move or trip for any restrictions on the use of a wireless device in the destination country If your system came equipped with an internal embedded wireless device do not...

Страница 7: ...te the receiving antenna Increase the separation between the equipment and receiver Connect the equipment into an outlet on a circuit different from that to which the receiver is connected Consult the...

Страница 8: ...cm2 may be exceeded at distances close to the antenna installed Therefore the user must maintain a minimum distance of 20cm from the antenna at all times This device can not be colocated with another...

Страница 9: ...that you disconnect the equipment until the problem is resolved The user must use the accessories and cables supplied by the manufacturer to get optimum performance from the product No repairs may be...

Страница 10: ...of 20 cm 8 inches between the wireless device and the body for use of a wireless device near the body this does not include extremities is typical This device should be used more than 20 cm 8 inches f...

Страница 11: ...tified equipment should be made by an authorized Canadian maintenance facility designated by the supplier Any repairs or alterations made by the user to this equipment or equipment malfunctions may gi...

Страница 12: ...ted with a 2 4 GHz band embedded wireless device European Radio Approval Information for products fitted with EU approved radio devices This Product is a Notebook computer low power Radio LAN type dev...

Страница 13: ...for pan European approval for connection to the analogue Public Switched Telephone Networks PSTNs of TE excluding TE supporting voice telephony services in which network addressing if provided is by m...

Страница 14: ...step information they apply to Warning Indicates the possibility of personal injury Caution Warns you of possible damage to equipment or data Note Informs you of special circumstances Technical Inform...

Страница 15: ...or shown in a small figure such as the Start Button shown on the right Table 1 Touchpad Click Conventions Windows Conventions Almost all Windows programs will display the name function of a button or...

Страница 16: ...nsor is optional For more information on using the fingerprint sensor refer to the manual supplied with the device Touchpad Button Keyboard p8 LCD Panel Touchpad p11 Power Button Hot Keys p14 Fingerpr...

Страница 17: ...r multi bay devices in the multi bay of the system Refer to p 27 Left View USB Port 2 0 Headphone Jack Microphone Jack Multi Bay PCMCIA Card Slot p31 Modem Port p40 LAN Port p41 Memory Card Slot p28 F...

Страница 18: ...o replace the hard disk drive please contact your nearest Samsung Service Centre USB Port 2 0 1394 Port 6 pin TV Out Port S Video DC In Port Monitor Port Parallel Port Serial Port Memory Compartment p...

Страница 19: ...Insert the battery and connect the AC adapter according to the Installation Guide 2 Slide the LCD latch to the right and open the LCD panel 3 Press the power button To turn off the computer 1 Click th...

Страница 20: ...box appears click Shut Down Turn Off to turn off the computer Your unsaved work may be lost damaged If Ctrl Alt Delete keys do not operate either press the power button for more than 4 seconds to tur...

Страница 21: ...he layout of the keys on your computer s keyboard is different from that on a desktop computer s keyboard the keyboard feels like a full sized keyboard when you use it You can use a symbol of if press...

Страница 22: ...rip into the keyboard or you may damage the keyboard Using the Numeric Keypad Your keyboard includes a numeric keypad which is a group of keys that you can set to type numbers and mathematical symbols...

Страница 23: ...Turns the audio output on and off F9 Touchpad Turns the touchpad function on and off F10 Low Noise Mode You can select Low Noise Mode when you need a tranquil work environment Caution In low noise mo...

Страница 24: ...ape or I shape The touchpad on your computer allows you to move the pointer on the LCD screen just like a mouse that is used with a desktop computer The touchpad buttons allow you to take actions with...

Страница 25: ...ad button once Or place the pointer over an object then tap the touchpad once with your finger Double Click Launch a program or open a file Place the pointer over an object then quickly press left tou...

Страница 26: ...r touchpad button while starting your system may increase the time required for starting Windows Scroll Display upper lower left right part of the content within a window Applicable to certain program...

Страница 27: ...ternet Explorer 2 E Mail Button Launches Outlook Express 3 User 1 Button You can launch a frequently used program by pressing the button By default Windows Calculator is configured to be launched when...

Страница 28: ...dows Calculator is configured to launch when you press the User 1 button You can set the program by completing the following procedure 1 Double click the Key Define Utility icon on the taskbar 2 Click...

Страница 29: ...it is set to scroll the screen up and down while the cursor position does not change in some applications Battery Turned blue when the battery is fully charged or when the battery is not installed Tu...

Страница 30: ...m off and on 1 Turn the system on When the Samsung Logo appears press the F2 key to enter Setup 2 In the Boot menu change the Brightness Control Mode option to User Control 3 Save the settings and exi...

Страница 31: ...per part of the screen for a few seconds To adjust using volume adjustment program Click the Volume icon on the taskbar and move the Volume slider to a desired level For advanced volume control option...

Страница 32: ...ace and a taskbar at the bottom Start Button Opens the Start menu Taskbar Displays programs that are currently running Frequently used icons can be placed here Recycle Bin Deleted files or folders are...

Страница 33: ...licking Search My Computer Displays the contents of the hard disk the CD ROM drive the network drive s and floppy disks It can also be used to search and open files and folders Control Panel Enables u...

Страница 34: ...which files and folders are saved in and read from What is a folder A folder is used to group and manage files systematically and may include files in sub folders It is similar to a bookshelf What is...

Страница 35: ...oting information regarding computer use Click Start Help and Support Windows XP Tour You can tour elementary functions provided by Windows XP Click Start Tour Windows XP Or click Start All Programs A...

Страница 36: ...access LED is on the disk and the data in it may be damaged Emergency Eject Hole To eject a CD when the CD drive is not working or the computer is turned off unfold a paperclip and insert the unfolded...

Страница 37: ...o use the Windows Media Player The Windows Media Player allows you to play audio and video files from the computer or the Internet To launch the Windows Media Player click Start All Programs Accessori...

Страница 38: ...k OK The video starts playing Above procedure applies only to the video CDs that has a dat file as the execution file Playing procedure may be different according to video CDs To write data on a CD Op...

Страница 39: ...a completed message appears and the CD drive window opens automatically For more information on writing CDs Click Start Help and Support Type CD copy in the search field and click the Search icon For...

Страница 40: ...ce the drive installed in the Multi Bay with other drives are described below Before Replacing the Multi Bay Replace the Multi Bay only after turning the computer off 1 Turn off the computer 2 While h...

Страница 41: ...uter and any digital equipment such as a digital camera Restrictions when Using Memory Sticks SD Cards You can use Memory Stick SD Memory Card and Memory Stick Pro for storing data only Copyright prot...

Страница 42: ...u can write data to the memory card If the memory card is not formatted yet format the memory card before use Since the memory card may be easily mislaid when moving your computer keep the memory card...

Страница 43: ...k Start My computer 2 Press the right touchpad button on the memory card drive and select Format from the pop up menu 3 Click Start to start the format operation To use a memory card in both the compu...

Страница 44: ...ill damage the PCMCIA card slot 2 Windows automatically installs the necessary driver for the card If there is no available driver found by Windows you have to install the driver using a disk supplied...

Страница 45: ...es folders computer scheduling and system recovery BIOS In windows based mode you can recover the BIOS defaults and change the boot sequence Desktop Desktop management features include changing the fo...

Страница 46: ...sed as an example here to show the function of Easybox Configuring Firewall The Windows Firewall prevents unauthorized users from gaining access to your system via the network or the Internet 1 Click...

Страница 47: ...automatically launched when you start your computer 2 Samsung Smart Screen appears When you run the program for the first time water drop image is displayed 3 To move an icon click a water drop to op...

Страница 48: ...the desktop Or select Start All Programs Samsung Samsung Theme Samsung Theme Samsung Theme Switches to Samsung Theme desktop logon screen and sound effects on booting Windows XP Theme Switches to the...

Страница 49: ...t Start All Programs Samsung Samsung Update Plus Samsung Update Plus If this is the first time you are running the program a window will appear asking you if you agree to the agreement in the window C...

Страница 50: ...matic update items display By default your computer is configured to automatically search for updates If there is a new update available this is notified in the notification area Click the balloon hel...

Страница 51: ...sts of the following 4 areas S W Group Area You can classify programs into 5 groups these being System Utility Network Support and Entertainment and manage them You can add a file that can be launched...

Страница 52: ...c movie or album player of the AV Station program Drag and drop a media file from the Desktop or Explorer over any of the buttons to launch the corresponding player Samsung Update Plus Area When there...

Страница 53: ...internet service provider ISP for instructions on how to connect to and disconnect from the Internet 1 Connect a telephone line to the computer s modem port 2 Connect to the Internet according to the...

Страница 54: ...AN cable to the computer s LAN port 2 Click Start Control Panel 3 Click Network and Internet Connections in the Control Panel window 4 Click Network Connections in the Network and Internet Connections...

Страница 55: ...in DNS server address automatically Click OK To use a static IP On the General tab select Use the following IP address and fill in the IP address Subnet mask Default gateway Preferred DNS server and A...

Страница 56: ...ce and the network settings will be automatically changed accordingly You can easily find out your current IP To configure network setting 1 Connect LAN cable to the computer s LAN port 2 Double click...

Страница 57: ...using DHCP select DHCP check box and click Save If you are using a static IP clear DHCP check box enter appropriate network setting and click Save Ask ISP or network administrator for IP address To ch...

Страница 58: ...Using Internet Connect Share you can use the Internet by connecting to a computer connected to the Internet even if your computer does not have a direct Internet connection You can setup the server wh...

Страница 59: ...k OK 6 Your configuration is displayed such as the Internet Connection Use Firewall Home Network Connection etc Confirm your configuration and click OK to begin the Internet Connection Share setup 7 C...

Страница 60: ...icons Click the client computer 4 Select a network to connect to the server and click OK If it is a wireless connection the wireless network connection properties and the wireless network setup proce...

Страница 61: ...Maintenance System Hardware tab Device Manager The actually displayed images may differ from the figures shown in this section according to the installed device and the connection state and the suppo...

Страница 62: ...s see Connecting to computer to computer networks peer to peer or ad hoc on page 51 Connecting to an Access Point AP This section describes how to connect to an AP You can use the network when you are...

Страница 63: ...e window and then click the Connect button When a network key is not defined for a selected AP click on Link to display the warning message box Then click Connect again in the box Now when Connected i...

Страница 64: ...nternet can share the Internet by accessing another computer connected to the Internet Refer to See To share an Internet connection on page 45 You can connect by completing the following steps Step 1...

Страница 65: ...ferred Networks 3 On the Wireless Network tab click Advanced 4 Clear Automatically connect to non default network check box if it is selected Select Computer to computer ad hoc networks only and click...

Страница 66: ...on key in the Network key field and click OK To prevent a network connection from an unauthorized user it would be better to configure a network key encryption key A network key consists of 5 or 13 al...

Страница 67: ...amsung is in the Preferred networks item and click OK Now your wireless network setup has been completed Step 2 Connecting to the configured computer 1 Right click on the Wireless Network Connection i...

Страница 68: ...d click Connect 3 Enter a cryptographic key in the network key box and click Connect If the network key is not configured in Connecting to computer to computer networks peer to peer or ad hoc on page...

Страница 69: ...56 Users Manual Checking the connection status Move the mouse pointer over the Wireless Network Connection icon on the taskbar and the connection status is displayed...

Страница 70: ...program PROSet You can install the wireless LAN client administrator program following the instruction displayed automatically when you insert the system software CD Insert the system software CD into...

Страница 71: ...Search Security Settings window the wireless network security search message will appear Click Next 5 Enter the network authentication data encryption WEP encryption level key index and wireless secu...

Страница 72: ...te a new computer to computer Ad Hoc network or to connect to a hidden access point Stealth Closed Mode refer to the following procedures A hidden access point is an access point that exists but is co...

Страница 73: ...ng a computer to computer network connection profile For more information on security settings refer to the security settings in Connecting to AP or Help When you are creating a computer to computer n...

Страница 74: ...Connecting Through a Wireless LAN Option on page 48 Sharing files or folders This section describes how to share files and folders between computers connected to the network To share files complete th...

Страница 75: ...Wizard This screen does not appear if Internet Sharing Network Wizard has been installed in the computer to computer wireless network environment 3 Select Just enable file sharing and click OK 4 In t...

Страница 76: ...the shared file If your computer is a member of another workgroup 1 Click Other Places Microsoft Windows Network 2 Click the desired workgroup 3 Click the desired computer to display the shared files...

Страница 77: ...name for the shared printer and click OK 4 In the Printers and Faxes window you will find the printer icon has been changed to another icon on a hand Step 2 Adding and Using a Shared Printer 1 From a...

Страница 78: ...e 7 Read the warning about a shared printer and click Yes to install the shared printer 8 Select Yes for Do you want to use this printer as a default printer and click Next 9 Click Finish 10 When the...

Страница 79: ...by the Bluetooth software Transferring files You can transfer files between Bluetooth devices such as computers mobile phones PDAs Personal Digital Assistant etc For more detailed procedures on trans...

Страница 80: ...m Hand held PC or a Pocket PC You can transfer data to and from a Palm Hand held PC or Pocket PC For more detailed procedures on sharing data refer to Installing a Palm handheld computer using Bluetoo...

Страница 81: ...hen infrared communication is available a beep sounds and Send files to another computer icon appears on the desktop You can now transfer data through infrared communication To transmit data through i...

Страница 82: ...rt and set the item to Enabled by pressing F5 or F6 d Save the configuration and exit the Setup 2 Check Windows configuration a Click Start Control Panel Performance and Management System Hardware tab...

Страница 83: ...pting you to run the program You may also want to run System Setup particularly the first time you use your computer to set the time and date use security or power management features or alter the set...

Страница 84: ...ures including passwords Boot Specifies the order of boot devices and configures boot features Exit Specifies how to exit System Setup Navigation Key Function F1 Displays the General Help window Esc E...

Страница 85: ...irst booting device when the CD ROM drive is configured as the first booting device by default 1 Select the Boot menu in System Setup 2 Press Enter on Boot Device Priority item 3 Use key to move to th...

Страница 86: ...er 3 Enter a password press Enter re enter the password for confirmation and press Enter again 4 When a message confirming the password configuration appears in the Setup Notice window press Enter Set...

Страница 87: ...rd on boot option to Enabled From now on system booting will not proceed without the password Deactivating the Password 1 On the password to delete press Enter e g supervisor password 2 Enter the curr...

Страница 88: ...n 2 Make changes on the Settings tab of the Display Properties dialog box The Graphics Chipset For P40 model either an ATI or Intel Graphics Chipset is installed You can view the installed graphics ch...

Страница 89: ...dels configuring the screen resolution to 1024x768 and the colour quality to Highest 32 bit is recommended For SXGA models configuring the screen resolution to 1400x1050 and the colour quality to High...

Страница 90: ...ay device e g a monitor or a projector to the corresponding port of the system To connect a TV connect the TV to the TV output port of the system Connecting to a TV To connect to a TV connect the TV O...

Страница 91: ...isplay device is connected the display option changes in LCD CRT LCD CRT order whenever the Fn F4 keys are pressed Provided that multiple external display devices are connected the display order is LC...

Страница 92: ...l display device e g a monitor or a projector to the corresponding port of the system To connect a TV connect the TV to the TV output port of the system Connecting to a TV p77 2 Press touchpad right b...

Страница 93: ...he settings to the desired screen resolution and colour quality in the Display Properties dialog box Deactivating Dual View Mode Click the monitor 2 icon clear the Extend my Windows desktop onto this...

Страница 94: ...connect the TV to the TV output port of the system Connecting to a TV p77 2 Right click on the desktop and select Graphics Options Graphics Properties 3 On the Devices tab select your desired display...

Страница 95: ...ompt To change display devices easily Right click on the desktop and select Graphics Options Output To to change the current display device easily To change the screen resolution and color quality If...

Страница 96: ...c Power Management Schemes This section discusses the basic schemes of power management when the computer is operating on battery power or using AC power Standby vs Hibernation Hibernation is a state...

Страница 97: ...Mode Power Management or Manual Method When hibernation is used your computer turns off and when you power up again everything is restored exactly as you left it including programs and documents you m...

Страница 98: ...ly for conserving battery power in your notebook computer It also gives you the benefit of getting right back to your work without waiting for the computer to restart Standby turns off your monitor an...

Страница 99: ...ect the mode Do nothing Ask me what to do Standby Hibernate Shut down assigned to the Power button and or Rest Esc key Also select the action Do nothing Standby Hibernate associated with closing the c...

Страница 100: ...refer to the system operation environment p131 of this manual and operate and store the battery at room temperature Ejecting and Attaching Battery 1 Shutdown the system and close LCD 2 Put the compute...

Страница 101: ...ance and Maintenance Power Option Power Measure tab Then you can view the current power source and the current remaining battery charge Using the battery Battery is an expendable supply so when you us...

Страница 102: ...anager Using the Battery Manager program you can change the configuration of the LCD brightness the sleep timer and system devices and can extend the battery usage time to maximum Click on Start All P...

Страница 103: ...ss in Custom Mode the LCD brightness is changed to its default value To keep the brightness value configured in Custom Mode configure the Brightness Control Mode item to User Control in the Boot menu...

Страница 104: ...may not show 100 Before you commence the battery calibration process you should fully charge then fully discharge and finally fully recharge the battery again 1 Disconnect the AC power adapter after t...

Страница 105: ...Removing the memory module Before removing replacing the memory module turn the system off completely Do not replace the memory module when the system is in Standby Hibernate mode 1 Using a screwdriv...

Страница 106: ...le Ensure the notch on the memory module corresponds with the notch on the socket 2 Push the memory module in until the module clicks into place If the memory module is not fixed completely gently pus...

Страница 107: ...The shape and methods of use may differ depending on the manufacturer Please refer to the manual provided with the security lock for proper use 1 Connect a security lock cable to a fixed object 2 Whil...

Страница 108: ...ents and remove any accumulated dust on the outside Avoid using or storing the computer in extremely hot or cold areas such as a car on a hot day Keep the computer away from heaters and out of direct...

Страница 109: ...omputer The best way to avoid spills is to avoid eating and drinking around your computer If you do spill something on your computer turn off your computer unplug it immediately and do the following I...

Страница 110: ...ur authorized manufacturer s service center for a replacement Storing the Computer for Long Periods If you will not be using the computer for a long period of time a month or more you should discharge...

Страница 111: ...ed as follows Click Start All Programs Norton AntiVirus Norton AntiVirus 2005 Windows Help and Support Run Windows Help and Support to find problem that may be affecting your computer To run Windows H...

Страница 112: ...t the system off When the system is turned on after such manual shutdown Scandisk will run to check errors in the system Q2 The system freezes during program operation A1 There is an error with the pr...

Страница 113: ...gs Q4 In the following cases the screen blinks or displays noise for a short time Click on the Graphics related tab change the Resolution change the Display Device remove the AC Adapter restart the sy...

Страница 114: ...sabled due to a changed operating environment the PowerPlay function warning message may be displayed Q9 I cannot see the Taskbar on the Desktop when I use a projector ATI chipset models A This happen...

Страница 115: ...ing procedures Press Fn F4 keys to change the display device Otherwise click the Ati icon on the taskbar and change the screen resolution to the correct setting Q12 Pressing a function key in DOS mode...

Страница 116: ...that the modem is not operating properly Diagnose the modem again after restarting the system or reinstalling the driver You have to exit all programs using modem in the advance of diagnostics of the...

Страница 117: ...shape of the telephone plug may differ according to the country you have to purchase and use the appropriate telephone plug for that particular country Q4 How do I receive a fax while the system is in...

Страница 118: ...click OK Restart the system If the system in rest mode is activated when there is no received signal use the system after disabling Wake On LAN function Connecting wired LAN while using wireless LAN m...

Страница 119: ...mance and Maintenance System Hardware tab Device Manager Network adapters Wireless LAN adapter If there is a yellow exclamation mark please reinstall the device driver with the system software CD A4 R...

Страница 120: ...lowing If the wireless LAN function is off turn it on For Windows XP verify that the wireless network connection has been set to Enable in Start Control Panel Network Connections If there is a Wireles...

Страница 121: ...nnels further apart from each other Ex Ch1 Ch5 Ch9 Ch13 When an AP s SSID Service Set ID option is set to Hide you cannot search for that AP on the computer We recommend canceling the Hide option for...

Страница 122: ...e sure that Use Windows to configure my wireless network settings is selected This may happen when a third party wireless network setup program e g PROSet other than Windows XP default program is inst...

Страница 123: ...work connections using the same IP address simultaneously To use either the wireless or the wired network in turn with the same IP address you have to Disable whichever network device will not be usin...

Страница 124: ...View Available Wireless Networks Advanced In the Wireless Networks tab select an AP in the Available Networks field and click Configure and select Network Authentication Shared Mode If you are using W...

Страница 125: ...Use Microsoft Client in the Tools menu of the PROSet program to manage a wireless network in Windows To manage a wireless network in the PROSet program click on Use Inter PROSet Wireless in the Tools...

Страница 126: ...t click on the desktop using the touchpad and then select Properties 2 In the Display Properties window click the Settings tab Advanced ATI Display tab 3 Select the Panel item and select Extend the im...

Страница 127: ...Change the setting of Power Schemes to Always On Click Start Control Panel Performance and Maintenance Power Options Power Schemes tab then configure the Power schemes field to Always On Q8 Pressing F...

Страница 128: ...e system memory When the system memory is not enough the data is stored in the hard disk and transferred to system memory when the data is needed In some games the screen may be interrupted during thi...

Страница 129: ...curity settings for 2 In the Privacy tab of Internet Properties click on Settings from Block pop ups 3 Enter a URL to want to allow pop ups into Address of Web site to allow and click on Add 4 You wil...

Страница 130: ...indows Firewall If you want to add a program to Programs and Services click on Add Program and select it A2 Set up Windows Automatic Updates This automatically downloads and installs critical updates...

Страница 131: ...ti virus program that your computer is able to identify Check the following programs which Windows can detect and select one from the list A list of anti virus programs that Windows can detect Symante...

Страница 132: ...solutions higher than 480P Configure the resolution of the component output mode to lower than 480P Q4 How can I configure a component TV device ATI chipset models A 1 Right click over the Desktop and...

Страница 133: ...tab select a mode 720p 1080i and click the Apply button Q6 When I am watching the screen on a TV using YPbPr the edges of the screen are trimmed ATI chipset models A Due to the hardware limit of the c...

Страница 134: ...files such as the registry A problem occurs after installing a new program Creating a Restore Point Restore points are created at predetermined times and at times of significant system events such as...

Страница 135: ...rforming system recovery 3 In the Restore point description box type a name to identify the restore point and than click Create A restore point has been created Returning your computer to an earlier r...

Страница 136: ...desired restore date from the calendar restoration and select the desired restore point from the list and then click Next The date of the restore point is displayed in bold font 4 Confirm the selected...

Страница 137: ...ed below 1 Click Start All Programs Accessories System Tools System Restore 2 Select Undo my last restoration and then click Next 3 Confirm the restoration information to undo and than click Next Syst...

Страница 138: ...e CD Insert the system software CD into the CD ROM drive The initial screen appears automatically Standard Installation This displays a list of drivers or programs that are not currently installed on...

Страница 139: ...the main window of the System Software CD Standard Installation is recommended 2 The system is scanned to display the drivers and programs that need to be installed 3 Click OK The drivers and program...

Страница 140: ...Reinstalling Window may delete the data on the hard disk drive such as files programs etc In order to minimize damage from data loss please remember to always back up data Samsung Electronics is not l...

Страница 141: ...e reinstalled 4 After the system has restarted the message Press any key to boot from CD appears Do not press any key at this time After a while the partition configuration screen appears To not chang...

Страница 142: ...password appears Enter the computer name and the administrator password and click Next 9 When the Date and Time Settings window appears click Next Setup will continue 10 When the system restarts to d...

Страница 143: ...ent file system press Enter 5 Select the folder to install the Windows operating system To delete the previous version of Windows and install in the current folder press L on the keyboard 6 After the...

Страница 144: ...e Modem SENS LT56ADW V 92 Modem Wired LAN Broadcom 440x 10 100 Intergated Controller Wireless LAN 802 11g or 802 11a g Bluetooth Bluetooth 1 1 Optional Optional Memory Card Slot Memory Stick Memory St...

Страница 145: ...bo DVD Super Multi Optional Graphics ATI Mobility Radeon X300 X600 Memory 64 128MB Sound SigmaTel C Major Audio AC97 CODEC Network Interface Modem SENS LT56ADW V 92 Modem Wired LAN Broadcom NetLink Gi...

Страница 146: ...an IEEE802 11g device e g IEEE802 11g compatible Access Point Item Detailed Specifications Physical Specifications Dimensions Width X Height 59 75 X 44 45 mm operation temperature and humidity Same a...

Страница 147: ...rtificates or PROSet may be required depending on the network settings For driver update visit www samsung com and for information on the PROSet installation refer to Wireless Network Setup Using the...

Страница 148: ...hat can be used for wireless LAN differs from country to country In France however use only 4 channels channel 10 11 12 13 when using wireless networks Standard IEEE 802 11a g Regulation ETSI 300 328...

Страница 149: ...tput system C Centigrade CD Compact disc CD ROM Compact disc read only memory cm Centimeters COM Communication as in communication port CMOS Complementary metal oxide semiconductor DC Direct current D...

Страница 150: ...processor unit ms Millisecond PDF Portable document format PC Personal computer PCI Peripheral component interconnect PCMCIA Personal Computer Memory Card International Association POST Power on self...

Страница 151: ...d disk The BIOS on your computer is flash BIOS which means that it has been recorded on a flash memory chip that can be updated if needed Boot To start your computer A cold boot resets the entire comp...

Страница 152: ...s and application programs can directly access this memory without using memory management software Disk The device used by the computer to store and retrieve information Disk can refer to a floppy di...

Страница 153: ...e uses to signal the microprocessor when the device needs the microprocessor s services The number of IRQs is limited by industry standards LCD liquid crystal display The LCD screen on your computer d...

Страница 154: ...cluding conventional and extended memory You can write to and read from RAM Information stored in RAM is temporary and is erased when the system is turned off Refresh rate The refresh rate is the rate...

Страница 155: ...ation in ROM to RAM The BIOS can be executed much faster in RAM than in ROM The BIOS remains in shadow RAM until you turn off the computer TFT thin film transistor LCD A TFT LCD uses a separate transi...

Страница 156: ...Getting Started This chapter provides basic information for using this computer System overview and methods for general use are provided Chapter 1 Chapter 1...

Страница 157: ...us Indicators P 1 12 Touchpad Button Touchpad P 1 7 Status Indicators P 1 12 LCD Latch Microphone Finger Print Optional Power Button Hot Keys P 1 11 N N No ot te e The Fingerprint Identification Syste...

Страница 158: ...e You can install various other multi bay devices in the multi bay of the system For procedures to replace the multi bay device refer to Chapter 3 Using Multi Bay Security Lock Port P 5 10 Modem Port...

Страница 159: ...lease contact your nearest Samsung Service Centre 1 4 Manual Rear View Bottom View 1394 Port 6 Pin TV Output Port Monitor connector USB 2 0 Port DC in Jack Parallel Port Serial Port Port Replicator Co...

Страница 160: ...the power button to turn the system on Turning Off 1 Click the Start button on the Taskbar 2 Select Turn Off Computer 3 Click Turn Off from the Turn Off Computer window C Ca au ut ti io on n If the sy...

Страница 161: ...anel 2 Click User Accounts Create a new account 3 Type a name for the new account and click Next 4 Select the account type and click Create Account The new user account has been created Changing users...

Страница 162: ...ed to move the cursor during document operations Double click Run Function Place a finger on the touchpad move the pointer on the screen to the item to run and quickly tap your finger on the touchpad...

Страница 163: ...not apply to some programs Drag Move Select Drag and drop a part to the required place C Ca au ut ti io on n Please use the touchpad only with your finger Using sharp devices may damage the touchpad O...

Страница 164: ...ay device is connected P 6 8 Turns the LCD on and off Turns the audio output on and off Turns the touchpad function on and off The system operates in low noise mode Enables the numeric keypad Scrolls...

Страница 165: ...t or end of a line Windows key Display start menu Application Key Provides the right button function of the touchpad Low Noise Mode Key Pressing the low noise mode button lets your computer operate in...

Страница 166: ...xample Outlook Express User Button User 1 You can launch a frequently used program by press ing the button By default Windows Calculator is configured to be launched when you press this button WLAN Bl...

Страница 167: ...when the battery is fully charged or when the battery is not installed Turns amber when the battery is being charged Blinks when the battery is not properly installed Turns on when the computer is tu...

Страница 168: ...he system off and on 1 Turn the system on When the Samsung Logo appears press the F2 key to enter Setup 2 In the Boot menu change the Brightness Control Mode option to User Control 3 Save the settings...

Страница 169: ...t of the screen for a few seconds Volume Up Volume Down Using the Volume Control Program On the taskbar click the Volume icon and adjust the slide bars For advanced volume control options double click...

Страница 170: ...ack Place the legs naturally If necessary use a cushion to provide extra back support Avoid working postures that require twisting the body or neck Lighting Soft indirect lighting is recommended Posit...

Страница 171: ...1 16 Manual...

Страница 172: ...Introducing Windows This chapter provides basic information on using the computer s main operating system Windows Chapter 2 Chapter 2...

Страница 173: ...for efficiently computer use Windows XP Tour A tour of the elementary functions provided by Windows XP Click Start Tour Windows XP Or click Start All Programs Accessories Tour Windows XP Click on the...

Страница 174: ...art Button Opens the Start Menu Taskbar Displays programs that are currently running Frequently used icons can be placed here Recycle Bin Deleted files or folders end up here Language Bar Enables swit...

Страница 175: ...and floppy disks It can also be used to search and open files and folders Enables users to configure settings on the computer Provides on line help information on Windows and troubleshooting Enables u...

Страница 176: ...lose Window Button Maximize Button Minimize Button Click Shared Files or the Local Disk to view the folders and files in it Folders Files What is a Drive A storage device in which files and folders ar...

Страница 177: ...ding computer use Click Start Help and Support Related help information appears when a search keyword is entered Displays Help Index Help Topics Troubleshooting Information Connect to Support Center T...

Страница 178: ...documents using WordPad is provided here Creating a New Document 1 Click Start All Programs Accessories WordPad 2 Create and edit your document For more information about WordPad refer to on line Help...

Страница 179: ...Printing a Document To print a document connect a printer to the computer For more information about connecting and configuring a printer please refer to the printer manual To print a WordPad documen...

Страница 180: ...Using The Computer This chapter investigates various different functions of the computer and provides information on using the related application programs for them Chapter 3 Chapter 3...

Страница 181: ...2 When the tray slides out place a CD onto it and push down until it clicks 3 Push the CD tray in gently The CD will run automatically To eject a CD when the CD drive is out of order or the system is...

Страница 182: ...All Programs Accessories Entertainment Windows Media Player Features Playlist pane Playback Controls area Windows Media Player tour For more information about using the Windows Media Player run the Wi...

Страница 183: ...k OK to play the audio CD To Play a Video CD 1 Insert a video CD into the CD drive 2 When a video window appears double click the MPEGAV folder 3 Double click the DAT file 4 When a warning window appe...

Страница 184: ...le CD Folder and click OK The CD ROM drive window appears automatically 3 Click Start My Computer 4 Select drag and drop folders or files to copy onto the CD ROM drive window Click Write Files to CD i...

Страница 185: ...r and the CD ROM drive will open automatically 3 6 Manual For more information on copying CDs Click Start Help and Support Enter CD copy in the search field and click the Search button To create an au...

Страница 186: ...replace the drive installed in the Multi Bay with other drives are described below 1 Turn off the computer 2 While holding the Multi Bay latch to the UNLOCK position remove the installed drive 3 Inse...

Страница 187: ...use a memory card 1 Insert the memory card into the memory card slot Memory Stick Memory Stick Pro SD Secure Digital Memory Card C Ca au ut ti io on n Before using the memory card slot remove the slo...

Страница 188: ...ly mislaid when moving your computer keep the memory card separately C Ca au ut ti io on n Since format operation deletes all data in the memory card please make sure that there is no important data i...

Страница 189: ...e driver can be found by Windows the driver has to be installed using the disk supplied with the card To remove PCMCIA card a Double click Safely Removes Hardware icon in Taskbar b Select the appropri...

Страница 190: ...e BIOS defaults and change the boot sequence Desktop Desktop management features include changing the font size execut ing a magnifier function the start menu settings and managing the quick launch ic...

Страница 191: ...authorized users from gaining access to your system via the network or the Internet 1 Click Start All Programs Samsung EasyBox EasyBox 2 Click Security from the top menu bar 3 Select Windows Firewall...

Страница 192: ...ther water drop Click a water drop to open and close the group When you launch Samsung Smart Screen for the first time a dialog box asking whether to register the program as a start program or not app...

Страница 193: ...esktop Or select Start All Programs Samsung Samsung Theme Samsung Theme Samsung Theme Switches to Samsung Theme desktop logon screen and sound effects on booting Windows XP Theme Switches to the Windo...

Страница 194: ...pdate Plus Samsung Update Plus 2 Click Search for and Install Updates and click the Search for Updates button 3 If there are available software or driver updates for your computer the available update...

Страница 195: ...puter is configured to automatically search for updates If there is a new update available this is notified in the notification area Click the balloon help icon in the notification area Here you will...

Страница 196: ...ursor in the right most position Select Start All Programs Samsung Samsung Command Center Samsung Command Center The Samsung Command Center screen consists of the following 4 areas S W Group Area You...

Страница 197: ...e Run button to launch AV Station Area This only appears when the AV Station program has been installed You can easily launch the TV music movie or album player of the AV Station program Drag and drop...

Страница 198: ...Connecting to the Internet This chapter provides instructions on connecting to the Internet Chapter 4 Chapter 4...

Страница 199: ...munication network service such as ADSL and VDSL Service has to be applied for and received from a High speed communication network service provider Receiving Internet service may require support from...

Страница 200: ...ne 2 To connect the modem to the Internet and use e mail you have to apply to an Internet Service Provider ISP for an Internet service For more account information please contact your ISP Ask your ISP...

Страница 201: ...Control Panel 3 Select Network and Internet Connections in the Control Panel window 4 Click Network Connections in the Network and Internet Connections window 5 In the Network Connections window poin...

Страница 202: ...NS server address automatically on the General tab 9 Once all of the information is entered in the Internet Protocol TCP IP Properties window click OK to finish 4 5 Chapter 4 Connecting to the Interne...

Страница 203: ...e network settings will be automatically changed accordingly You can easily find out your current IP To configure network setting 1 Connect LAN cable to the computer s LAN port 2 Double click Samsung...

Страница 204: ...network place is changed corresponding place icon is displayed in color and full dialog box appears In the right area of full dialog box network setting is displayed 5 Click Close to close the dialog...

Страница 205: ...service To configure the server 1 Connect the network LAN cable and double click the Samsung Network Manager icon on the Desktop 2 Click Click here to setup Internet Connection Share 3 The computers...

Страница 206: ...ssages of the wire less network setup procedure instruction window 8 The current location is represented as a server The server configu ration is complete To configure the client 1 Connect the network...

Страница 207: ...ea Connection press the right button of the touchpad and then select Properties 2 Select the Internet Protocol TCP IP item and then click Properties 3 In the Alternate Configuration tab click User con...

Страница 208: ...escription in this section refers to the Intel R PRO Wireless 2200BG Network Connection hereafter referred to as an 11g card and the Intel R PRO Wireless 2915ABG Network Connection hereafter referred...

Страница 209: ...etwork Key window appears Enter the Network Key in the window and then click the Connect button Now when Connected in AP is displayed and you can access the network For more detailed information such...

Страница 210: ...another computer connected to the Internet Refer to Sharing an Internet connection through a wireless network See P 4 8 To share an Internet Connection You can connect by completing the following step...

Страница 211: ...the network name e g samsung and unselect The key is provided for me automatically Enter the encryption key in the Network key field and click OK To prevent a network connection from an unauthorized u...

Страница 212: ...4 15 Chapter 4 Connecting to the Internet 7 Check that the configured network name e g samsung is in the Preferred networks item and click OK Now your wireless network setup has been completed...

Страница 213: ...a cryptographic key in the network key box and click Connect When connected to the wireless network the system displays Connected in the selected network of the Network Connection window If the netwo...

Страница 214: ...ou insert the system software CD Insert the system software CD into the CD ROM drive and install the wireless LAN configuration program Step 2 Using the wireless LAN configuration program PROSet Doubl...

Страница 215: ...The network authentication data encryption WEP key index and password of a access point are configured in the access point management program For infor mation on the security information check the sec...

Страница 216: ...n access point is an access point that exists but is configured not to be detected by the scan operation to prevent access attempts from unauthorized users N No ot te e What is a network name SSID Net...

Страница 217: ...e sharing of files and folders on a computer Step 2 Accessing shared files and folders from another computer Network services are provided for the computers that are connected to the net work through...

Страница 218: ...haring and security field select Share this folder on the network enter the share name and click OK The file and folder sharing configuration has been completed It has the same security effect as that...

Страница 219: ...rt My Computer Under Other Places click My Network Places in your computer 2 Click View workgroup computers and click the desired computer to access the shared file If your computer is a member of ano...

Страница 220: ...tep 1 Configure printer sharing in the computer connected to the printer Step 2 Add and use the shared printer in other computers on the network Step 1 Configuring Printer Sharing 1 From the computer...

Страница 221: ...wants to use the shared printer click Start Printers and Faxes 2 Click Add a printer 3 In the Add Printer Wizard click Next 4 Select A network printer or a printer attached to another computer and cl...

Страница 222: ...8 Select Yes for Do you want to use this printer as a default printer and click Next 9 Click Finish 10 When the printer sharing configuration has been completed the shared printer appears in the Prin...

Страница 223: ...nnection to the Internet using a Bluetooth mobile phone of the Bluetooth On line help Using a wireless keyboard and mouse You can use a wireless keyboard and mouse which have the Bluetooth function Fo...

Страница 224: ...ures on sharing data refer to Installing a Palm handheld computer using Bluetooth technology and Installing a Pocket PC using Bluetooth technology of the Bluetooth On line help Precautions Please do n...

Страница 225: ...When infrared communication is available a beep sounds and Send files to another computer icon appears on the desktop You can now transfer data through infrared communication To transmit data through...

Страница 226: ...Infrared Port and set the item to Enabled by press ing F5 or F6 d Save the configuration and exit the Setup 2 Check Windows configuration a Click Start Control Panel Performance and Management System...

Страница 227: ...4 30 Manual...

Страница 228: ...System Management This chapter provides information on efficient computer management Chapter 5 Chapter 5...

Страница 229: ...and hard disk drives are turned off to reduce power consumption Hibernation Mode Saves the current working status onto the hard disk and turns the computer off Pressing the Power button restores the c...

Страница 230: ...aintenance Power Options and select the Advanced tab Configure the Power button function Configuring the function of the fn key combination C Ca au ut ti io on n When the Power button is configured to...

Страница 231: ...system and close LCD 2 Put the computer upside down 3 While pushing the battery latch to the Unlock position remove the battery 4 To attach the battery place battery into the system Check that the ba...

Страница 232: ...tery is an expendable supply so when you use it for a long time the capacity bat tery life is shortened If the battery life time is reduced to under half of the initial time we recommend that you purc...

Страница 233: ...egradetheperformanceofthesystem Normal Mode Thismodeextendsthebatteryusagetimetonormal Maximum Performance Mode Thismodeprovidesmaximumsystemperformanceatthe costofthebattery Therefore thebatteryusage...

Страница 234: ...LCD Brightness If you restart the system after changing the LCD Brightness in Custom Mode the LCD brightness is changed to its default value To keep the brightness value configured in Custom Mode conf...

Страница 235: ...onal memory module 1 Using a screwdriver open the memory module compartment cover on the bottom of the system 2 Push the memory module tabs outward to pop the memory module outward Pull the module out...

Страница 236: ...and slide it into the slot at a 30 angle 4 Push the memory module in until the module clicks into place If the memory module is not fixed completely push the module while pressing the memory mod ule...

Страница 237: ...ic place The locking device needs to be purchased separately The shape and meth ods of use may differ depending on the manufacturer Please refer to the manual provided with the security lock for prope...

Страница 238: ...ok PCs and hand carry the computer Allow the computer and disks to pass through security X rays but do not pass the computer and disks through metal detectors Do not use the computer during take off a...

Страница 239: ...5 12 Manual...

Страница 240: ...Customizing your computer This chapter provides information how to use the system setup customizinig screen settings Chapter 6 Chapter 6...

Страница 241: ...appears press F2 3 The initial System Setup screen will appear in a moment Sub Menu Press enter to display sub menu Setup Menu Help Displays help information on the current selected item Tab Shift Tab...

Страница 242: ...p Navigation Keys Displays the Help window Exits the current sub menu or opens the Exit menu Moves between menus Selects a field or opens a sub menu Saves changes and exits System Setup Moves up and d...

Страница 243: ...word you can restrict system access to autho rized users only 1 Select the Security menu in the System Setup To enter into System Setup see Page 6 2 2 On the Set Supervisor Password item press Enter 3...

Страница 244: ...ssword 1 On the password to delete press Enter e g supervisor password 2 Enter the current configured password and press Enter 3 Leave the New Password and Confirm New Password field empty and press E...

Страница 245: ...CD ROM drive etc The following example describes how to con figure the hard drive as the first booting device when the CD ROM drive is configured as the first booting device by default 1 Select the B...

Страница 246: ...y To change the number of colors displayed on a monitor select an appropriate color quality To change your screen resolution move the slider to select an appropriate resolution You can view the graphi...

Страница 247: ...nect the TV to the TV output port of the system Connecting to a TV To connect to a TV connect the TV Out port of the system and the S Video port of the TV with the S Video cable The cable is not inclu...

Страница 248: ...corre sponding port of the system To connect a TV connect the TV to the TV output port of the system See P 6 8 Connecting to a TV 2 Press touchpad right button on the desktop click Properties and the...

Страница 249: ...tor check box and then click Apply To move a window between display devices in Dual View mode Click the title bar of the window in the primary display device 1 the LCD and drag it to the secondary dis...

Страница 250: ...play devices would be especially useful when you are giving presentations or watching a video file 1 Connect the external display device e g a monitor or a projector to the corre sponding port of the...

Страница 251: ...LCD CRT LCD CRT whenever the Fn key is pressed Provided that multiple external display devices are connected the display order is LCD CRT TV LCD CRT LCD TV LCD whenever the Fn keys are pressed You can...

Страница 252: ...homepage When you first run Norton AntiVirus the Norton AntiVirus Configuration window pops up If you complete the configuration and your computer connect to network you can download and install the...

Страница 253: ...6 14 Manual...

Страница 254: ...Recovering the Computer This chapter provides recovery procedures using the System Recovery CD when the computer is not operating properly Chapter 7 Chapter 7...

Страница 255: ...ignificant system events such as when a program or a driver is installed You can also decide when to create your own restore points The procedures to create your own restore point are described below...

Страница 256: ...mpleted dialog box click OK Your computer has been restored to the selected restore point Undoing the last restoration The procedures to undo a restoration are described below 1 Click Start All Progra...

Страница 257: ...rograms that are not currently installed on your computer from the system software CD provided All necessary components are installed using the factory defaults Minimum Installation This displays the...

Страница 258: ...allation in the main window of the System Software CD Standard Installation is recommended 2 The system is scanned to display the drivers and programs that need to be installed 3 Click OK The drivers...

Страница 259: ...oting password after restarting the system during the Windows installation Enter the password to continue to the next steps N No ot te e Reinstalling Windows XP If the Windows XP does not operate prop...

Страница 260: ...ptions window appears click Next 8 When a window that requires your name and organization pops up enter your name and the organization and click Next In the Windows XP Professional edition an addition...

Страница 261: ...allation process copies the necessary folders for the Windows instal lation restart the system and the message Press any key to boot from CD is displayed You do not need to enter anything In a moment...

Страница 262: ...ut the system off When the system is turned on after such manual shutdown Scandisk will run to check errors in the system Q2The system freezes during program operation A1 There is an error with the pr...

Страница 263: ...k on the Graphics related tab change the Resolution change the Display Device remove the AC Adapter restart the system and change the PowerPlay level A In the above cases the display devices may flick...

Страница 264: ...ports 1400x1050 pixels In this case change the sys tem screen resolution to 1024 x 768 pixels recommended Q10 The Video mode not supported or Input signal exceede message appears for some older model...

Страница 265: ...ng the system or reinstalling the driver You have to exit all programs using modem in the advance of diagnostics of the modem Q2 I cannot make a call using an extension line A In general the dial tone...

Страница 266: ...you have to purchase and use the appropriate telephone plug for that particular country Q4 How do I receive a fax while the system is in power saving mode Rest mode For Windows XP and 2000 A To receiv...

Страница 267: ...lick OK Restart the system If the system in rest mode is activated when there is no received signal use the system after disabling Wake On LAN function Connecting wired LAN while using wireless LAN ma...

Страница 268: ...Control Panel Performance and Maintenance System Hardware tab Device Manager Network adapters Wireless LAN adapter If there is a yellow exclamation mark please reinstall the device driver with the sys...

Страница 269: ...e wireless network connection has been set to Enable in Start Control Panel Network Connections If there is a Wireless LAN On Off button check if the wireless LAN button is pressed A2 Verify whether t...

Страница 270: ...e computer We recommend canceling the Hide option for an AP The SSID is a name for distinguishing one wireless LAN from another wireless LAN It is recommended using Long Preamble Preamble is a signal...

Страница 271: ...d party wireless network setup program e g PROSet other than Windows XP default program is installed For setting up a wireless network using the Windows XP program this option should be selected Q6 Wh...

Страница 272: ...connection of the Control Panel Q10 The wireless LAN does not work properly when there is a device operating on an adjacent frequency in the vicinity of the product A1 Channel interference may occur w...

Страница 273: ...gram PROSet For more network authentication procedures ask your AP Access Point administrator Q12 After PROSet is installed The AEGIS Protocol IEEE 802 1x v2 2 1 0 appears in the Local Area Connection...

Страница 274: ...dures 1 Right click on the desktop using the touchpad and then select Properties 2 In the Display Properties window click the Settings tab Advanced ATI Display tab 3 Select the Panel item and select E...

Страница 275: ...erformance and Maintenance Power Options Power Schemes tab then configure the Power schemes field to Always On Q8 Pressing Fn keys while running a game may cause abnormal operation of the system A Do...

Страница 276: ...a is stored in the hard disk and transferred to system memory when the data is needed In some games the screen may be interrupted during this process Lower the game resolution or texture image quality...

Страница 277: ...ity settings for 2 In the Privacy tab of Internet Properties click on Settings from Block pop ups 3 Enter a URL to want to allow pop ups into Address of Web site to allow and click on Add 4 You will f...

Страница 278: ...b of the Windows Firewall If you want to add a program to Programs and Services click on Add Program and select it A2 Set up Windows Automatic Updates This automatically downloads and installs critica...

Страница 279: ...program that your computer is able to identify Check the following programs which Windows can detect and select one from the list A list of anti virus programs that Windows can detect Symantec Norton...

Страница 280: ...D international standard does not support resolutions higher than 480P Configure the resolution of the component output mode to lower than 480P Q4 How can I configure a component TV device ATI chipset...

Страница 281: ...erties 2 Select TV from the Device tab select a mode 720p 1080i and click the Apply button Q6 When I am watching the screen on a TV using YPbPr the edges of the screen are trimmed ATI chipset models A...

Страница 282: ...Appendix System specifications software types and safety instructions are provided here Appendix Appendix...

Страница 283: ...Headphone Modem RJ 11 LAN RJ 45 Monitor TV Output DC In Serial Parallel Options Port Replicator 2nd HDD pack Dimensions mm 327 5 x 275 5 x 32 2 15 0 Width x Depth x Height LCD Panel Size 14 1 XGA 15...

Страница 284: ...Wired LAN Broadcom NetLink Gigabit Ethernet wireless LAN 802 11 g or 802 11 a g Optional Bluetooth Bluetooth 1 1 Optional Memory Card Slot Memory Stick Memory Stick Pro SD Secure Digital Memory Card...

Страница 285: ...2 4GHz Support Channels Channels allowed per country Device Description Transceiver Power 5 mW Transmission Method 11b mode DSSS 11g mode OFDM Data Rate Mbps 11b mode 11 5 5 2 and 1 11g mode 54 48 36...

Страница 286: ...b mode DSSS 11g mode OFDM Data Rate Mbps 11a mode 54 48 36 24 18 12 9 and 6 11b mode 11 5 5 2 and 1 11g mode 54 48 36 24 18 12 9 and 6 Antenna Type Internal Antenna 2 EA main aux The data rate may dif...

Страница 287: ...Celeron are registered trademarks of Intel Corporation Microsoft MS DOS and Windows are registered trademarks of Microsoft Corporation Memory Stick and are trademarks of Sony Corporation All other pr...

Страница 288: ...aged or it may cause fires Use standard power voltage High voltage may result in product damage or cause fires Use grounded power outlets designed for computers A grounded power outlet prevents electr...

Страница 289: ...ng in resetting the computer may cause disk or data damage Execution of delete DEL or format FORMAT commands by mistake may cause loss of data Virus infection may cause unrecoverable loss of data An a...

Страница 290: ...ers as the system may be damaged Do not touch the power strip with wet hands There is a danger of electric shock Place the computer away from heat devices such as heaters It may damage the system or c...

Отзывы: