background image

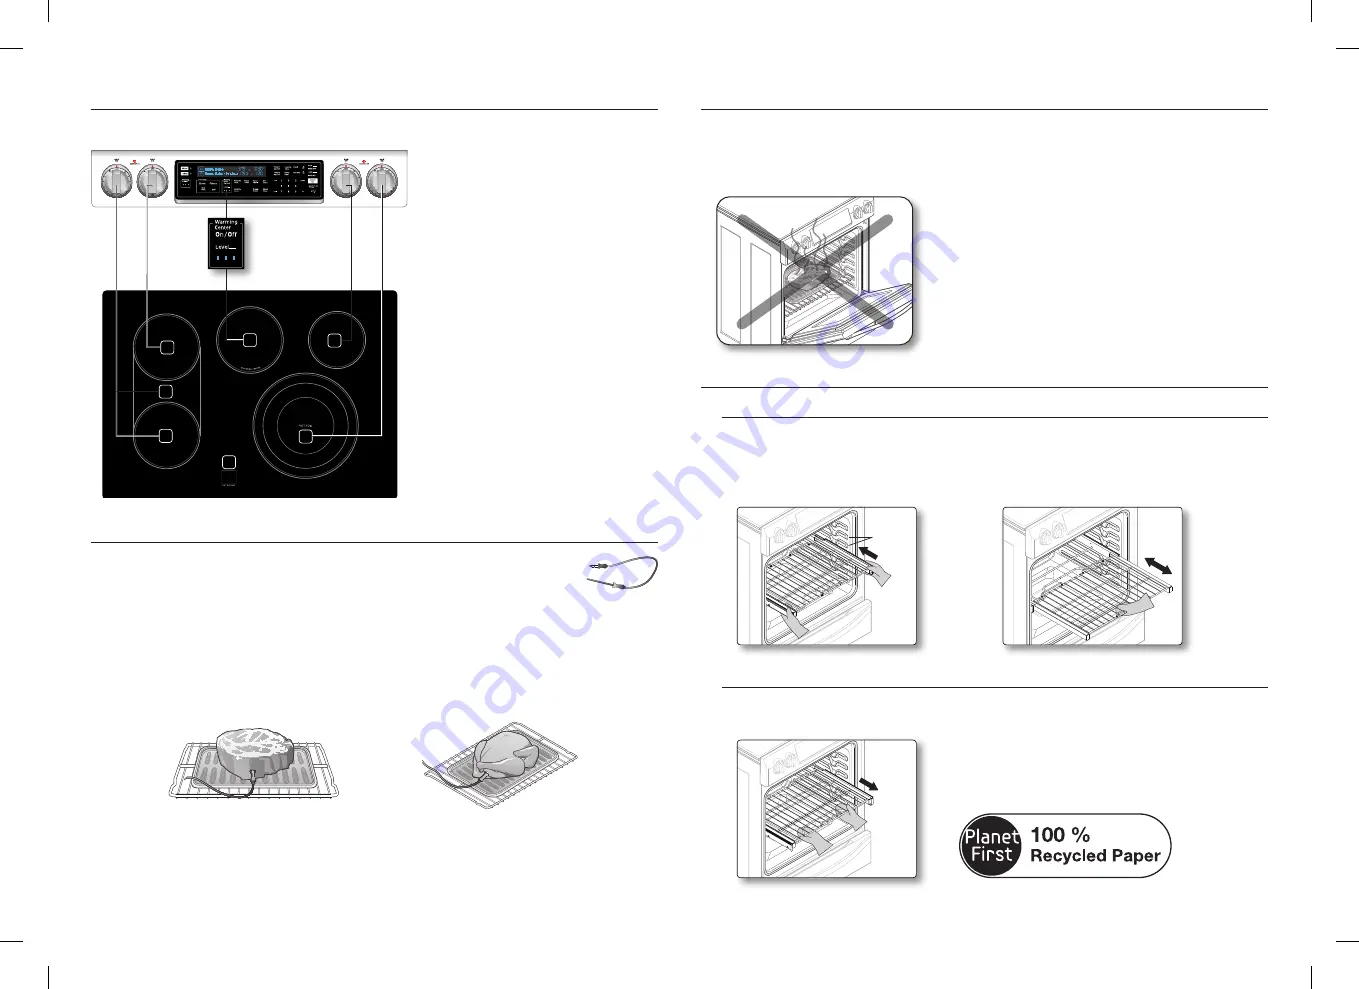
LOCATION OF THE RADIANT SURFACE ELEMENTS AND CONTROLS

The radiant control knobs operate the radiant surface elements on the cooktop as shown below.

1

5

2

3

4

6

1

1.  Left Front:

  7”, 1,800 W  

(Bridge 2,600 W)

2.  Left Rear:

 7”, 1,800 W

3.  Right Front:

  6”/9”/12”, 3,000 W

4.  Right Rear:

 6”, 1,200 W

5.  Warming Center:

 100 W

6.  Hot surface indicator

USING THE TEMP PROBE

For many foods, especially roasts and poultry (beef, chicken, turkey, pork, lamb etc), 

measuring the internal temperature is the best way to determine if the food is properly 

cooked. 

The temp probe lets you cook meat to the exact internal temperature you want, taking the guess 

work out of determining whether a piece of meat is done or not. 

This function can be used with Chef Bake, Convection Bake, or Convection Roast in Single mode. 

After the internal temperature of the food reaches 100 °F, the increasing internal temperature will be 

shown in the display.

• 

Push the tip of the temp probe into the meat as fully as possible, so that the tip is in the center 

of the meat.

• 

Insert the probe completely into the meat as shown in the illustrations. It should not touch bone, 

fat, or gristle.

• 

If you do not fully insert the probe into the meat, the Temp Probe function will not work correctly 

because the probe will sense the oven temperature, not the temperature of the meat.

• 

Available temperature : 100 °F to 200 °F

BROILING

Broil mode is best for meats, fish, and poultry up to 1” thick. Broiling is a method of cooking tender 

cuts of meat by direct heat under the broil element of the oven. The high heat cooks quickly and 

gives a rich, brown outer appearance. Temp probe cannot be used with this mode.

• 

This oven is designed for CLOSE DOOR broiling. The oven door must be closed during broiling.

USING THE GLIDING RACK

Installing the Gliding rack

• 

With the Gliding rack in the “Closed” position and the oven off, carefully insert the Gliding 

Rack between the guides until the rack reaches the back.

• 

When using the Gliding Rack in the oven, be sure to pull on the handle of the rack only to slide it 

in and out. If you grasp the frame while using the rack, the entire Gliding Rack will be removed.

Rack 

Guides

Removing the Gliding rack

• 

With the Sliding rack in the “Closed” position and the oven off and cool, grasp the rack and 

frame and pull both forward to remove.

This manual is made with 100 % recycled paper.

Manual guide_NE58H9950WS_AA_AC_DG68-00530A-00_EN.indd   2

2014-02-11   �� 3:05:48

Содержание NE58H9950W

Страница 1: ...ion 1 Press UPPER or LOWER Skip this step in single mode 2 Press FAVORITE COOK the number of times that corresponds to the position in which you want to store the setting 2 Press HEALTHY COOK 3 Press NUMBER PAD 1 5 which you want to set 3 Press START SET 4 Press START SET TEMP PROBE BREAD PROOF 1 Press BREAD PROOF 2 Press START SET 1 Push the tip of the probe into food and place in the oven 2 Inse...

Страница 2: ...h bone fat or gristle If you do not fully insert the probe into the meat the Temp Probe function will not work correctly because the probe will sense the oven temperature not the temperature of the meat Available temperature 100 F to 200 F BROILING Broil mode is best for meats fish and poultry up to 1 thick Broiling is a method of cooking tender cuts of meat by direct heat under the broil element ...

Страница 3: ...mple 2 Presione FAVORITE COOK COCCIÓN FAVORITA la cantidad de veces que corresponda para la posición en la que desea guardar la configuración 2 Presione HEALTHY COOK COCCIÓN SALUDABLE 3 Presione el TECLADO NUMÉRICO 1 5 que desea configurar 3 Presione START SET INICIO HORNO 4 Presione START SET INICIO HORNO SONDA DE TEMPERATURA ENTIBIAR PAN PARA LEUDADO 1 Presione BREAD PROOF ENTIBIAR PAN PARA LEUD...

Страница 4: ... no se inserta por completo en la carne la función Sonda de temperatura no funcionará correctamente dado que se detectará la temperatura del horno y no la temperatura de la carne Temperatura disponible 100 F a 200 F ASAR A LA PARRILLA El modo Asar a la parrilla es el mejor para carnes pescados y aves de hasta 1 de grosor Asar a la parrilla es un método de cocinar cortes tiernos de carne mediante e...

Страница 5: ...INFÉRIEURE Ignorez cette étape en mode unique 2 Appuyez sur FAVORITE COOK PLATS PRÉFÉRÉS autant de fois que le nombre correspondant à la position sur laquelle vous souhaitez stocker le réglage 2 Appuyez sur HEALTHY COOK CUISSON SAINE 3 Appuyez sur la TOUCHE NUMÉRIQUE 1 à 5 que vous souhaitez définir 3 Appuyez sur START SET DÉMARRAGE RÉGLAGE 4 Appuyez sur START SET DÉMARRAGE RÉGLAGE SONDE THERMIQUE...

Страница 6: ...Si la sonde n est pas complètement insérée dans la viande la fonction Sonde thermique ne fonctionne pas correctement car la sonde détecte la température du four et non la température de la viande Température disponible 100 F à 200 F CUISSON AU GRIL Le mode de cuisson au gril est le mode le plus adapté aux viandes aux poissons et à la volaille d une épaisseur maximale de 1 La cuisson au gril est un...

Страница 7: ...MEMO Manual guide_NE58H9950WS_AA_AC_DG68 00530A 00_CFR indd 3 2014 02 11 3 08 24 ...

Страница 8: ...DG68 00530A 00 Manual guide_NE58H9950WS_AA_AC_DG68 00530A 00_CFR indd 4 2014 02 11 3 08 24 ...

Отзывы: