


ENGLISH
132
132
P
PiiccttB
Brriid
dg
ge
e
模
模式
式:
: 使
使用
用
P
PiiccttB
Brriid
dg
ge
e
功
功能
能列
列印
印
配備隨附的
USB
纜線以及支援
PictBridge
的印表機,
舅
可以在無須
連接至電腦的情況下直接列印
舅
的相片影像
0
1
1..
使
使用
用
U
US
SB
B
纜
纜線
線連
連接
接
M
Miin
niik
ke
ett
P
Ph
ho
otto
o
與
與支
支
援
援
P
PiiccttB
Brriid
dg
ge
e
的
的印
印表
表機
機
0
0
2
2..
開
開啓
啓印
印表
表機
機
0
0
3
3..
將
將模
模式
式轉
轉盤
盤轉
轉到
到
P
PiiccttB
Brriid
dg
ge
e
模
模式
式
0
0
4
4..
按
按下
下
[[P
PO
OW
WE
ER
R]]
按
按
瞿
瞿
以
以開
開啓
啓
M
Miin
niik
ke
ett
P
Ph
ho
otto
o
0
0
◆
如果尙未進行
USB
連接,“
Connect
USB Cable!
”訊息將會顯示
0
5
5..
按
按下
下
[[S
Sh
ho
orrttccu
utt
2
2]]
按
按
瞿
瞿
以
以設
設定
定日
日期
期
//
時
時間
間
壓
壓印
印選
選項
項
0
0
◆
每次按下
[Shortcut 2]
按
瞿
,將會在
Off<
>-Date <
>-Time <
>-
Date&Time<
>
中轉換
0
6
6..
[[S
Sh
ho
orrttccu
utt
3
3]]
將
將會
會增
增加
加
略
略
數
數而
而
[[S
Sh
ho
orrttccu
utt
4
4]]
將
將減
減少
少
略
略
數
數
0
0
◆
可能的範圍:
1 ~ 99
◆
在
99
上再次按下
[Shortcut 3]
按
瞿
將會設定
爲
1
0
◆
在
1
上再次按下
[Shortcut 4]
按
瞿
將會設定爲
99
0
7
7..
按
按下
下
[[S
Sh
ho
orrttccu
utt
1
1]]
按
按
瞿
瞿
以
以開
開始
始列
列印
印
0
0
◆
若要取消列印,請再次按下
[Shortcut 1]
按
瞿
0
8
8..
完
完成
成後
後,
,拔
拔下
下纜
纜線
線
0
0
[
警
警告
告
]
✤
此功能僅可在支援
PictBridge
的印表機上操作
0
[
附
附註
註
]
✤
略
數與壓印選項可以在選單中設定
0
按下
[MENU]
按
瞿
可存取該
功能
0
✤
如需關於列印的資訊,請參閱印表機的使用手冊
0
✤
根據印表機而定,可能會出現列印故障
0
在此情況下,請直接將
JPEG
圭
案下載到電腦然後列印
0
✤
根據印表機,日期和時間壓印選項可能不會被支援
0
在此情況下,
日期和時間選單將不會顯示
0
使
使用
用
P
Piic
cttB
Brriid
dg
ge
e
功
功能
能列
列印
印
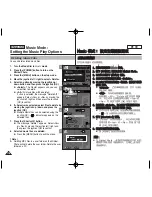
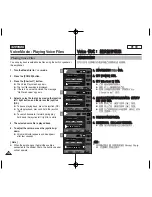
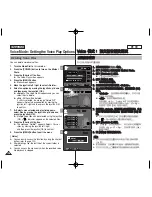
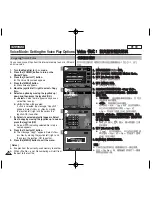
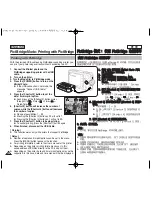
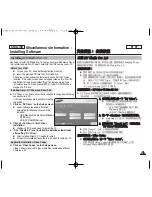
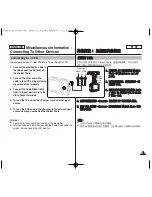
PictBridge Mode: Printing with PictBridge
With the provided USB cable and a PictBridge-supporting printer, you
can print your photo images directly without connecting to a PC.
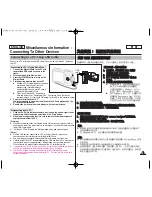
1. Connect the Miniket photo and the
PictBridge supporting printer with a USB
cable.
2. Turn on the printer.
3. Turn the Mode Dial to PictBridge mode.
4. Press the [POWER] button to turn on the
Miniket Photo.
◆
If the USB connection is not made, the
message “Connect USB Cable!”
appears.
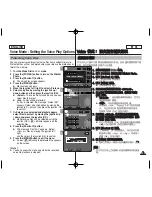
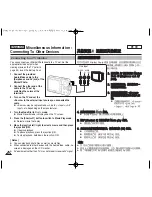
5. Press the [Shortcut 2] button to set the
date / time imprint option.
◆
Each press of the [Shortcut 2] button cycles
through Off< >-Date < >-Time < >-
Date&Time< >.
6. [Shortcut 3] button will increase the number of
copies, while the [Shortcut 4] button will decrease
the number of copies.
◆
Range of possibilities: 1 ~ 99
◆
Pressing the [Shortcut 3] button on 99 will set to 1.
◆
Pressing the [Shortcut 4] button on 1 will set to 99.
7. Press the [Shortcut 1] button to begin printing.
◆
To cancel printing, press the [Shortcut 1] button again.
8. When finished, disconnect the USB Cable.
[ Warning ]
✤
This function works only with printers that support PictBridge.
[ Notes ]
✤
Number of copies and imprint options can be set in the menu.
Press the [MENU] button to access the function.
✤
For printing information, refer to the User's manual of the printer.
✤
Depending on the printer, printing failure may occur. In this
case,download JPEG files directly to the PC and print them.
✤
Depending on the printer, date and time imprint option may not be
supported. In this case, date and time menu will not be displayed.
Printing with PictBridge


