background image

English-

23

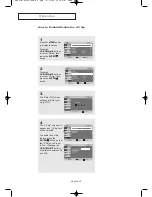
Using Automatic Sound Settings

Your TV has two automatic sound settings (“Standard”, and “Speech”) that are preset at the

factory. You can activate either of them by pressing the S.MODE button (or by making a

selection from the on-screen menu). Or, you can select “Custom Sound”, which automati-

cally recalls your personalized sound settings. 

Choose 

Standard

for the standard factory settings.

Choose 

Speech

when watching a show that is mostly dialogue (i.e., news).

2

Press the

UP/DOWN

buttons

repeatedly to select the
“Standard”, or “Speech”
sound settings.

Press the 

EXIT

button

to exit.

1

Press the 

MENU

button

to display the menu. 

Press the

UP/DOWN

buttons

to select “Sound”, then
press the 

ENTER

button.

Press the 

ENTER

button

to select “Mode”

O

P E R AT I O N

Alternate method:

Simply press the 

S.MODE

button on the remote control to

select one of the standard sound settings.

 BN68-00633B-00Eng 2.qxd  6/11/04 8:38 AM  Page 23

Содержание LT-P 1545

Страница 1: ...IMPORTADO POR SAMSUNG ELECTRONICS MEXICO S A DE C V Saturno No 44 Col Nueva Industrial Vallejo Gustavo A Madero C P 07700 Mexico D F Mexico TEL 52 55 5747 5100 EXPORTADO POR Samsung Electronics Co Ltd...

Страница 2: ...ed period of time the amounts of light transmission will also remain varied and as a result the borders may leave traces Digital Ready TV When you select the wide screen 16 9 mode to watch an SD grade...

Страница 3: ...ft right and the center of the screen remain fixed for an extended period of time the amounts of light transmission will also remain varied and as a result the borders may leave traces When you watch...

Страница 4: ...10 Connecting an S VHS VCR 11 Connecting a DVD Player 12 Chapter 3 Special Features Turning the TV On and Off 13 Changing Channels 13 Using the Channel Buttons 13 Using the PRE CH Button to select th...

Страница 5: ...the TV after the V Chip Blocks a Channel Emergency Escape 41 Chapter 5 PC Display Using Your TV as a Computer PC Display 42 How to Set up Your PC Software Windows only 42 Adjusting the Screen Quality...

Страница 6: ...r to reduce or eliminate reception problems Fine tuning control for the sharpest picture possible A built in multi channel sound decoder for stereo and bilingual listening Built in dual channel speake...

Страница 7: ...screen menu on the screen CH Press to change channels Also press to highlight various items on the on screen menu POWER Press to turn the TV on and off HEADPHONE JACK Connect a set of external headph...

Страница 8: ...IDEO INPUT Connect to the video output port on your PC VIDEO INPUT Connect a video signal from a camcorder or VCR AUDIO INPUT Connect an audio signal L R from a camcorder or VCR S VIDEO INPUT Connect...

Страница 9: ...y function with VCR or DVD units that are compatible with the LCD TV AUTO PROG Use to store the broadcast cable channels that you receive P MODE Adjust the TV picture by selecting one of the preset fa...

Страница 10: ...es Make sure to match the and ends of the batteries with the diagram inside the compartment Installing Batteries in the Remote Control 1 Slide the cover out completely YOUR NEW TV If remote control do...

Страница 11: ...and UHF Antennas on page 7 Antennas with 300 ohm Flat Twin Leads If you are using an off air antenna such as a roof antenna or rabbit ears that has 300 ohm twin flat leads follow the directions below...

Страница 12: ...inal on the bottom of the rear panel INSTALLATION Antennas with 75 ohm Round Leads 1 Plug the antenna lead into the TV ANTENNA terminal on the bottom of the back panel Separate VHF and UHF Antennas If...

Страница 13: ...e box descrambles only some channels such as premium channels follow the instructions below You will need a two way splitter an RF A B switch and four lengths of coaxial cable These items are availabl...

Страница 14: ...last coaxial cable between the OUT terminal on the RF A B switch and the VHF UHF terminal on the rear of the TV INSTALLATION After you ve made this connection set the A B switch to the A position for...

Страница 15: ...axial cable is usually included with a VCR If not check your local electronics store If you have a mono non stereo VCR use the Y connector not supplied to hook up to the left and right audio input jac...

Страница 16: ...fferent back panel configuration 1 To begin follow steps 1 3 in the previous section to connect the antenna or cable to your VCR and your TV Connecting an S VHS VCR Your Samsung TV can be connected to...

Страница 17: ...ifferent back panel configuration Connecting a DVD Player The rear panel jacks on your TV make it easy to connect a DVD player to your TV 1 Connect a set of audio cables between the L R AUDIO INPUT ja...

Страница 18: ...channel Then use the PRE CH button to quickly alternate between them Chapter Three SPECIAL FEATURES Adjusting the Volume 1 To control speaker volume 2 To control headphone volume when headphone is con...

Страница 19: ...ton on the remote control The TV will display the channel the type of sound and the status of certain picture and sound settings 1 With the power on press the MENU button The main menu appears on the...

Страница 20: ...sh Fran ais Espa ol or Portugu s then press the ENTER button Press the UP DOWN buttons to select Air STD HRC or IRC then press the ENTER button 3 Press the ENTER Button The TV will begin memorizing al...

Страница 21: ...channels you must specify the type of signal source that is connected to the TV i e an antenna or a cable system 1 Press the MENU button to display the menu Press the UP DOWN buttons to select Channe...

Страница 22: ...ect the correct signal source Air STD HRC IRC See steps 1 2 on previous page Press the MENU button Press the UP DOWN buttons to select Channel then press the ENTER button 4 After all the available cha...

Страница 23: ...on the remote control 1 Use the number buttons to directly select the channel to Add or Delete Press the MENU button to display the menu Press the UP DOWN buttons to select Channel then press the ENT...

Страница 24: ...hoice 1 Press the MENU button to display the on screen menu Press the ENTER button 2 Press the ENTER button to select TV then press the ENTER button 3 Press the UP DOWN buttons to select the Input sou...

Страница 25: ...ton Press the UP DOWN buttons to select Edit Name then press the ENTER button 2 Press the UP DOWN buttons to select AV S Video Component or PC then press the ENTER button 3 Press the UP DOWN buttons r...

Страница 26: ...ose Standard for the standard factory settings Choose Movie when viewing a Movie Choose Custom if you want to adjust the settings according to personal preference see Customizing the Picture page 22 1...

Страница 27: ...omatic settings See the previous page 3 Press the ENTER button to select a particular item Press the UP DOWN buttons to select Contrast Brightness Sharpness Color or Tint 4 Press the LEFT RIGHT button...

Страница 28: ...dard for the standard factory settings Choose Speech when watching a show that is mostly dialogue i e news 2 Press the UP DOWN buttons repeatedly to select the Standard or Speech sound settings Press...

Страница 29: ...imes SAP has unrelated information like news or weather 3 Press the UP DOWN buttons to select Mono Stereo or SAP then press the ENTER button Press the EXIT button to exit Choose Mono for channels that...

Страница 30: ...e Press the ENTER button 1 Press the MENU button to display the menu Press the UP DOWN buttons to select Setup then press the ENTER button 3 Press the UP DOWN buttons to select English Fran ais Espa o...

Страница 31: ...must set the Blue screen mode to Off 1 Press the MENU button to display the menu Press the UP DOWN buttons to select Setup then press the ENTER button 2 Press the UP DOWN buttons to select Blue Screen...

Страница 32: ...ess the ENTER button 1 Press the MENU button to display the menu Press the UP DOWN buttons to select Picture then press the ENTER button 3 Press the UP DOWN buttons to select Color Tone Press the EXIT...

Страница 33: ...UP DOWN buttons to select Auto Volume then press the ENTER button 1 Press the MENU button to display the menu Press the UP DOWN buttons to select Sound then press the ENTER button 3 Press the UP DOWN...

Страница 34: ...r the hour is entered press the LEFT RIGHT buttons to select Minute Press the UP DOWN buttons until the correct minute appears Press the LEFT RIGHT buttons to select am pm and adjust with the UP DOWN...

Страница 35: ...the ENTER button to select Time Press the ENTER button to select Clock Option 2 Using the Local PBS Channel to Automatically Set the TV Clock 3 Press the UP DOWN buttons to select Auto then press the...

Страница 36: ...to select Time Zone then press the ENTER button 8 Press the UP DOWN buttons to select DST Daylight Saving Time then press the ENTER button 9 Press the UP DOWN buttons to select No or Yes then press th...

Страница 37: ...ss the UP DOWN buttons to select On Timer then press the ENTER button Press the UP DOWN buttons repeatedly to select the appropriate hour After the hour is entered press the LEFT RIGHT buttons to sele...

Страница 38: ...n finished press the ENTER button To deactivate the On time select Off during this step 4 To set the Off time press the UP DOWN buttons to select Off Timer Press the ENTER button and set the hours and...

Страница 39: ...s the ENTER button Press the ENTER button to select Time 3 Press the UP DOWN buttons repeatedly until the correct time appears Press the EXIT button to exit 2 Press the UP DOWN buttons to select Sleep...

Страница 40: ...impaired or foreign language translations All VCRs record the closed caption signal from television programs so home recorded video tapes also provide closed captions Most pre recorded commercial vid...

Страница 41: ...ear Enter your 4 digit PIN Note The default PIN for your new TV set is 0 0 0 0 4 After entering a valid PIN number the V Chip screen will appear Press the UP DOWN buttons to select Change PIN 5 Press...

Страница 42: ...Chip feature press the ENTER button so that the V Chip Lock is set to Yes Pressing the UP DOWN buttons will alternate between On and Off OPERATION 1 Press the MENU button to display the menu Press th...

Страница 43: ...two separate groups TV Y and TV Y7 young children through age 7 and TV G through TV MA everybody else The restrictions for these two groups work independently If a household includes very young child...

Страница 44: ...o the next section and set up additional restrictions based on the MPAA codes OPERATION 5 At this point one of the TV Ratings is selected Press the ENTER button Depending on your existing setup the co...

Страница 45: ...ation is for movies When the V Chip lock is on the TV will automatically block any programs that are coded with objectionable ratings either MPAA or TV Ratings 1 Press the MENU button to display the m...

Страница 46: ...y press the UP DOWN buttons to select a particular MPAA category When a category is selected its color changes to yellow Pressing the UP DOWN buttons will cycle through the MPAA categories G General a...

Страница 47: ...r Samsung Dealer First click on Settings on the Windows start menu While Settings is highlighted move the cursor so that Control Panel is highlighted When the control panel screen appears click on Dis...

Страница 48: ...to select Image Lock 4 When you are satisfied with the settings press the MENU button repeatedly to return to normal viewing 3 Press the UP DOWN buttons to select Coarse or Fine then press the ENTER b...

Страница 49: ...on to display the menu Press the UP DOWN buttons to select Setup then press the ENTER button Press the UP DOWN buttons to select PC then press the ENTER button 3 Press the UP DOWN buttons to adjusting...

Страница 50: ...U button to display the menu Press the UP DOWN buttons to select Setup then press the ENTER button 3 Press the UP DOWN buttons to select Image Reset or Color Reset then press the ENTER button Press th...

Страница 51: ...d adjusts the frequency values and positions PC DISPLAY 1 Press the MENU button to display the menu Press the UP DOWN buttons to select Setup then press the ENTER button 2 Press the UP DOWN buttons to...

Страница 52: ...isplay the menu Press the UP DOWN buttons to select Picture then press the ENTER button twice 2 Press the UP DOWN buttons to select the Entertain Internet Text or Custom picture setting Press ENTER bu...

Страница 53: ...rding to personal preference Alternatively you can use one of the automatic settings 3 Press the UP DOWN buttons to select Contrast or Brightness 4 Press the LEFT RIGHT buttons to decrease or increase...

Страница 54: ...hen press the ENTER button 1 Press the MENU button to display the menu Press the UP DOWN buttons to select Picture then press the ENTER button 3 Press the UP DOWN buttons to select color tone Press th...

Страница 55: ...to select a particular item Press the UP DOWN buttons to select Red Green or Blue 4 Press the LEFT RIGHT buttons to decrease or increase the value of a particular item For example if you select Red p...

Страница 56: ...t the antenna Check all wire connections Try another channel Adjust the antenna Try another channel Press the SOURCE button Make sure the TV is plugged in Check the antenna connections First check the...

Страница 57: ...on and then adjust the Fine function See page 43 On your computer check Power Signal Cable 15 pin D Sub The TV is using its power management system Move the computer s mouse or press any key on the ke...

Страница 58: ...ce and locking method may differ from the illustration depending on the manufacturer Please refer to the manual provided with the Kensington lock for proper use 1 Insert the locking device into the Ke...

Страница 59: ...kward direction Please do not tilt the TV outside the specified range Using excessive force to tilt the TV may cause permanent damage to the mechanical part of the stand The 20 model swivels left and...

Страница 60: ...9 Pivot direct mount adapter No 97 101 003 Wall mount bracket kit LT P2045 20 No 47 007 099 Pivot direct mount adapter No 97 101 003 Wall mount bracket kit LT P2045U 20 No 47 007 099 Pivot direct moun...

Страница 61: ...itting anchors into the bracket holes Note If the bracket is not firmly fixed to the wall LCD TV can fall off How to assemble the Wall Mount Kit Bracket Anchors 3EA Screws 3EA Installation Guide After...

Страница 62: ...TV up and shift to the right to detach it from bracket When moving or transferring to other areas reverse No 4 procedure so as to disconnect LCD TV with ease 6 Picture 1 shows the adjustment angle 0 1...

Страница 63: ...after fitting anchors into the bracket holes Note If the bracket is not firmly fixed to the wall LCD TV can fall off How to assemble the Wall Mount Kit Bracket Anchors 4EA Screws 4EA Installation Gui...

Страница 64: ...LCD TV on the wall 5 Push the LCD TV up and shift to the right to detach it from bracket When moving or transferring to other areas reverse No 4 procedure so as to disconnect LCD TV with ease 6 Pictur...

Страница 65: ...he mode by referring to your Videocard user guide otherwise there may be no video For the display modes listed below the screen image has been optimized during manufacture Mode PC Resolution Horizonta...

Страница 66: ...x 12 24 V inch 413 0 H x 311 0 V mm 16 06 H x 12 05 V inch 408 0 H x 306 0 V mm a si TFT active matrix 0 51 H x 0 51 V mm 160 120 30 69kHz 50 75Hz 16 2 Million 30 80kHz 50 75Hz 16 2 Million 28 33kHz...

Отзывы: