ENG - 7
02 PRODUCT OVERVIEW
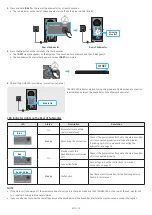
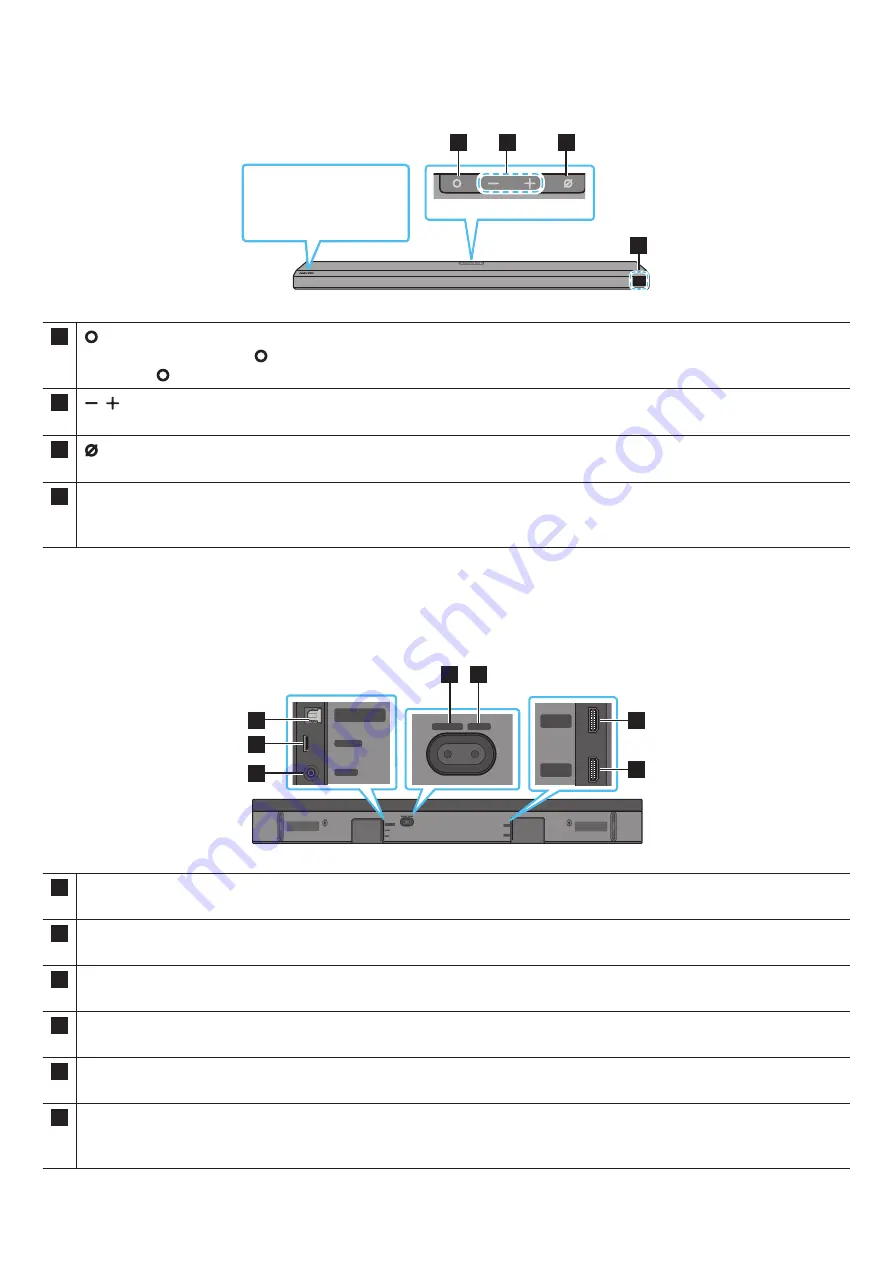
Front Panel / Top Panel of the Soundbar
1
2
3
4
Position the product so
that the SAMSUNG logo is
located on the top.
1
(Multi Function) Button
• In standby mode, press the
(Multi Function)
button to turn on the Soundbar.
• Press the
(Multi Function)
button to change the input source.
2
(Volume) Button
Adjusts the volume.
3
(Mic On/Off) Button
Press the button to turn the microphone on or off.
4
Display
Displays the product’s status and current mode.
D.IN
→
HDMI
→
Wi-Fi
→
BT
• When you plug in the AC cord, the power button will begin working in 4 to 6 seconds.
• When you turn on this unit, there will be a 4 to 5 second delay before it produces sound.
• If you hear sounds from both the TV and Soundbar, go to the
Settings
menu for the TV audio and change the TV speaker to
External Speaker
.
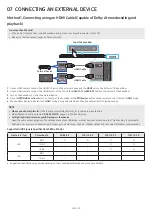
Bottom Panel of the Soundbar
DIGITAL AUDIO IN
(OPTICAL)
SERVICE
DC 19V
HDMI
NETWORK ID SET
DIGITAL AUDIO IN
(OPTICAL)
SERVICE
NETWORK ID SET
HDMI TO TV
(eARC/ARC)
HDMI IN
HDMI OUT
(TV-ARC)
DIGITAL AUDIO IN
(OPTICAL)
SERVICE
DC 19V
DIGITAL AUDIO IN
(OPTICAL)
SERVICE
DC 19V
HDMI
HDMI TO TV
(eARC/ARC)
DIGITAL AUDIO IN
(OPTICAL)
SERVICE
DC 19V
HDMI
NETWORK ID SET
DIGITAL AUDIO IN
(OPTICAL)
SERVICE
NETWORK ID SET
HDMI TO TV
(eARC/ARC)
HDMI IN
HDMI OUT
(TV-ARC)
DIGITAL AUDIO IN
(OPTICAL)
SERVICE
DC 19V
DIGITAL AUDIO IN
(OPTICAL)
SERVICE
DC 19V
HDMI
HDMI TO TV
(eARC/ARC)
DIGITAL AUDIO IN
(OPTICAL)
SERVICE
DC 19V
HDMI
NETWORK ID SET
DIGITAL AUDIO IN
(OPTICAL)
SERVICE
NETWORK ID SET
HDMI TO TV
(eARC/ARC)
HDMI IN
HDMI OUT
(TV-ARC)
DIGITAL AUDIO IN
(OPTICAL)
SERVICE
DC 19V
DIGITAL AUDIO IN
(OPTICAL)
SERVICE
DC 19V
HDMI
HDMI TO TV
(eARC/ARC)
DIGITAL AUDIO IN
(OPTICAL)
SERVICE
DC 19V
HDMI
NETWORK ID SET
DIGITAL AUDIO IN
(OPTICAL)
SERVICE
NETWORK ID SET
HDMI TO TV
(eARC/ARC)
HDMI IN
HDMI OUT
(TV-ARC)
DIGITAL AUDIO IN
(OPTICAL)
SERVICE
DC 19V
DIGITAL AUDIO IN
(OPTICAL)
SERVICE
DC 19V
HDMI
HDMI TO TV
(eARC/ARC)
1
2
3
4
5
6
7
1
DIGITAL AUDIO IN (OPTICAL)
Connect to the digital (optical) output of an external device. (See page 21)
2
SERVICE
Connect a USB storage device to upgrade the product’s software.
3
DC 19V (Power Supply In)
Connect the AC/DC power adapter. (See page 12)
4
NETWORK
Press to connect to a wireless network (Wi-Fi) via the
SmartThings
app.
5
ID SET
Press to connect the Soundbar to surround speakers and a subwoofer wirelessly.
6
HDMI
Inputs digital video and audio signals simultaneously using an HDMI cable.
Connect to the HDMI output of an external device. (See page 20)


