background image

English

63

05

Network Services

When done, press the 

ENTER

 button to 

select 

OK

, and then press the 

ENTER


button again. The Create Account screen 
re-appears.

Select 

Confi rm password

, and then press 

the 

ENTER

 button.

Repeat Steps 7 and 8. 

When the Create Account screen re-
appears, select 

Create Account

, and then 

press the 

ENTER

 button. The Confi rmation 

window appears.

Select 

OK

, and then press the 

ENTER


button. The Continue to Register Service 
window appears.

Select 

Connect Service

, and then press the 

ENTER

 button.

The Register Service Account Window 
appears. 

If you have existing accounts with any of 
the listed providers, you can associate the 
provider account and the provider account 
password with your Smart TV Account. 
Registration makes it easier to access 
the providers web site. For registration 
instructions, go to Step 2 in Account 
Management under the Settings Menu.

If you don’t have existing provider accounts 
or do not want to register existing accounts 
at this time, select 

OK

, and then press the 

ENTER

 button. You can also let the window 

close on its own in about a minute.

NOTE

You must use an e-mail address as an ID.

You can register up to 10 User Accounts.

You do not need an account to use Smart 
Hub.

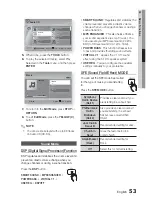
Account Log In

To log in to your Smart TV Account, follow these 
steps:

With the Smart Hub main screen displayed 
on your TV, press the 

RED (A)

 button on 

your remote. The Create Account screen 
appears.

8.

9.

10.

11.

12.

13.

14.


1.

Select the 

Down Arrow

 next to the 

Smart 

Hub ID

 fi eld, and then press the 

ENTER


button. 

Select your ID from the list that appears, and 
then press the 

ENTER

 button. The Create 

Account screen re-appears.

Select 

Password

, and then press the 

ENTER

 button. The Password window and 

a keypad appears.

Using the keypad and your remote, enter 
your password. When done, press the 

ENTER

 button, select 

OK

, and then press 

the 

ENTER

 button again.

NOTE

If you want Smart Hub to enter your password 
automatically, select Remember my Smart TV 
ID and password after you have entered your 
password, and then press the 

ENTER

 button. 

A check appears. Smart Hub will now enter 
your password automatically when you select 
or enter your ID.

The Settings Menu - BLUE (D)

The Settings Menu Screen gives you access to 
account management, account reset, and 
account properties functions. 

To access the Settings Menu, and then select a 
menu item, follow these steps:

Press the 

BLUE (D) 

button on your remote.

Press the ▲▼ to select a menu item, and 
then press the 

ENTER

 button.

The functions on the Settings Menu screen are 
described below.

NOTE

The Service Manager item listed in the Settings 
Menu is not available for Blu-ray Home 
Theaters.

Account Management

The Account Management Menu contains 
functions that let you register your service 
provider accounts, change your Smart Hub 
password, and delete or deactivate your Smart 
TV Account.

2.

3.

4.

5.

1.

2.

HT-D5300_XAA_0125.indd   63

2011-01-25     12:02:40

Содержание HT-D5300

Страница 1: ...ray Home Entertainment System user manual imagine the possibilities Thank you for purchasing this Samsung product To receive more complete service please register your product at www samsung com register HT D5300 ...

Страница 2: ...radio frequency energy and if not installed and used in accordance with the instructions may cause harmful interference to radio communications However there is no guarantee that interference will not occur in a particular installation If this equipment does cause harmful interference to radio or television reception which can be determined by turning the equipment off and on the user is encourage...

Страница 3: ...wide blade or the third prong are provided for your safety If the provided plug does not fit into your outlet consult an electrician for replacement of the obsolete outlet 10 Protect the power cord from being walked on or pinched particularly at plugs convenience receptacles and the point where they exit from the apparatus 11 Only use attachment accessories specified by the manufacturer 12 Use only ...

Страница 4: ... Condensation may occur if you store your product or a disc in cold temperatures If transporting the product during the winter wait approximately 2 hours until the product has reached room temperature before using The batteries used with this product contain chemicals that are harmful to the environment Do not dispose of batteries in the general household trash Viewing TV using the 3D function IMP...

Страница 5: ...cludes software DTS Inc All Rights Reserved ABOUT DIVX VIDEO DivX is a digital video format created by DivX Inc This is an official DivX Certified device that plays DivX video Visit www divx com for more information and software tools to convert your files into DivX video ABOUT DIVX VIDEO ON DEMAND This DivX Certified device must be registered in order to play purchased DivX Video on Demand VOD movies...

Страница 6: ...g Audio from External Components 26 Connecting to a Network 27 Connecting the FM Antenna SETUP 28 28 Initial Settings 29 Accessing the Settings Menu 30 Display 30 3D Settings 31 TV Aspect 31 Smart Hub Screen Size 31 BD Wise Samsung Products only 31 Resolution 33 HDMI Color Format 33 Movie Frame 24 Fs 33 HDMI Deep Color 33 Still Mode 33 Progressive Mode 34 Audio 34 Speaker Settings 35 Musical Room ...

Страница 7: ...aying back a Picture 55 Playing back a USB Storage Device 56 Listening to Radio 56 Connecting an iPod iPhone Using the USB Cable 56 Connecting an iPod iPhone Using the Dock 57 Use an iPod iPhone with a Wireless Dock Cradle sold separately for iPod iPhone 58 iPod iPhone Models You Can Use with This Product 59 How to Link the Wireless Transmitter with the Main Unit NETWORK SERVICES 60 60 Using Smart...

Страница 8: ...o a digital TV video can sometimes lag behind the audio To compensate for this you can adjust the audio delay time to sync up with the video iPod Sync function If the video signal from an iPod player you attached to the product lags behind the audio signal during playback you can set the audio delay time so that the video and audio match iPod iPhone support If you have connected an iPod player to ...

Страница 9: ...WMA w Indicates a function available in a CD RW R DVD RW R disc or a USB storage media containing MP3 or WMA contents JPEG G Indicates a function available in a CD RW R DVD RW R disc or a USB storage media containing JPEG contents DivX MKV MP4 DivX x Indicates a function available in a CD RW R DVD RW R disc or a USB storage media containing DivX contents USB storage device F Indicates a function a...

Страница 10: ... or deposits of cigarette smoke on the recording surface may make it impossible to playback a disc When you play a BD Java title loading may take longer than a normal title or some functions may perform slowly Discs that cannot be played HD DVD Disc DVD RAM 3 9 GB DVD R Disc for Authoring DVD RW VR mode Super Audio CD except CD layer DVD ROM PD MV Disc etc CVD CD ROM CDV CD G CD I LD CDGs play aud...

Страница 11: ...IDEO This product can play back pre recorded commercial DVD discs DVD VIDEO discs with movies When switching from the first layer to the second layer of a dual layered DVD VIDEO disc there may be momentary distortion in the image and sound This is not a malfunction of the product DVD RW R R This product can play back a DVD RW R R disc recorded and finalized with a DVD video recorder The ability to p...

Страница 12: ...ile Formats Video File Support File Extension Container Video Codec Audio Codec Resolution avi AVI DivX 3 11 4 x 5 1 6 0 MP3 AC3 LPCM ADPCM DTS Core 1920x1080 XviD 1920x1080 H 264 BP MP HP 1920x1080 MPEG4 SP ASP 1920x1080 Motion JPEG 1920x1080 mkv MKV DivX 3 11 4 x 5 1 6 0 MP3 AC3 LPCM ADPCM DTS Core 1920x1080 XviD 1920x1080 H 264 BP MP HP 1920x1080 MPEG4 SP ASP 1920x1080 Motion JPEG 1920x1080 asf...

Страница 13: ... index table is corrupt the Seek Jump function will not be supported If you play a video via the network it may not play properly depending on the network status Video decoder Up to H 264 Level 4 1 supported H 264 FMO ASO RS VC1 SP MP AP L4 AVCHD not supported XVID MPEG4 SP ASP Below 1280 x 720 60 frame max Above 1280 x 720 30 frame max GMC 2 or higher not supported Audio decoder Up to WMA 7 8 9 s...

Страница 14: ... the PTP protocol for digital cameras Do not disconnect a USB device during a loading process The bigger the image resolution the longer the the image takes to display This player cannot play MP3 files with DRM Digital Rights Management downloaded from commercial sites 6 7 8 9 10 11 Accessories Check the box for the supplied accessories listed below FUNCTION TV SOURCE POWER DISC MENU MENU TITLE MEN...

Страница 15: ...loses the disc tray 10 ASC IN JACK Used to connect the ASC Microphone for setting up MRC Musical Room Calibration 11 VOLUME CONTROL Volume adjustment 12 USB PORT You can connect a USB memory flash stick here and use it as storage when the product is connected to BD LIVE You can also use the USB Host for software upgrades and MP3 JPEG DivX MKV MP4 playback NOTE You must use a USB memory flash stick t...

Страница 16: ...uct and the optional wireless receiver module 8 AUX IN JACKS Connect to the 2CH analog output of an external device such as a VCR 9 COMPONENT VIDEO OUT JACKS Connect a TV with Component video inputs to these jacks 10 VIDEO OUT JACK Connect your TV s Video Input jack VIDEO IN to the VIDEO OUT Jack on this product 11 5 1 CHANNEL SPEAKER OUTPUT CONNECTORS Connect the front center surround subwoofer s...

Страница 17: ... FM stations and change channels Cut off the sound temporarily You can set the SFE Sound Field Effect mode best suited for the type of music you are listening to Press to view the disc menu Press to move to the home menu Select on screen menu items and change menu value Return to the previous menu Allows you to repeat a title chapter track or disc Press to exit the menu Use to display the playback...

Страница 18: ... Howell M Wards 57 58 81 Brocsonic 59 60 Candle 18 Cetronic 03 Citizen 03 18 25 Cinema 97 Classic 03 Concerto 18 Contec 46 Coronado 15 Craig 03 05 61 82 83 84 Croslex 62 Crown 03 Curtis Mates 59 61 63 CXC 03 Daewoo 02 03 04 15 16 17 18 19 20 21 22 23 24 25 26 27 28 29 30 32 34 35 36 48 59 90 Daytron 40 Dynasty 03 Emerson 03 15 40 46 59 61 64 82 83 84 85 Fisher 19 65 Funai 03 Futuretech 03 General ...

Страница 19: ...downward Unlike the front and center speakers the surround speakers are used mainly for sound effects Sound will not come from them all the time Subwoofer g The position of the subwoofer is not so critical Place it anywhere you like Position of the product Place it on a stand or cabinet shelf or under the TV stand Selecting the Listening Position The listening position should be located about 2 5 ...

Страница 20: ... Speaker R Subwoofer Surround Speaker R Front Speaker L Connecting The Speakers Press down the terminal tab on the back of the speaker Insert the black wire into the black terminal and the red wire into the red terminal and then release the tab Connect the speaker wire plugs to the back of the product by matching the colors of the speaker plugs to the speaker jacks 1 2 3 Black Red Surround Speaker...

Страница 21: ...to the TX Card Connection WIRELESS on the back of the product Hold the TX card so that the label WIRELESS faces upward and insert the card into the port The TX card enables communication between the product and the wireless receiver module Connect the left and right surround speakers to the wireless Receiver module Plug the power cord of the wireless Receiver module in the wall outlet 1 2 3 4 5 6 ...

Страница 22: ...he wireless surround speakers NOTE Place the wireless receiver module at the rear of the listening position If the wireless receiver module is too close to the product you may hear some sound interruption due to interference If you use a device such as a microwave oven wireless LAN Card or any other device that uses the 2 4 5 8GHz frequencies near the product some sound interruption may be heard d...

Страница 23: ...le connect the HDMI OUT terminal on the rear of the product to the HDMI IN terminal of your TV Turn on the product and TV For possible HDMI resolutions see page 32 This function is not available if the HDMI cable does not support CEC HDMI is an interface that enables the digital transmission of video and audio data with just a single connector Using HDMI the product transmits a digital video and a...

Страница 24: ...nent jacks are connected and you select the Component 1080p 1080i 720p or 480p mode the Display Setup menu will show the output resolution as 1080p 1080i 720p or 480p in the menu The resolution is actually 480i METHOD 3 Composite Video GOOD QUALITY Connect the supplied Video cable from the VIDEO OUT jack on the back of the product to the VIDEO IN jack on your TV NOTE The VIDEO source always output...

Страница 25: ...om external digital components This system supports only DTS and Dolby Digital audio MPEG audio which is bitstream cannot be supported AUX Connecting an External Analog Component Analog signal components such as a VCR Connect AUX IN Audio on the product to the Audio Out of the external analog component Be sure to match connector colors Press the FUNCTION button to select AUX input The mode switche...

Страница 26: ...onnect the LAN terminal of the product to the LAN terminal of your modem Set the network options See page 38 NOTE Internet access to Samsung s software update server may not be allowed depending on the router you use or the ISP s policy For more information contact your ISP Internet Service Provider DSL users please use a router to make a network connection To use the AllShare function you must co...

Страница 27: ...ce depending on the use condition router performance distance obstacles interference by other radio devices etc Set the wireless IP sharer to Infrastructure mode Ad hoc mode is not supported The home theater supports the following security protocols only Authentication Mode WEP WPAPSK WPA2PSK Encryption Type WEP AES For the AllShare function a PC must be connected in the network as shown in the fig...

Страница 28: ...rk Settings press the BLUE D button on your remote instead to skip Network Settings here finish the Initial Settings and go to the Home menu If you selected a Network Settings go to pages 38 41 for more information about the Network settings When done go to Step 8 The Home menu appears For more information about the Home menu please see page 29 1 2 3 4 5 6 7 8 Home Menu d PBC WPS My Devices Interne...

Страница 29: ...s Videos Photos Music My Contents 5 6 2 4 3 Function 1 1 Selects My Devices 2 Selects Function 3 Selects My Contents 4 Selects Internet 5 Selects Settings 6 Displays the buttons available 1 Press the buttons to select Settings and then press the ENTER button Press the buttons to select the desired submenu and then press the ENTER button Press the buttons to select the desired item and then press t...

Страница 30: ...P button once The Blu ray menu appears Press the STOP button again then select 3D Settings in the Blu ray menu Depending on the content and the position of the picture on your TV screen you may see vertical black bars on the left side right side or both sides Screen Size Lets you enter the actual screen size of your TV so that the product can adjust the image according to the screen size and displ...

Страница 31: ...screen BD Wise Samsung Products only BD Wise is Samsung s latest inter connectivity feature When you connect a Samsung product and a Samsung TV with BD Wise to each other via HDMI and BD Wise is on in both the product and TV the product outputs video at the video resolution and frame rate of the BD DVD disc Off The output resolution stays fixed at the resolution you set previously in the Resolution...

Страница 32: ...Resolution of TV input Max Resolution of TV input 480i 1080p 60F 1080p 60F 1080p 60F 480i Movie Frame Auto 24Fs 1080p 24F 1080p 24F 480i 1080i 1080i 1080i 480i 480i 1080i 480i 720p 720p 720p 480i 480i 720p 480i 480p 480p 480p 480i 480i 480p 480i 480i 480i 480i 480i DVD playback Output Setup HDMI connected HDMI not connected HDMI Mode Component VIDEO Mode Component Mode VIDEO Mode BD Wise 480i 480i...

Страница 33: ...supports the YCbCr color space via HDMI select this to output the normal YCbCr color gamut RGB Standard Select RGB Standard to output the normal RGB color gamut RGB Enhanced If you have connected the product to a DVI display device such as a monitor select RGB Enhanced to output the enhanced RGB color gamut Movie Frame 24 Fs Setting the Movie Frame 24Fs feature to Auto allows you to adjust the pro...

Страница 34: ...peakers are set up correctly To stop the test tone press the buttons to select Off Settings Display Audio Network System Language Security General Support Speaker Settings Move Enter Return Level Distance Test Tone On NOTE When HDMI Audio is ON audio is produced through TV speakers the Test Tone function is not available Audio Speaker Settings Settings Display Audio Network System Language Securit...

Страница 35: ...ical Room Calibration function takes about 3 minutes Make sure there is no disc in the product when you run the Musical Room Calibration function If the ASC microphone is disconnected during the Musical Room Calibration setup the setup will be canceled When the Musical Room Calibration function is activated the DSP Dolby Pro Logic ll and SFE Mode will not work If the product is connected to extern...

Страница 36: ...capabilities Bitstream Re encoded DTS Choose if you have connected an AV receiver using a Digital Optical input that can decode DTS Bitstream Re encoded Dolby D Select if you don t have an HDMI supported AV receiver but have an AV receiver with Dolby Digital decoding capabilities For more details please refer to the digital output selection table See page 37 Blu ray Discs may include three audio s...

Страница 37: ...io stream together into PCM audio and adds Navigation Sound Effects Outputs only the main feature audio stream so that your AV receiver can decode the audio bitstream You will not hear BONUSVIEW audio or Navigation Sound Effects Decodes the main feature audio and BONUSVIEW audio stream together into PCM audio and adds Navigation Sound Effects then re encodes the PCM audio into DTS bitstream Decode...

Страница 38: ...ton Press the buttons to select Wired Wireless General WPS PBC or One Foot Connection and then press the ENTER button If you have a wired network go to Wired Network below If you have a wireless network go to Wireless Network on pages 39 41 1 2 3 4 5 Wired Network Setting Up a Wired Connection Auto Press the buttons to select Wired Settings Display Audio Network System Language Security General Su...

Страница 39: ...1 Wireless Network You can setup a wireless network three ways Wireless General Using WPS PBC One Foot Connection Wireless General includes both Automatic and Manual setup procedures Setting Up the Wireless Network Connection Auto Most wireless networks have an optional security system that requires devices that access the network to transmit an encrypted security code called an Access or Security...

Страница 40: ...b click the Details button The Network settings are displayed 4 5 1 2 3 4 To enter the Network settings into your product follow these steps Follow Steps 1 through 5 in the Setting Up the Wireless Network Connection Auto procedure When done press the buttons to move the cursor to Done and then press the ENTER button The Network Status screen appears Settings Display Audio Network System Language S...

Страница 41: ...less Router supports One Foot Connection Select this connection type after placing the Wireless Router within 10 inches 25cm of product One Foot Connection WPS PBC 1 2 3 1 Press the ENTER button Place the Samsung Wireless Router within 25 cm 10 inches of your product to connect Wait until the connection is automatically established Network Status Check whether a connection to the network and the I...

Страница 42: ...u manage the downloaded contents you accessed through a Blu ray Disc that supports the BD LIVE service and stored on an attached Flash memory device You can check the device s information including the storage size delete the BD data or change the Flash memory device BD Data Management Screen Information Total Size Total memory size of the device Available Size Available memory in the device NOTE ...

Страница 43: ...ck of Blu ray discs with specific age ratings unless a password is entered DVD Parental Rating Prevent playback of DVD discs with specific numerical ratings unless a password is entered Change Password Change the 4 digit password used to access security functions If you forgot your password Remove the disc Press and hold the STOP button on the front panel for 5 seconds or more All settings will reve...

Страница 44: ...s the upgrade 6 7 1 2 3 4 5 6 NOTE Your product must be connected to the Internet to use the By Internet function The upgrade is complete when the product turns off and then turns on again by itself Never turn the product off or back on manually during the update process Samsung Electronics shall take no legal responsibility for product malfunction caused by an unstable Internet connection or cons...

Страница 45: ...uct begins the upgrade When the update is complete the product turns off automatically and then turns on 1 2 3 4 5 6 7 8 1 2 3 4 NOTE When the system upgrade is done check the software details in the software Upgrade menu Do not turn off the product during the software Upgrade It may cause the product to malfunction To use the By Downloaded function your product must be connected to the Internet D...

Страница 46: ... STOP button Video files with high bit rates of 20Mbps or more strain the product s capabilities and may stop playing during play back 1 2 3 4 Disc Structure The content of discs are usually divided as shown below Blu ray Disc DVD VIDEO title 1 title 2 chapter 1 chapter 2 chapter 1 chapter 2 chapter 3 Audio CD CD DA track 1 track 2 track 3 track 4 track 5 MP3 WMA DivX MKV and MP4 folder group 1 fol...

Страница 47: ...unctions During playback you can search quickly through a chapter or track and use the skip function to jump to the next selection Searching for a Desired Scene hzZyx During playback press the SEARCH button Each time you press the SEARCH button the playback speed will change as follows BD ROM BD RE R DVD RW R DVD RW R DVD VIDEO 1 2 3 4 5 6 7 1 2 3 4 5 6 7 DivX MKV MP4 1 2 3 1 2 3 To return to norm...

Страница 48: ... Chapter hzZy Repeat the disc title or chapter During playback press the REPEAT button on the remote control Press the buttons to select Chapter or Title then press the ENTER button 1 2 Repeat Off To return to normal play press the REPEAT button again Press the buttons to select Off then press the ENTER button NOTE Depending on the disc the Repeat function may not be available Repeat the Section h...

Страница 49: ...y secondary audio modes will be also displayed if the Blu ray Disc has a BONUSVIEW section Use the button to switch between primary and secondary audio modes The languages available depend on the languages that are encoded on the disc This function or certain languages not be available Some Blu ray Discs may allow you to select either the multi channel LPCM or Dolby digital audio soundtrack in Eng...

Страница 50: ...ss the ENTER button Press the buttons to select the desired Mode then press the ENTER button Dynamic Choose this setting to increase Sharpness Normal Choose this setting for most viewing applications Movie This is the best setting for watching movies 1 2 3 1 2 3 User The user can adjust the sharpness and noise reduction function respectively NOTE If the system is connected to a BD Wise compliant T...

Страница 51: ...ist 6 YELLOW C button Select or deselect a track in the music list 7 ENTER button Plays the selected track 8 button During playback moves to the next page in the Music List or moves to the next track in the Playlist button During playback moves to the previous page in the Music List or moves to the previous track in the Playlist 9 STOP button Stops a track 0 button Plays the next track button Play...

Страница 52: ...During the Playlist playback press the REPEAT button Select the desired play mode by pressing the REPEAT button repeatedly Off Audio CD CD DA MP3 Tracks on a disc are played in the order in which they were recorded on the disc One Song Audio CD CD DA MP3 Current track is repeated All Audio CD CD DA MP3 All tracks are repeated NOTE During playback press the TOOLS button and set Shuffle Mode to On Yo...

Страница 53: ...7 8 SMART SOUND Regulates and stabilizes the volume level and prevents a drastic volume change when you change channels or during a scene transition MP3 ENHANCER This also helps enhance your sound experience ex mp3 music You can upscale your MP3 level sound 24 kHz 8bit to CD level sound 44 1 kHz 16bit POWER BASS This function stresses low tones and provides thudding sound effects VIRTUAL 7 1 Appli...

Страница 54: ...d to the system you can the video files in your iPod player through the connected TV If the video signal does not synchronize properly with the audio signal press GREEN B on the remote control to correct the synchronization NOTE Before you can play the video files in the iPod player you must connect the Audio Video terminals of the TV to the home theater using the Composite A V cable The models belo...

Страница 55: ...ge media with the music file However the sound quality can be affected by the bit rate of the MP3 file the size of the photo and the encoding method Playing back a USB Storage Device F You can use the USB connection to play multimedia files MP3 JPEG DivX etc downloaded from the USB storage device Move to the home menu Safely Remove USB d PBC WPS My Devices Internet Settings Videos Photos Music My Con...

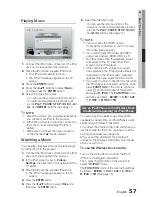
Страница 56: ... is stored in memory To preset another station repeat steps 2 to 4 To tune in to a preset station press the TUNING CH button to select a channel 1 2 1 2 3 4 5 C TUNER MEMORY Connecting an iPod iPhone Using the USB Cable If the home theater is connected to an iPod iPhone using the provided USB cable you can play music in iPod iPhone through the home theater 5V 500mA ASC IN ASC IN 50 Connect an iPod...

Страница 57: ...y You can use the remote control or the product to control simple playback functions such as the PLAY PAUSE STOP and buttons See page 17 NOTE You must have the VIDEO output Composite connected to your TV to view iPod video See page 24 If you want to play iPod video via VIDEO output set Anynet HDMI CEC to off No other screen than the playback screen will appear on the TV View other iPod screens on ...

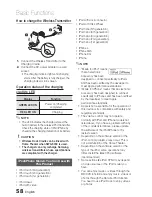
Страница 58: ...ano 3rd generation iPod nano 2nd generation iPod nano 1st generation iPhone 4 iPhone 3GS iPhone 3G iPhone NOTE Made for iPod means that an electronic accessory has been designed to connect specifically to iPods and has been certified by the developer to meet Apple performance standards Made for iPhone means that an electronic accessory has been designed to connect specifically to iPhones and has been...

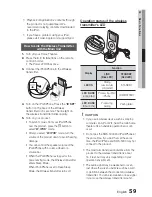
Страница 59: ...d iPhone is stopped or in a power saving mode the Wireless transmitter enters Sleep Mode When iPod iPhone is set to Deep Sleep Mode the Wireless transmitter turns off 1 2 3 4 5 Operation status of the wireless transmitter s LED CH AR GE STAN DB Y LI N K STANDBY LIN K Display Function LINK Blue LED STANDBY Red LED LED ON Pairing successfully completed STANDBY LED BLINK Long blink Processing iPod iP...

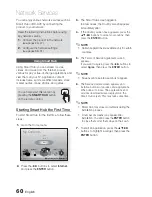
Страница 60: ...otos Music My Contents Function Press the buttons to select Internet and press the ENTER button 1 2 The Smart Hub screen appears In a few cases the Country screen appears immediately after If the Country screen has appeared press the buttons to select your country then press the ENTER button NOTE Certain applications are available only in certain countries The Terms of Service Agreement screen app...

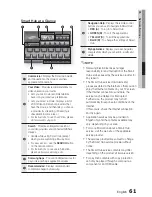
Страница 61: ...ction please visit www samsung com 4 Samsung Apps You can download various for pay or free of charge application services 5 Recommended Displays recommended contents managed by Samsung 6 Navigation Help Displays the remote control buttons you can use to navigate in Smart Hub RED A To log in to Smart Hub GREEN B To sort the applications YELLOW C To edit the applications BLUE D To change the setting...

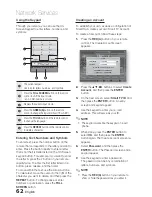
Страница 62: ...an Account To establish your own exclusive configuration of Smart Hub create your own Smart TV Account To create an account follow these steps Press the RED A button on your remote control The Create Account screen appears xxxxxxxx Contents 1 xxxxxxxx Contents 6 xxxxxxxx Contents 5 xxxxxxxx Contents 4 xxxxxxxx Contents 3 xxxxxxxx Contents 2 xxxxxxxx Contents 7 xxxxxxxx Contents 8 xxxxxxxx Contents ...

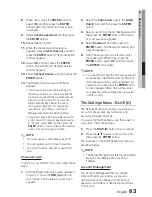
Страница 63: ...displayed on your TV press the RED A button on your remote The Create Account screen appears 8 9 10 11 12 13 14 1 Select the Down Arrow next to the Smart Hub ID field and then press the ENTER button Select your ID from the list that appears and then press the ENTER button The Create Account screen re appears Select Password and then press the ENTER button The Password window and a keypad appears Us...

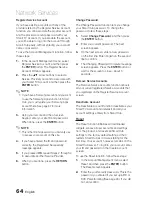
Страница 64: ...he RETURN button 1 2 3 4 5 6 Change Password The Change Password function lets you change your Smart Hub password To change the password follow these steps Select Change Password and then press the ENTER button Enter your current password The next screen appears On the next screen enter a new password on the first line Enter it again on the second line to confirm The Changing Password Complete messa...

Страница 65: ... a menu item follow these steps Press the YELLOW C button on your remote The Edit Mode menu bar appears on the bottom of the screen 3 4 1 Press the to select a menu item and then press the ENTER button The functions in the Edit Mode Menu bar are described below NOTE Some menu items may not appear on the screen To see these items press the to move to the screen edge and then press one more time to ...

Страница 66: ...Move to Folder window appears Select My Applications and then press the ENTER button The Move to Folder window closes and the widget returns to the main My Applications screen 1 2 3 4 1 2 3 1 2 3 Rename Folder The Rename Folder function lets you rename folders To use the Rename Folder function follow these steps Press the YELLOW C button on your remote Press the to select a folder and then press t...

Страница 67: ...automatically highlights User Defined when you start it To sort the widgets in My Applications follow these steps Press the GREEN B button on your remote Press the to select a sorting method and then press the ENTER button Smart Hub sorts the widgets by the method you have chosen 1 2 3 4 5 1 2 3 4 1 2 Samsung Apps Samsung Apps lets you download for pay or free of charge applications and services to...

Страница 68: ...e tab Recommended Most Downloaded Most Recent Name You can also use the BLUE D button on your remote to access the Sort By tabs Each time you press the BLUE D button you change the display from one sort tab to the next 1 2 3 4 5 Samsung Apps by category The following categories are available What s New Displays newly registered applications Video Displays various video media such as movies TV show...

Страница 69: ...nt of the product and then check its remaining memory The memory device must have at least 1GB of free space to accommodate the BD LIVE services Insert a Blu ray disc that supports BD LIVE Select an item from various BD LIVE service contents provided by the disc manufacturer NOTE The way you use BD LIVE and the provided contents may differ depending on the disc manufacturer 1 2 3 Using the AllShar...

Страница 70: ...Sound can be heard only from a few speakers and not all 6 On certain BD DVD discs sound is output from the front speakers only Check if the speakers are connected properly Adjust the volume When listening to a CD radio or TV sound is output to the front speakers only Select PRO LOGIC II by pressing PL II Dolby Pro Logic II on the remote control to use all six speakers Dolby Digital 5 1 CH Surround...

Страница 71: ...a s input signal is weak install an external FM antenna in an area with good reception While listening to TV audio through the Product no sound is heard If the OPEN CLOSE button is pressed while listening to TV audio using the D IN or AUX functions the BD DVD functions are turned on and the TV audio is muted Not Available appears on screen The features or action cannot be completed at this time be...

Страница 72: ...y device must have at least 1GB of free space to accommodate the BD LIVE service You can check the available size in BD Data Management See page 42 Please check whether the BD LIVE Internet Connection menu is set to Allow All If all above fails contact the contents provider or update the latest firmware When using the BD LIVE service an error occurs The memory device must have at least 1GB of free ...

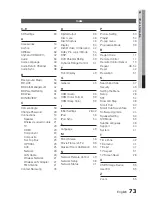
Страница 73: ...Mode 54 DSP 53 DVD Parental Rating 43 Dynamic Range Control 37 F Front Display 43 G General 43 H HDMI Audio 36 HDMI Color Format 33 HDMI Deep Color 33 I Initial Settings 28 42 iPod 56 iPod Sync 54 L Language 43 M Mono Stereo 56 Movie Frame 24 Fs 33 Musical Room Calibration 35 N Network Remote Control 43 Network Setup 38 Network Status 41 P Picture Setting 50 Playlist 52 Popup menu 46 Progressive M...

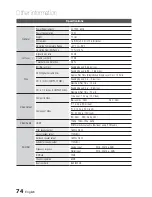
Страница 74: ...CT DISC Reading Speed 4 8 5 6 m sec Maximum Play Time 74 min CD 3 1 2 inches COMPACT DISC Reading Speed 4 8 5 6 m sec Maximum Play Time 20 min Video Output Composite Video 1 channel 1 0 Vp p 75 Ω load Blu ray Disc 480i DVD 480i Component Video Y 1 0 Vp p 75 Ω load Pr 0 70 Vp p 75 Ω load Pb 0 70 Vp p 75 Ω load BD 480i DVD 480p 480i Video Audio HDMI 1080p 1080i 720p 480p PCM multichannel audio Bitst...

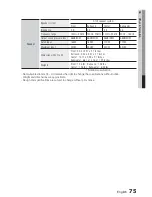
Страница 75: ... 170W Maximum input 330W 330W 340W 340W Dimensions W x H x D Front 3 54 x 5 57 x 2 7 inches Surround 3 54 x 5 57 x 2 7 inches Center 14 17 x 2 93 x 2 7 inches Subwoofer 6 61 x 13 78 x 11 22 inches Weights Front 1 28 Ibs Surround 1 28 Ibs Center 1 26 Ibs Subwoofer 8 38 Ibs Nominal specification Samsung Electronics Co Ltd reserves the right to change the specifications without notice Weight and dimens...

Страница 76: ...t systems utilities services parts supplies accessories applications installations repairs external wiring or connectors not supplied and authorized by SAMSUNG or which damage this product or result in service problems incorrect electrical line voltage fluctuations and surges customer adjustments and failure to follow operating instructions cleaning maintenance and environmental instructions that ...

Страница 77: ... Area Contact Center Web Site Serbia 0700 Samsung 0700 726 7864 www samsung com Slovakia 0800 SAMSUNG 726 7864 www samsung com Spain 902 1 SAMSUNG 902 172 678 www samsung com Sweden 0771 726 7864 SAMSUNG www samsung com Switzerland 0848 SAMSUNG 7267864 CHF 0 08 min www samsung com ch www samsung com ch_fr French U K 0330 SAMSUNG 7267864 www samsung com Eire 0818 717100 www samsung com Lithuania 8 ...

Страница 78: ...ONS OR COMMENTS COUNTRY CALL OR VISIT US ONLINE AT WRITE IN THE US 1 800 SAMSUNG 7267864 www samsung com us Samsung Electronics America Inc 85 Challenger Road Ridgefield Park NJ 07660 2112 Code No AH68 02358R ...

Страница 79: ...sung 5 1 CH Blu ray Home Entertainment System We have manufactured this product to provide you with many hours of AudioNideo Entertainment This QUICK START GUIDE guide has been included to get you up and running in thE least amount of time as possible If you have any questions or comments relating to Samsung products pleas1e contact the SAMSUNG customer care center Samsung Electronics America Inc ...

Страница 80: ...the RED A button NETFLIX BUTION Press this to use the Netflix SMART HUB BUTION Press th1s to use the Smart Hub PLII BUTION Select the des1red Dolby Pro Logic II aud1o mode FUNCTION TV SOURCE BUTION Th1s IS mode select1on button or Press to select TV s v1 deo mode SLEEP BUTION Set the Sleep t1me to shut off the product f English OPEN CLOSE BUTION To open and close the d1sc tray REPEAT BUTION Allows...

Страница 81: ...rround Speaker R Do not let children play With or near the speakers They could get hurt if a speaker falls When connecting the speaker w1res to the speakers make sure that the polarity 1s correct Keep the subwoofer speaker out of reach of children so as to prevent children from inserting their hands or allen substances into the duct hole of the subwoofer speaker Do not hang the subwoofer on the wa...

Страница 82: ...o HOMI automatically within 10 seconds If Component and HOMI are both connected HOMI mode is automatically selected When you connect the product to the TV using the HOMI cable for the first time or to a new TV the HOMI output resolution will be automatically set to the highest provided by the TV If you connect a Samsung TV to the product using an HOMI cable the product can be easily operated using...

Страница 83: ...l Output of the external digital component 2 Press the FUNCTION button to select D IN input The mode switches as follows BD DVD D IN AUX R IPOD W IPOD FM NOTE To see video from your Cable Box Satellite receiver you must connect it s video output to a TV AUX Connecting an External Analog Component Analog signal components such as a VCR 1 Connect AUX IN Audio on the product to the Audio Out of the e...

Страница 84: ...e A T buttons to highlight a widget then press the ENTER button O Commercial Displays the Smart HubGutde an 1ntroduct100 to the product and newapplicat100 ntroductiOOS f YourVideo Providesrecornrnendat100s for VIdeos based on your tastes e Search Provides an Integrated search ofyour VIdeo prOVIders and connected AIIShare devices 0 Samsung Apps You can download vanous for pay or free of charge appl...

Страница 85: ...aTV antenna Analog TVs should continue to work as before for other purposes e g for watching low power TV stations still broadcasting in analog watching pre recorded movies or playing video games When aConverter is used with an older television receiver or directly with this product a signal splitter might be necessary to continue to receive low power analog broadcasts via an antenna For more info...

Страница 86: ...I 0 c ...

Страница 87: ...ion Elimine Ia suciedad del pano suministrado antes de limpiar Ia caja Para limpiarella caja frontal asegurese de que utiliza unicamente un pano y Espariol de que lo roda entre 4y6veces antes de pasarlo suavemente en una direcci6n Despues de limpiar Ia caja sequela cuidadosamente para eliminar Ia humedad Limpie unicamente con agua 4 A Polski Ten produkt ma powierzchnhp lakierowanct o wysokim polys...

Страница 88: ......

Страница 89: ......

Страница 90: ... SAMSUNG PRODUCTS Valued Customer If you experience any technical problems with your new Samsung Products please call Samsung Customer Support 1 Monday Sunday 9 00 AM 9 00PM Before returning this product to your place of purchase ...

Страница 91: ... Valued Customers Thank you for purchasing Samsung Products If you have any further q uestions please contact Samsung Electronics America Web www samsung com Call 1 800 Samsung II 1 111111111 II 6801 001672 ...

Отзывы: