background image

90 - 

English

E

diting

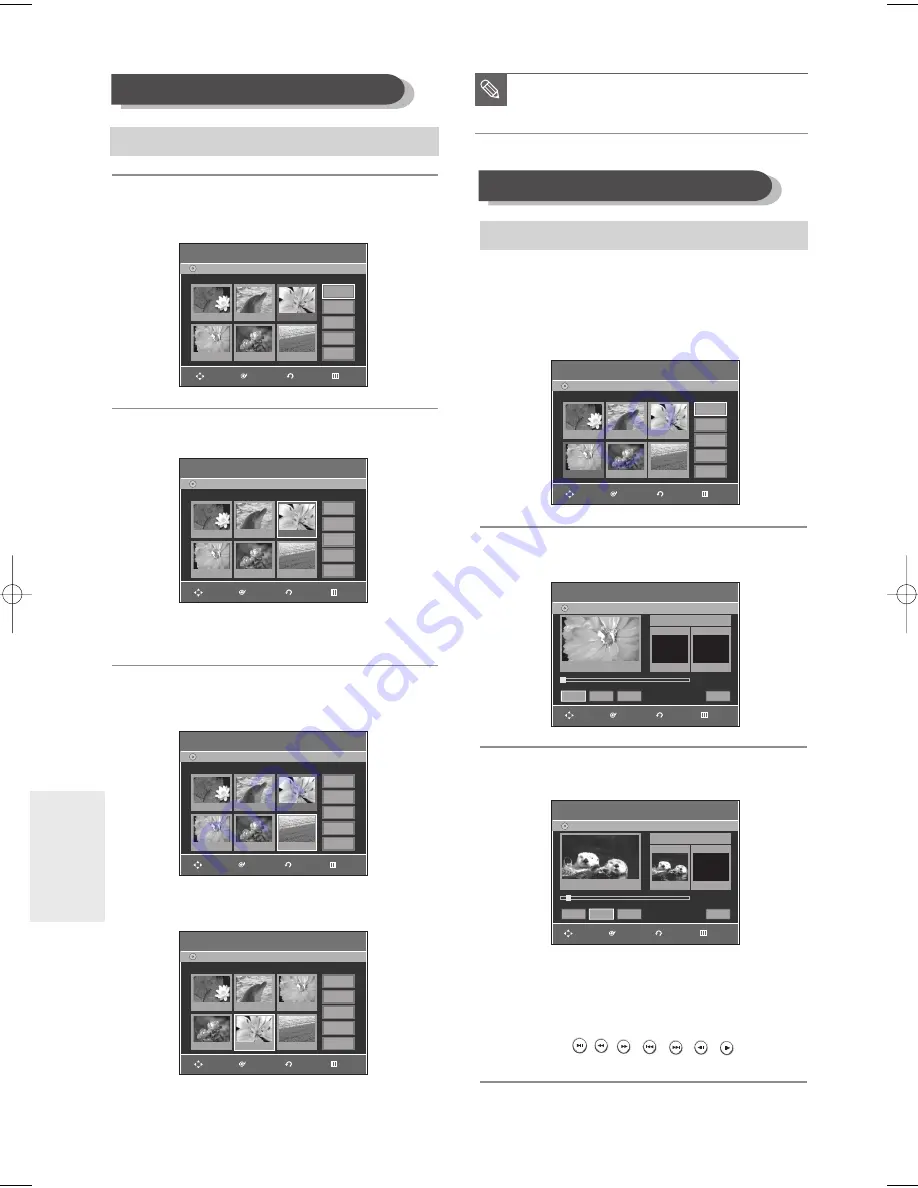
Moving a Scene (Changing the Position of a Scene)

To setup, follow steps 1 to 3 in page 88.

To setup, follow steps 1 to 3 in page 88.

4

Press the 

…† œ √

buttons to select the scene you

want to move (change the position), and then press
the 

ENTER

button.

5

Press the 

…†

buttons to select 

Move

, then press the

ENTER

button.

• A yellow selection window is displayed on the scene to

be moved.

6

Press the 

…† œ √

buttons to select the position to

which you want to move the selected scene, and
then select the 

ENTER 

button.

• The selected scene is moved to the selected position.

4

Press the 

…† œ √

buttons to select the scene that

will have a new scene inserted before it, and then
press the 

ENTER

button.

A yellow selection window is displayed on the scene to
be added as the new scene.

5

Press the 

…†

buttons to select 

Add

, then press the

ENTER

button.

6

Press the 

ENTER 

button at the starting point of the

scene.

• The image and starting point time are displayed on

the Start window.

• Select the end point of the section where you want

to add the new scene using the playback related
buttons (

,

,

, , , , ).

■ 

Depending disc type, the displayed screen
may look slightly different.

NOTE

Adding a Scene

Edit Scene

DVD-Recorder

Scene No.

3/7

Playlist No.

3

DVD-RW(VR)

01 00:00:26

02 00:00:07

04 00:00:03

05 00:00:11

06 00:00:04

03 00:00:04

Play

Modify

Move

Add

Delete

DVD-RW(VR)

Edit Scene

DVD-Recorder

DVD-RW(VR)

Edit Scene

DVD-Recorder

DVD-RW(VR)

Edit Scene

DVD-Recorder

Scene No.

3/7

Playlist No.

3

01 00:00:26

02 00:00:07

04 00:00:03

05 00:00:11

06 00:00:04

03 00:00:04

Play

Modify

Move

Add

Delete

Scene No.

6/7

Playlist No.

3

01 00:00:26

02 00:00:07

04 00:00:03

05 00:00:11

06 00:00:04

03 00:00:04

Play

Modify

Move

Add

Delete

Scene No.

5/7

Playlist No.

3

01 00:00:26

02 00:00:04

04 00:00:11

05 00:00:04

06 00:00:04

03 00:00:03

Play

Modify

Move

Add

Delete

Edit Scene

DVD-Recorder

Scene No.

4/7

Playlist No.

3

DVD-RW(VR)

01 00:00:26

02 00:00:07

04 00:00:03

05 00:00:11

06 00:00:04

03 00:00:04

Play

Modify

Move

Add

Delete

Add Scene

DVD-Recorder

DVD-RW(VR)

Scene No. 004

Title List : 4/6

Start

End

00:00:15

00:00:00

Start

End

Add

Cancel

00:00:15

Add Scene

DVD-Recorder

DVD-RW(VR)

Scene No. 004

Title List : 1/6

Start

End

00:00:00

00:00:00

Start

End

Add

Cancel

00:00:00

RETURN

ENTER

MOVE

EXIT

RETURN

ENTER

MOVE

EXIT

RETURN

ENTER

MOVE

EXIT

RETURN

ENTER

MOVE

EXIT

RETURN

ENTER

MOVE

EXIT

RETURN

ENTER

MOVE

EXIT

RETURN

ENTER

MOVE

EXIT

01050A-R145-XAA-ENG-77-98  2006.4.11  6:7 PM  Page 90

Содержание DVD-R145

Страница 1: ...Instruction Manual DVD R145 www samsung com AK68 01050A 00 US ...

Страница 2: ...ntial installation This equipment generates uses and can radiate radio frequency energy and if not installed and used in accordance with the instructions may cause harmful interference to radio communications However there is no guarantee that interference will not occur in a particular installation If this equipment does cause harmful interference to radio or television reception which can be det...

Страница 3: ... is damaged liquid has been spilled or objects have fallen into the apparatus the apparatus has been exposed to rain or moisture does not operate normally or has been dropped Handling Cautions Before connecting other components to this recorder be sure to turn them all off Do not move the recorder while a disc is being played or the disc may be scratched or broken and the recorder s internal parts...

Страница 4: ...ecording after inserting the disc or turning on the unit Recording onto the disc may become impossible if optimizing is carried out too many times Playback may be impossible in some cases due to the condition of recording Do not use record cleaning sprays or antistatic Also do not use volatile chemicals such as benzene or thinner Do not apply labels or stickers to discs Do not use discs fixed with...

Страница 5: ...0 discs can be played in this unit DVD RAM recorded on this unit may not work with other DVD Players To determine compatibility with these DVD RAM discs refer to the user s manual for the player Protection This DVD Recorder can allow you to protect the contents of your discs as described below Program protection See page 79 Locking a Title Disc protection See page 94 Disc Protection DVD RAM DVD RW...

Страница 6: ...ck 19 Connecting to Component video input jacks Y PB PR 20 Step 3 Connecting the Audio cable 21 Connecting to your TV 21 Connecting to a stereo amplifier with analog input jacks 22 Connecting to an AV amplifier with a digital input jack 23 Step 4 Connecting HDMI DVI to a TV 24 Connecting to a TV with HDMI Jack 24 Connecting to a TV with DVI Jack 25 Step 5 Connecting External Devices 26 Connecting ...

Страница 7: ...ction 63 Selecting the Subtitle 65 Selecting the Audio language 65 Changing the Camera Angle 66 Zooming In 66 Using Bookmarks 67 Using Markers 68 Playing an Audio CD MP3 69 Playing an Audio CD CD DA MP3 69 Playing a Picture CD 72 Playing an MPEG4 Disc 73 Playing the Title List 74 Free Space Function 76 Editing Editing Basic Editing Title List 78 Renaming Labeling a Title 78 Locking Protecting a Ti...

Страница 8: ...d onto the free disc space See page 55 Create a DVD video title using a DVD RW DVD R disc With the DVD R145 you can create your own DVD video title on 4 7 GB DVD RW DVD R or 8 5GB DVD R discs Copying data from a digital camcorder using a DV input jack Record digital camcorder video onto DVD RAM DVD RW or DVD R discs using the DV input jack IEEE 1394 4pin See page 53 High quality progressive scan P...

Страница 9: ...rts formatting when an unused disc is inserted This is required for the preparation of disc recording Using a DVD RAM This type of disc can be formatted in DVD Video Recording format VR mode You can edit recorded video and create a playlist and edit video in a specific sequence according to your requirements Using a DVD RW R When an unused DVD RW R disc is first inserted the message Uninitialized ...

Страница 10: ...e LP long recording mode and EP extended mode according to the record mode When recording is set in the FR mode the best quality picture is recorded with regards to the remaining time on the disc Step 4 Playing You can select the title you want to play in a displayed menu and then immediately start playback A DVD consists of sections called titles and sub sections called chapters During recording ...

Страница 11: ...isc tray 7 DISPLAY Displays the playing status time etc 8 CH Select TV channels 9 REC Starts recording 10 PLAY PAUSE Plays a disc or pauses playback 11 STOP Stops disc playback 12 SEARCH Go to the next title chapter track or go back to the previous title chapter track Description Front Panel Display 1 Lights when a disc is loaded 2 Lights in the record mode 3 Lights to indicate the timer record mo...

Страница 12: ...aving Component video input jacks 8 AV 1 AUDIO IN Connect the output of external equipment using audio cables 9 AV 1 VIDEO IN Connects the output of external equipment using a video cable 10 AV 1 S VIDEO IN Connects the output of external equipment using an S Video cable 11 Cable Box Control OUT Connection of the IR Blaster for a cable box 12 HDMI OUT Connects the input of external equipment using...

Страница 13: ...ylist 23 CANCEL Button 24 TIMER MARKER Button Press to directly enter the Timer Recording Mode menu Use this to Bookmark or mark a position while playing a disc 25 REC PAUSE Button Press this to pause the recording 26 TV Button Press this to operate your TV 27 DVD Button Press this to operate your DVD Recoder 28 INFO Button This will display current setting or disc status 29 INPUT SEL Button Selec...

Страница 14: ...guidelines for proper grounding and in particular specifies that the cable ground shall be connected to the grounding system of the building as close to the point of cable entry as practical Quick Overview 14 Step 1 Connecting the Antenna Cable 15 Step 2 Connecting the Video Cable 18 Step 3 Connecting the Audio Cable 21 Step 4 Connecting HDMI DVI to a TV 24 Step 5 Connecting External Devices 26 St...

Страница 15: ...an record non scrambled channels by selecting the channel on the DVD Recorder Also use this method if you watch channels without cable box The VHF UHF ANT RF OUT jack of this product sends only signals received through the antenna It does not output Audio Video signals You must connect Audio Video cables to view Video from the unit i e DVD playback NOTE Connecting Setting Up English 15 ...

Страница 16: ... of the device see Figure 1 C Move the remote across the front while pressing the power button On and Off Figure 2 Press and release the power button each time you move the remote holding down the button will not work D When the cable box powers On you have found the sensor E Remember the location of the sensor 3 Place the Cable Box Control Wand Place the Cable Box Control wand underneath the cabl...

Страница 17: ...glish 17 Antenna Cable box DVD Recorder TV Cable box with an antenna output only You can record non scrambled channels by selecting the channel on the DVD Recorder You cannot record scrambled channels that require a cable box ...

Страница 18: ...ntenna It does not output audio video signals You must use one of the following audio video connections on this unit Connecting to a Video input jack Connect a video yellow cable between the VIDEO yellow OUT jack on DVD Recorder and VIDEO yellow IN jack on the TV or AV amplifier You will enjoy normal quality images Connect audio cables white and red between the AUDIO OUT jacks on the DVD Recorder ...

Страница 19: ...VD Recorder and AUDIO IN jacks on TV or AV amplifier See pages 21 23 Connecting to an S Video input jack Connect an S Video cable not supplied between the S VIDEO OUT jack on DVD Recorder and S VIDEO IN jack on your TV or AV amplifier S Video or Component video outputs are available only if your TV supports S Video input or Component video input respectively If S Video or Component video output do...

Страница 20: ...mplifier See pages 21 23 Compared to standard interlaced video progressive scan doubles the amount of video lines fed to your TV resulting in a more stable flicker free and clear image than interlaced video The progressive scan video output jack is used in progressive output mode This is only available with TVs that support progressive scan Progressive Scan Output 480p Not all high definition tele...

Страница 21: ...Connecting Setting Up English 21 Step 3 Connecting the Audio Cable Select one of the Audio connections on the following pages Connecting to your TV This connection will use your TV s speakers ...

Страница 22: ...Connecting Setting Up 22 English Connecting to a stereo amplifier with analog input jacks If your stereo amplifier only has AUDIO INPUT jacks L and R use the AUDIO OUT jacks ...

Страница 23: ...ital or DTS decoder and a digital input jack use this connection To enjoy Dolby Digital or DTS sound you will need to set up the audio settings See pages 35 36 Manufactured under license from Dolby Laboratories Dolby and the double D symbol are trademarks of Dolby Laboratories DTS and DTS Digital Out are trademarks of DTS Inc ...

Страница 24: ...of your TV Press the input selector on your TV remote control until the HDMI signal from the DVD Recorder appears on your TV screen HDMIOUT To watch through the HDMI output set the digital audio output to PCM See page 35 36 Depending on the HDMI device TV HDMI Receiver you use audio may not be supported If TV does not support Dolby digital DTS Audio output is not available when you set Digital out...

Страница 25: ...having anHDMI input jack HDMI connection description HDMI connector Both uncompressed video data and digital audio data LPCM or Bit Stream data Though the DVD recorder uses a HDMI cable the DVD recorder outputs only a pure digital signal to the TV If TV does not support HDCP Highbandwidth Digital Content Protection snow noise appears on the screen Why does Samsung use HDMI Analog TVs require an an...

Страница 26: ...your DVD Recorder to other external devices and view or record their outputs Connecting a VCR Set Top Box STB or DVD Player to the AV 1 IN or S VIDEO IN jacks Connecting a VCR or external device to the AV 1 IN jacks of the DVD Recorder You can record from connected equipment VCR STB or DVD Player ...

Страница 27: ...the AV 2 IN jacks You can also use the AV 2 IN jacks on the front panel of the DVD Recorder You can record from connected equipment such as a camcorder When an input source is inserted into AV 2 while watching TV the input will be switched to AV 2 automatically ...

Страница 28: ...UT SEL button on the remote control to select the DV input Check your camcorder s owner s manual to see how to use the camcorder in this mode NOTE Connecting a Camcorder to the DV IN jack If your camcorder has a DV output jack connect it to the DV input jack of your DVD Recorder See page 53 ...

Страница 29: ...ates normally the current time is automatically set and displayed in the front panel display Setting the Remote Control You can control part of another manufacturer s TV functions with this remote control Buttons that can be controlled on your TV POWER INPUT SEL VOL CH TV MUTE 0 9 100 Step 7 Preparing the Remote Control Install Batteries in the Remote Control Open the battery cover on the back of ...

Страница 30: ...BISHI 06 48 62 65 MIVAR 52 77 NEC 83 NEWSAN 68 NOBLEX 66 NOKIA 74 NORDMENDE 72 73 75 PANASONIC 53 54 74 75 PHILIPS 06 55 56 57 PHONOLA 06 56 57 PIONEER 58 59 73 74 RADIOLA 06 56 RADIOMARELLI 57 RCA 45 46 REX 74 Button Function POWER Used to switch the television on and off INPUT SEL Used to select an external source VOL Used to adjust the volume of the television CH Used to select the desired chan...

Страница 31: ...able TV Auto Channel Memory Chanel Add Delete Language Setup of the Language Options Audio Subtitle Disc Menu On Screen Menu Audio Setup of the Audio Options Digital Output DTS Dynamic Compression Video Setup of the Display Options Use to select which type of screen you want to watch and several display options TV Aspect Input Level Black Level 3D Noise Reduction HDMI DVI Resolution DivX R Registr...

Страница 32: ...rent time You need to set the time first to use timer recording If you have the antenna connected via Method 2 on page 16 you have to set the clock manually See Manual Clock set on pages 33 You must have the antenna cable connected to set the Auto Clock See pages 15 17 for Antenna connections Method 1 and 3 Method 1 or 3 Method 2 Initial Setup If you have the antenna connected via Method 1 or 3 on...

Страница 33: ...When the current time is stored in memory and then the set is powered off the current time will appear in the front panel display Sets the value You can set the value using the number 0 9 buttons œ Moves to items Manual Clock Set To setup follow steps 1 to 3 in page 32 Auto Clock Set DVD Recorder No Disc Timer Rec Setup Clock Data CH Automatic Time Zone Automatic Daylight Saving Automatic Clock Da...

Страница 34: ...ant to stop Auto Channel Memory press the ENTER button The confirmation message will be displayed Select YES using the œ buttons then press the ENTER button NOTE Timer Record DVD Recorder Timer Record Scheduled Record List No Disc Timer Rec Setup Setup DVD Recorder No Disc Timer Rec Setup System Clock Set Channel Set Language Audio Video Parental Control Setup DVD Recorder No Disc Timer Rec Setup ...

Страница 35: ...er system Allows you to setup the audio device and sound status settings depending on the audio system in use 1 With the unit in Stop mode No Disc mode press the MENU button on the remote control 2 Select Setup using the buttons then press the ENTER or button 3 Select Audio using the buttons then press the ENTER or button To setup follow steps 1 to 3 in page 34 Manual Channel Set can be used after...

Страница 36: ...tem can apply appropriate compression to make low level content more intelligible and prevent dramatic passages from getting too loud Off You can enjoy the movie with standard Dynamic Range 5 Select the desired item PCM Bitstream DTS Off DTS On Dynamic Compression Off or Dynamic Compression On using the buttons Then press the ENTER or button Select the item that matches the audio connection you ve...

Страница 37: ... screen Extreme left and right side of movie picture will be cut off If you have a wide screen TV or 4 3 standard TV with a wide screen mode 16 9 Wide You can view the full 16 9 picture on your widescreen TV Timer Record DVD Recorder Timer Record Scheduled Record List No Disc Timer Rec Setup Setup DVD Recorder No Disc Timer Rec Setup System Clock Set Channel Set Language Audio Video Parental Contr...

Страница 38: ... to the recorder s audio video input page16 AV1 Select this when the cable box or satellite receiver is connected to the DVD recorder s AV 1 IN jacks AV2 Select this when the cable box or satellite receiver is connected to the DVD recorder s AV 2 IN jacks If you connect your cable box or satellite receiver to the recorder s antenna input page17 CH3 or CH4 Select the output channel from CH3 or CH4 ...

Страница 39: ...ss the ENTER or œ button System menu will be displayed Set Top Box Control DVD Recorder No Disc Timer Rec Setup RETURN ENTER MOVE EXIT Brand Code 0000 Connection CH3 CH Digit Lock Off Mode for SET button Off Control Off Set Top Box Test Off Mode 1 Mode 2 Set Top Box Control DVD Recorder No Disc Timer Rec Setup RETURN ENTER MOVE EXIT Brand Code 0000 Connection CH3 CH Digit Lock Off Mode for SET but...

Страница 40: ...he next scene is played CM Skip does not work in a still picture mode When a set time is less than a remaining time of a scene a last title or a last track that is displayed currently a prohibition mark appears CM Skip releases Repeat including Repeat A B Chapter and Title CM Skip may not operate with some DVD Video discs DVD R DVD RW discs doesn t support this function NOTE System DVD Recorder Ti...

Страница 41: ...Setup DVD Recorder Title List Playlist Disc Manager Timer Rec Setup DVD RW VR System Clock Set Channel Set Language Audio Video Parental Control System DVD Recorder Title List Playlist Disc Manager Timer Rec Setup DVD RW VR Set Top Box Control CM Skip Time 15 Sec EP Mode Time 6 Hours Chapter Creator Off Quick Recording Off System DVD Recorder Title List Playlist Disc Manager Timer Rec Setup DVD RW...

Страница 42: ...ing to wait for the disc to load 1 With a disc inserted and the unit in Stop mode press the MENU button on the remote control 2 Select Setup using the buttons then press the ENTER or button You can t use the Setup functions while playing a disc 3 Select System using the buttons then press the ENTER or button System menu will be displayed 4 Select Quick Recording using the buttons then press the EN...

Страница 43: ...ot recorded on the disc the original pre recorded language is selected 1 With the unit in Stop mode No Disc mode press the MENU button on the remote control 2 Select Setup using the buttons then press the ENTER or button System Clock Set Channel Set Language Audio Video Parental Control Setup DVD Recorder No Disc Timer Rec Setup Audio Original Subtitle Automatic Disc Menu English On Screen Menu En...

Страница 44: ...menu will be displayed Black level function is not available in the progressive scan mode NOTE Setup DVD Recorder No Disc Timer Rec Setup System Clock Set Channel Set Language Audio Video Parental Control Video DVD Recorder No Disc Timer Rec Setup TV Aspect 16 9 Wide Input Level Darker Black Level 7 5 IRE 3D Noise Reduction Off HDMI DVI Resolution 480P DivX R Registration System Clock Set Channel ...

Страница 45: ...utton 480p 720p 1080i If your TV is connected the AV or component cables without HDMI DVI cable the output resolution mode toggles 480p 480i in turn TV Aspect 16 9 Wide Input Level Darker Black Level 7 5 IRE 3D Noise Reduction Off HDMI DVI Resolution 480P DivX R Registration 480P 720P 1080i Video DVD Recorder No Disc Timer Rec Setup RETURN ENTER MOVE EXIT DivX R Registration Please use the Registr...

Страница 46: ...isc Password Off On 0 9 0 9 RETURN ENTER EXIT RETURN ENTER EXIT RETURN ENTER MOVE EXIT The Parental Control function works in conjunction with DVDs that have been assigned a rating which helps you control the types of DVDs that your family watches There are up to 8 rating levels on a disc 1 With the unit in Stop mode No Disc mode press the MENU button on the remote control 2 Select Setup using the...

Страница 47: ...g the 0 to 9 buttons on the remote control See page 102 if you forgot your password NOTE Parental Control DVD Recorder Timer Rec Setup No Disc Password On Rating Level Level 1 Kids Change Password NUMBER Change Password DVD Recorder Timer Rec Setup No Disc Enter the password NUMBER Change Password DVD Recorder Timer Rec Setup No Disc Enter the password NUMBER Change Password DVD Recorder Timer Rec...

Страница 48: ...recording can be done Unfinalize This allows additional recording on a DVD RW disc originally recorded on the DVD R145 A DVD RW disc that has been recorded by DAO Disc At once in a PC cannot be unfinalized A DVD RW disc that has been recorded in Video Mode of another manufacturer s recorder cannot be unfinalized A DVD R disc cannot be unfinalized NOTE Disc Types Recording Recording Device Finalizi...

Страница 49: ...x 4 hours about 2 Mbps Approx 6 hours about 1 2 Mbps Approx 8 hours about 0 8 Mbps Approx 60 to 480 Min Approx 0 8 to 8Mbps Mode Characteristic RecordingTimesDataRates Media Copy Free Copy Once Copy Never DVD RAM Ver 2 0 O O DVD RW O DVD R O DVD RW Ver 1 1 O DVD RW Ver 1 1 with CPRM VR mode O O DVD R O Signal type You cannot record copy protected movie Recording Formats When you insert an unused d...

Страница 50: ...format Disc Type Current information display status Disc Name Total Title Total number of titles Total Playlist Total number of Playlists Recordable Time The longest continuous recording time in each of the record modes approximate Date Current date Time Current time About the INFO button Content Protection for Recordable Media CPRM CPRM is a mechanism that ties a recording to the media on which i...

Страница 51: ...ording Press the REC PAUSE ll button to pause recording in progress Press the REC PAUSE ll button again to resume recording Recording will stop automatically if there is no free space left for recording Up to 99 titles can be recorded onto a DVD RAM RW R disc and up to 48 titles onto a DVD RW R disc Recording will stop automatically if a copy protected image is selected If you are using a Cable Bo...

Страница 52: ...elect DV See page 53 4 Press the REC MODE button repeatedly or press the REC MODE button and then press the button to select the recording speed quality SP LP EP XP 5 Press the REC button To stop recording Press the STOP button to stop or finish recording in progress When using DVD RAM DVD RW DVD R discs the message Updating the information of disc Please wait for a moment is displayed Before you ...

Страница 53: ...on on the upper part of the screen to playback the camcorder and find the starting position to copy 6 To start recording select REC icon in the top side of the screen using the œ buttons then press the ENTER button To stop recording Press the STOP button to stop or finish recording in progress When using DVD RAM DVD RW DVD R discs the message Updating the information of disc Please wait for a mome...

Страница 54: ...ress of recording Press the INFO button and information about the disc will appear Press the INFO button once again Then you can check the information about the title being recorded To stop recording Press the STOP button The message Press STOP button once more to cancel Timer Record is displayed Press the STOP button again to stop recording The timer counter decreases to 0 00 then the DVD Recorde...

Страница 55: ...s the buttons until MON FRI appears To make a recording on a specific day of the week Every SUN Every SAT press the buttons until Sun s Sat s appears Start End Time Start and end time of the timer recording Mode Record mode XP Approx 1 hour SP Approx 2 hours LP Approx 4 hours EP Approx 6 hours or 8 hours FR See page 56 7 Press the ENTER button and Timer Set will appear on the front panel display T...

Страница 56: ...CH 11 01 01 05 00 AM 07 00 AM SP 02 CH 7 01 03 12 06 AM 02 06 AM SP 03 Recordable Time 01 59 SP RETURN ENTER MOVE EXIT Scheduled Record List DVD Recorder DVD RW VR Current Time 12 03 AM No Source Date Start End Mode Edit 01 CH 11 01 01 05 00 AM 07 00 AM SP 02 CH 7 01 03 12 06 AM 02 06 AM SP 03 Recordable Time 01 59 SP RETURN ENTER MOVE EXIT Edit Delete If the timer settings overlap The programs ar...

Страница 57: ...M SP 02 CH 7 01 03 12 06 AM 02 06 AM SP 03 Recordable Time 01 59 SP RETURN ENTER MOVE EXIT Scheduled Record List DVD Recorder DVD RW VR Current Time 12 03 AM No Source Date Start End Mode Edit 01 CH 11 01 01 05 00 AM 07 00 AM SP 02 CH 7 01 03 12 06 AM 02 06 AM SP 03 Recordable Time 01 59 SP RETURN ENTER MOVE EXIT Edit Delete Scheduled Record List DVD Recorder DVD RW VR Current Time 12 03 AM No Sou...

Страница 58: ...ded 10 second images are played back This function starts to operate 10 seconds from the time you press the REC button On the TIME SLIP screen you can playback scan or perform other operations for the recorded program using the playback related buttons Press the SEARCH button on the remote control 2 Press the STOP button once to clear the TIME SLIP function To stop a recording while a TIME SLIP fu...

Страница 59: ...le sided 3 5 MP3 Audio Single sided 5 Single sided 3 5 MPEG4 Movie Single sided 5 Single sided 3 5 1hr XP ExcellentQuality Single sided 5 2hrs SP StandardQuality 4 7GB 4hrs LP Long Playback DVD RAM VIDEO 6 or 8hrs EP Extended AUDIO 2hrs XP ExcellentQuality Double sided 5 4hrs SP StandardQuality 9 4GB 8hrs LP Long Playback 12or16hrs EP Extended 1hr XP ExcellentQuality DVD RW VIDEO 2hrs SP StandardQ...

Страница 60: ...e recording Discs with PAL programs recorded on them can not be recorded on using this product NOTE When you stop playing the disc the recorder remembers where you stopped When you press PLAY button again it will pick up where you left off unless the disc is removed or the recorder is unplugged or if you do not press the STOP button twice This function is only applicable to DVD VIDEO DVD RAM DVD R...

Страница 61: ...ain a dedicated menu system that allow you to select special functions for the title such as chapters audio track subtitles film previews information on characters etc No sound is heard during Scan Search mode except fast playback 1 7X speed mode For CD CD DA You can hear sound during Scan mode You cannot also hear during scanning MPEG4 in all mode NOTE For DVD RAM DVD RW R discs 1 Press the TITLE...

Страница 62: ...sed a new frame will appear When STEP is pressed the previous frame will be activated When STEP is pressed the next frame will be activated To return to normal speed playback press the PLAY button The speed marked in this function may be different from the actual playback speed Slow motion operates only in the forward direction on MPEG 4 discs NOTE Searching Chapters or Tracks About ANYKEY The ANY...

Страница 63: ... playback 2 Press the REPEAT button or press the buttons to select the Title or Chapter you want to play repeatedly Press the ENTER button Chapter Repeats the chapter that is playing Title Repeats the title that is playing To return to normal playback 3 Press the REPEAT button and select Off by using or REPEAT button Press the ENTER or CANCEL button to return to normal playback Playing Repeatedly ...

Страница 64: ...Using the ANYKEY button 1 Press the ANYKEY button during playback 2 Press the buttons to select Repeat and press the œ buttons to select the Title or Chapter you want to play repeatedly 3 Press the ENTER button To make the menu screen disappear press the ANYKEY or RETURN button DVD RAM DVD RW VR mode unfinalized DVD R and unfinalized DVD RW Video mode do not repeat a chapter NOTE DVD VIDEO Title C...

Страница 65: ...e during playback Using the AUDIO button 1 Press the AUDIO button during playback 2 Press the AUDIO button or buttons to select the desired audio language Using the ANYKEY button 1 Press the ANYKEY button during playback 2 Press the buttons to select Audio and press the œ œ buttons to select the desired audio language VR mode DVD VIDEO Title Chapter Time Subtitle Audio Repeat Angle Zoom 1 2 1 20 0...

Страница 66: ...les the ANGLE mark appears on the screen Using the ANYKEY button 1 Press the ANYKEY button during playback 2 Press the buttons to select Angle and press the œ buttons or number 0 9 buttons to select the desired angle Audio languages may be different because they are disc specific Some discs allow you to select the audio language for the disc menu only NOTE This function is disc dependent and may n...

Страница 67: ...enes V mode When the disc tray is opened and then closed bookmarks will disappear The button display may differ depending on the disc type NOTE Selecting the Audio language 1 Press the MARKER button during playback 2 Press the œ buttons to select a bookmarked scene 3 Press the ENTER or PLAY button to start playing from the selected scene 1 Press the MARKER button during playback 2 Press the œ butt...

Страница 68: ...atically move ahead by one and the 8th marker becomes the 7th Clearing a Marker Using Markers 1 Press the MARKER button during playback 2 Press the ENTER button when the desired scene appears The number 01 is displayed and the scene is memorized 3 Press the œ button to move to the next position 4 Press the ENTER button when the desired scene appears The number 02 is displayed and the scene is memo...

Страница 69: ...to the beginning of the current track when pressed during playback If pressed again your DVD recorder moves to and plays the previous track If you press this button within three seconds after playback starts the previous track will be played If you press this button after three seconds the current track will be replayed from the beginning 6 SEARCH button Fast Play X2 X4 X8 7 STOP Stops a track son...

Страница 70: ...ess the buttons to select Disc Navigation and then press the ENTER or button 2 Press the buttons to select Music and then press the ENTER or button The MP3 menu appears and the tracks songs are played automatically 3 Press the buttons to select the track song you want to hear and then press the ENTER button or button 1 PLAY MODE icon 2 Current track song Displays the name of the track being played...

Страница 71: ... REPEAT button repeatedly until the repeat mode icon disappears or press the CANCEL button Using the ANYKEY button 1 Press the ANYKEY button during playback The play mode window appears 2 Select the desired repeat mode TRACK or DISC using œ buttons and then press the ENTER button For MP3 discs you can select Folder Track or Disc To return to normal playback 3 Select Off in play mode window using œ...

Страница 72: ... see the previous 8 pictures press the SKIP button Playing a Picture CD Music List CD TRACK 1 0 00 01 001 TRACK 1 00 03 50 002 TRACK 2 00 04 00 003 TRACK 3 00 03 49 004 TRACK 4 00 03 47 005 TRACK 5 00 04 29 006 TRACK 6 00 03 44 007 TRACK 7 00 03 44 No Title Length TRACK 1 01 15 CDDA PLAY MODE Repeat Off Play option Normal Playlist CD 07 15 001 TRACK 1 002 TRACK 3 003 TRACK 4 004 TRACK 7 TRACK 1 TR...

Страница 73: ...Slide Show Speed Slow Normal Fast Playing an MPEG4 Disc MPEG4 File is used to contain the audio and video data MPEG4 File with following extensions can be played AVI DIVX avi divx 1 Insert a MPEG4 Disc into the disc tray 2 Press the buttons to select the Disc Navigation and then press the ENTER or button 3 Press the buttons to select the DivX and then press the ENTER or button 4 Press the buttons ...

Страница 74: ...4 APR 20 2006 12 30 00 00 16 05 APR 21 2006 12 00 00 06 32 06 APR 21 2006 12 30 00 08 16 No Title Length Edit APR 19 2006 1 6 APR 21 2006 12 00 AM CH1 APR 21 2006 SP Title List DVD RW VR 01 APR 19 2006 12 00 00 00 21 02 APR 19 2006 12 30 00 00 03 03 APR 20 2006 12 00 00 00 15 04 APR 20 2006 12 30 00 00 16 05 APR 21 2006 12 00 06 32 06 APR 21 2006 12 30 00 08 16 No Title Length Edit APR 21 2006 5 6...

Страница 75: ... 15 04 APR 20 2006 12 30 00 00 16 05 APR 21 2006 12 00 00 06 32 06 APR 21 2006 12 30 00 08 16 No Title Length Edit APR 21 2006 5 6 APR 21 2006 12 00 AM CH1 APR 21 2006 SP EXIT RETURN ENTER MOVE EXIT To view the current status of the disc and the progress of playback Press the INFO button and the information about the disc will appear Press the INFO button once again Then you can check the informat...

Страница 76: ... 12 00 00 00 15 04 APR 20 2006 12 30 00 00 16 05 APR 21 2006 12 00 00 06 32 06 APR 21 2006 12 30 00 08 16 07 Free Space 03 40 27 No Title Length Edit APR 21 2006 1 7 APR 21 2006 12 00 AM CH1 APR 21 2006 SP RETURN ENTER MOVE EXIT Title List DVD RW No Title Length Edit Free Space 7 7 Free Space CH 1 SP RETURN ENTER MOVE EXIT Title List DVD RW 01 APR 19 2006 12 00 00 00 21 02 APR 19 2006 12 30 00 00 ...

Страница 77: ...ed that title cannot be played again Playlist This refers to a unit of playback which is made by selecting a desired scene in the entire Title List When one playlist is played only the scene selected by the user will play and then stop Since only the information necessary for playing a desired scene is included in a playlist even if that playlist is deleted the original recorded title will not be ...

Страница 78: ...06 12 00 AM CH11 Rename Back Space Space Delete Clear Save Sports A1 Title List DVD RW VR APR 21 2006 5 6 APR 21 2006 12 00 AM CH1 APR 21 2006 SP 01 APR 19 2006 12 00 00 00 21 02 APR 19 2006 12 3 00 00 03 03 APR 20 2006 12 0 00 00 15 04 APR 20 2006 12 3 00 00 16 05 APR 21 2006 12 0 00 06 32 06 APR 21 2006 12 3 00 08 16 No Title Length Edit Play Rename Delete Edit Protection Title List DVD RW VR AP...

Страница 79: ...2006 SP On Off Title Protection Title List DVD RW VR 01 Drama 00 00 21 02 Music 00 00 03 03 Sports 00 00 15 04 Movie 00 00 16 05 Sports A1 00 06 32 06 Edu 1 00 08 16 No Title Length Edit Drama 1 6 Drama APR 19 2006 SP Title List DVD RW VR 01 Drama 00 00 21 02 Music 00 00 03 03 Sports 00 00 15 04 Movie 00 00 16 05 Sports A1 00 06 32 06 Edu 1 00 08 16 No Title Length Edit Sports A1 5 6 Sports A1 APR...

Страница 80: ...ted entry select Off in the Title Protection menu Once an entry is deleted from the Title List it cannot be recovered Once a DVD R or DVD RW is finalized it cannot be deleted With DVD R titles are only deleted from the menu however the Title remains physically on the disc NOTE VR mode Title List DVD RW VR 01 Drama 00 00 21 02 Music 00 00 03 03 Sports 00 00 15 04 Movie 00 00 16 05 Sports A1 00 06 3...

Страница 81: ...e at least 5 seconds long If the length of the section to be deleted is less than 5 seconds you will be prompted with the message The range is too short If the end time precedes the starting point you will be prompted with the message End point cannot be marked earlier than start point The section cannot be deleted when it includes a still picture Press the MENU button after the operation has fini...

Страница 82: ...T DVD RW 4 Select the point where you want to add a chpater using the playback related buttons then press the ENTER button at that point Each time you press the ENTER button a new chapter will be added Playback related buttons 5 Press the œ buttons to select Return and then press the ENTER button The edited title will now have the chapter you added Title List 01 JAN 01 2006 12 00 00 04 48 02 JAN 0...

Страница 83: ... MOVE EXIT DVD RW Chapter Edit 00 00 00 Add Return Delete All Hidden Delete RETURN ENTER MOVE EXIT DVD RW Do you want to delete all chapter marks Yes No Deleting a chapter Follow steps 1 to 3 in page 82 4 Select a chapter you want to delete using the playback related buttons Playback related buttons 5 Press the œ buttons to select Delete and then press the ENTER button The edited title has chapter...

Страница 84: ... Press the MENU button Press the buttons to select Title List then press the ENTER or button twice 2 Press the buttons to select a title you want to divide from the Title List then press the ENTER or button 3 Press the buttons to select Divide Title then press the ENTER or button The Divide Title screen is displayed Title List 01 JAN 01 2006 12 00 00 04 48 02 JAN 01 2006 12 30 00 01 47 03 JAN 01 2...

Страница 85: ... Playlist Follow these instructions to create a new playlist entry from a recorded title 1 With the unit in Stop mode press the MENU button on the remote control 2 Press the buttons to select Playlist and then press the ENTER or button 3 Press the buttons to select New Playlist and then press the ENTER or button The Make Scene screen is displayed 4 Press the ENTER button at the start point The ima...

Страница 86: ...hen the playback has finished 4 Press the STOP button to stop playing The screen returns to the Edit Playlist screen VR mode Playlist DVD Recorder Title List Playlist Disc Manager Timer Rec Setup DVD RW VR New Playlist Edit Playlist DVD RW VR Disc Info Disc Name Total Title 19 Total Playlist 5 Recordable Time 01 09 XP Protection Not Protected Screen Playback Playlist JAN 01 2006 SUN 12 00 AM DVD R...

Страница 87: ...ss the ENTER button VR mode Edit Playlist DVD RW VR APR 24 2006 3 5 APR 24 2006 12 00 AM 1 Scene APR 24 2006 12 00 AM 01 APR 23 2006 12 0 00 00 21 02 APR 23 2006 12 3 00 00 03 03 APR 24 2006 12 0 00 00 15 04 APR 24 2006 12 3 00 00 16 05 APR 25 2006 12 0 00 00 32 No Title Length Edit Play Rename Edit Scene Copy Delete Edit Playlist DVD RW VR APR 24 2006 3 5 APR 24 2006 12 00 AM 1 Scene APR 24 2006 ...

Страница 88: ... stop scene play press the STOP button VR mode Playing a Selected Scene Edit Playlist DVD RW VR Dolphin 3 4 01 Science 00 00 17 02 Sky 00 00 06 03 Dolphin 00 00 06 04 Natural 00 00 37 No Title Length Edit Play Rename Edit Scene Copy Delete Dolphin 7 Scene APR 24 2006 10 43 AM Edit Playlist DVD RW VR Science 1 4 Science 7 Scene APR 24 2006 10 43 AM 01 Science 00 00 17 02 Sky 00 00 06 03 Dolphin 00 ...

Страница 89: ... a Scene Replacing a Scene To setup follow steps 1 to 3 in page 88 Edit Scene DVD Recorder Scene No 2 7 Playlist No 3 DVD RW VR 01 00 00 26 02 00 00 07 04 00 00 03 05 00 00 11 06 00 00 04 03 00 00 04 Play Modify Move Add Delete Modify Scene DVD Recorder DVD RW VR Scene No 002 Start End 00 00 25 00 00 00 00 00 25 Start End Change Cancel Title List 5 6 Modify Scene DVD Recorder DVD RW VR Scene No 00...

Страница 90: ...ype the displayed screen may look slightly different NOTE Adding a Scene Edit Scene DVD Recorder Scene No 3 7 Playlist No 3 DVD RW VR 01 00 00 26 02 00 00 07 04 00 00 03 05 00 00 11 06 00 00 04 03 00 00 04 Play Modify Move Add Delete DVD RW VR Edit Scene DVD Recorder DVD RW VR Edit Scene DVD Recorder DVD RW VR Edit Scene DVD Recorder Scene No 3 7 Playlist No 3 01 00 00 26 02 00 00 07 04 00 00 03 0...

Страница 91: ... that has been selected will be copied Add Scene DVD Recorder DVD RW VR Scene No 004 Start End 00 00 15 00 00 35 00 00 35 Start End Add Cancel DVD RW VR Edit Scene DVD Recorder Edit Playlist DVD RW VR Dolphin Dolphin 7 Scene APR 23 2006 06 43 AM 01 Science 00 00 17 02 Sky 00 00 06 03 Dolphin 00 00 06 04 Natural 00 00 37 No Title Length Edit Play Rename Edit Scene Copy Delete Scene No 4 8 Playlist ...

Страница 92: ... 2006 06 43 AM 01 Science 00 00 17 02 Sky 00 00 06 03 Dolphin 00 00 06 04 Natural 00 00 37 05 Dolphin 00 00 06 No Title Length Edit Edit Playlist DVD RW VR Natural Natural 1 Scene APR 23 2006 06 43 AM 01 Science 00 00 17 02 Sky 00 00 06 03 Dolphin 00 00 06 04 Natural 00 00 37 No Title Length Edit Edit Playlist DVD RW VR Dolphin Dolphin 7 Scene APR 23 2006 06 43 AM Yes No Do you want to delete Edit...

Страница 93: ...A disc name is given to the disc You may need to clear disc protect before beginning editing see page 94 Depending on the kind of disc the displayed screen may be different NOTE Rename DVD Recorder DVD RW VR Back Space Space Delete Clear Save Disc Manager DVD Recorder Title List Playlist DiscManager Timer Rec Setup DVD RW VR Disc Name Disc Protection Not Protected Disc Format DVD VR Disc Finalize ...

Страница 94: ...Delete All Title Lists Not Protected Protected Title List DVD Recorder Title List Title List Playlist Disc Manager Timer Rec Setup DVD RW VR Disc Manager DVD Recorder Title List Playlist DiscManager Timer Rec Setup DVD RW VR Disc Name Disc Protection Not Protected Disc Format DVD VR Disc Finalize Delete All Title Lists Disc Manager DVD Recorder Title List Playlist DiscManager Timer Rec Setup DVD R...

Страница 95: ...DVD RW DVD R Disc Manager DVD Recorder Title List Playlist DiscManager Timer Rec Setup DVD RW VR Disc Name Disc Protection Not Protected Disc Format DVD VR Disc Finalize Delete All Title Lists Choose the recording format for DVD RW DVD VR DVD V Title List DVD Recorder Title List Title List Playlist Disc Manager Timer Rec Setup DVD RW VR Disc Manager DVD Recorder Title List Playlist DiscManager Tim...

Страница 96: ... press the ENTER button The Edit Compatible process will start After performing Edit Compatible you can move to the title menu of the disc by pressing the Title MENU button Disc Manager DVD Recorder Title List DiscManager Timer Rec Setup DVD RW Disc Name Disc Format Edit Compatible RETURN ENTER MOVE EXIT Disc Manager DVD Recorder Title List DiscManager Timer Rec Setup DVD RW Disc Name Disc Format ...

Страница 97: ...corder is powered off during finalizing process NOTE Disc Manager DVD Recorder Title List Playlist DiscManager Timer Rec Setup DVD RW VR Disc Name Disc Protection Not Protected Disc Format DVD VR Disc Finalize Delete All Title Lists Disc Manager DVD Recorder Title List DiscManager Timer Rec Setup DVD R V Disc Name Disc Protection Not Protected Disc Finalize Delete All Title Lists Disc Manager DVD ...

Страница 98: ...Video Additional recording protection and deletion are possible Finalize Unfinalize Mark DVD RW VR F DVD RW VR Operation Additional recording deletion editing and protection are impossible Additional recording deletion editing and protection are possible Disc Manager DVD Recorder Title List Playlist Disc Manager Timer Rec Setup DVD RW VR F Disc Name Disc Format DVD VR Disc Unfinalize Disc Manager ...

Страница 99: ...alfunctions go through the checkpoints below before contacting a Samsung authorized service center Power Recording The DVD recorder requires some time to initialize and the input will be displayed for approx 10 seconds after it is turned on Checkpoint 1 Check whether the power cord is securely plugged into the power outlet Did you set the DVD recorder channel settings correctly Check the free spac...

Страница 100: ...nge Checkpoint 1 icon appears on the screen The disc does not support all selected functions In this case some settings configured in the settings menu may not work properly Checkpoint 1 Play mode settings are different from the settings configured in the Settings menu The aspect ratio is fixed for DVD discs See page 37 Checkpoint 1 Cannot change the aspect ratio The angle operation is available o...

Страница 101: ...s not a fault Checkpoint 1 Checkpoint 2 Checkpoint 3 The disc revolves but no image or bad quality images are displayed Re check the recording time and the end time settings again Recording will be cancelled if the power is disconnected due to a power failure or other similar reason while recording Checkpoint 1 Checkpoint 2 Timer recording does not work properly Timer Recording Check if there is e...

Страница 102: ... recorded disc is played with only the subtitle and the audio signal which were selected during recording Checkpoint 1 Is it possible to change a subtitle and an audio signal on a recorded disc Other Press the and buttons on your DVD recorder simultaneously when the power is on All settings including the password will revert to the factory settings Do not use this unless absolutely necessary Note ...

Страница 103: ...cs 0060 0028 Cable box brand Code number Eastern 0002 0274 0418 Electricord 0078 Emerson 0797 0303 0015 0014 Everquest 0040 0015 Focus 0400 Fosgate 0276 Fujitsu 0246 Funai 0248 0019 FutureVision 0649 Garrard 0153 Gateway 0764 GC Electronics 0207 0056 0330 0016 0040 0077 0030 GE 0232 0233 0144 0021 Gemini 0015 0070 0057 0242 0014 0797 0013 0400 General Instrument 0476 0011 0014 0098 0810 0024 0003 ...

Страница 104: ...10 Sears 0510 Sejin 1265 Siemens 0246 Sigma 0019 Signal 0040 0015 0011 0035 Signature 0011 SkyCable 0112 Skygiant 1091 SL Marx 0040 Sony 1006 1506 1606 Spectradyne 0769 0058 Spectravision 0058 Sprucer 0021 0307 0010 0144 Standard Components 0203 0096 0155 Starcom 0003 0015 0047 0014 0098 0305 Cable box brand Code number Stargate 0015 0040 0770 0865 0797 0305 0014 Starquest 0015 StarSight 0542 0422...

Страница 105: ...ker 0775 HTS 0775 Hughes Network Systems 0749 1749 1442 1142 Humax 1176 1359 1048 0863 0283 Innova 0099 Jerrold 0361 0036 0627 JVC 0775 1170 Magnavox 0722 0724 McIntosh 0869 Memorex 0724 Mitsubishi 0749 Motorola 0869 NEC 1270 0496 0499 0507 0508 Netsat 0099 Next Level 0869 Optimus 0724 Panasonic 0247 0701 Paysat 0724 Philips 1076 1142 0724 0722 0749 1442 1749 0856 0775 0099 Primestar 0361 0627 086...

Страница 106: ... movie You cannot record This disc is protected This disc cannot be formatted the disc is protected This disc cannot be renamed the disc is protected The disc cannot be finalized the disc is protected This Menu is not available the disc is protected The disc cannot be played Please check the regional code of the disc This disc cannot be formatted Please check the disc You could not format the disc...

Страница 107: ... the device Make sure the DV device is connected properly to the DV connection Jack If it is connected properly turn it off and on once again Error Message Error is detected on the disc System error is found Please try it again after turning off the power The DV device is not connected If you are unable to solve the problem after reading the above instructions note The model and serial number on t...

Страница 108: ... 9 in W x 8 5 in D x 1 9 in H 41 F to 95 F Keep level when operating Less than 75 operating humidity 1 0 V p p at 75Ω load sync negative S Video input Y 1 0Vp p C 0 286Vp p at 75Ω load Max Audio Input Level 2Vrms IEEE 1394 4p compatible jack Regular TV broadcasting VHF 2 13 UHF 14 69 Cable TV broadcasting 1 125 Analog output jacks 1 2 Optical Coaxial digital audio output Full scale Analog output l...

Страница 109: ...ntact SAMSUNG for problem determination and service procedures SAMSUNG does not warrant uninterrupted or error free operation of the product All replaced parts and products become the property of SAMSUNG and must be returned to SAMSUNG Replacement parts and products assume the remaining original warranty or ninety 90 days whichever is longer This limited warranty covers manufacturing defects in ma...

Страница 110: ... fi FRANCE 08 25 08 65 65 0 15 Min www samsung com fr GERMANY 01805 121213 0 12 Min www samsung de HUNGARY 06 40 985 985 www samsung com hu ITALIA 199 153 153 www samsung com it LUXEMBURG 02 261 03 710 www samsung lu NETHERLANDS 0900 20 200 88 0 10 Min www samsung com nl NORWAY 231 627 22 www samsung com no POLAND 0 801 801 881 www samsung com pl PORTUGAL 80 8 200 128 www samsung com pt SLOVAKIA 0...

Страница 111: ...ADQUARTERS 105 Challenger Road Ridgefield Park N J 07660 0511 TEL 1 800 SAMSUNG SERVICE DIVISION 400 Valley Road Suite 201 Mount Arlington NJ 07856 1 800 SAMSUNG 726 7864 www samsung com US AK68 01050A 00 ...

Отзывы: