


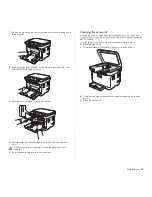

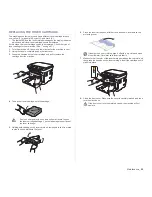


Scanning
_ 40
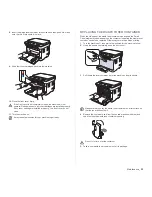
5.
Press the left/right arrow until
Local PC
appears on the bottom line of
the display and press
OK
. If the machine connected to a network, select
Network PC
and press
OK
.
6.
From
Scan Destination
, press the left/right arrow until the application
program you want appears, then press
OK
.
Default setting is
My Documents
.
7.
Press the left/right button until the setting you want appears then press
OK
.
•
Resolution
: Sets the image resolution.
•
Scan Color
: Sets the color mode.
•
Scan Format
: Sets the file format in which the image is to be saved.
•
Scan Size
: Sets the image size.
8.
Scanning begins.
CHANGING THE SETTINGS FOR SCAN JOB
Your machine provides you with the following setting options to allow you to
customize your scan jobs.
•
Scan Size:
Sets the image size.
•
Original Type:
Sets the original document’s type.
•
Resolution:
Sets the image resolution.
•
Scan Color:
Sets the color mode.
•
Scan Format:
Sets the file format in which the image is to be saved. If
you select TIFF or PDF, you can select to scan multiple pages.
Depending on the selected scan type, this option may not appear.
To customize the settings before starting a scan job:
1.
Press
Menu
.
2.
Press the left/right arrow until
Scan Menu
appears and press
OK
.
3.
Press
OK
when
Scan Feature
appears.
4.
Press
OK
when
USB Feature
appears.
5.
Press the left/right arrow until the scan setting option you want appears
and press
OK
.
6.
Press the left/right arrow until the desired status appears and press
OK
.
7.
Repeat steps 5 and 6 to set other setting options.
8.
When you have finished, press
Stop/Clear
to return to ready mode.
CHANGING THE DEFAULT SCAN SETTINGS
To avoid having to customize the scan settings for each job, you can set up
default scan settings.
1.
Press
Menu
.
2.
Press the left/right arrow until
Scan Menu
appears and press
OK
.
3.
Press the left/right arrow until
Scan Setup
appears and press
OK
.
4.
Press
OK
when
Change Default
appears.
5.
Press
OK
when
USB Default
appears.
6.
Press the left/right arrow until the scan setting option you want appears
and press
OK
.
7.
Press the left/right arrow until the desired status appears and press
OK
.
8.
Repeat steps 6 and 7 to change other settings.
9.
Press
Stop/Clear
to return to ready mode.
If you see
Not Available
message, check the port connection.
If you selected
Network PC
, select your registered user ID and
enter the PIN. Press
OK
.
•
ID is the same ID as the registered ID for
Samsung Scan
Manager
.
•
PIN is the 4 digit number registered for
Samsung Scan
Manager
.
To add or delete the folder where the scanned file is saved, add or
delete the application program in
Samsung Scan Manager
>
Set
Scan Button
.
•
Scan Format
appears only when you selected the
Scan
Destination
to
My Documents
.
•
If you want to scan from the default setting, press
Color Start
or
Black Start
.
•
Scanned image is saved in computer's
My Documents
>
My
Pictures
>
Samsung
folder.
•
You can use Twain driver to scan quickly in
Samsung Scan
Manager
program.
•
You can also scan by pressing Window's
Start
>
Control
Panel
>
Samsung Scan Manager
>
Quick Scan
.
Содержание CLX-3170FN series
Страница 14: ...14_Safety information...
Страница 15: ...Safety information_15...
Страница 50: ...50 _Scanning...
Страница 102: ...5...
Страница 112: ...15_Safety information...
Страница 126: ...29 _Getting started...
Страница 138: ...41 _Scanning...
Страница 175: ...REV 1 07...
Страница 176: ...Samsung Printer Software section...


