background image

23

Ins
tallation Pr

oc

edur

e

English

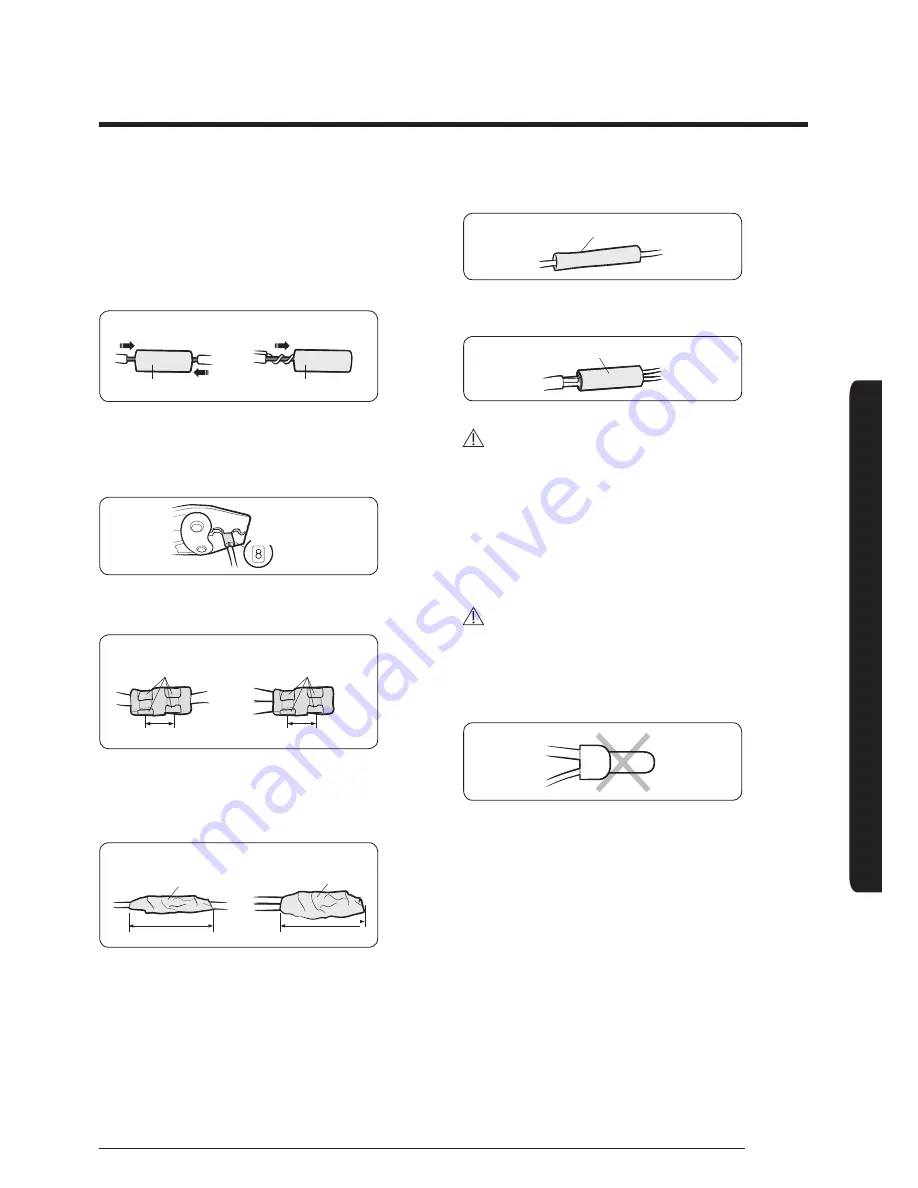
Insert both sides of core wire of the power cable into the 
connection sleeve. 

• 

Method 1

: Push the core wire into the sleeve from 

both sides.

• 

Method 2

: Twist the wire cores together and push it 

into the sleeve.

Method 1

Method 2

Connection sleeve

Connection sleeve

Using a crimping tool, compress the two points and flip 
it over and compress another two points in the same 
location.

• 

The compression dimension should be 8.0.

Compression 

dimension

• 

After compressing it, pull both sides of the wire to 
make sure it is firmly pressed.

Method 1

Method 2

Compress it 4 times

Compress it 4 times

5 mm

5 mm

Wrap it with the insulation tape twice or more and 
position your contraction tube in the middle of the 
insulation tape.
Three or more layers of insulation are required.

Method 1

Method 2

Insulation tape

Insulation tape

40 mm

35 mm

Apply heat to the contraction tube to contract it.

Contraction tube

After tube contraction work is completed, wrap it with 
the insulation tape to finish.

Insulation tape

  CAUTION

• 

Make sure that the connection parts are not exposed 
to outside.

• 

Be sure to use insulation tape and a contraction tube 
made of approved reinforced insulating materials that 
have the same level of withstand voltage with the 
power cable. (Comply with the local regulations on 
extensions.)

  WARNING

• 

In case of extending the electric wire, please DO NOT 
use a round-shaped pressing socket.


– Incomplete wire connections can cause electric shock 

or a fire. 

Содержание AE071MNMPEH

Страница 1: ...conditioner Installation manual AE MNLDEH AE MNMPEH Thank you for purchasing this Samsung air conditioner Before operating this unit please read this manual carefully and retain it for future referen...

Страница 2: ...refrigerant pipes Step 8 Performing the gas leak test Step 9 Insulating the refrigerant pipes Step 10 Installing the drain hose and drain pipe Step 11 Performing the drainage test Step 12 Connecting t...

Страница 3: ...nges or the improper connection of electric and requirements set forth in the Operating limits table included in the manual shall immediately invalidate the warranty The air conditioner should be used...

Страница 4: ...other elevation system will NOT be considered part of the warranty and will be charged to the end customer Power supply line fuse or circuit breaker WARNING Always make sure that the power supply is c...

Страница 5: ...d Resin parts flame and the accessories may drop or water may leak The capacity of the heat exchanger may reduce or the air conditioner may be out of order The place where corrosive gas such as sulphu...

Страница 6: ...nstalled at the end of the installation It is always essential to check the efficiency of the drainage system Space requirements for installation Construction Standard for Inspection Hole 1 In case th...

Страница 7: ...ion 18 3 2 hole Air around 660 Air outlet duct flange 28 28 600 600 6x100 700 5 05 06 07 Suction side 333 199 Discharge side 182 246 151 6 18 100 02 01 03 04 No Name Description 01 Liquid pipe connect...

Страница 8: ...flange 900 22 3 2 Hole 28 28 All around Discharge side Suction side 199 151 6 100 182 246 18 OD32 30 5 115 5 145 5 333 No Name Description 01 Liquid pipe connection 6 35 1 4 02 Gas pipe connection 12...

Страница 9: ...ension position 604 Suspension position 700 500 850 950 185 158 28 220 180 2x90 250 213 125 323 06 07 05 01 02 04 03 No Name Description 01 Liquid pipe connection 6 35 1 4 02 Gas pipe connection 035 9...

Страница 10: ...pension position 700 1200 500 1300 Suction side Discharge side 220 180 2x90 250 213 125 323 06 07 05 01 02 04 03 185 158 28 Inspection hole No Name Description 01 Liquid pipe connection 9 52 3 8 02 Ga...

Страница 11: ...n duct and discharge duct Unit mm NOTE Insulate the end of the pipe and some curved area by using separate insulator Insulate the discharge and suction part at the same time when you insulate connecti...

Страница 12: ...between two nuts 1 2 2 CAUTION Piping must be laid and connected inside the ceiling when suspending the unit If the ceiling is already constructed lay the piping into position for connection to the u...

Страница 13: ...0700kPa Copper pipe for hydro sanitary applications is completely unsuitable For sizing and limits height difference line length max bends refrigerant charge etc see the outdoor unit installation manu...

Страница 14: ...1 Remove the pinch pipe on the pipes and connect the assembly pipes to each pipe tightening the nuts first manually and then with a torque wrench a spanner applying the following torque Torque wrench...

Страница 15: ...g the refrigerant gas pressurize the whole system with nitrogen using a cylinder with a pressure reducer at a pressure above 4 MPa in order to immediately detect leaks on the refrigerant fittings Made...

Страница 16: ...side and liquid side pipe noting the insulation thickness that must differ according to the pipe size Standard Less than an indoor temperature of 30 C with humidity at 85 If installing in a high humid...

Страница 17: ...0mm Step 10 Installing the drain hose and drain pipe 1 Push the supplied drain hose as far as possible over the drain socket 2 Tighten the metal clamp as shown in the picture 3 Wrap the supplied large...

Страница 18: ...e installed upward position it may cause water flow back to the indoor unit 1 1 5m 20mm or more 200mm or more Hanger Within 300 550mm Air vent 300mm or less Flexible hose Horizontal drainpipe more tha...

Страница 19: ...N among the units within maximum length and communication cable F1 F2 each 5 Connect F3 F4 for communication wires when installing the wired remote control N L N L N L N L ELCB MCCB ELB V1 V2 Outdoor...

Страница 20: ...screw mm B C d1 E F L d2 t Standard dimension mm Allowance mm Standard dimension mm Allowance mm Standard dimension mm Allowance mm Min Min Max Standard dimension mm Allowance mm Min 1 5 4 6 6 0 2 3...

Страница 21: ...ower cable in accordance with relevant local and national regulations Wire size must comply with local and national code For the power cable use the grade of H07RN F or H05RN F materials You should co...

Страница 22: ...driver with a small head will strip the head and make proper tightening impossible Over tightening the terminal screws may break them See the table below for tightening torque for the terminal screws...

Страница 23: ...th the insulation tape twice or more and position your contraction tube in the middle of the insulation tape Three or more layers of insulation are required Method 1 Method 2 Insulation tape Insulatio...

Страница 24: ...option setting mode while pressing High Temp button and Low Temp button 3 Check if you have entered the option setting status 4 After entering the option setting status select the option CAUTION Optio...

Страница 25: ...ed to Dry mode in the ON status 5 Setting SEG6 SEG8 option a Press Low Fan button to enter SEG6 value b Press High Fan button to enter SEG8 value Each time you press the button will be selected in rot...

Страница 26: ...button to enter SEG17 value Each time you press the button will be selected in rotation SEG16 SEG17 14 Setting Dry mode Press Mode button to be change to Dry mode in the OFF status 15 Setting SEG18 S...

Страница 27: ...tting an indoor unit address MAIN RMC 1 Check whether power is supplied or not When the indoor unit is not plugged in there should be additional power supply in the indoor unit 2 Before installing the...

Страница 28: ...for the condition of each installation location 1 Check whether power is supplied or not When the indoor unit is not plugged in there should be additional power supply in the indoor unit 2 Set the ins...

Страница 29: ...es installation option Detailed Option No 02XXXX 1XXXXX 2XXXXX 3XXXXX Option SEG1 SEG2 SEG3 SEG4 SEG5 SEG6 Explanation PAGE Mode Use of robot cleaning Use of external room temperature sensor Minimizin...

Страница 30: ...t 5 Disuse 0 Default value 2 channel 2 1 2 C Disuse 1 Oil return or Noise decreasing in defrost mode 3 channel 3 2 5 C Disuse 4 channel 4 3 Default 5 Use 6 4 2 C Use 6 5 5 C Use 6 Advanced function Co...

Страница 31: ...Mode Select switch MCM C200 on the outdoor unit and fix it as Cool mode If Fan is set to off for cooling only indoor unit by setting the SEG9 3 or SEG15 3 you need to use an external sensor or wired r...

Страница 32: ...ies installation option Detailed Option No 02XXXX 1XXXXX 2XXXXX 3XXXXX Option SEG1 SEG2 SEG3 SEG4 SEG5 SEG6 Explanation PAGE MODE Use of Auto Change Over for HR only in Auto mode When setting SEG3 Sta...

Страница 33: ...min 9 Use 9sec A Use 10sec B C D E F Option SEG13 SEG14 SEG15 SEG16 SEG17 SEG18 Explanation Set to variable breeze Control variables when using hot water external heater Indication and Details Indicat...

Страница 34: ...EG18 0 Hot water heater is turned on at the same time as the heating thermostat is on and turned off when the heating thermostat is off e g 2 Setting 02 series SEG15 2 Setting 05 series SEG18 A Room t...

Страница 35: ...an indoor unit address setting option set the SEG3 as A When changing a digit of indoor unit installation option set the SEG3 as 2 Ex When setting the buzzer control into disuse status Option SEG1 SE...

Страница 36: ...Static Pressure mmAq Option code for indoor unit 0 SP 3 010054 1C50D1 202D2D 331204 010054 1C50F1 203838 331203 010054 1C548D 204747 331201 3 SP 6 010054 1C5453 202D2D 331204 010054 1C5447 203838 3312...

Страница 37: ...1 Check the following Strength of the installation site Tightness of pipe connection to detect gas leak Electric wiring connection Heat resistant insulation of the pipe Drainage Grounding conductor co...

Страница 38: ...va in sensor Short or Open Error on Eva out sensor Short or Open Discharge sensor error Short or Open E122 E123 E126 Indoor fan error E154 Error on outdoor temperature sensor Short or Open Error on co...

Страница 39: ...tion 6th detection High pressure sensor is detached Low pressure sensor is detached Outdoor unit copression ration error Outdoor sump down_1 prevetion control Compressor down due to low pressure senso...

Страница 40: ......

Отзывы: