3-1
3. Disassembly and Reassemble
3. Disassembly and Reassemble
This section describes the disassembly and reassembly sequences for this monitor.
WARNING: As this monitor has parts that are sensitive to static electricity, be careful when handling them.
3-1. Disassembly
Cautions: 1. Turn the monitor off before beginning the disassembly process.
2. Disassemble the monitor carefully as directed in the following procedures.
3. When disassembling the monitor, do not use any metal tools except for the provided jig.
Part
Description
Picture Description
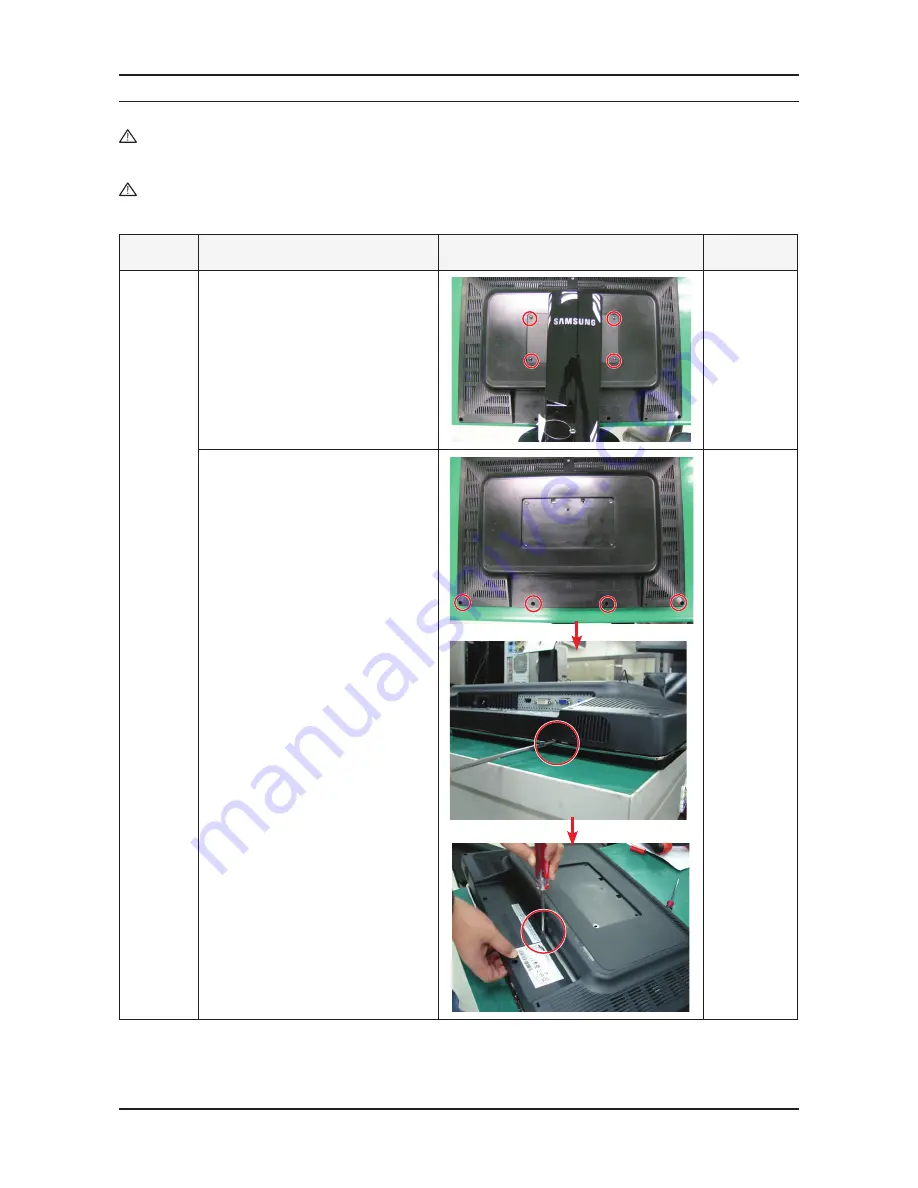
Screws
Stand
1. Place the monitor down onto a table
covered by a soft cloth and remove
the 4 screws from the stand.
2. Remove 4 screws.
Содержание 2493HM - SyncMaster - 24" LCD Monitor
Страница 23: ...5 16 5 Exploded View Part List Memo ...
Страница 27: ...1 4 1 Precautions Memo ...
Страница 31: ...2 4 2 Product specifications Memo ...
Страница 39: ...4 3 4 Troubleshooting 4 2 1 Circuit Diagram and Waveform for Power Failures ...
Страница 42: ...4 6 4 Troubleshooting ...
Страница 44: ...4 8 4 Troubleshooting 4 4 1 Circuit diagrams and waveforms DVI when a blank screen is displayed on the monitor ...
Страница 45: ...4 9 4 Troubleshooting ...
Страница 53: ...4 17 4 Troubleshooting 7 Enter the Monitor S N and press Enter Enter for Analog Digital and HDMI ...
Страница 54: ...4 18 4 Troubleshooting Memo ...
Страница 55: ...6 1 6 Wiring Diagram 6 Wiring Diagram 6 1 Wiring Diagram Main Board CN400 CN600 CN601 CN702 CN101 CN102 CN703 ...
Страница 56: ...6 2 6 Wiring Diagram 6 2 Wiring Diagram Main CN703 CN702 ...
Страница 57: ...6 3 6 Wiring Diagram 6 3 Wiring Diagram SMPS ...
Страница 58: ...6 4 6 Wiring Diagram 6 4 Wiring Diagram PANEL ...
Страница 60: ...6 6 6 Wiring Diagram Memo ...


