background image

EB 8384-5 EN 

 55 

Connections

Selecting cables and wires

Observe 

clause 12 of


EN 60079-14: 2008


(VDE 0165, Part 1) for installation of the 
intrinsically safe circuits.
Clause 12.2.2.7 applies when running multi-
core cables and wires with more than one 
intrinsically safe circuit.
The radial thickness of the insulation of a 
conductor for common insulating materials 
(e.g. polyethylene) must not be smaller than 
0.2 mm. The diameter of an individual wire 
in a fine-stranded conductor must not be 
smaller than 0.1 mm. Protect the conductor 
ends against splicing, e.g. by using wire-end 
ferrules. When two separate cables or wires 
are used for connection, an additional cable 
gland can be installed. Seal cable entries left 
unused with plugs. Fit equipment used in 
ambient temperatures 

below –20 °C

 with 

metal cable entries.

Equipment for use in zone 2/zone 22

In equipment operated according to type of 
protection Ex nA II (non-sparking equipment) 
according to EN 60079-15: 2003, circuits 
may be connected, interrupted or switched 
while energized only during installation, 
maintenance or repair.
Equipment connected to energy-limited cir-
cuits with type of protection Ex nL (ener-
gy-limited equipment) according to 
EN 60079-15: 2003 may be switched under 
normal operating conditions.

The maximum permissible values specified 

in the statement of conformity and its ad

-

denda apply when interconnecting the 

equipment with energy-limited circuits in 

type of protection Ex nL IIC.
Cable entry

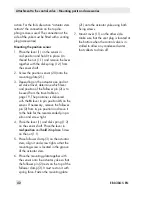
Cable entry with M20 x 1.5 cable gland. 
See section on Accessories for clamping 
range.

u

Option

+81 -82

IEC 1158-2

+87 -88

+85 -86

+41 -42

A

B

24 V DC

BE1

BE2

G

Forced venting func-

tion with solenoid 

valve (optional)

Bus line

Binary contacts

(optional)

Switching amplifier 

EN 60947-5-6

Inductive limit 

switch (optional)

Leakage sensor

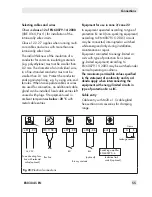
Fig. 20: 

Electrical connections

Содержание FOUNDATION 3730-5

Страница 1: ...ng and Operating Instructions EB 8384 5 EN 1300 1619 Firmware version 1 56 Edition April 2016 Series 3730 Type 3730 5 Electropneumatic Positioner With FOUNDATION fieldbus communication FF device rev 2...

Страница 2: ...if not avoided will result in death or seri ous injury WARNING Hazardous situations which if not avoided could result in death or seri ous injury NOTICE Property damage message or mal function Note A...

Страница 3: ...hment to rotary actuators 32 4 5 1 Heavy duty version 34 4 6 Reversing amplifier for double acting actuators 36 4 6 1 Reversing amplifier 1079 1118 or 1079 1119 38 4 7 Attachment of external position...

Страница 4: ...6 3 MAN Initialization based on a manually selected range 69 7 6 4 SUb Substitute calibration 70 7 7 Zero calibration 73 7 8 Reset to default settings 74 8 Operation 75 8 1 Enabling and selecting par...

Страница 5: ...stic selection 104 Test certificates 106 Note Configuration and operation over FOUNDATION fieldbus are described in the Con figuration Manual u KH 8384 5 KH 8384 5 is included on the enclosed CD ROM a...

Страница 6: ...ion Block Discrete Output new functions are imple mented Configuration Manual u KH 8384 5 Action on fault detection If the AO Transducer Block is in O S mode and the condensed state changes to Mainten...

Страница 7: ...e A masking allows to set whether a de energized internal solenoid valve generates an AO block error resulting in a block alarm SOLENOID_SELECT parameter The SOLENOID_SELECT parameter in firmware K 1...

Страница 8: ...oke test PST Start and reset the data logger Resetting the diagnosis Stop diagnosis Move to fail safe position Lock on site operation Action on fault detection If the AO Transducer Block is in O S mod...

Страница 9: ...uthorized to work on explo sion protected devices in hazardous areas Refer to section 11 Any hazards that could be caused in the valve by the process medium the signal pres sure or by moving parts are...

Страница 10: ...t 0 SJ2 SN NC contact 1 SJ2 S1N NO contact 0 2 Solenoid valve Without 0 With 24 V DC 4 External position sensor Without 0 With 0 1 0 0 Leakage sensor Without 0 With 1 Binary input Without 0 Floating c...

Страница 11: ...al pressure supplied to the actuator can be limited by software or on site to 1 4 2 4 or 3 7 bar The fixed flow regulator ensures a constant air flow to the atmosphere which is used to flush the insid...

Страница 12: ...to the atmosphere The positioner can no longer operate and the control valve moves to the fail safe posi tion determined by the actuator regardless of the set point NOTICE The manual set point is also...

Страница 13: ...W software The positioner can be configured with SAMSON s TROVIS VIEW Configuration and Operator Interface The positioner has for this purpose a serial interface to allow the RS 232 or USB port of a c...

Страница 14: ...s IS FB 30 ms AO FB 30 ms DO FB 30 ms MAO FB 50 ms Local SAMSON SSP interface and serial interface adapter Software requirements TROVIS VIEW with database module 3730 5 Permissible operating voltage 9...

Страница 15: ...ed connection additionally exists Screw terminals for 0 2 to 2 5 mm wire cross sections Degree of protection IP 66 NEMA 4X Use in safety instrumented systems SIL Emergency venting at 0 V or over the o...

Страница 16: ...acc to EN 60947 5 6 SJ2 SN proximity switch Measuring plate not detected 3 mA Measuring plate detected 1 mA SJ2 S1N proximity switch Measuring plate not detected 1 mA Measuring plate detected 3 mA Ext...

Страница 17: ...11 KB4BO 0225 Ex ia IIC T6 T5 T4 Date 2011 11 10 Valid until 2016 11 10 No GYJ111267 Ex ia IIC T6 Date 2011 01 24 Valid until 2016 01 23 3730 53 No 1675804 Ex ia IIC T6 Class I II Div 1 Groups A G Ex...

Страница 18: ...or rect assignment of lever and pin posi tion Attach the positioner to the control valve only using the mounting parts and accessories as specified in Ta ble 1 to Table 6 Observe the type of attachmen...

Страница 19: ...achment according to IEC 60534 6 NAMUR SAMSON valves with Type 3271 Actuator Adjustment range at positioner 1 Other control valves Required lever Assigned pin position Actuator size Rated travel Min t...

Страница 20: ...crew is located in the groove of the actuator stem 4 Mount cover plate 10 with narrow side of the cut out Fig 3 on the left pointing towards the signal pressure connection Make sure that the gasket 14...

Страница 21: ...tachment Cut out of cover plate NOTICE Only use the connecting plate 6 in cluded in the accessories to connect supply and output Never screw threaded parts directly into housing 1 Lever 1 1 Nut 1 2 Di...

Страница 22: ...e groove of the positioner housing 5 Place positioner on the cover plate in such a manner that the follower pin 2 rests on the top of the follower clamp 3 Adjust the lever 1 correspondingly and open t...

Страница 23: ...ver plate 10 Actuator stem extends Actuator stem retracts Connection block old with switch plate 13 Actuator stem 1 Lever 1 1 Nut 1 2 Disk spring 2 Follower pin 3 Follower clamp 10 Cover plate 11 Cove...

Страница 24: ...to the em bossed scale so that the follower plate 3 is shifted by half the angle range to the NAMUR bracket the slot of the follower plate is centrally aligned with the NAMUR bracket at mid valve trav...

Страница 25: ...1 1 14 1 3 3 1 16 15 14 1 1 2 1 1 2 9 1 9 6 1 6 7 8 Attachment to rod type yoke Rods with 20 to 35 mm diameter Attachment to NAMUR rib Additional bracket for actuators with 2800 cm and travel 60 mm X...

Страница 26: ...positioner attachment The Y2 port can be used for air purging of the spring chamber 1 Place follower clamp 3 on the actuator stem align it and screw tight so that the mounting screw is located in the...

Страница 27: ...1 Nut 1 2 Disk spring 2 Follower pin 3 Follower clamp 4 Screw plug 5 Stopper 6 Adapter bracket 6 1 Screws 6 2 Formed seal 6 3 Screws 11 Cover 11 1 Vent plug 12 Connecting plate 12 1 Seal 13 Adapter b...

Страница 28: ...vent plug 11 1 into the Exh connection 11 For fail safe action actuator stem ex tends seal the Y1 port with a blanking plug For fail safe action actuator stem re tracts connect the Y1 port to the sig...

Страница 29: ...valves with rod type yokes using the formed plate 15 which is placed around the yoke screw the four studs into the NAMUR connection block 10 Place the NAMUR connection block on the rod and position th...

Страница 30: ...sten the adapter block 13 to the NAMUR connection block using the screws 13 1 9 Insert the vent plug into the Exh connec tion 10 Place the positioner on the adapter block 13 in such a manner that the...

Страница 31: ...pin 3 Follower plate 3 1 Follower plate 4 Blanking plug 5 Stopper 6 Adapter bracket 6 1 Screws 6 2 Formed seal 6 3 Screws 10 NAMUR con nection block 11 Screw with toothed lock washer 13 Adapter block...

Страница 32: ...ng sure the two seals are seated properly 7 Unscrew the standard M lever 1 includ ing follower pin 2 from the positioner shaft 8 Take the S lever 1 and screw the follow er pin 2 in the hole for pin po...

Страница 33: ...readed parts directly into housing 1 Lever 1 1 Nut 1 2 Disk spring 2 Follower pin 3 Follower plate 6 Connecting plate 6 1 Seals 7 Pressure gauge bracket 8 Pressure gauge mounting kit 9 Stem connector...

Страница 34: ...r pin 2 from the positioner s M lever 1 Use the metal follower pin 5 mm included in the mounting kit and screw tight into the hole for pin position 90 7 Place positioner on the top bracket 10 and fast...

Страница 35: ...into housing Legend for Fig 10 and Fig 11 1 Lever 1 1 Nut 1 2 Disk spring 2 Follower pin 3 Follower clamp Fig 10 4 Coupling wheel 4 1 Screw 4 2 Disk spring 4 3 Scale plate 5 Actuator shaft Adapter for...

Страница 36: ...for required G connecting thread or pressure gauge bracket 7 with pressure gauges on the positioner making sure the two seals 6 1 are seated properly Dou ble acting springless rotary actuators re qui...

Страница 37: ...4 3 Adhesive label 5 Actuator shaft or adapter 5 1 Adapter 6 Connecting plate only for G 6 1 Seals 7 Pressure gauge bracket 8 Pressure gauge mounting kit 10 Adapter housing 10 1 Screws 11 Spacer SAMSO...

Страница 38: ...the accessories in Table 5 to the positioner Make sure that both O rings 6 1 are seated correctly 2 Thread the special nuts 1 3 from the ac cessories of the reversing amplifier into the boreholes of...

Страница 39: ...1 A2 Z A1 Output 38 Supply 9 Output 38 Supply 9 1 3 1 2 1 1 From the positioner Control signals to the actuator 1 Reversing amplifier 1 1 Special screws 1 2 Gasket 1 3 Special nuts 1 4 Rubber seal 1 5...

Страница 40: ...ting plate 6 or a pressure gauge bracket 7 must be fixed to the housing depending on the accessory chosen Make sure the seals 6 1 are correctly inserted see Fig 5 bot tom right For the electrical conn...

Страница 41: ...aligned with the marking Fig 15 below Make absolutely sure that the gasket for the connecting plate 9 is correctly insert ed The connecting plate has threaded holes with NPT and G threads Seal the th...

Страница 42: ...ivered with the M lever in pin position 35 on the sensor If necessary remove the follower pin 2 from its pin position and move it to the hole for the recommended pin po sition and screw tight 4 Place...

Страница 43: ...vels se lect the lever and pin position from the travel table on page 19 L and XL levers are in cluded in the mounting kit 3 Place the lever 1 and disk spring 1 2 on the sensor shaft Place the lever i...

Страница 44: ...acket 21 3 Select the S lever 1 from the accessories and screw the follower pin 2 into the hole for pin position 17 Place the lever 1 and disk spring 1 2 on the sensor shaft Place the lever in mid pos...

Страница 45: ...te 21 3 Replace the follower pin 2 normally at tached to the lever 1 with the metal fol lower pin 5 mm from the accessories and screw it into the hole for pin position 90 4 Place the lever 1 and disk...

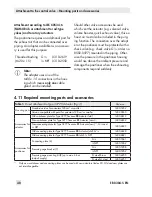
Страница 46: ...unction due to incorrect fastening Fasten the leakage sensor using a torque of 20 5 Nm The M8 threaded connection on the NAMUR rib should preferably be used to mount the sensor Fig 19 Tip If the posit...

Страница 47: ...0534 6 NAMUR rib or attachment to rod type yokes All mounting kits from Table 3 can be used Connecting plate in stainless steel Attachment to rotary actuators All mounting kits from Table 5 can be use...

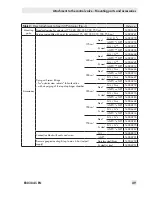
Страница 48: ...the ambient pressure and damage the positioner when the exhausting components respond suddenly 4 11 Required mounting parts and accessories Table 1 Direct attachment to Type 3277 5 Actuator Fig 3 Orde...

Страница 49: ...NPT 3 8 NPT 1402 0978 240 cm Steel G G 3 8 1400 6444 NPT 3 8 NPT 1402 0911 St steel G G 3 8 1400 6445 NPT 3 8 NPT 1402 0912 350 cm Steel G G 3 8 1400 6446 NPT 3 8 NPT 1402 0913 St steel G G 3 8 1400...

Страница 50: ...red depending on the travel See rows above 1400 6771 Valtek Type 25 50 1400 9554 Accessories Connecting plate 6 G 1400 7461 NPT 1400 7462 Pressure gauge bracket 7 G 1400 7458 NPT 1400 7459 Pressure ga...

Страница 51: ...78 with 320 cm and to VETEC Type S320 heavy duty version 1400 5891 and 1400 9526 Attachment to Camflex II 1400 9120 Accessories Connecting plate 6 G 1400 7461 NPT 1400 7462 Pressure gauge bracket 7 G...

Страница 52: ...60 cm See Fig 17 1400 7469 Attachment to rotary actuators VDI VDE 3845 September 2010 see section 15 1 for details Actuator surface corresponds to fixing level 1 Size AA1 to AA4 with follower clamp a...

Страница 53: ...T or G thread Custom ary fittings for metal or copper tubing or plastic hoses can be used NOTICE Risk of malfunction due to failure to comply with required air quality Only use supply air that is dry...

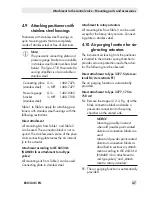
Страница 54: ...of the positioner can be restricted to 1 4 bar 2 4 bar or 3 7 bar in Code 16 The limitation is not activated No by de fault 5 2 Electrical connections DANGER Risk of electric shock and or the for mat...

Страница 55: ...Equipment for use in zone 2 zone 22 In equipment operated according to type of protection Ex nA II non sparking equipment according to EN 60079 15 2003 circuits may be connected interrupted or switche...

Страница 56: ...M20x1 5 to NPT Powder coated aluminum 0310 2149 Stainless steel 1400 7114 Bus line Route the two wire bus line to the screw ter minals marked IEC 1158 2 whereby no polarity needs to be observed To con...

Страница 57: ...s control system Bus termination Supply unit FOUNDATION fieldbus FOUNDATION fieldbus IEC 61158 2 Power Conditioner 3730 51 3730 51 3730 51 3730 51 IEC 61158 2 Process control system Bus termination Ha...

Страница 58: ...or automation system or between a PC or work station and the positioner s is implemented to conform with IEC 61158 2 Note The action of the positioner upon fail ure of the FOUNDATION fieldbus communic...

Страница 59: ...ting rotary actuators connections ac cording to section 4 6 Volume restriction Q The volume restriction serves to adapt the air output capacity to the size of the actuator Depending on the air passage...

Страница 60: ...hat de pends on the sign and the value One bar element appears per 1 set point devi ation If the positioner has not been initialized blinks on the display the bar graph indi cates the lever position i...

Страница 61: ...AFE_POS parameter in the AO Transducer Block AO TRD u KH 8384 5 and together AO Transducer Block is in the MAN mode u KH 8384 5 and S both blinking The positioner is manual mode while the mechanical f...

Страница 62: ...f injury due to the actuator stem extending or retracting Do not touch or block the actuator stem Note The positioner performs a test in the start up phase while following its au tomation task at the...

Страница 63: ...MAX The position of volume restriction Q also de pends on how the signal pressure is routed at the actuator in SAMSON actuators The SIDE position applies for actuators with a loading pressure connect...

Страница 64: ...ressure Note If no settings are entered within 120 seconds the enabled configuration function becomes invalid Enable configuration Default No Turn g Code 3 display No Press Code 3 blinks Turn YES Pres...

Страница 65: ...absolutely essential that you check the lever and pin position as described in section 4 WARNING Risk of injury due to the actuator stem extending or retracting Before exchanging the lever or changin...

Страница 66: ...gs If nec essary perform a reset see sec tion 7 8 Alternating readings Initialization in progress Icon depending on initializa tion mode selected Bar graph display indicating the progress of the initi...

Страница 67: ...ation process An initialization procedure in progress can be canceled by pressing the rotary pushbut ton STOP appears for three seconds on the display and the positioner then changes to the fail safe...

Страница 68: ...n nominal range The calibrated sensor allows the effective valve travel to be set very accurately During initialization the positioner checks whether the control valve can move through the indi cated...

Страница 69: ...ode 7 and if necessary change it 7 6 3 MAN Initialization based on a manually selected range Before starting initialization move the con trol valve manually to the OPEN position Turn the rotary pushbu...

Страница 70: ...es the valve to move through its entire travel range several times This initialization mode however is an emergency mode in which the control parameters are estimated and not deter mined by an initial...

Страница 71: ...de 3 blinks Turn YES Press display Enter the pin position and nominal range mm Pin position Default No mm Nominal range locked when Code 4 No Turn Code 4 Press Code 4 blinks Turn Pin position on lever...

Страница 72: ...Press to confirm the setting Enter closing direction and blocking position Closing direction direction of ro tation causing the valve to move to the CLOSED position view on to positioner display Defa...

Страница 73: ...ic mode The current valve position is indicated in Note If the positioner shows a tendency to oscillate in automatic mode the pa rameters KP and TV must be slightly corrected Proceed as follows Set TV...

Страница 74: ...rt up parameters as well as the diagnosis to the factory default settings see code list in section 14 Enable configuration Turn g Code 3 display No Press Code 3 blinks Turn YES Press display Reset sta...

Страница 75: ...e setting in Code 3 Turn YES Press display Configuration is enabled You can now configure codes one after the other Turn to select the required code Press to activate the selected code The code number...

Страница 76: ...oves to the required position Note The positioner automatically returns to Code 0 if no settings are made within 120 seconds but remains in the manual mode Switch to automatic mode Turn Code 0 Press C...

Страница 77: ...functional fault in the posi tioner itself or in one of its peripherals or an initialization has not yet been suc cessfully completed Maintenance required The positioner still performs its control tas...

Страница 78: ...the possible source of error is displayed in Code 49 onwards In this case Err appears on the display S Example Error caused by pin position Refer to the code list section 14 for possible causes and th...

Страница 79: ...section 5 2 1 must be connected to the output circuit When the tag 1 is located in the inductive field of the switch the switch assumes a high resistance When it moves outside the field the switch as...

Страница 80: ...contact is closed Tag entering the field contact is opened For OPEN position 1 Initialize the positioner 2 Move the valve to 95 in the MAN mode see display 3 Adjust the tag 1 at the yellow adjust ment...

Страница 81: ...positioner Insert the fixing screws 2 and screw tight Attach the clamping plate 8 onto the proximity switch 6 Attach the rotary switch 5 Make sure the flattened side of the positioner shaft is turned...

Страница 82: ...ne tested components from the manufacturer Devices that have already been operated outside hazardous areas and are intended for future use inside hazardous areas must comply with the safety requiremen...

Страница 83: ...ed add the current firmware to the nameplate this can be done using labels 13 Maintenance calibration and work on equipment Interconnection with intrinsically safe cir cuits to check or calibrate the...

Страница 84: ...lever in relation to the longitudinal axis is indicated in degrees Note It can only be selected when Code 0 MAN 2 Reading direction 1234 1234 ESC The reading direction of the display is turned by 180...

Страница 85: ...b Substitute calibration without initialization 7 w x Increasing increas ing Increasing decreas ing ESC Direction of action of the set point w in relation to the travel angle x Automatic adaptation AI...

Страница 86: ...range See also ex ample in Code 11 11 Travel angle upper limit upper x limit 50 0 to 120 0 100 of the operating range No ESC Limits travel angle to the entered value upper limit The characteris tic i...

Страница 87: ...sure limitation for double acting actuators with fail safe position AIR TO OPEN 17 Proportional action coeffi cient KP level 0 to 17 7 ESC Read or change KP Note concerning changing the KP and TV leve...

Страница 88: ...e 21 and 22 For some applications it is recommendable to limit the transit time of the actuator to prevent it from engaging too fast in the running pro cess Code 21 has priority over Code 15 NOTICE Th...

Страница 89: ...h SUb initialization mode 36 Reset Std diAG ESC Std Resets all parameters and diagnosis data to their default set tings After a reset the positioner must be re initialized diAG Resets diagnosis data o...

Страница 90: ...d valve info YES HIGH LOW No Read only Indicates whether a solenoid valve is installed or not If a voltage supply is connected at the terminals of the installed sole noid valve YES and HIGH appear on...

Страница 91: ...active When prompted Err appears When fault alarms exist they are displayed here 50 x permissible range Value of measuring signal too high or too low the lever operates near its me chanical stops Pin...

Страница 92: ...The positioner returns to the previous operating mode No pressure in supply line or pneumatic leakage Supply air failure during initialization Status classification Maintenance required Recommended ac...

Страница 93: ...llows the controlled variable within tolerable times tolerance band alarm Code 19 Actuator blocked Positioner attachment shifted subsequently Supply pressure no longer suffices Status classification M...

Страница 94: ...is defective The device continues functioning in emergency mode but it must be replaced as quickly as possible The emergency mode on the display is indicated by a blinking closed loop op eration icon...

Страница 95: ...to the fail safe position Status classification Maintenance alarm cannot be classified Recommended action Return positioner to SAMSON AG for repair 67 Check calculation Hardware controller monitored...

Страница 96: ...evice error Status classification Maintenance required Recommended action Return positioner to SAMSON AG for repair 74 FF parameters Error in parameters not critical to control operation Status classi...

Страница 97: ...ation Maintenance required Recommended action Return positioner to SAMSON AG for repair Diagnosis errors Error codes Recommended action Condensed state message active When prompted Err appears When fa...

Страница 98: ...ock alarm 132 Good NC Active advisory alarm 136 Good NC Active critical alarm 140 Good NC Unack block alarm 144 Good NC Unack advisory alarm 148 Good NC Unack critical alarm 152 Uncertain Non specific...

Страница 99: ...Not selected 208 Good C Local override 216 Good C Fault state active 220 Bad Non specific 0 Bad Configuration error 4 Bad Not connected 8 Bad Device failure 12 Bad Sensor failure 16 Bad No comm with l...

Страница 100: ...14 80 164 Output 38 Supply 9 86 70 15 46 34 70 70 28 Schild 58 58 Pressure gauge bracket or connecting plate Attachment according to IEC 60534 6 Lever mm S 17 M 50 L 100 XL 200 External position sens...

Страница 101: ...mensions in mm Attachment according to VDI VDE 3847 to Type 3277 Attachment according to VDI VDE 3847 to a NAMUR rib 62 164 3 8 200 164 164 13 62 24 Lever mm M 50 L 100 XL 200 Fig 28 Attachment accord...

Страница 102: ...Output A2 Supply 9 50 80 58 130 49 59 79 76 50 150 Reversing amplifier optional Connecting plate G or NPT Reversing amplifier Type 3710 see drawing of heavy duty version for dimensions 1079 1118 1079...

Страница 103: ...o VDI VDE 3845 September 2010 A M6 C B 25 Mmin d D Fixing level 2 bracket surface Fixing level 1 actuator surface Actuator Dimensions in mm Size A B C d Mmin D AA0 50 25 15 5 5 for M5 66 50 AA1 80 30...

Страница 104: ...tage select characteristic 2 0 50 100 0 50 100 Travel angle of rotation Reference variable 0 50 100 0 50 100 Travel angle of rotation Reference variable 16 Valve characteristic selection The character...

Страница 105: ...lve linear select characteristic 5 VETEC rotary plug valve equal percentage select characteristic 6 0 50 100 0 50 100 Travel angle of rotation Reference variable 0 50 100 0 50 100 Travel angle of rota...

Страница 106: ...106 EB 8384 5 EN...

Страница 107: ...EB 8384 5 EN 107...

Страница 108: ...108 EB 8384 5 EN...

Страница 109: ...EB 8384 5 EN 109...

Страница 110: ...110 EB 8384 5 EN...

Страница 111: ...EB 8384 5 EN 111...

Страница 112: ...112 EB 8384 5 EN...

Страница 113: ...EB 8384 5 EN 113...

Страница 114: ...114 EB 8384 5 EN...

Страница 115: ...EB 8384 5 EN 115...

Страница 116: ...116 EB 8384 5 EN...

Страница 117: ...EB 8384 5 EN 117...

Страница 118: ...118 EB 8384 5 EN...

Страница 119: ...EB 8384 5 EN 119...

Страница 120: ...120 EB 8384 5 EN...

Страница 121: ...EB 8384 5 EN 121...

Страница 122: ...122 EB 8384 5 EN...

Страница 123: ...EB 8384 5 EN 123...

Страница 124: ...124 EB 8384 5 EN...

Страница 125: ...EB 8384 5 EN 125...

Страница 126: ...126 EB 8384 5 EN...

Страница 127: ...EB 8384 5 EN 127...

Страница 128: ...128 EB 8384 5 EN...

Страница 129: ...EB 8384 5 EN 129...

Страница 130: ...130 EB 8384 5 EN...

Страница 131: ...EB 8384 5 EN 131...

Страница 132: ...SAMSON AG MESS UND REGELTECHNIK Weism llerstra e 3 60314 Frankfurt am Main Germany Phone 49 69 4009 0 Fax 49 69 4009 1507 samson samson de www samson de EB 8384 5 EN 2016 04 20 English...

Отзывы: