background image

2023_02_28-09:30

EN

15

R. 02/23  853 803

 SAMOA Industrial, S.A. · Pol. Ind. Porceyo,  I-14 · Camino del Fontán, 831 · 33392 -  Gijón - Spain · Tel.: +34 985 381 488 · www.samoaindustrial.com

FR

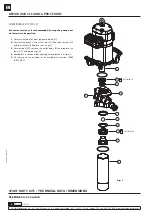
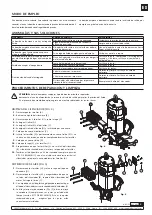
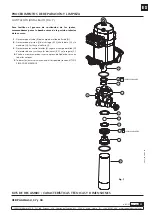
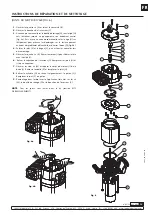
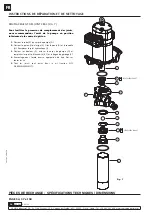
JOINTS DU MOTEUR D’AIR (FIG. 6)


1. 

Dévisser les quatre vis (A) et retirer le couvercle (B).


2. 

Dévisser le bouchon de l’inverseur (C).


3. 

Avec une pince manuelle sur la douille de serrage (D), tirer la tige (O) 
vers l’extérieur jusqu’à ce qu’apparaisse son évidement central 


(Fig. 6a). Puis, avec une autre pince manuelle, saisir la tige (O) sur 
l’évidement pour prévenir les dommages sur la surface pouvant 
entrainer des problèmes d’étanchéité, et dévisser l’écrou (D) (Fig. 6b).


4. 

Enlever le joint (E) et la bague (F), puis utiliser les nouvelles lors  
du remontage.


5. 

Dévisser les quatre vis (R). Retirer le moteur (J) pour libérer la tête 
avec la bride (L).


6. 

 Retirer le capuchon de l’inverseur (G). Remplacer les joints (H) et 
(I) de ce capuchon.


7. 

Dévisser les cinq vis (M) et séparer le corps de moteur (J) de la 
bride (L). Retirer la rondelle (K) et remplacer le joint (H).


8. 

Retirer le cylindre (N) en tenant soigneusement le piston (Q). 
Remplacer le joint (P) du piston.


9. 

Remontage dans l’ordre inverse, Application frein filet sur les vis 
(M), la douille de serrage (D) et le bouchon de l’inverseur (C).

NOTE: 

Tous les joints sont inclus dans le kit (section KITS 


DE REMPLACEMENT).

Fig. 6a

Fig. 6b

INSTRUCTIONS DE RÉPARATION ET DE NETTOYAGE

Fig. 6

A

B

C

D

E
F

G
H

J

K
H

L

M

N

O

P

Q

R

I

Содержание PM45

Страница 1: ...ON 3 1 10 DRUCKLUFTBETRIEBENE LPUMPE PM45 BERSETZUNG 3 1 19 PROPULSORA PNEUM TICA PARA LEO PM45 RATEIO 3 1 23 PM45 3 1 27 EN ES FR DE PT RU ADVERTENCIA LEA ATENTAMENTE EL MANUAL DE INSTRUCCIONES Y SUS...

Страница 2: ...occurs Directive part 2014 34 EU Standard part UNE EN ISO 80079 36 2017 ATEX MARKING CAREFULLY READ THE INSTRUCTIONS AND WARNINGS BEFORE STARTING TO OPERATE THE EQUIPMENT technical documentation in t...

Страница 3: ...per use poor maintenance or removal of identifications labels may invalidate the guarantee All fittings in the system connected to the outlet of the pump should be suitable for the maximum possible pr...

Страница 4: ...or diminishes over time Contamination in the foot valve Remove and clean Replace if damaged Contamination in the upper valve Remove and clean Replace if damaged The exhaust muffler is clogged by comp...

Страница 5: ...t D Fig 6b 4 Remove o ring E and ring F and replace them with new ones later 5 Unscrew the bolts R Pull the motor body J outwards to free it along with bridle L 6 Take away the gasket G and replace it...

Страница 6: ...he pump near de lowest stroke position 1 Unscrew the tube K from the pump body D 2 Unscrew the piston J from the rod A Take away the ball G and the washer H Replace the V ring I 3 Unscrew bolts E remo...

Страница 7: ...ecalientamiento por funcionamiento en seco durante varias horas Gb nos indica el EPL de la bomba Parte directiva 2014 34 EU Parte norma UNE EN ISO 80079 36 2017 MARCADO ATEX LEA ATENTAMENTE EL MANUAL...

Страница 8: ...rial S A Cualquier modificaci n no autorizada del equipo uso indebido mantenimiento incorrecto o la retirada de las etiquetas identificativas puede ser causa de anulaci n de la garant a Todos los acce...

Страница 9: ...asegur ndose de que no se salen del silenciador B separe dicho silenciador del motor Extraiga la t rica C 3 Con ayuda de un til de pl stico golpeando suavemente por el lado del silenciador extraer la...

Страница 10: ...a E y el aro F y use otros nuevos posteriormente al volver a montar 5 Desenrosque los cuatro tornillos R Tire hacia arriba del cabezal motor J hasta liberarlo junto con la brida L 6 Quite el casquillo...

Страница 11: ...Desenrosque el pist n J del v stago A Quite la bola G y la arandela H Sustituya el collar n I 3 Desenrosque los cuatro tornillos E separe el cuerpo de salida D del motor de aire y sustituya las dos j...

Страница 12: ...E MANUEL D INSTRUCTIONS ET SES AVERTISSEMENTS AVANT DE COMMENCER FAIRE FONCTIONNER L QUIPEMENT Ce processus a consist en la pr paration et le d p t ult rieur de la documentation technique requise aupr...

Страница 13: ...doivent tre effectu s uniquement par du personnel qualifi Losqu elle n est pas utilis e assurez vous de couper l alimentation en air de la pompe pour viter les accidents Ne pas modifier cet quipement...

Страница 14: ...Remplacer les joints D bit de fluide trop faible ou en dimi nution Impuret s dans le clapet de pied D monter et nettoyer Remplacer s il est endommag Impuret s dans la valve sup rieure D monter et nett...

Страница 15: ...d visser l crou D Fig 6b 4 Enlever le joint E et la bague F puis utiliser les nouvelles lors du remontage 5 D visser les quatre vis R Retirer le moteur J pour lib rer la t te avec la bride L 6 Retirer...

Страница 16: ...s de pompe D 2 D visser le piston J de la tige A Otez la boule G et la rondelle H Remplacer le joint hydraulique I 3 D visser les boulons E enlever le corps de pompe D et remplacer les joints d tanch...

Страница 17: ...enden ls die niemals 70 C oder die Umgebungstemperatur je nachdem welche h her ist berschreiten sollte Ein Erdungskabel mit einer Erdungsklemme ist im Lieferumfang enthalten Das Erdungskabel muss fest...

Страница 18: ...enden Sie nur Originalkomponenten von Samoa Industrial S A Jegliche unbefugte Ver nderung des Ger ts Missbrauch unsachgem eWartungoderEntfernungvonKennzeichnungsschildern kann zum Erl schen der Garant...

Страница 19: ...er vom Motor wobei Sie darauf achten m ssen dass sie nicht aus dem Schalld mpfer B herausfallen Entfernen Sie den O Ring C 3 Mit einem Kunststoffwerkzeug vorsichtig auf die Seite des Schalld mpfers kl...

Страница 20: ...Ring F und verwenden Sie sp ter beim Wiederzusammenbau neue 5 SchraubenSiedievierSchrauben R heraus ZiehenSiedenAntriebskopf J nach oben bis er zusammen mit dem Flansch L frei ist 6 Entfernen Sie die...

Страница 21: ...ie den Kolben J von der Stange A ab Entfernen Sie die Kugel G und die Unterlegscheibe H Die Manschette I wieder anbringen 3 Die vier Schrauben E abschrauben den Auslassk rper D vom Luftmotor trennen u...

Страница 22: ...h sobreaquecimento devido ao funcionamento a seco durante v rias horas Parte da directiva 2014 34 EU Parte da norma UNE EN ISO 80079 36 2017 MARCA O ATEX LEIA ATENTAMENTE O MANUAL DE INSTRU ES E OS S...

Страница 23: ...manuten o Para assegurar o correto funcionamento do equipamento qualquer opera o de manuten o somente dever ser feita por um profissional qualificado Para evitar acidentes quando o equipamento n o es...

Страница 24: ...da de 6 bar 80 psi Mesmo assim recomendado instalar o filtro regulador de ar para poder regular e fechar a alimenta o de ar no final de cada dia de trabalho no caso de rupturas ou vazamentos na sa da...

Страница 25: ...os parafusos A no silenciador B encaixar o silenciador no lugar e fixar os parafusos 12 O essencial trocar todo o conjunto do silenciador sec o PE AS DE REPOSI O Desta forma basta retirar os parafusos...

Страница 26: ...rca a D figura 6b 4 Remover o o ring E e a arruela F e trocar estas pe as ao montar o equipamento 5 Desrosquear os quatro parafusos R Puxar para cima para liberar o motor J juntamente com a flange L 6...

Страница 27: ...rar a esfera G e a arruela H Substituir o apoio do pist o I 3 Desrosquear os 4 parafusos E separar o corpo de saida D do motor de ar e substituir as juntas B F e o arruela guia C 4 Montar em ordem con...

Страница 28: ...Font n 831 33392 Gij n Spain Tel 34 985 381 488 www samoaindustrial com 2023_02_28 09 30 RU ATEX 2014 34 EU Samoa Industrial S A ATEX Ex h 80079 36 IIB 2G 1 T4 II T4 135 C 70 C 2014 34 EU UNE EN ISO...

Страница 29: ...23 853 803 SAMOA Industrial S A Pol Ind Porceyo I 14 Camino del Font n 831 33392 Gij n Spain Tel 34 985 381 488 www samoaindustrial com RU 360132 1 0 5 7 12 170 Samoa Industrial S A ATEX 360132 2 ATEX...

Страница 30: ...l Font n 831 33392 Gij n Spain Tel 34 985 381 488 www samoaindustrial com 2023_02_28 09 30 RU 0 3 2 12 40 180 6 80 K I L A B C D E J F G H 3 1500 1000 1000 A 950319 239004 B 241001 C 362100 D 251412 E...

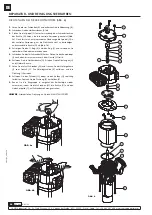
Страница 31: ...Industrial S A Pol Ind Porceyo I 14 Camino del Font n 831 33392 Gij n Spain Tel 34 985 381 488 www samoaindustrial com RU 4 1 A 2 B 3 G F 4 D 5 E C 6 D 7 C 8 A E 9 D 10 F G 11 B A 12 A 5 1 H G 2 A B C...

Страница 32: ...Ind Porceyo I 14 Camino del Font n 831 33392 Gij n Spain Tel 34 985 381 488 www samoaindustrial com 2023_02_28 09 30 RU 6 1 A B 2 C 3 D O 6 O D 6b 4 E F 5 R J L 6 G H I 7 M J L K H 8 Q N P 9 M D C 6a...

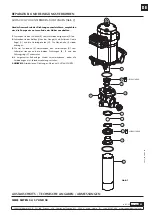
Страница 33: ...3 R 02 23 853 803 SAMOA Industrial S A Pol Ind Porceyo I 14 Camino del Font n 831 33392 Gij n Spain Tel 34 985 381 488 www samoaindustrial com RU 7 1 K D 2 J A G H V I 3 E D B F C 4 5 34 37 38 Fig 7 A...

Страница 34: ...04 539603 Kit N Kit N 539303 13 14 15 15 16 30 19 17 41 37 36 2 3 4 5 6 7 9 10 18 44 45 46 47 38 8 1 21 20 35 34 33 25 26 26 25 22 15 23 24 12 6 11 27 28 29 31 39 40 41 42 32 REPLACEMENT KITS KITS DE...

Страница 35: ...Kit Asas Kit de Poigne s 539002 12 13 14 3x 15 16 4x 22 23 24 2X 25 2X 26 30 Air Motor Seals Kit Kit Juntas Motor Aire Kit de Joints Moteur Pneumatique 539005 1 2 4x 3 4x 4 5 6 2x 7 8 4x 9 10 Exhaust...

Страница 36: ...f Kit Kit de Pegas 539002 12 13 14 3x 15 16 4x 22 23 24 2X 25 2X 26 30 Dichtungssatz Luftmotor Kit de Veda o do motor pneum tico 539005 1 2 4x 3 4x 4 5 6 2x 7 8 4x 9 10 Schalld mpfer Kit Kit silenciad...

Страница 37: ...Durchfluss Vaz o m xima Ma 120 l min 7 bar 32 gal min 100 psi 120 7 32 100 Gewinde f r Lufteinlass Conex o de entrada de ar 1 2 BSP F 1 2 NPT F lablassgewinde Conex o de sa da de leo 3 4 BSP F 3 4 NP...

Страница 38: ...30 PT RU DE FR ES EN 707 mm mm 204 mm mm 90 mm mm A B C D 446 mm mm 536330 536331 A 1 2 BSP F 1 2 NPT F B 3 4 BSP F 3 4 NPT F C 1 1 2 BSP F 1 1 2 NPT F D 1 4 BSP F 1 4 BSP F 4xM10 holes agujeros orifi...

Страница 39: ...includes the symbol and the reference to the technical file Special conditions for safe use specified in the instruction manual EN SAMOA INDUSTRIAL S A Pol Ind Porceyo I 14 Camino del Font n 831 33392...

Страница 40: ...ar o presente manual Organismo notificado 0163 Laboratorio Oficial Jos Mar a de Madariaga LOM Calle Alenza 1 2 28003 Madrid Espanha Ref tec LOM 22 556R C X Faz se abaixo refer ncia s normas harmonizad...

Отзывы: