background image


·

 2


ER-180  


Contents 


Getting Started.....................................................................................................4


Unpacking........................................................................................................................... 4


Paper Roll and Take-Up Spool Installation......................................................................... 5


Basic Features and Functions ............................................................................................ 6


Mode Lock .......................................................................................................................... 6


Display ................................................................................................................................ 7


Keyboard............................................................................................................................. 7


Key Functions ..................................................................................................................... 8


Initial Set Up Instructions .................................................................................10


Receipt or Journal Paper Usage....................................................................................... 10


Setting the Date and Time ................................................................................................ 10


Register Mode....................................................................................................11


Clerk Operation................................................................................................................. 12


Printing On / Off ................................................................................................................ 12


No Sale Cash Drawer Open ............................................................................................. 13


Non Add Reference Number Entry................................................................................... 13


Department Operation ...................................................................................................... 14


Price Look Up (PLU) Operation ........................................................................................ 15


Multiplication Operation .................................................................................................... 16


Single Item Operation ....................................................................................................... 17


Percentage (%) Premium or Discount .............................................................................. 18


Minus (-) Key Operation.................................................................................................... 20


Merchandise Return Operation......................................................................................... 21


Voiding last Item (VOID) ................................................................................................... 21


Tender Operations............................................................................................................ 22


Received on Account (RA) Operation............................................................................... 24


Paid Out Monies (PO) Operation...................................................................................... 24


Currency Conversion Operation ....................................................................................... 25


Calculator Operation......................................................................................................... 26


Содержание ER-180Series

Страница 1: ...ER 180 Series Electronic Cash Register Operation and Programming Manual...

Страница 2: ...Note All specifications are subject to change without notice...

Страница 3: ...ystem Check with your local solid waste officials for details concerning recycling options or proper disposal It is recommended that the batteries are changed every 12 months WARNING This is a Class A...

Страница 4: ...s do not touch thermally hot parts 7 Product Safety Notice Some electrical and mechanical parts have special safety related characteristics that might not be obvious from visual inspection These safet...

Страница 5: ...trument chassis ground before connecting the positive lead always remove the instrument s ground lead last 1 3 Precautions for Electrostatic Sensitive Devices ESDs 1 Some semiconductor solid state dev...

Страница 6: ...Mode 11 Clerk Operation 12 Printing On Off 12 No Sale Cash Drawer Open 13 Non Add Reference Number Entry 13 Department Operation 14 Price Look Up PLU Operation 15 Multiplication Operation 16 Single It...

Страница 7: ...Mode 34 Printing Receipt or Journal and Tax Print 35 Tax and Country Settings 36 Tax Rate Programming 37 Price and Tax Settings 38 Price Look Up PLU linking to Department 39 Setting the Register Numb...

Страница 8: ...ay result in the need to carry out the factory reset operation outlined in maintenance Insert the key stamped C into the mode lock and turn the key one position past PGM to S not shown on the mode loc...

Страница 9: ...ss the Feed button to advance the paper Then follow the instructions for either customer receipt or journal roll setup For Receipt Ensure the paper is fed through the paper outlet in the roll cover an...

Страница 10: ...ode Key The cash register has a mode lock located on the front right of the cabinet This is used to control the operations of the register such as reporting and programming OFF Turns the register off...

Страница 11: ...n position 1 of the display C Indicates the amount due in change Indicates the amount displayed is the Total monies E Indicates an error pressing the Clear button will stop the error S Indicates the a...

Страница 12: ...mode Used to register any money received and increase the cash in drawer total on reports This key also acts as the plus key in calculator mode This is used to sign on a clerk for total monies taken...

Страница 13: ...to a separate totaliser on the financial report When pressed the current total of the sale is displayed This can be used prior to a operation to determine the value to be adjusted or before finalisat...

Страница 14: ...the REG position Setting the Date and Time The following procedures are used to set the time and date To Change the Time Ensure the key is in the PGM position Type in time 24hr clock using the number...

Страница 15: ...ER 180 11 REGISTER MODE...

Страница 16: ...eceipts Clerk Sign On Clerks can be signed on by entering a clerk number followed by the CLERK key Clerk Sign off Pressing the CLERK key will sign off an operator this will also set the register to th...

Страница 17: ...y The No Sale key can be used to enter up to a seven digit number which is printed on the receipt and journal as a reference The reference entry can be made prior or during any operation in the regist...

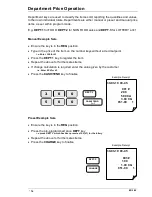
Страница 18: ...point i e Enter 200 for 2 Press the DEPT 1 key to register the item Repeat the above for further sales items If change calculation is required enter the value given by the customer i e Enter 500 for...

Страница 19: ...without a decimal point i e Enter 200 for 2 Press the PLU key Repeat the above for further sales items If change calculation is required enter the value given by the customer i e Enter 500 for 5 Pres...

Страница 20: ...EPT 1 key to register the item Repeat the above for further sales items Press the CASH TEND key to finalise Example Receipt 2 0 0 DEPT 30 03 10 09 45 15 x 2 00 001 30 00 30 00 CA 051 00 1 Preset Price...

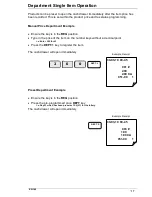
Страница 21: ...e of the item on the number keys without a decimal point i e Enter 200 for 2 Press the DEPT 1 key to register the item The cash drawer will open immediately Example Receipt 30 03 10 09 45 001 2 00 2 0...

Страница 22: ...m related The value is then calculated as part of the whole sale total and reports Gross unlike the which reports the value to the item Item Manual Price Department Example Ensure the key is in the RE...

Страница 23: ...the item on the number keys without a decimal point i e Enter 200 for 2 Press the DEPT 2 key to register the item Press the SUBTOTAL key to see amount to be discounted Enter the value of the discount...

Страница 24: ...tity multiplier This would allow the user to present more than one voucher per item For example multiple 10p vouchers requires the user to enter 5 x 10p i e 5 X Time would be pressed prior to the minu...

Страница 25: ...001 1 00 1 00 CA 051 00 1 Voiding Last Item VOID The Void key can be used within an existing sale to correct the last item sold with a pre entered value to remove one manually priced item within the...

Страница 26: ...e REG position Type in the price of the item on the number keys without a decimal point i e Enter 200 for 2 Press the DEPT 1 key to register the item Repeat the above for further items If change calcu...

Страница 27: ...e of the item on the number keys without a decimal point i e Enter 2000 for 20 00 Press the DEPT 1 key to register the item Press the SUBTOTAL key to display the value due Enter the value of monies pa...

Страница 28: ...7 Press the RA button to register the monies received Example Receipt RA 30 03 10 09 45 7 00 RA 051 00 1 Paid Out Monies PO Operation It is possible to register monies removed from the cash drawer whi...

Страница 29: ...ency Ensure the key is in the REG position Type in the price of the item on the number keys without a decimal point i e Enter 100 for 1 00 Press the DEPT 1 key to register the item Press the SUBTOTAL...

Страница 30: ...re the key is in the REG position Press the CALC key to enter the calculator mode Use the calculator functions as required RA Is the Plus Function PO Is the Minus Function X Time X Is the Multiplicati...

Страница 31: ...ER 180 27 REPORTS MODE...

Страница 32: ...d key for the report i e Cash Tend for a financial report Once the report has finished return to the REG position Mode Lock Key press Report Printed X Only AMOUNT Enter cash in drawer amount for compa...

Страница 33: ...program setting To Enter Actual Monies Ensure the key is in REG position Press the NO SALE key to open cash drawer Count the actual sum of cash Ensure the key is in X position Type on the number keys...

Страница 34: ...otal Tax 1 Total Taxable 2 Total Tax 2 Total Taxable 3 Total Tax 3 Total Taxable 4 Total Tax 4 Total 0 54 0 30 7 50 Total Total Total 188 26 1 Net Sales Total 2 00RF 3 00VD 198 00 2 Return Merchandise...

Страница 35: ...Number Department Counter Total 016 0 05 20 00 Department Number Department Counter Total 064 01 1 Receipt No Machine No Clerk No Example Clerk Report Ensure the key is in either X to print or Z to pr...

Страница 36: ...ress the 02 01 10 10 33 1 Z 425 71 4 016 77 1 Date Time Z Counter Mode Key Position P T D Grand Total Receipt No Machine No Clerk No Example Calculations Below are listed the common calculations shown...

Страница 37: ...ER 180 33 PROGRAM MODE...

Страница 38: ...any training sales adding to the report values Start Training Ensure the key is in the PGM position On the number keys type 1 and press the CHARGE key Return the key to REG and begin trading in train...

Страница 39: ...rn to the PGM position On the number keys type in the answer to question a This is usually set to 0 to print tax On the number keys type in the answer to question b This is either 0 for Receipts or 1...

Страница 40: ...estion a This is usually 0 for 2 decimal places in the UK On the number keys type in the answer to question b This is usually 0 for price inclusive Vat Press the X TIME key and return the key to the R...

Страница 41: ...osition On the number keys type in the answer to question a This would be value for the first tax rate i e 17500 for 17 5 On the number keys type in the answer to question b This would tax number i e...

Страница 42: ...p PLU code Price and Tax Setting Insert the key stamped C and turn to the PGM position On the number keys type in PLU code 1 to 100 as represented by xxx Press the PLU key i e For PLU item 13 enter 13...

Страница 43: ...sed For Example all Food PLU Sales may be set to total to Department 1 and all Non Food PLU sales to Department 2 To Change Settings Insert the key stamped C and turn to the PGM position On the number...

Страница 44: ...to 2 digits i e for 12 for register number 12 Press the NO SALE key and return the key to the REG position Till Number Setting the and key The and can be programmed with a preset rate This can then ad...

Страница 45: ...or question e i e enter 0 not to print the subtotal key presses or 1 to print subtotal Answer Question Explanation a 0 1 None Compulsory Declaration Compulsory Declaration This programs the register t...

Страница 46: ...eturn the key to the REG position Answer Question Explanation a 0 1 Print running Grand Total Do not print the Grand Total The register has a GT Grand Total which increases with each sale This sets if...

Страница 47: ...ll be in the home currency The following sets the rate for the foreign currency to the C CONV key To Change Settings Ensure the key is in the PGM position On the number keys type in the rate as for an...

Страница 48: ...44 ER 180...

Страница 49: ...ER 180 45 MAINTENANCE...

Страница 50: ...al setup Insert the key stamped C in to the mode lock and turn the key to one position past PGM to S not shown on the mode lock Power OFF and press the and while still pressing the key power ON PGM Z...

Страница 51: ...void excess dust and extreme temperatures Replacing the Batteries It is recommended the three AA batteries are replaced every 12 months Remove the printer cover Ensure three AA batteries have been fit...

Страница 52: ...t on off Key 6 OFF R X Z PGM S by keyboard KEYBOARD Type Number of keys Keystroke buffer Rubber contact type 38 15 PRINTER Model Stations Paper Copy Print speed M 42v 1 Single ply 57 5 mm none thermal...

Страница 53: ...ER 180 49...

Отзывы: