29 |
Sailrite�com
Leatherwork
®
Guidebook
| 30
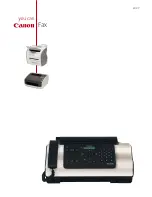
Removing the Hook to Clean the Shuttle Race
Guide Shaft & Free Thread Jams
Perform these steps with care:
1� Move the needle to its highest point�
2� Remove the bobbin case/bobbin�
3� Turn each lever (
K
) one half turn
away from the retaining ring (
L
)�
4� Pull the axle of the hook to remove
retaining ring (
L
) and hook (
M
)�
5� Gently remove the accumulated lint and
thread from the retaining ring (
L
), hook
(
M
) and driver (
N
)� Use a small brush to
clean the parts or blow out the debris�
6� Replace hook (
M
) opposite driver
(
N
)� The hook just rests in place�
Be sure the axle is facing out�
7� Replace retaining ring (
L
) so that both
pins are under the black levers (
K
)
when turned� The polished side of the
retaining ring should be facing out�
8� Replace the bobbin and bobbin
case before beginning to sew�
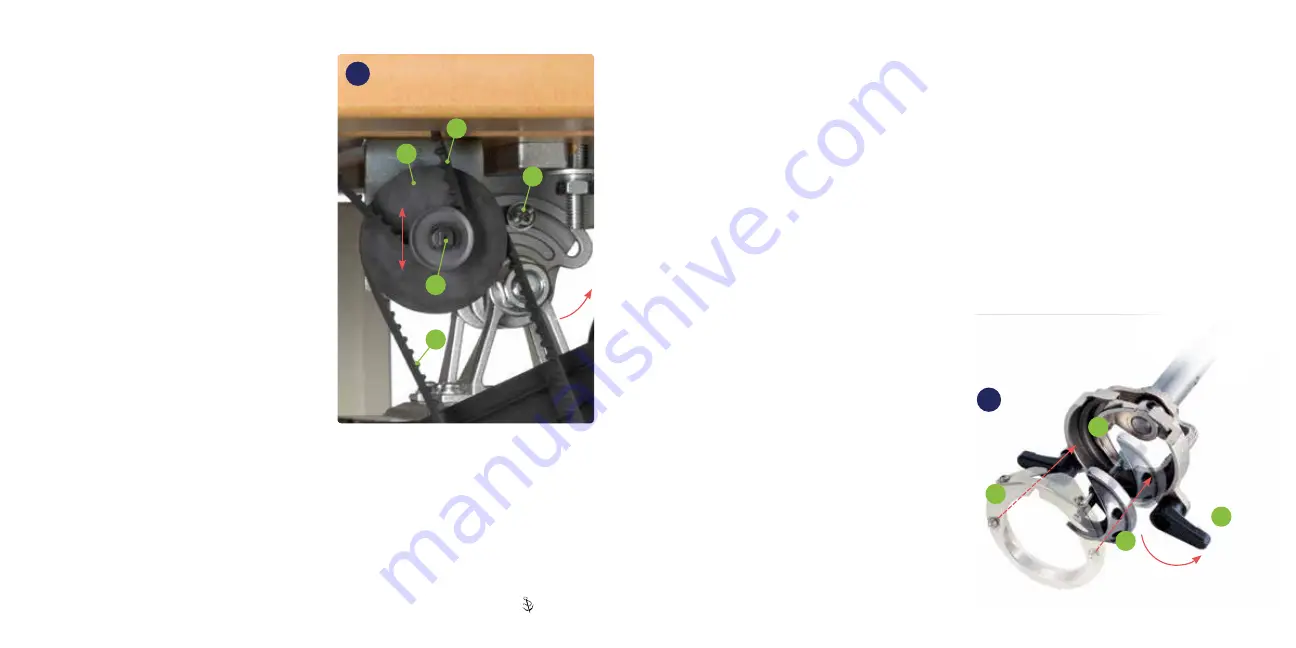
Belt Issues
The belts slip or come off the
pulleys:
If belts stretch after prolonged use and start
to slip cogs, you may need to adjust the
belt tension� If the longer belt (
A
) requires
adjustment, it should be done first. Move the
Idler Pulley (
B
) down to tighten the long belt�
To do so, loosen the pulley shaft (
C
)
using the
box wrench provided and slide the pulley on its
bracket (
35
)� Tighten when done�
To adjust the shorter belt (
D
), loosen the screw
(
E
) in the curved slot above the motor (pulley
end) in the aluminum bracket (
35
)� Pivoting the
motor back will tighten the belt between the
motor and the Idler Pulley�
N
K
M
L
Material Surface Is Being Damaged
Surface marring is damage to leather and other delicate material surfaces� The Leatherwork
Sewing Machine has a special knurled surface foot and feed dog to reduce marring� To further
avoid marring, reduce the amount of pressure down on the presser feet by nearly unthreading the
Pressure Regulating Thumbscrew from the machine� See “Adjusting Presser Foot Tension” (p� 21)�
35
E
D
A
B
C
Clutch Will Not Disengage
If the clutch will not disengage, first remove the reverse threaded Posi-Pin
®
nut (p� 10,
C
) from the
balance wheel (p� 10,
B
)� Remove the balance wheel� Polish and lubricate the Posi-Pin bushing shaft
that the balance wheel rides on� Slide the balance wheel back on and screw the reverse threaded
Posi-Pin nut down�
36
Содержание Leatherwork
Страница 1: ......


