background image

103

KEY OPERATOR PROGRAMS

88

DEFAULT SENDING MODE

This program is used to select [MEMORY TX] or 
[DIRECT TX] for the default transmission mode. For 
more information on these modes, see page 15.

AUTO COVER SHEET

When this program is enabled, a cover page is 
automatically generated and added to each fax 
transmission. The cover page shows the date, time, 
destination name, destination fax number, sender's 
name, sender's fax number, number of pages, and a 
message if the message function is selected. A cover 
sheet cannot be added when scanning a document 
into polling memory or F-code polling memory, or 
when performing polling, direct transmission, relay 
broadcast transmission, F-code relay broadcast 
transmission, or manual transmission.

SLOW SCAN MODE

When this program is enabled, thin-sheet scanning is 
selected by default when an original is scanned using 
the RSPF.
Thin-sheet scanning uses a slower scanning speed to 
prevent thin originals from misfeeding.

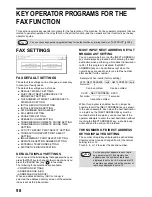
FAX RECEIVE SETTINGS

The fax reception settings allow you to adjust certain 
parameters for receiving faxes to better suit your 
needs.
Settings that can be adjusted depend on the peripheral 
devices installed.
The fax receive settings are as follows:

AUTO RECEIVE REDUCE SETTING

DUPLEX RECEPTION SETTING

PRINT STYLE SETTING

NUMBER OF CALLS IN AUTO RECEPTION

SET THE TELEPHONE NUMBER FOR DATA 
FORWARDING

INDEX PRINT

RECEIVED DATA PRINT CONDITION

LETTER SIZE RX REDUSE PRINT

ENTER JUNK FAX NUMBER

ANTI JUNK FAX

AUTO RECEIVE REDUCE SETTING

When you receive a fax that includes the sender's 
name and number, the received image is slightly larger 
than the standard sizes*. This setting can be enabled 
to have the received image automatically reduced 
before printing to fit the standard paper sizes.

* Standard paper sizes are sizes such as A4 and B5.

DUPLEX RECEPTION SETTING

When the duplex module is installed, this setting can be 
enabled to have received documents printed on both 
sides of the paper. When enabled, received faxes will be 
printed on both sides of the paper whenever the fax 
consists of two or more pages of the same size of paper.

PRINT STYLE SETTING

This setting determines the condition for selecting 
paper when printing received faxes. Select [PRINT 
ACTUAL SIZE CUT OFF ENABLED] or [AUTO SIZE 
SELECT].

• PRINT ACTUAL SIZE CUT OFF ENABLED

Each received image is printed at actual size. If 
necessary, the image is split onto multiple sheets of 
paper.

• AUTO SIZE SELECT

Each received image is printed at actual size when 
possible. When not possible, the image is 
automatically reduced before printing.

If you turn automatic reduction off, the 
overall printed image may be larger than the 
original and the excess portion may be cut 
off. However, the printed image will be the 
same size as the original and thus clearer.

Note

Содержание MF9300

Страница 1: ...S Operation manual for facsimile MF9300 30000 113474 0 1...

Страница 2: ...mits are designed to provide reasonable protection against interference in an installation This equipment generates uses and can radiate radio frequency energy and if not installed and used in accorda...

Страница 3: ...CEIVING FAXES 26 RECEIVING A FAX 26 3 ADVANCED TRANSMISSION METHODS SENDING THE SAME DOCUMENT TO MULTIPLE DESTINATIONS IN A SINGLE OPERATION BROADCAST TRANSMISSION 27 USING BROADCAST TRANSMISSION 28 F...

Страница 4: ...G ON THE PHONE MANUAL TRANSMISSION 63 RECEIVING A FAX AFTER TALKING MANUAL RECEPTION 64 FAXING A DOCUMENT FROM A COMPUTER PC FAX 66 USING PC FAX TRANSMISSION 66 6 PROGRAMMING PROGRAMMING 67 STORING ED...

Страница 5: ...the line cord in Australia New Zealand and Hong Kong Insert the end of the cord with the core into the LINE socket on the side of the machine as shown in the illustration Insert the other end without...

Страница 6: ...h is turned off Power is consumed even if no settings or information are stored in the machine When the machine s power switch is turned on almost no battery power is consumed The life of the lithium...

Страница 7: ...he operation of the Daylight Saving Time setting varies by region Follow these steps to enable Daylight Saving Time 1 Press the CUSTOM SETTINGS key 2 Touch the CLOCK key 3 Select the DAYLIGHT SAVING T...

Страница 8: ...atus of a job DATA light This light blinks when a fax has been received to memory The light stays on constantly when a fax is waiting in memory for transmission CUSTOM SETTINGS key Use to customize th...

Страница 9: ...ut tray for received faxes can be changed to the centre tray using the key operator programs for the copy function Front cover Open this cover to remove a misfeed See the operation manual for copier P...

Страница 10: ...e NEXT ADDRESS key ADDRESS BOOK key p 17 This displays the Address Directory screen p 9 Touch this key when you want to use an auto dial number rapid dialling or group dialling SUB ADDRESS key p 54 To...

Страница 11: ...displayed on one screen this shows how many screens are left Touch the keys to move through the screens CONDITION SETTINGS key This displays the condition setting screen p 8 which is used to set vari...

Страница 12: ...size In this case the left and right edges will not be transmitted AUTO RECEIVE REDUCE SETTING p 103 Minimum original size Maximum original size Using the RSPF 210 mm width x 148 mm length 148 mm widt...

Страница 13: ...then insert the pages face up in the document feeder tray Insert the stack into the document feeder tray until it stops The stack should not be higher than the indicator line maximum 100 pages USING T...

Страница 14: ...hine only retains the fax number it does not retain the sub address or passcode If numeric keys were pressed during a phone conversation the REDIAL key may not dial the correct number The number is no...

Страница 15: ...the address directory screen appears touch the CONDITION SETTINGS key to display the condition settings screen p 8 If you loaded a non standard size original or the original size was not correctly det...

Страница 16: ...r page to scan change pages and then press the START key Repeat this sequence until all pages have been scanned You can change the original size resolution and exposure settings as needed for each pag...

Страница 17: ...sion will be automatically reattempted at a later time See If the receiving party is busy on page 16 Direct transmission mode When direct transmission mode is selected the document is directly transmi...

Страница 18: ...s are rotated to A4R A5R originals are rotated to A5 and 8 1 2 x 11 originals are rotated to 8 1 2 x 11 R A4R originals A5 originals and 8 1 2 x 11 R originals are not rotated If desired you can turn...

Страница 19: ...through 6 of BASIC PROCEDURE FOR SENDING FAXES p 13 2 Touch the ADDRESS BOOK key The address directory screen appears This step is not necessary if the address directory screen already appears go dire...

Страница 20: ...ssary if you placed the original so that it is oriented horizontally the top of the original is on the right or left side Otherwise go directly to step 6 6 Touch the OK key You will return to the init...

Страница 21: ...directory screen appears touch the CONDITION SETTINGS key to display the condition settings screen p 8 After touching the ORIGINAL key check the original size displayed in the key If the original size...

Страница 22: ...scanned originals will be transmitted READ END Pg No 2 AL ESS READ END Note If the memory becomes full while originals are being scanned a message will appear and scanning will stop The page that was...

Страница 23: ...al screen Pressing the inner OK key in the step above returns you to step 2 5 The selected size appears in the top half of the ORIGINAL key Region Original sizes that can be set Australia New Zealand...

Страница 24: ...esolution setting cannot be changed once scanning has begun Even if you send a document using Fine Super fine or Ultra fine resolution some receiving fax machines may not be able to print the document...

Страница 25: ...ll return to the initial screen The selected exposure will appear in the top half of the EXPOSURE key When using the document glass to scan a multi page original the original size resolution and expos...

Страница 26: ...ing transmitted Transmission of the priority job will begin when the current job finishes If a job key for a broadcast type transmission is selected the name or number of the destination to which the...

Страница 27: ...smission If a job key for a broadcast type transmission is selected the name or number of the destination to which the fax is currently being transmitted appears If the job has not yet begun the name...

Страница 28: ...s sufficient paper must be loaded in the paper tray Refer to LOADING PAPER in operation manual for copier to load appropriate paper Incoming A4 and B5 size faxes will be automatically adjusted to the...

Страница 29: ...mission to all destinations has been completed the document is automatically cleared from memory If you frequently use broadcasting to send faxes to the same group of destinations it is convenient to...

Страница 30: ...DURE FOR SENDING FAXES p 14 If you enter an incorrect number If you make a mistake while entering a number press the CLEAR key and then re enter the correct digit s If you have already completed entry...

Страница 31: ...ey blinks see If received faxes cannot be printed p 26 When fax forwarding is performed all faxes that were received in memory to that point are forwarded The page that was being printed when the prob...

Страница 32: ...DATA FORWARD key When a forwarding number is not programmed THE DESTINATION IS NOT ENTERED will appear 3 Touch the FAX No key 4 Press the numeric keys to enter the forwarding number Enter the forward...

Страница 33: ...will change quickly The current time appears at the top of the screen If the current time is not correct press the CLEAR ALL key to cancel the operation Correct the date and time setting as explained...

Страница 34: ...l polling p 33 F code polling p 55 F code confidential transmission p 58 F code relay request transmission p 60 Other operations can be performed after a timer transmission is set up If another operat...

Страница 35: ...s and polls your machine is called polling memory Polling This function allows your machine to call a sending machine and initiate reception of a document in that machine A timer setting can also be e...

Страница 36: ...ting screen appears touch the ADDRESS BOOK key to display the address book screen p 9 The selected auto dial key is highlighted If you are performing serial polling touch the NEXT ADDRESS key and repe...

Страница 37: ...stination s press the START key JOB STORED appears in the screen Your machine prints the document following reception from the sending machine To cancel the operation Press the JOB STATUS key and then...

Страница 38: ...in the new document 1 Make sure that the machine is in fax mode When the FAX key light is on the machine is in fax mode If the light is not on press the FAX key 2 Place the document in the RSPF or on...

Страница 39: ...PUBLIC BOX key To check the stored data you can print it out 1 Touch the SPECIAL MODES key in fax mode and then touch the MEMORY BOX key If the address book screen appears touch the CONDITION SETTING...

Страница 40: ...o display the condition settings screen p 8 2 Touch the DELETE DATA key 3 Touch the PUBLIC BOX key A message screen appears 4 Touch the YES key All documents in the Public Box are deleted and you retu...

Страница 41: ...of polling security functions Polling is permitted when the numbers of either type match If you do not use the polling security function the document will be sent to any fax machine that polls you Wh...

Страница 42: ...e function has already been enabled To disable the function touch the SLOW SCAN MODE key so that the key is no longer highlighted 3 Touch the OK key You will return to the condition settings screen 4...

Страница 43: ...MODES key in fax mode and then touch the DUAL PAGE SCAN key If the address book screen appears touch the CONDITION SETTINGS key to display the condition settings screen p 8 2 Touch the OK key You wil...

Страница 44: ...IAL MODES key and then the PROGRAM key If the address book screen appears touch the CONDITION SETTINGS key to display the condition settings screen p 8 The program selection screen appears 3 Touch the...

Страница 45: ...the fax transmission p 13 To appear on the cover sheet your sender s name and number must be programmed OWN NUMBER AND NAME SET p 99 A key operator program can be enabled to have a cover sheet added t...

Страница 46: ...the key and then the TX MESSAGE key If the address book screen appears touch the CONDITION SETTINGS key to display the condition settings screen p 8 3 Touch the key of the message that you wish to ad...

Страница 47: ...s if you use manual transmission or Quick On Line transmission If desired you can use a key operator program to have the page number omitted PRINTING PAGE NUMBER AT RECEIVER p 101 Position of sender s...

Страница 48: ...ndition settings screen p 8 2 Touch the key and then the OWN PASSCODE SELECT key The list of programmed senders appears 3 Touch the desired sender key in the list 4 Touch the OK key You will return to...

Страница 49: ...be programmed CONFIDENTIAL CODE SET p 105 As shown above receiving a fax in a confidential box is called confidential reception and sending a fax to a confidential box in the receiving machine is cal...

Страница 50: ...ddress book screen appears touch the CONDITION SETTINGS key to display the condition settings screen p 8 2 Touch the CONFIDENTIAL TX key 3 Touch the or key to specify the confidential box number of th...

Страница 51: ...he ID code is not correct the message ID CODE IS NOT VERIFIED appears and you will return to the screen of step 4 To return to the screen of step 4 touch the CANCEL key 6 Press the START key Printing...

Страница 52: ...t of transmission can be reduced even more Sending a fax to a relay machine and requesting relay transmission is called the relay request function Receiving a fax and broadcasting it to a group of end...

Страница 53: ...h the CONDITION SETTINGS key to display the condition settings screen p 8 2 Touch the RELAY BROADCAST key 3 Touch the key of the relay group that you wish to use The selected relay group key is highli...

Страница 54: ...EN MACHINES SUPPORTING F CODES This machine supports the F code standard as established by the ITU T The F code standard makes it possible to perform special operations such as relay broadcast and con...

Страница 55: ...a document from that memory box you must know the sub address and passcode of that memory box Memory boxes are managed in this machine not only by sub addresses and passcodes which are number sequence...

Страница 56: ...e passcode of the other machine s memory box max 20 digits If a passcode has not been established for the other box this step is not necessary CREATING A MEMORY BOX FOR F CODE TRANSMISSION F code oper...

Страница 57: ...at security is provided by means of the sub address and passcode How F code polling memory works F code polling is when your machine calls another machine and retrieves a document that was scanned int...

Страница 58: ...an the document the key is highlighted and selected as the scanning destination Checking and deleting a document in a memory box The procedure for checking a document in an F code polling memory box b...

Страница 59: ...key to display the address book screen See ENTERING A SUB ADDRESS AND PASSCODE FOR A MEMORY BOX IN THE OTHER MACHINE on page 54 for the procedure for entering sub addresses and passcodes 4 Press the S...

Страница 60: ...ther party of the sub address SUB and passcode SID of your confidential memory box Omit the passcode if a passcode is not programmed in the box For Sagem s regular confidential transmission function w...

Страница 61: ...each digit is entered changes to If the print PIN you entered is correct the message PRESS START TO PRINT DATA appears If the passcode is not correct the message PIN IS NOT VERIFIED appears and you wi...

Страница 62: ...f the San Francisco office creates a relay broadcast memory box and programs the Oakland Berkeley and San Jose offices as end receiving destinations the overall phone charges will be lower than if the...

Страница 63: ...he document data is automatically cleared after transmission to all end receiving machines is finished USING THE F CODE RELAY REQUEST FUNCTION your machine requests a relay broadcast First ask the ope...

Страница 64: ...e sure you hear a click sound indicating that the cord is securely connected A different connection method is used in Hong Kong In Hong Kong insert the end of the extension phone cord into the adapter...

Страница 65: ...4 Lift the extension phone Or you can press the SPEAKER key ON HOOK DIALLING p 12 5 Dial the number of the other party or touch a rapid key You can also dial using the keypad on the extension phone Y...

Страница 66: ...on without breaking the connection Changing the reception mode to MANUAL 1 Press the CUSTOM SETTINGS key 2 Touch the RECEIVE MODE key 3 Touch the MANUAL RECEPTION key The MANUAL RECEPTION key is highl...

Страница 67: ...the other party begins transmission To adjust the receiver volume touch the VOLUME ADJUSTMENT key You will switch through 3 levels low medium and high 3 Replace the extension phone When reception is...

Страница 68: ...the PC FAX driver To open the manual click the Windows Start button select All Programs Programs in operating systems other than Windows XP SAGEM PC FAX Driver and then Operation manual This function...

Страница 69: ...d PROGRAMMING FREQUENTLY USED OPERATIONS on page 42 and the procedure for using relay groups is explained in SENDING FAXES USING THE RELAY REQUEST FUNCTION on page 50 A combined total of 500 rapid key...

Страница 70: ...GRAM key Storing a program key p 75 RELAY GROUP key Storing a relay group p 77 GROUP key Storing a group key p 73 AMEND DELETE key Rapid key p 72 Group key p 74 Program p 76 Relay group p 79 DIRECT AD...

Страница 71: ...6 Touch the desired index key Select one of the upper row of keys USER 1 through USER 6 to determine the location of the rapid key when the GROUP index is displayed instead of the ABC index p 80 The l...

Страница 72: ...aracters 14 Check the transmission settings The initial transmission settings are TRANSMISSION SPEED 33 6 kbps and INTERNATIONAL CORRESPONDENCE MODE NONE To change either of the settings touch the MOD...

Страница 73: ...you touch the NEXT key you will return to the screen of step 1 on page 69 When sending a fax to a foreign country telephone line conditions can sometimes distort the fax or interrupt the transmission...

Страница 74: ...WXYZ ABC GROUP CORPO TPS SAGEM D E F G H PROGRAM RELAY GROUP DIRECT ADDRESS AMEND DELETE NAME SAGEM SA S INITIAL DELETE EXIT INDEX USER 3 0666211221 3456 987654 FAX No KEY NAME SAGEM SA 33 6 kbps NONE...

Страница 75: ...hen a message appears asking if you want to delete the destination touch the YES key 5 Touch the outer OK key The number of destinations in the group appears to the right of the ADDRESS key 6 Check th...

Страница 76: ...with the numeric keys after touching the 10 KEY PAD key delete the destination from the list that appears when the ADDRESS REVIEW key is touched See step 4 on page 73 Rapid dial keys can also be dele...

Страница 77: ...message p 44 Sender p 46 Confidential transmission p 48 Relay request transmission p 51 4 Touch the OK key If you cannot edit or delete a group key If you attempt to edit or delete a group key in the...

Страница 78: ...e the edit delete screen for the selected program appears Touching the ADDRESS BOOK key returns you to the screen of step 2 4 To edit the program follow the same procedure as for storing the program T...

Страница 79: ...E key is touched the letter entry screen appears Enter up to 36 characters for the name See page 82 for the procedure for entering letters 2 Touch the RELAY STATION key The number entry screen for the...

Страница 80: ...two digits of the number Touch the or key to enter the number Continuing to touch the key makes the number change quickly The numbers entered will vary depending on the model used for the relay machi...

Страница 81: ...through 5 6 Touch the DELETE key 7 Touch the YES key To delete another relay group repeat steps 3 6 and 7 AMEND DELETE 1 1 PROGRAM RELAY GROUP DIRECT ADDRESS AMEND DELETE SELECT ADDRESS TO AMEND DELE...

Страница 82: ...he ADDRESS CONTROL key see steps 1 and 2 on page 67 2 Touch the CUSTOM INDEX key 3 Touch an index key USER 1 to USER 6 You can enter a name for the selected index When the index key is touched the let...

Страница 83: ...ey of the list you wish to print PRINT JOB IN MEMORY PLEASE WAIT UNTIL PRINT OUT appears in the message display and printing begins DATA LINE B STATUS CUSTOM SETTINGS Y T S L LIST PRINT RECEIVE MODE S...

Страница 84: ...the key to move the cursor back one space and then enter the correct character You can also press the AB ab 12 key during entry to enter a number or symbol 4 Touch the SPACE key The cursor moves forwa...

Страница 85: ...r entry screen and return to the programming screen If you touch the CANCEL key you will return to the programming screen without storing the entered characters NAME SPACE ABC abc CANCEL OK Sagem NAME...

Страница 86: ...You can also touch another character type selection key key or AB ab 12 key to enter characters other than numbers and symbols 3 When you have finished entering characters touch the OK key You will e...

Страница 87: ...sending PRINT OUT ALL REPORT NO PRINTED REPORT Receiving PRINT OUT ALL REPORT PRINT OUT ERROR REPORT ONLY Broadcasting PRINT OUT ERROR REPORT ONLY NO PRINTED REPORT Confidential reception NO PRINTED...

Страница 88: ...occurred PASSCODE E The connection was broken because the polling passcode was not correct RX NO POLL The machine that was polled does not have a polling function NO RX POLL The other machine refused...

Страница 89: ...es and sending receiving parties TIMER LIST Timer settings stored transmission jobs and recall jobs MEM POLLING LIST Documents scanned into polling memory and F code polling memory PASSCODE LIST Progr...

Страница 90: ...ner cartridge operation manual for copier CHANGE THE TONER CARTRIDGE The toner cartridge is out of toner and the received document cannot be printed Replace the toner cartridge THE MEMORY BECOMES FULL...

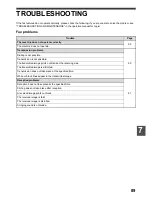
Страница 91: ...problems 90 Dialling is not possible Transmission is not possible The transmitted image prints out blank at the receiving side The transmitted image is distorted Transmission does not take place at t...

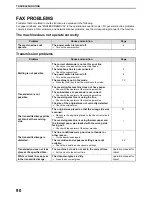
Страница 92: ...the receiving machine The sub address or passcode is not correct Check with the operator of the receiving machine The receiving machine is using the line Check with the operator of the receiving mach...

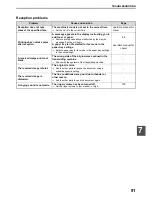
Страница 93: ...e in the paper tray settings Select a paper tray for fax mode in the paper tray settings in the user settings 88 operation manual for copier A received image prints out blank The wrong side of the ori...

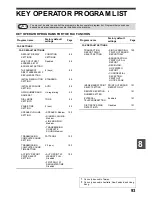
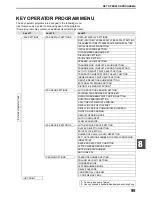
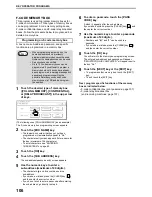
Страница 94: ...ion explains key operator programs for the fax features of the machine For key operator programs that are related to general operation the copy function the printer function and the network scanner fu...

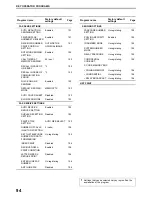
Страница 95: ...PEAKER VOLUME SETTING SPEAKER Medium RINGER VOLUME Medium LINE MONITOR Medium TRANSMISSION COMPLETE SOUND Medium 100 TRANSMISSION COMPLETE SOUND SETTING PATTERN 2 100 TRANSMISSION COMPLETE SOUND TIME...

Страница 96: ...MBER OF CALLS IN AUTO RECEPTION 2 calls 104 SET THE TELEPHONE NUMBER FOR DATA FORWARDING Un registering 104 INDEX PRINT Disabled 104 RECEIVED DATA PRINT CONDITION Enabled 104 LETTER SIZE RX REDUSE PRI...

Страница 97: ...RECEPTION NUMBER SETTING EXTERNAL TELEPHONE SETTING DISTINCTIVE RING DETECTION 2 FAX SEND SETTINGS AUTO REDUCTION SENDING SETTING PRINTING PAGE NUMBER AT RECEIVER DATE OWN NUMBER PRINT POSITION SETTI...

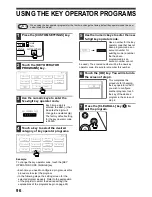
Страница 98: ...that has not been programmed as an account number for auditing mode a number that has been programmed as an account number cannot be used The entered number will be the new key operator code Be sure...

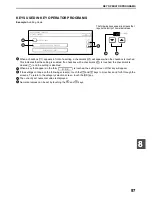
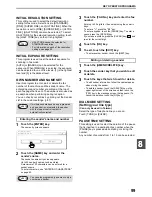
Страница 99: ...the form is touched the setting screen of that key will appear If the settings continue on the following screen s touch the and keys to move back and forth through the screens To return to the catego...

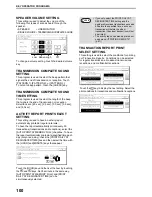
Страница 100: ...T ADDRESS KEY AT BROADCAST SETTING You can select whether or not the NEXT ADDRESS key must always be pressed before entering the next destination when performing a broadcast transmission p 28 If this...

Страница 101: ...ber Enter up to 20 digits for the number using the numeric keys To enter a press the key To enter a hyphen touch the PAUSE key To enter a space press the SPACE key If you make a mistake press the CLEA...

Страница 102: ...me way AUTO PRINT AT MEMORY FULL and PRINT DAILY AT DESIGNATED TIME can be simultaneously selected TRANSACTION REPORT PRINT SELECT SETTING This setting is used to select the conditions for printing ou...

Страница 103: ...ifferent ringing pattern for each number The setting is initially turned off In Taiwan Singapore Malaysia India Saudi Arabia UAE Bahrain Oman and Qatar this setting is turned off and cannot be turned...

Страница 104: ...hat have finished scanning When the program is disabled transmission will not begin until all pages have been scanned with the exception of manual transmission and direct transmission Quick On line p...

Страница 105: ...LS IN AUTO RECEPTION SET THE TELEPHONE NUMBER FOR DATA FORWARDING INDEX PRINT RECEIVED DATA PRINT CONDITION LETTER SIZE RX REDUSE PRINT ENTER JUNK FAX NUMBER ANTI JUNK FAX AUTO RECEIVE REDUCE SETTING...

Страница 106: ...YS p 69 INDEX PRINT This program is used to have an index black mark printed at the top of received fax pages The mark moves from left to right as pages are printed RECEIVED DATA PRINT CONDITION When...

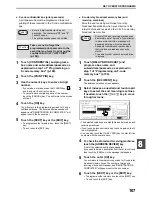
Страница 107: ...ed ID numbers This method can only be used if the other machine is also a Sagem machine excluding certain models Up to 10 ID numbers can be programmed To check the programmed ID numbers print out the...

Страница 108: ...6 To enter a passcode touch the PASS CODE key A slash appears after the sub address If you make a mistake press the CLEAR key and then enter the correct number 7 Use the numeric keys to enter a passc...

Страница 109: ...If needed touch the or key to move through screens The selected rapid keys are highlighted and stored as end receiving machines If you touch an incorrect rapid key touch it again so that it is not hig...

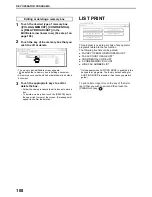
Страница 110: ...on LIST PRINT This program is used to print lists of key operator programs related to the fax function The following five lists can be printed FAX KEY OPERATOR PROGRAMS LIST FAX ACCOUNT USAGE LIST CON...

Страница 111: ...109 9 Chapter 9 APPENDIX This chapter contains reference information regarding the fax features of the machine...

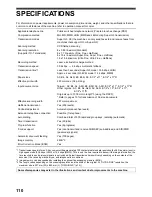
Страница 112: ...tbed scanning Scanning resolution Supports ITU T standards 8 x 3 85 lines mm Standard 8 x 7 7 lines mm Fine Fine Halftone 8 x 15 4 lines mm Super Fine Super Fine Halftone 16 x 15 4 lines mm Ultra Fine...

Страница 113: ...n 29 Fax mode 13 Fax receive settings 103 Fax send settings 101 Fax transmission Broadcast transmission 27 Cancelling 25 Confidential transmission 48 Direct transmission 15 F code transmission 52 Larg...

Страница 114: ...6 Group indexes 80 Group keys 73 Programs 75 Rapid dial keys 69 Relay groups 77 Programs 42 R Rapid dialling 12 17 Read end 14 Receiving party is busy 16 Reception Automatic reception 26 Extension pho...

Страница 115: ...ception 26 Manual reception 64 Sending faxes Basic procedure for sending faxes 13 Cancelling a fax transmission 25 Manual transmission 63 F code transmission F code relay broadcast transmission 60 Pre...

Страница 116: ...114...

Отзывы: