background image

6-8

Maintenance

Date en cours : 12 June 2006
\\osn01001\be31-doc\DOC 31 - En cours\Travaux en cours\URD31\Fax\MFL V3\LUs MFLV3 MF4640\LU 252 551 036A MFL_V3 FAX 4640

GB\Maintenance Gb.fm

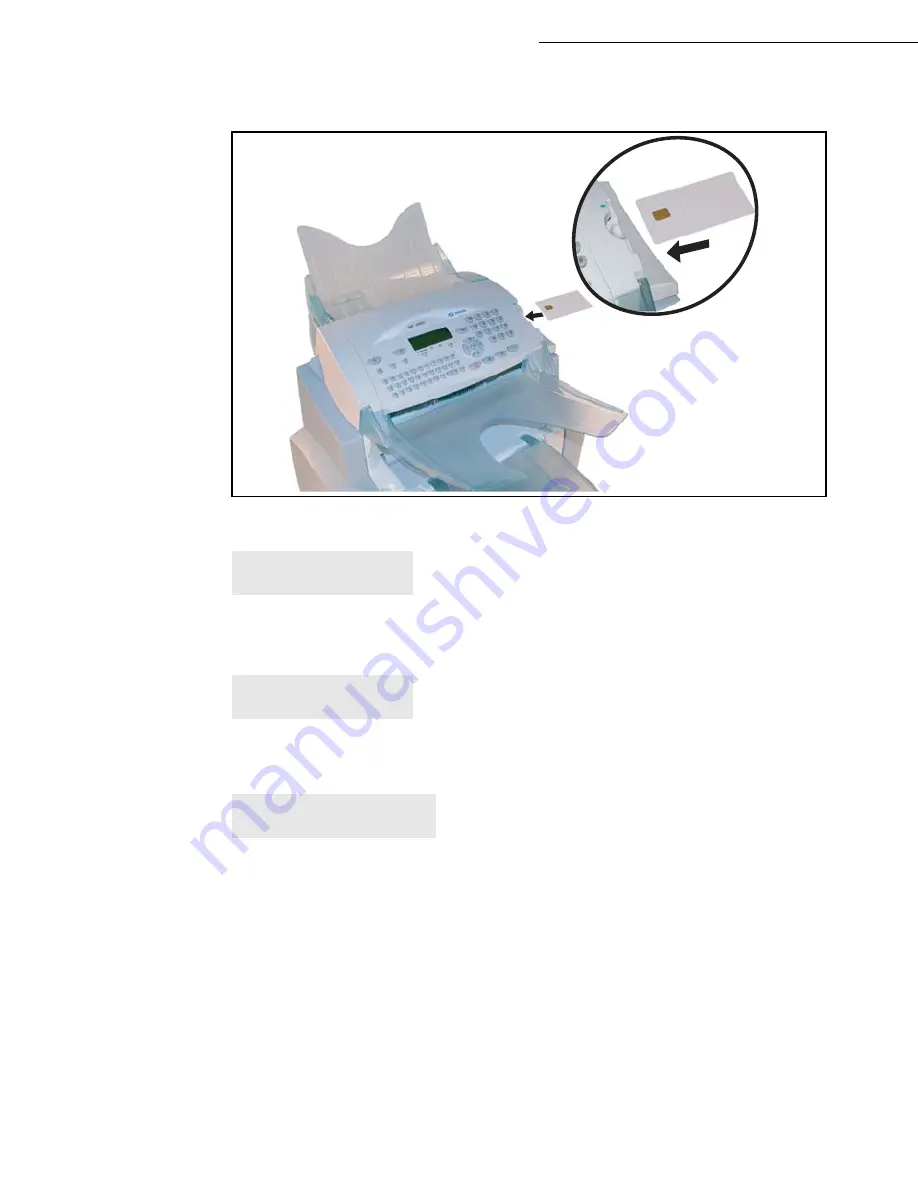
Insert chip card (supplied with the toner cartridge) into the card reader ensuring that the chip is
entered as shown in the illustration below. 

The following is displayed on the scanner control panel screen: 

Press

OK

.

Once the chip card has been read, the display shows: 

Remove the card.

Caution - 

If the following is displayed, check that you have inserted the chip card the right way up. 


CHANGE TONER?

YES = OK - NO = C

TONER OK

REMOVE CARD

CANNOT READ CARD

REMOVE CARD

Содержание FAX 4640

Страница 1: ...TELECOM User Manual SAGEM FAX 4640...

Страница 2: ...ess and its direct access directory We recommend that you read this Manual carefully in order to familiarise yourself with the various features and functions of your terminal List of accessories1 The...

Страница 3: ...selection 16 C key return to previous menu and correct data entry 17 or keys navigation keys 18 Alphabetical keypad 19 key enter or go to next line 20 key erase character before cursor 21 key Shift k...

Страница 4: ......

Страница 5: ...nstalling the second paper cassette unit option 1 12 Connections 1 14 Telephone connection 1 15 Power line connection and switch on 1 15 2 GETTING STARTED 2 1 Navigation methods 2 1 Presentation 2 1 T...

Страница 6: ...mbers 5 3 Transmission over the Public Switched Telephone Network PSTN 5 4 Immediate transmission 5 4 Sending in the eco mode 5 4 Delayed transmission 5 4 Transmission with auto redial 5 5 Rerouting 5...

Страница 7: ...ment code 5 19 Printing a department code 5 20 Printing the department report 5 20 Use of the department codes by a department 5 21 Charge code 5 22 Entering the charge code 5 22 Mail box MBX FAX 5 22...

Страница 8: ...VIRONMENT 7 1 Safety 7 1 Environment 7 2 The packaging 7 2 Batteries and rechargeable batteries 7 2 The product 7 2 Energy Star 7 2 The mark CE attests that the products comply with the essential requ...

Страница 9: ...1 INSTALLATION INSTALLING YOUR TERMINAL INSTALLATION REQUIREMENTS A proper location helps to ensure that your printer provides you with the long service life for which it is designed Double check to...

Страница 10: ...ors and areas subject to temperature and humidity extremes Choose a sturdy level surface where the printer will not be exposed to strong vibration Keep the printer away from any objects that might blo...

Страница 11: ...t Also make sure that cords and cables do not get into the terminal s mechanism Any of these conditions create the danger of malfunction and fire Always take care that paper clips staples or other sma...

Страница 12: ...e parts depicted below 1 Scanner output stacker 2 Printer output stacker 3 Printer paper feed tray 4 AC power cord model depending on country 5 Telephone line cord model depending on country 6 Fax pri...

Страница 13: ...y Maintenance Safety Contents Installation Pull out the two pads from the paper feed inlet Press the paper size guide on the right in order to push both paper size guides to the left or to the right P...

Страница 14: ...stacker Printer Printer paper feed tray Second paper cassette option Scanner AC power connector Phone cord AC power cord Scanner release button On Off switch Second cassette paper tray 500 pages Chip...

Страница 15: ...ntenance Safety Contents Installation INSTALLING THE REMOVABLE PARTS This section details the installation of the terminal s removable parts INSTALLING THE PRINTER PAPER TRAY Using the printer s left...

Страница 16: ...NG THE PRINTER OUTPUT STACKER With both hands slightly bend the centre part of the stacker upwards in order to insert its clips into the notches located on the upper part of the printer Release the st...

Страница 17: ...n INSTALLING THE DOCUMENT FEEDER FOR SCANNING Fit the stacker by inserting its two toes into the notches provided at the rear of the terminal INSTALLING THE ORIGINAL DOCUMENT OUTPUT STACKER Fit the ou...

Страница 18: ...ft or to the right Place a stack of paper into the tray In case of letterhead paper be sure to place the paper printed side up Secure the stack of paper by pushing the paper size guides against the ri...

Страница 19: ...ng on special paper such as 60 to 160 g m2 max colour paper or transparent film laser printer compatible you should load the paper manually one sheet after the other To do so Insert your sheet of pape...

Страница 20: ...ts in place Place the printer on top of the base unit Make sure to align the coupling pins of the base unit with the holes located underneath the printer Remove the cover from tray 2 Press down on the...

Страница 21: ...g started Directory Maintenance Safety Contents Installation Remark Be sure to use both hands whenever tray 2 is removed from or inserted into the second paper cassette unit Replace the cassette cover...

Страница 22: ...on CONNECTIONS Key to the diagram A Telephone line connector B AC power connector 1 Line cord model depending on country 2 AC power cord model depending on country Make sure the On Off switch is set t...

Страница 23: ...ax machine and the other end into the wall telephone socket POWER LINE CONNECTION AND SWITCH ON Caution Refer to safety procedures in the Safety and Environment Chapter Plug end of the main power cord...

Страница 24: ...1 16 Installation...

Страница 25: ...irectory Maintenance Safety Contents Installation 2 GETTING STARTED NAVIGATION METHODS PRESENTATION The navigator gives you access to the menus visible on screen The navigator This navigator has 5 key...

Страница 26: ...er the main menu M Select the next line in a menu Select the previous line in a menu Confirm entry and go to the following menu OK Return to the previous menu C Confirm and exit from the current menu...

Страница 27: ...FUNCTIONS Access to functions may be achieved in two ways Menu driven access Direct function access Menu driven access You may print the functions list to know the number of a function Press the M ke...

Страница 28: ...p 4 5 M 15 OK PRINT Print the directory p 4 5 M 16 OK SAVE LOAD Store the directory on a chip card 161 OK SAVE Save the directory to a chip card p 4 1 162 OK LOAD Load the directory from a chip card...

Страница 29: ...ON Activating or deactivating the answering machine p 3 6 383 OK ANSWER CODE Saving an access code p 3 6 M 39 OK REROUTING Rerouting of a document to a directory entry p 5 5 3911 OK ACTIVATION Gateway...

Страница 30: ...YBD Activate keyboard lock p 5 16 813 OK LOCK NUMBER Activate dialling lock p 5 17 M 82 OK COUNTERS See the activity counters p 5 14 821 OK PRINTED PG Printed pages counter p 5 14 822 OK SCANNED PAGE...

Страница 31: ...date and time the network type the language and check the others parameters shown hereafter BEFORE TRANSMISSION Date Time At any moment you may change the date and time on your fax machine To change t...

Страница 32: ...e about any change at the end of March and October You will just be informed of this change by a message on the screen The default for this parameter is NO Warning message On automatic changing to sum...

Страница 33: ...select the country M 201 OK SETUP GEOGRAPHICAL COUNTRY Select the required option and press the OK key to confirm Remark If the required language does not appear select the setting Others Network This...

Страница 34: ...tically dialled with each number Defining the minimal size and the local prefix M 252 OK SETUP NETWORK PREFIX You can change the default value for the minimal size of the company s outside numbers and...

Страница 35: ...d This function allows you to defer a fax transmission to off peak hours and thus reduce the cost of your communications The economy period via the telephone network at off peak hours is preset by def...

Страница 36: ...ted Reception without paper Your fax offers you the possibility to either accept or refuse document reception if your printer is unavailable no paper If your fax printer is unavailable you may choose...

Страница 37: ...agraph Document positioning page 5 1 Select M 37 OK FAX BROADCAST Enter the remote fax number where you will relay to or choose your dialling mode refer to paragraph Dialling page 5 2 and press OK Ent...

Страница 38: ...ome calls 4 ECHO PROTECT 1 WITH 2 WITHOUT If this parameter is on the on line echo will be reduced during long distance calls 6 EPT MODE 1 WITH 2 WITHOUT For some long distance calls satellite the on...

Страница 39: ...ber of rings to automatically start your machine 20 E C M 1 WITH 2 WITHOUT This parameter helps correct the calls made on disturbed telephone lines It is used when the lines are weak or too noisy Tran...

Страница 40: ...3 10 Setting your machine...

Страница 41: ...u may also group several names to build a subscriber list with up to 24 subscriber lists A subscriber list is made from the subscriber records already stored For all subscriber records or subscriber l...

Страница 42: ...your subscriber s name then validate with OK Remark You can stop the list creation at any time by pressing Enter the person s fax number1 and press OK to confirm Your subscriber s ID number will auto...

Страница 43: ...t M 12 OK DIRECTORY NEW LIST Your fax machine has just created a new list fill it in by first entering the name of this list then confirm with OK Remark You can stop a list or record creation at any t...

Страница 44: ...eys and validate your choice with OK Press OK to display the SUBSCRIBER 1 field and add or delete the subscriber as shown in the table hereafter Confirm the new list by pressing key CONSULTING A RECOR...

Страница 45: ...odification by pressing key but you will exit the menu and may not be able to modify the following lines DELETING A RECORD OR A LIST M 14 OK DIRECTORY CANCEL The directory appears in alphabetical orde...

Страница 46: ...4 6 Directory...

Страница 47: ...d the addressee will receive a blank page Remark Since the addressee s number is generally on the document to be transmitted you may also dial before positioning the document Place your original docum...

Страница 48: ...cter drawings Photo mode symbolised by Photo at the bottom of the display screen To be used for photo graphic documents To select the resolution mode Press key as many times as necessary to select the...

Страница 49: ...subscriber or subscriber list assigned to this number From the redial key You can redial one number among the last ten fax numbers you just dialled before For a fax number Tel in the Directory Press...

Страница 50: ...ase it stays lit when both faxes are in communication At the end of transmission the initial screen is displayed Delayed transmission This function allows you to transmit a document at a later time To...

Страница 51: ...with navigator or keys If not already done enter the subscriber number or refer to paragraph From the redial key page 5 3 to call back the last subscriber As soon as you hear the remote fax tone the...

Страница 52: ...OK key Tx forwarding This function is used to configure the machine so that any document transmitted by fax is also sent to a third party The recipient will be selected from the entries in your machi...

Страница 53: ...orage waiting to be transmitted or in deposit print the waiting queue to get the status of each document in the queue by either queue order number document name or number scheduled transmission time f...

Страница 54: ...whatever the type of transmission but varies depending on whether the transmission is a single call number or a multi call number For a single call number from the memory the document is erased from t...

Страница 55: ...tion the document face down refer to paragraph Document positioning page 5 1 Press key twice Sophisticated copy Position the document face down refer to paragraph Document positioning page 5 1 Press k...

Страница 56: ...NOT ASSEMBLED copies The ORIGIN parameter to choose the origin to be applied to the document CONTRAST to choose the photocopy contrast BRIGHTNESS is used to make your original document lighter or dark...

Страница 57: ...Y given in mm X 210 and Y 286 you will move the scanning zone as shown on the figure below Select the X and Y coordinates with keys or Set the required coordinates with the numeric keypad or or Confi...

Страница 58: ...o confirm OTHER FUNCTIONS LOGS The incoming and outgoing logs list the last 30 transmissions incoming and outgoing made by your machine An automatic print out will take place after every 30 transmissi...

Страница 59: ...rameters MEMORIZING A SEQUENCE OF KEYS You may memorize a sequence of keys for example to send a fax directly to one or multiple subscribers to call this subscriber or to get access to a specific menu...

Страница 60: ...osition the document refer to paragraph Document positioning page 5 1 Press the key COUNTERS At any time you may consult the activity counters of your machine To get access to the counters of the mach...

Страница 61: ...immediate poll program a delayed poll with a chosen time launch a multi poll either immediately or later Placing a document in deposit Insert the document to deposit in the feeder Select M 34 OK FAX P...

Страница 62: ...Confirm by pressing OK Confirm the interlock code by entering the code one more time Press OK to confirm Remark When a code is already registered the machine asks you to give the former code before al...

Страница 63: ...rtment codes The FAX 4640 can then monitor the usage for each department The master department code is used to setup and modify the department code information During the setup procedure you are promp...

Страница 64: ...tering the master1 code M 882 OK ADVANCED FCT DEPT CODES NEW DEPT The screen displays Using the browser s key select 00 Confirm by pressing OK The screen displays Press OK to confirm the line 8821 DEP...

Страница 65: ...by pressing OK The machine also asks you if you want to be able to modify the department name Press OK then the key to return to the main menu Deleting a department code The administrator can also de...

Страница 66: ...department report The administrator may print reports for all the departments created To do so M 884 OK ADVANCED FCT DEPT CODES PRINT Enter the administrator department number 00 and confirm by pressi...

Страница 67: ...inistrator If this code is correct the machine will grant you access to all the functionalities available except for menu 88 as this is reserved for the administrator If the access code does not corre...

Страница 68: ...number used by your PABX to access the telephone network for example 0 followed by a or pause When a charge code is used the transmission reports and the machine log printout contains the corresponden...

Страница 69: ...may perform MBX deposits or polls by depositing a document in a fax MBX transmit to deposit a document in a remote fax MBX perform document poll from a remote fax MBX MANAGEMENT Creating an MBX M 71 O...

Страница 70: ...AILBOXES DELETE MBX Select a free MBX out of the 31 MBX or enter the number of a free MBX directly 1 31 and confirm with OK Enter the code of the MBX if there is one and confirm with OK Press to confi...

Страница 71: ...uest to a remote MBX fax by pressing key In the case of an immediate transmission the document is sent immediately If the document is set for a postponed transmission the document will be stored in th...

Страница 72: ...5 26 p...

Страница 73: ...larly clean the inside For normal usage please respect the following rules Never leave the cover open unless required Do not attempt to oil the machine Always gently close the cover and avoid vibratio...

Страница 74: ...The toner cartridge and the drum cartridge come with a chip card After replacing a consumable item in the printer you need to inform the machine about its features Replacing cartridges Replacing the t...

Страница 75: ...using unit located inside the printer may become very hot during operation To avoid injury do not touch 2 Remove the drum toner cartridge assembly In order to protect the environment do not throw away...

Страница 76: ...by turning the blue locking clip in the direction shown in the illustration below 4 Separate the drum cartridge from the toner cartridge 5 Remove the new toner cartridge from its box holding it firmly...

Страница 77: ...machine Getting started Directory Maintenance Safety Contents Installation 6 Shake the toner cartridges alternately in the directions shown by the arrows in the illustration below 7 Remove the protec...

Страница 78: ...uality of your faxes and your local photocopies Caution Do not touch the metal parts located on the side of the toner drum cartridge set as shown below to prevent causing damage due to possible static...

Страница 79: ...nance Safety Contents Installation 9 Insert the toner drum cartridge in the printer as shown below 10 Close the printer cover pressing it carefully but firmly until it clicks into position Press OK on...

Страница 80: ...the illustration below The following is displayed on the scanner control panel screen Press OK Once the chip card has been read the display shows Remove the card Caution If the following is displayed...

Страница 81: ...our machine Getting started Directory Maintenance Safety Contents Installation Replacing the drum cartridge To replace the drum cartridge proceed as shown below When the display shows 1 Open the print...

Страница 82: ...artridges should be disposed of in accordance with local regulations concerning waste materials Caution The fusing unit located inside and at the bottom of the printer may become very hot during opera...

Страница 83: ...ould cause deterioration to the print quality of your faxes and your local photocopies Caution Do not touch the metal parts located on the side of the toner drum cartridge set as shown below to preven...

Страница 84: ...6 12 Maintenance 5 Insert the new toner cartridge in the drum cartridge until locked in place 6 Insert the toner drum cartridge in the printer as shown below...

Страница 85: ...Getting started Directory Maintenance Safety Contents Installation 7 Close the printer cover pressing it carefully but firmly until it clicks into position Press OK on the scanner control panel The d...

Страница 86: ...lustration below The following is displayed on the scanner control panel screen Press OK Once the chip card has been read the display shows Remove the card Caution If the following is displayed check...

Страница 87: ...ance Clean the printer regularly Caution Use a soft cloth to clean the printer Never use abrasive or corrosive detergents The fusing unit can become very hot during operation To avoid injury do not to...

Страница 88: ...der the fusing unit 4 Put the drum toner cartridge set back in place refer to paragraph Replacing cartridges page 6 2 5 Close the printer cover connect the power lead and power the machine using the s...

Страница 89: ...is operation when the quality of photocopied documents is no longer satisfactory M 80 OK ADVANCED FCT CALIBRATION Confirm your choice by pressing the OK key INCIDENTS COMMUNICATION ERRORS If the commu...

Страница 90: ...General codes Code 01 Busy or no fax answer This code appears after 6 unsatisfactory attempts Call later Code 03 User break A communication has been stopped by the user pressing the key Code 04 Non pr...

Страница 91: ...documents in the transmission queue Code 14 Memory full Received document memory full Code 15 Unknown mailbox number You wish to deposit a document in a subscriber s mailbox The mailbox number does no...

Страница 92: ...er CLOSE UPPER COVER PRINTER Close the rear upper cover of the printer DRUM NEAR END The drum cartridge is nearly worn out 10 use left TONER NEAR END The toner cartridge is nearly worn out 10 capacity...

Страница 93: ...Caution The fusing unit inside the printer can become very hot during operation To avoid injury do not touch Open the front cover of the printer Remove the toner drum cartridge set from inside the pr...

Страница 94: ...e feeders and trays The figures below show different type of paper jam you might experience when using your machine Remove any stuck sheets as shown by the arrow depending on where the paper jam occur...

Страница 95: ...tenance 6 23 Operation Setting your machine Getting started Directory Maintenance Safety Contents Installation At the paper tray At the manual feed tray Second cassette unit and paper tray option 2 1...

Страница 96: ...message REMOVE DOCUMENT appears on the control panel screen If jams often occur in a specific part of the unit the latter needs to be checked cleaned or repaired Open the scanner cover by pressing key...

Страница 97: ...by means of the key You receive a blank page Make a photocopy of a document if it is correct then your fax is functioning normally Call back the subscriber and have him resend the document It was prob...

Страница 98: ...ax capacity a normal capacity of 35 pages 80 g m2 Reception size A4 size Width 210 mm Length 297 mm Reception paper Plain paper copier type 80 g m2 Paper tray capacity 250 pages max 80 g m2 Second pap...

Страница 99: ...nts Installation Internet general specifications V90 modem up to 56 kbps TCP IP PPP protocols SMTP POP3 MIME protocols for E mails File format Image TIFF F for black white documents and JPEG for color...

Страница 100: ...6 28 Maintenance...

Страница 101: ...sposed of following the manufacturer s instructions Depending on the model the unit s mains plug may be the only way to disconnect the unit from the power network Therefore you must respect the follow...

Страница 102: ...ignated collecting centers THE PRODUCT The crossed bin symbol on the product indicates that it belongs to the electric and electronic equipment family The crossed bin symbol on the product indicates t...

Страница 103: ...e type of printed document and the average number of pages per print operation Drum cartridge The standard drum cartridge can produce up to 20 000 pages The initial drum cartridge that comes with the...

Страница 104: ...252551036A Data subject to change without notice Sagem Communication Soci t anonyme au capital de 300 272 000 480 108 158 RCS PARIS 27 rue Leblanc 75512 PARIS CEDEX 15 FRANCE www sagem com...

Отзывы: