


32
5. Make a test cut to verify that the ruler is lined up correctly.
General Operating Tips
•
For smooth, clean, chip-free cuts, you must use industrial carbide saw blades that are sharp. Dull or improperly
sharpened blades will cause chipping, unclean cuts, chatter, and motor overloading. If you are not sure that
a blade is sharp, replace it with a new/sharp one.
•
When you feed the material through the tool horizontally, or move the carriage over the material vertically, do
it slowly, smoothly, and (whenever possible) without stopping and in the direction of the arrows on the
carriage labels. Overfeeding results in poor-quality cuts, shortened blade life and motor overloading.
•
Be careful when setting material onto the rollers. Do not drop heavy material onto the rollers or damage to
the rollers may result.
•
For best results when sawing, place the work piece onto the tool with its backside facing you. This provides
the smoothest possible cut on the face side of the panel.
•
Panels being cut horizontally or vertically must always be fed against the rotation of the saw blade.
•
Vertical panel saws are intended for cutting
large
panels down to size. As the overall panel size becomes
smaller and smaller consider the “Midway fence” page 50 or other types of sawing tools as they become more
convenient and safer to use.
•
Refer to the Maintenance section for regular maintenance procedures.
Operating Procedure: Crosscutting
A crosscut is a vertical cut that must always be done from the top to the bottom of a work piece as shown on page
33, Fig. 34 and 35. (See also “General Operating Tips” above and “Capacities of the Tool”.)
To reduce the risk of injury, do not place your hands on or under the carriage or in the
path of the saw blade.
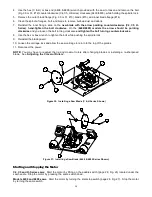
1.
Position the saw motor in the crosscutting position with the blade oriented vertically. See “Rotating the
Turntable”.
2.
Loosen the carriage lock and move the carriage to the top of the guides.
3.
Place the work piece on top of the rollers. Be careful not to drop the material on the rollers.
4.
Slide the work piece to the desired position, using the crosscut rulers or optional gauging systems (Stop Bar or
Quick Stop) as measures.
5.
Make certain that the work piece is adequately supported and stable in the machine. Refer also to “Capacities
of the Tool”. The work piece can be held with one hand.
6.
Do not hold the work piece so that your hand is anywhere behind the carriage or guides or in the path
of the saw blade!
7.
Start the motor (see “Starting and Stopping the Motor”), and allow it to reach full speed before beginning the
cut.
8.
When the motor has reached full speed, slowly and smoothly pull the carriage down so the blade runs through
the work piece. Keep one hand on the handle at all times and the other hand clear of saw carriage. Be
careful not to force the saw through the work piece, to avoid binding.


