


31
Rotating the Turntable on the Carriage
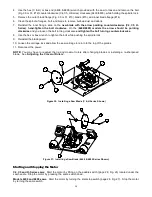
All saw models. Pull out both of the indexing pins (page 28, Fig. 26 & 27), and pivot the turntable until they snap
into the appropriate holes.
Moving the Carriage Up or Down
C4, C5, and H-Series saws. Use the handle attached to the motor body (page 28, Fig. 26).
Models 6400 and 6800 saws. Use the handle in front of the right guide tube, attached to the carriage in the far
upper right hand corner (page 28, Fig. 27).
Locking the Carriage
Lock the carriage by tightening the (carriage lock), (page 28, Fig. 26 & 27) lock knob:
•
On the C4, C5, and H-Series saws, located on the left guide tube.
•
On Models 6400 and 6800 saws, located on the right guide tube.
Adjusting the Crosscut Rulers
The saw has one rip ruler mounted vertically, and two crosscut rulers, one attached to the frame on each side of
the saw. The rip ruler is set at the factory, but the two crosscut rulers must be adjusted to the specific blade that is
mounted in the saw.
Unplug Saw before adjusting
Be sure the blade is installed before following these steps:
1.
Remove the blade guard (page 28, Fig. 26 & 27) so the blade is exposed.
2.
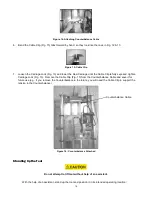
Loosen the carriage lock and lower the carriage as shown in Fig. 32.
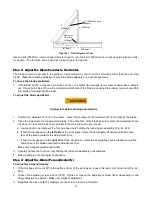
Figure 32: Adjusting the Crosscut Rulers
3. Use a square (#17) that measures at least 14” (356mm) on one side. Line up one edge of the square with the
tips of the saw blade, and the other edge of the square with the crosscut (horizontal) ruler. Slide the ruler (#19)
so that its measure matches the measure on the square. A magnet holds the ruler in place and allows the ruler
to be adjusted to various blade types. To prevent unauthorized adjustment, clear tape can be wrapped around
the ruler and frame.
4. Repeat the above steps to adjust the crosscut ruler on the other side (#20) of the tool.


