background image

18

2.6.4 CLOCKING WITH A WORK CODE

Make sure that the terminal is set to the desired In/Out status. Press the Work Code button (the default button is F5). Select a work code from the list and 
press


. After this the user needs to identify himself with fingerprint, RFID badge or pin code.

2.7 DAYLIGHT SAVING TIME

It is possible to have your terminal automatically change time for summer and winter time. There are two different ways to do this: by date/time, or by week/
day. The Date/Time mode is the easiest to set-up: just enter the date and time when daylight saving time begins and ends. The downside of this method 
is that these dates vary from year to year, meaning they have to be manually set into the terminal every year. Even though the Week/Day mode may seem a 
bit more complicated to set up, the big advantage is that the daylight saving time does not need to be entered again every year.


NOTE: ONLY THE SUPER ADMIN USER CAN EDIT DAYLIGHT SAVING TIME SETTINGS.

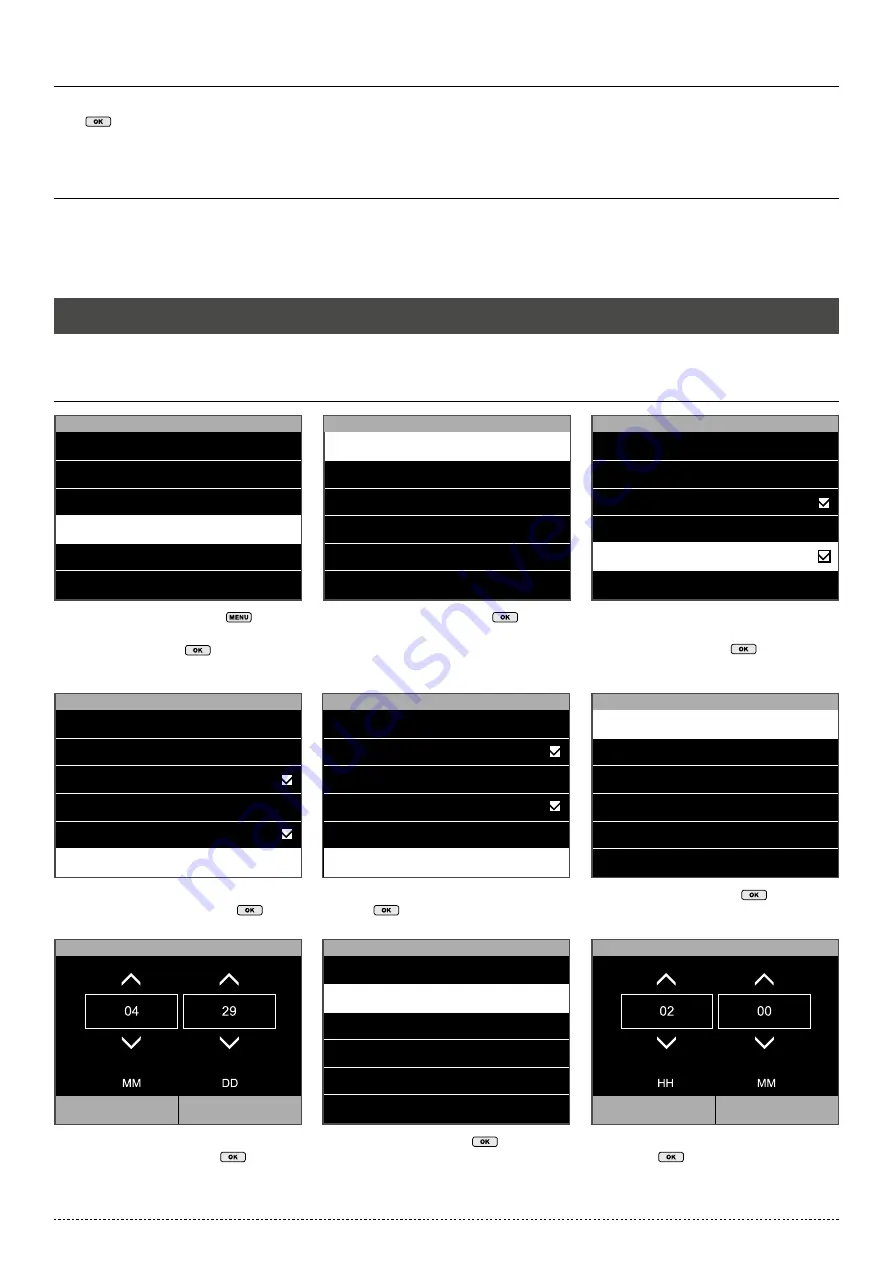
2.7.1 DAYLIGHT SAVING TIME: DATE/TIME SETTING


From the home screen, press 

 and 

identify as a 

super administrator

. Navigate 

to System, and press 

.

Navigate to ‘Daylight Saving Mode’, 
and select ‘By date/time’. Press 

.

Enter the date when the daylight saving time 
begins. Confirm by pressing 

.

Select ‘Date Time’ and press 

.

Select ‘Daylight Saving Setup’ and 
press 

.

Select ‘Start Time’, press 

.

Make sure that the ‘Daylight Saving Time’ 
option is checked. If not, navigate to Daylight 
Saving Time and press 

.

Select ‘Start Date’, press 

.

Enter the start time. Confirm by 
pressing 

.

1.

4.

7.

3.

6.

9.

2.

5.

8.

Main Menu

User Mgt.


User Role

COMM.

System

Personalize

Data Mgt.

System

Date Time

Attendance

Fingerprint

Reset

USB Upgrade

Date Time

Set Date 

28/04/14

Set Time 

16:21:35

24-Hour Time


Daylight Saving Time

Daylight Saving Mode 

By week/day

Date Time

Set Date 

28/04/14

Set Time 

16:21:35

24-Hour Time


Daylight Saving Time

Daylight Saving Mode 

By date/time

Daylight Saving Setup

Start Date 

03/29

Start Time 

02:00

End Date 

10/24

End Time 

02:00

Daylight Saving Setup

Start Day 

Sunday

Start Time 

02:00

End Month 

10

End Week  

5

End Day 

Sunday

End Time 

02:00

Date Time

Set Time 

16:21:35

24-Hour Time

Date Format 

DD/MM/YY

Daylight Saving Time

Daylight Saving Mode 

By date/time

Daylight Saving Setup

Set Date


  Confirm (OK) 

               Cancel (ESC)

Set Time


  Confirm (OK) 

               Cancel (ESC)

Содержание TA-8000 SERIES

Страница 1: ...MANUAL SAFESCAN TA 8000 Series TIME ATTENDANCE SYSTEM ENGLISH NEDERLANDS DEUTSCH FRANÇAIS ESPAÑOL ITALIANO PORTUGUÊS POLSKI ČESKY SZLOVÁK MAGYAR ...

Страница 2: ... on the terminal 13 2 ADVANCED USAGE SCENARIOS 2 1 User Management 14 2 2 Edit users 14 2 3 Delete users 15 2 4 Expiration Rule 15 2 5 Expiration Rule options 15 2 6 Using work codes 16 2 7 Daylight saving time 18 2 8 Custom user roles 21 2 9 Short Message Service 22 2 10 Customise the function keys 23 2 11 Punch State values 23 2 12 Menu shortcuts 24 2 13 Access control 25 2 14 Holidays 27 2 15 L...

Страница 3: ... purchasing the Safescan TA 8000 series Time Attendance terminal a complete solution for efficient time registration Before starting to install and use the TA terminal we recommend that you carefully read this user manual and keep it at hand for future reference The user manual describes the basic set up of the device the advanced settings and usage scenarios as well as details of each menu item o...

Страница 4: ...lf to the bracket 5 Plug the power adapter to the mains outlet the terminal will switch on automatically 4 Secure the terminal by fixing the screw at the bottom Depending on the model you can also choose to connect the terminal wirelessly to your network via WiFi Alternatively all models can also operate as stand alone devices whereby clocking data can be retrieved using a USB stick Please note th...

Страница 5: ... YY MM DD YY MM DD MM DD YY MM DD YY MM DD YY Main Menu User Mgt User Role COMM System Personalize Data Mgt Personalize User Interface Voice Bell Schedules Punch State Options Shortcut Key Mappings User Interface Language Lock Power Key Menu Screen Timeout s Idle Time to Sleep m Main Screen Style Set Time HH Confirm OK Cancel ESC MM SS YYYY MM DD 08 30 00 Comm Ethernet PC Connection Wireless Netwo...

Страница 6: ...per finger placement 1 5 INSTALLING THE TERMINAL IN YOUR NETWORK Network connection Your terminal can be connected to your network using either Ethernet Wired LAN or WiFi Wireless LAN depending on the model First of all your terminal needs to get an IP address from your network router To find a free IP address on your network you can use the DHCP protocol whereby your terminal is automatically ass...

Страница 7: ...onfirm OK Cancel ESC Main Menu User Mgt User Role COMM System Personalize Data Mgt COMM Ethernet PC Connection Wireless Network ADMS Ethernet IP Address 192 168 1 201 Subnet Mask 255 255 255 0 Gateway 0 0 0 0 DNS 0 0 0 0 TCP COMM Port 4370 DHCP Press the Windows key on your computer keyboard and type CMD in the search bar Press Enter 1 2 A small window will appear on your screen In this window typ...

Страница 8: ...to COMM using the arrow keys Press Select Wireless Network Press Make sure that the WiFi checkbox is checked A list of all available networks will be shown Select the network you want to connect to Wait for the connection to be established The terminal is now connected to the network using the WiFi connection The terminal will prompt you for the network password Enter the password using the keypad...

Страница 9: ...d empty and edit the user name at a later moment with the Safescan TA PC software Select Fingerprint and press Select Badge Number and press Select the finger you want to register using the arrow keys or the numeric keys then press The system will take your fingerprint 3 times in order to generate a reliable template When the enrol has been successful the system returns to the New User registratio...

Страница 10: ...nd press Select Date Time and press 1 2 Select Set Date and press Navigate between days months and years by using the left right arrows To set the values you can either increase or decrease the value with the up down arrows or enter the value directly with the numeric keyboard Press when finished 1 2 New User User ID 1 Name User Role Super Admin Fingerprint 0 Badge Number Password Password Please ...

Страница 11: ...igate between hours minutes and seconds by using the left right arrows To set the values you can either increase or decrease the value with the up down arrows or enter the value directly with the numeric keyboard Press when finished 1 2 1 1 Date Time Set Date 28 04 14 Set Time 16 21 35 24 Hour Time Date Format DD MM YY Daylight Saving Time Daylight Saving Mode By week day Set Time Confirm OK Cance...

Страница 12: ...e Work Code Autotest Download Access Data User Data Work Code Short Message USB Manager Download Upload Download Options The basic clocking scenario the screen of the terminal always displays the clocking status of the system IN or OUT is displayed at the top bar of the screen the corresponding symbol is also highlighted at the bottom of the screen The terminal has two default states IN and OUT If...

Страница 13: ...nload and press 1 3 2 Main Menu Access Control USB Manager Attendance Search Short Message Work Code Autotest Download Access Data User Data Work Code Short Message USB Manager Download Upload Download Options Insert a USB stick into the USB port at the left side of the terminal Wait for a few seconds until the USB stick is initialized Navigate to USB Manager and press Press and navigate to Attend...

Страница 14: ...ess It is now possible to edit all user data When you are finished press ESC The changes will be saved The device will display a list of all users in the terminal s memory To select a user navigate with the Up and Down keys or use the alphanumeric keys When you have found the right user press Select All Users and press 1 4 1 3 2 User Mgt New User All Users User 1 John Edit Delete User 1 John Edit ...

Страница 15: ...ey will receive a message on the screen stating that their credentials are invalid Keep user and audit future punch The user is kept in memory they will receive a message on the screen stating that their credentials are invalid but the punches will be still stored in the device Delete User The user will be deleted when the expiration rule is matched Select Expiration Rule make sure that the Expira...

Страница 16: ...t Then select Name and press Select New Work Code and press 1 4 3 2 Select Expiration Options and press OK The system will display the various expiration options None no expiration rule for this user Expiration date the user will become invalid at the selected date Entries The user will expire after the selected number of punches Expired Date and Entries The user will only be considered as valid d...

Страница 17: ...e you want to edit and select it by pressing Navigate to the work code you want to edit and select it by pressing 1 1 4 4 3 3 2 2 Main Menu USB Manager Attendance Search Short Message Work Code Autotest System info Work Code New Work Codes All Work Codes Work Code Options All Work Code 1 Customer s visit 2 Project 1 3 Meeting 1 Edit Delete Main Menu USB Manager Attendance Search Short Message Work...

Страница 18: ...and identify as a super administrator Navigate to System and press Navigate to Daylight Saving Mode and select By date time Press Enter the date when the daylight saving time begins Confirm by pressing Select Date Time and press Select Daylight Saving Setup and press Select Start Time press Make sure that the Daylight Saving Time option is checked If not navigate to Daylight Saving Time and press ...

Страница 19: ...to Daylight Saving Time and press Select Start Month press Select the month when daylight saving time begins 1 January 2 February etc In our example we need to select 3 for March Confirm your selection by pressing 1 4 3 6 2 5 Daylight Saving Setup Start Date 03 29 Start Time 02 00 End Date 10 24 End Time 02 00 Daylight Saving Setup Start Date 03 29 Start Time 02 00 End Date 10 24 End Time 02 00 En...

Страница 20: ...t and select the correct day Select Start Day press Select the desired day Sunday in our example Press Select Start Time press Enter the time when daylight saving time starts 02 00 in our example Confirm with 7 9 8 Daylight Saving Setup Start Month 3 Start Week 5 Start Day Sunday Start Time 02 00 End Month 10 End Week 5 Daylight Saving Setup Start Month 3 Start Week 5 Start Day Sunday Start Time 0...

Страница 21: ...ed User Role and press 4 7 6 5 User Defined Role 1 Enable Defined Role Name User Defined Role 1 Defined User Role User Defined Role 1 Enable Defined Role Name User Defined Role 1 Defined User Role Name Please Input Aa IN key to switch input method OUT key to enter space User Defined Role 1 User Mgt New User COMM All Users System Personalize MM DD YY Data Mgt Access Control From the home screen pre...

Страница 22: ...l be displayed to everyone clocking on the terminal or a personal message displayed only to selected users 7 8 From the home screen press and identify as super admin Select Short Message and press Select New Message and press To type your message select Message and press 1 3 2 Short Message New Message Public Message Personal Message Draft Message Message Options New Message Message Start date 29 ...

Страница 23: ...g action 2 11 1 LINK A PUNCH ACTION TO A FUNCTION KEY Select Function and press Tick the Punch State checkbox Select Punch State Value press 4 6 5 F6 Punch State Value 6 Function Punch State Name Set Switch Time F6 Function Personal Record Search From the main screen press and identify as super administrator Select Personalize and press 1 Select Shortcut Key Mappings press Select the key you want ...

Страница 24: ...ly Monday Tuesday Wednesday Thursday Friday Punch State Value Please input 0 250 Confirm OK Cancel ESC F6 Punch State Value 6 Function Punch State Name Set Switch Time F6 Punch State Value 6 Function Punch State Name Set Switch Time Monday Confirm OK Cancel ESC Select Function and press Tick the checkbox corresponding to the function you want to link to the key 4 5 F6 Function Personal Record Sear...

Страница 25: ...to be opened There are fifty available schedules in the machine By default schedule number one is used it allows door opening from Sunday 00 00 to Saturday 23 59 You can either edit this schedule or select another one to edit You can define the start and the end time for this day When you are finished confirm with or cancel with ESC To edit a different schedule just type its number in the search f...

Страница 26: ...e if special holiday schedules apply to this access group After all edits have been made press ESC twice to go back to the access control menu You will now have to register your new group in the combined verification list 4 From the main screen press and identify as super administrator Select Access Control and press 1 Select Access Groups and press Select New Group and press 3 2 Access Control Ac...

Страница 27: ...3 also belongs to Access Group 2 they use Verification Mode 2 linked to their group but is linked with Time Schedule 3 From the Access Control screen select Holidays and press 1 You can either add a new holiday period or consult the list of previously created holidays Select Add Holiday and press Edit the Start Date and the End Date and select a time schedule to link to this Holiday Press ESC when...

Страница 28: ...The terminal compares the fingerprint to all the templates in memory From the access control screen select Duress Options and press 1 Duress Function The alarm will be triggered if the user presses a key mapped as the Duress key before punching Please refer to the Customise the function keys section to learn how to map a key Alarm on 1 1 Match The alarm will be triggered if the user punches with a...

Страница 29: ...if the user is forced to open the door under duress 7 4 Apply Group Time Period It is possible to apply the group time period for the user or to select any other previously defined time period 8 All Users Displays a list of all users that are registered in the terminal and when required edit or delete any user 3 2 USER ROLE Create edit and activate custom user roles A maximum of three different us...

Страница 30: ...arding the way users clocking actions and data are handled 2 1 Duplicate Punch Period m Select the amount of time to ignore double clocking actions between 1 and 60 minutes 2 2 Attendance Log Alert Generates an alert when the available space becomes insufficient between 1 and 99 2 3 Cyclic Delete ATT Data Specify the maximum number of attendance records that can be deleted when their number reache...

Страница 31: ...lable 4 1 2 Manual Mode The status keys are switched manually the status disappears after the defined time 4 1 3 Auto Mode The terminal switches status automatically at the user defined times 4 1 4 Manual and Auto Mode The terminal switches status automatically at the user defined times It is also possible to switch the status keys 4 1 5 Manually The terminal switches back to the automatically def...

Страница 32: ...alarm The Duress Key can be linked to any function key of the device 6 2 Alarm on 1 1 Match The alarm will be triggered every time a user uses the 1 1 Match authentication process 6 3 Alarm on 1 N Match The alarm will be triggered every time a user uses the 1 N Match authentication process 6 4 Alarm on Password The alarm will be triggered every time a user uses the password authentication process ...

Страница 33: ...Keyboard Test the keyboard 5 Test Fingerprint Sensor Test the fingerprint sensor 6 Test Clock RTC Test the device clock 3 13 SYSTEM INFO Information about the terminal 1 Device Capacity Number of enrolled users administrators passwords fingerprint templates RFID cards and attendance logs 2 Device Info Various information of the device including the serial number the fingerprint algorithm and the M...

Страница 34: ...A TERMINAL 1 Share power with the lock 2 Do not share power with the lock 12V AGND AL AL NC COM NO SENSOR AGND BUTTON NC LOCK FR 107 12V AGND AL AL NC COM NO SENSOR AGND BUTTON NO LOCK FR 107 12V AGND AL AL NC COM NO SENSOR AGND BUTTON NC LOCK DC POWER DC POWER FR 107 12V AGND AL AL NC COM NO SENSOR AGND BUTTON NO LOCK FR 107 ...

Страница 35: ...35 3 Other connections DC POWER Exit Button Door Sensor Alarm 12V AGND AL AL NC COM NO SENSOR AGND BUTTON ...

Отзывы: