7
STANDBY/POWER ON/PAUSE
Sleep Mode:
When the oven is not in use, the digital display and start/stop light are off. If the
oven is not in use and the controls are not touched for 5 minutes, it will go to sleep.
Standby Mode:
When you press any of the buttons or turn any of the dials, the digital display
illuminates and the start/stop light flashes. This indicates the oven is ready to be started. If
the timer is at 0:00, the start/stop light will remain unlit and you’ll need to put time on the oven
before starting the oven.
Power On:
When you have selected your desired function and cook time and press the start/
stop button, the oven will power on and the start/stop light will illuminate. After 30 seconds,
the heating elements will glow. During operation, the heating elements will cycle on and off to
maintain the desired temperature.
Add Time:
To add time while the unit is running, turn the time/temp knob to add more time.
Change Temperature:
To change the temperature while the unit is running (in most functions),
press the time/temp knob to toggle to the “TEMP” setting then turn the time/temp knob to
change the temperature.
Pause:
When the start/stop button is pressed before the timer reaches zero, the heating
elements turn off. The start/stop light flashes. The display shows the time left on the cooking
cycle. To restart the cooking cycle, press the start/stop button and the start/stop light
illuminates and the timer starts again.
DIGITAL DISPLAY
When the digital display is showing temperature, “TEMP” is illuminated. When it is showing
time, “TIME” is illuminated. Toggle between showing time and temperature by pressing in the
time/temp knob.
Display while setting time:
The display shows hours and minutes.
Display while cooking:
For all functions, except for dehydrate,
the display shows minutes when above 20, up to a maximum of 90
minutes. Below 20 minutes, the display shows minutes and seconds.
BAKE FUNCTION
NOTE:
For best results, when baking or cooking, preheat the oven for at least 5 minutes at the
desired temperature setting.
NOTE:
This oven has been designed to cook rapidly. Please inspect your items earlier than the
prescribed cook time for a conventional oven to ensure that they do not get overcooked.
The default temperature for baking is 180°C. The range for the bake function is 70°C–230°C.
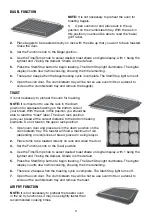
1.
Open oven door and place rack in the up position on the crumb/steam tray. With the rack
in this position you should be able to read the “bake/grill” label on the rack.
2.
Place items to be baked directly on wire rack or place pan on wire rack.
4
5
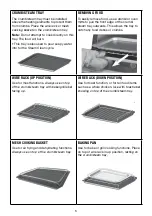
Crumb/steam tray
The crumb/steam tray must
be installed above the heat-
ing elements to protect them
from crumbs.
Place the wire
rack or mesh cooking basket
on the crumb/steam tray.
Note:
Do not attempt to cook
directly on this tray. The food
will burn.
• This tray is also used to
pour soapy water into for
the Steam Clean cycle.
Removing Food
To easily remove food, use a
utensil or oven mitts to pull
the front edge of the crumb/
steam tray outwards. This
allows the tray to catch any
food debris or crumbs.
Wire rack (up position)
Use for
most functions
.
Always use on top of the
crumb/steam tray with bake/
broil label facing up.
Wire rack (down position
)
Use for
toast function, or
for tall food items
such as a
whole chicken.
Use with toast label showing
on top of the crumb/steam tray.
Mesh cooking basket
Use for
air frying and
dehydrating
functions.
Always use on top of the
crumb/steam tray.
Baking pan
Use for
bake or broil
cooking
functions. Place on top of wire
rack in up position,
resting on
the crumb/steam tray
.
01:30
TIME
17:48
TIME


