background image

17

Spectrum Brands Australia Pty Ltd

Locked Bag 3004 Braeside
Victoria 3195 Australia

Customer Service in Australia

TollFree: 1800 623 118
Email: [email protected]
Website: www.spectrumbrands.com.au

Spectrum Brands New Zealand Ltd

PO Box 9817 Newmarket
Auckland 1149 New Zealand

Customer Service in New Zealand

TollFree: 0800 736 776
Email: [email protected]
Website: www.spectrumbrands.co.nz

Spectrum Brands Australia Pty Ltd and Spectrum Brands New Zealand Ltd

Warranty Against Defects

In this warranty:

Australian Consumer Law

 means the Australian consumer law set out in Schedule 2 to the 

Competition and Consumer Act 2010;

CGA

 means the New Zealand Consumer Guarantees Act 1993;

Goods means the product or equipment which was accompanied by this warranty and 
purchased in Australia or New Zealand, as the case may be;

Manufacturer

We

 or 

us

 means:

1.  for Goods purchased in Australia, Spectrum Brands Australia Pty Ltd ABN, 78 007 070 573;
 or
2.  for Goods purchased in New Zealand, Spectrum Brands New Zealand Ltd, as the case 

may be, contact details as set out at the end of this warranty;

Supplier means the authorised distributor or retailer of the Goods that sold you the Goods in 
Australia or in New Zealand; and
You means you, the original end-user purchaser of the Goods.
1.  Our goods come with guarantees that cannot be excluded under the Australian Consumer 

Law, or the CGA. You are entitled to a replacement or refund for a major failure and 
compensation for any other reasonably foreseeable loss or damage. You are also entitled 
to have the goods repaired or replaced if the goods fail to be of acceptable quality and the 
failure does not amount to a major failure.

2.  The benefits provided by this Warranty are in addition to all other rights and remedies in 

respect of the Goods which the consumer has under either the Australian Consumer Law 
or the CGA. The original purchaser of the Goods is provided with the following Warranty 
subject to the Warranty Conditions:

3.  We warrant the Goods for all parts defective in workmanship or materials for a period of 2 

years

 (Warranty Period) 

from the date of purchase.

If the Goods prove defective within the Warranty Period by reason of improper workmanship 
or material, we may, at our own discretion, repair or replace the Goods without charge.

Warranty Conditions

4.  The Goods must be used in accordance with the manufacturer’s instructions. This 

Warranty does not apply should the defect in or failure of the Goods be attributable 
to misuse, abuse, accident or non-observance of manufacturer’s instructions on the 
part of the user. As far as the law permits, the manufacturer does not accept liability 
for any direct or consequential loss, damage or other expense caused by or arising 
out of any failure to use the Goods in accordance with the manufacturer’s instructions.

5.  Exhaustible components (such as batteries, filters and brushes) of the Goods are 

included under this Warranty only where there is a defect in workmanship or materials 
used.

6.  The warranty granted under clause 3 is limited to repair or replacement only.
7.  Any parts of the Goods replaced during repairs or any product replaced remain the 

property of the manufacturer. In the event of the Goods being replaced during the 
Warranty Period, the warranty on the replacement Goods will expire on the same 
date as for the Warranty Period on the original Goods which are replaced.

8.  In order to claim under the warranty granted under clause 3 you must:

(a)  Retain this warranty with your receipt/proof of purchase; and
(b)  Return the Goods to us at the relevant address or to the Supplier by prepaid 

freight within the Warranty Period accompanied with (i) the legible and unmodified 
original proof of purchase, which clearly indicates the name and address of the 
Supplier, the date and place of purchase, the product name or other product serial 
number and (ii) this warranty.

9.  This warranty is immediately void if:

(a)  Any serial number or appliance plate is removed or defaced;
(b)  The Goods have been serviced or otherwise repaired by a person not authorised 

to do so by us or where non approved replaced parts are used.

10. The Goods are designed for domestic use only. The Goods must be connected to the 

electrical voltage requirements as specified in the ratings label  located on the Goods.

11. This warranty does not cover the cost of claiming under the warranty or transport 

of the Goods to and from the Supplier or us.

12. This warranty is only valid and enforceable in Australia against Spectrum Brands 

Australia Pty Ltd and in New Zealand against Spectrum Brands New Zealand Ltd.

Contact us or the Supplier for further details.

Register your product online

If you live in Australia please visit: www.spectrumbrands.com.au/warranty
If you live in New Zealand Please visit: www.spectrumbrands.co.nz/warranty
Registration of your warranty is not compulsory, it gives us a record of your purchase 
AND entitles you to receive these benefits: Product information; Hints and tips; Recipes 
and news; Information on special price offers and promotions.

Any questions? 

Please contact Customer Service for advice.

Содержание RHTOAF50

Страница 1: ...RHTOAF50_IB_FA_270522 Part No T22 9002510 2 YEAR WARRANTY RHTOAF50 INSTRUCTIONS WARRANTY EXPRESS AIR FRY EASY CLEAN TOASTER OVEN ...

Страница 2: ...from the power outlet when not in use 11 Always switch off and unplug from the power outlet and allow the oven to cool before cleaning 12 To disconnect set controls to OFF Switch off the wall power outlet then grasp the plug and remove from wall power socket Never pull by the cord 13 Do not operate this appliance with a damaged cord plug or after the appliance has malfunctioned or been dropped or ...

Страница 3: ...stem 33 For added safety electrical appliances should be connected to a power outlet that is protected by a residual current device RCD also often referred to as a Safety Switch Your switchboard may already incorporate an RCD If unsure call an electrician for verification and fitting if necessary This appliance is intended to be used in household and similar applications such as Staff kitchen area...

Страница 4: ... carefully and keep it for future reference Pass it on if you pass on the appliance When using this appliance basic safety precautions should always be followed 10 11 1 7 8 9 2 3 4 5 6 1 Door handle 2 Steam Clean button 3 Function knob 4 Digital display 5 Time Temp knob 6 Start Stop button 7 Baking pan 8 Wire rack 9 Crumb steam tray 10 Mesh cooking basket 11 Extra accessories can be tucked under t...

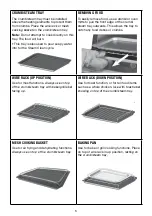
Страница 5: ...ch any food debris or crumbs Wire rack up position Use for most functions Always use on top of the crumb steam tray with bake broil label facing up Wire rack down position Use for toast function or for tall food items such as a whole chicken Use with toast label showing on top of the crumb steam tray Mesh cooking basket Use for air frying and dehydrating functions Always use on top of the crumb st...

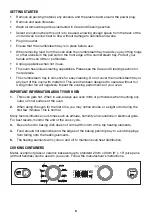
Страница 6: ...r any part of this oven with metal foil This oven has been designed to operate without foil Using metal foil will negatively impact the cooking performance of your oven IMPORTANT INFORMATION ABOUT YOUR OVEN 1 This oven gets hot When in use always use oven mitts or potholders when touching any outer or inner surface of the oven 2 When using the oven for the first time you may notice smoke or a slig...

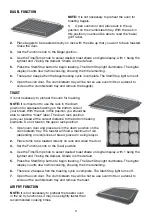
Страница 7: ...s oven has been designed to cook rapidly Please inspect your items earlier than the prescribed cook time for a conventional oven to ensure that they do not get overcooked The default temperature for baking is 180 C The range for the bake function is 70 C 230 C 1 Open oven door and place rack in the up position on the crumb steam tray With the rack in this position you should be able to read the ba...

Страница 8: ... 10 minute default 6 Press the Start Stop button to begin grilling The Start Stop light illuminates The digital display counts down while cooking showing the time remaining NOTE For best results when grilling meat turn over the meat half way through grilling 7 There are 2 beeps when the grilling cycle is complete The Start Stop light turns off The digital display reads 0 00 8 Unplug appliance when...

Страница 9: ... the door 3 Set the Function knob to the Toast position 4 Use the Time Temp knob to select desired toast shade on digital display with 1 being the lightest and 7 being the darkest Shade 4 is the default 5 Press the Start Stop button to begin toasting The Start Stop light illuminates The digital display counts down while cooking showing the time remaining 6 There are 2 beeps when the toasting cycle...

Страница 10: ...ing only the air fry mode as it would result in overcooking the outside and not fully cooked on the inside DEHYDRATE FUNCTION The default temperature for dehydrating is 70 C The range for the dehydrate function is 50 C 80 C NOTE Cut the food to even size and thickness NOTE Arrange your food in a single layer on the mesh rack for optimal dehydrating results 1 Place food on mesh cooking basket 2 Ope...

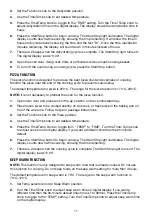
Страница 11: ...for the pizza function 1 Open oven door and place rack in the up position on the crumb steam tray 2 Place frozen pizza to be cooked directly on wire rack or fresh pizza in the baking pan on top of the wire rack Follow recipe or package instructions 3 Set the Function knob to the Pizza position 4 Use the Time Temp knob to set desired temperature 5 Press the Time Temp knob to toggle from TEMP to TIM...

Страница 12: ... up NOTE For very stubborn baked on food or grease see the Deep Cleaning Your Oven section below IMPORTANT Do not steam clean immediately after cooking Let the oven cool down NOTE Do not pour water on the crumb tray when the crumb tray is hot 1 Mix one drop of dish soap and 1 2 cup water Use distilled water if possible 2 Pour the soapy water onto the crumb tray Spread the water around the tray Mak...

Страница 13: ...y to deep clean your oven to remove baked on stains or grease 1 Ensure the crumb tray is in place but other accessories are removed 2 Create a mixture of 3 parts baking soda and 1 part water This will create a baking soda cleaning paste but it should not be too thick 3 Apply some of the paste to a paper towel sponge or nylon pad 4 Scrub the stained areas with the baking soda paste with medium pres...

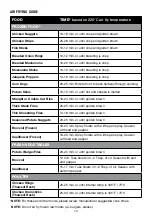
Страница 14: ...eak Fries 20 25 min or until golden brown Thin Shoestring Fries 14 18 min or until golden brown Seasoned Potato Nuggets 20 25 min or until golden brown Broccoli Frozen 18 20 min Spray florets with a little pan spray Season with salt and pepper Cauliflower Frozen 18 20 min Spray florets with a little pan spray Season with salt and pepper FRESH VEGETABLES Potato Wedge Fries 20 25 min or until golden...

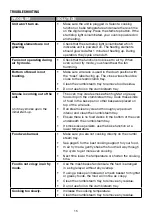
Страница 15: ... smoke upon the initial start up The oven may create smoke when high fat or greasy foods drip on the crumb steam tray Cook these kinds of food in the bake pan or other bakeware placed on top of the wire rack Run steam clean cycle and thoroughly wipe down interior and clean the crumb steam tray Ensure there is no food debris in the bottom of the oven underneath the crumb steam tray If smoke issue p...

Страница 16: ...tact details as set out at the end of this warranty Supplier means the authorised distributor or retailer of the Goods that sold you the Goods in Australia or in New Zealand and You means you the original end user purchaser of the Goods 1 Our goods come with guarantees that cannot be excluded under the Australian Consumer Law or the CGA You are entitled to a replacement or refund for a major failu...

Страница 17: ... by prepaid freight within the Warranty Period accompanied with i the legible and unmodified original proof of purchase which clearly indicates the name and address of the Supplier the date and place of purchase the product name or other product serial number and ii this warranty 9 This warranty is immediately void if a Any serial number or appliance plate is removed or defaced b The Goods have be...

Страница 18: ...1 RHTOAF50_IB_FA_270522 2 YEAR WARRANTY RHTOAF50 RECIPE BOOK EXPRESS AIR FRY EASY CLEAN TOASTER OVEN ...

Страница 19: ...egg mixture onto the center of the wrapper Fold the sides in to the center and then fold the point closest to you over the egg mixture Roll tightly away from you and seal the top point with more water to help seal the egg roll 4 Over a sink spray the mesh cooking basket with pan spray and then place the egg rolls on the basket Insert basket into oven 5 Turn oven to air fry set the time to 10 minut...

Страница 20: ...e up your bowls on the counter with the flour bowl first then the eggs and lastly the bowl with the breadcrumbs 7 Start by dredging the green beans in the seasoned flour then dipping in the eggs and lastly dredging in the breadcrumbs Place on the prepared baking pan Repeat the process until the beans are all coated 8 Transfer the coated green beans into the mesh cooking basket for the toaster oven...

Страница 21: ...epper in a large bowl Add the potatoes wedges and stir to coat Transfer the potatoes to the air fry basket and spread around so the wedges are not touching 2 Slide the mesh cooking basket into the oven Turn the function knob to air fry Turn the time dial to 25 minutes and press start 3 Potato wedges are done when they start to brown If the wedges are thicker it may take them a little longer than 2...

Страница 22: ...ady to use 2 On a cookie sheet place 2 of the Naan flatbreads Spread about 3 tbsp of barbeque sauce on each flatbread Sprinkle cup of pizza cheese blend over the sauce 3 Sprinkle cup of cooked shredded chicken over the cheese Sprinkle with caramelized onion and add cup of mozzarella cheese evenly over the top Repeat Steps 2 and 3 until all the Naan flatbread has been used 4 Place one flatbread piz...

Страница 23: ...ted garlic in another medium bowl Set aside 3 Put the panko crumbs in a medium bowl 4 Using a baking sheet pan line it with either parchment paper foil or plastic wrap and place it on the counter 5 Set the 3 bowls in a row starting with the flour mixture then the buttermilk mixture and last have the panko breadcrumbs The baking sheet pan should be next to the panko breadcrumbs Pro tip Sprinkle som...

Страница 24: ...u make the sauce 7 Make the sauce Whisk together all the ingredients in a small bowl until evenly combined or put all ingredients in a mason jar cover with the lid and shake until all ingredients are mixed Set aside until tenders are cooked 8 Turn on the toaster oven and set it to Air Fry Transfer some of the chicken tenders to the air fry basket spritz with pan spray and put it in the oven Cook f...

Страница 25: ...lemon juiced 2 Tbsp shredded parmesan cheese Directions 1 In a large bowl add broccoli oil salt and pepper Toss to coat 2 Place broccoli in the air fry basket Insert into the oven 3 Turn to air fry function set the time for 18 20 minutes press the start button and fry until florets are crispy 4 Carefully remove the air fry basket and return the broccoli to the large bowl Toss with lemon juice and ...

Страница 26: ...dd the parsley and cheeses to the sour cream mixture stir to combine Add the broccoli and cauliflower rice Stir to coat with cheese mixture Note if using bacon add at this time 3 Pour the mixture into a lightly greased 9x13 pan without handles Spread it evenly into the pan and set aside while making the panko topping 4 Panko topping in a small bowl combine the panko crumbs garlic paprika and parsl...

Отзывы: