Rumberger WP-1X Скачать руководство пользователя страница 10

E

  2

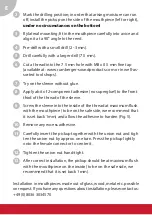
  Mark the drilling position; in order that arising moisture can run  


off, install the pickup on the side of the mouthpiece (left or right),  


under no circumstances on the bottom!

  3

  By lateral mounting, fit in the mouthpiece carefully into a vice and  


align it at a 90° angle to the reed.

  4


Pre-drill with a small drill (2 - 3mm).

  5

  Drill carefully with a larger drill (7.5 mm).

  6

  Cut a thread into the 7.5 mm hole with M8 x 0.5 mm fine tap  


(available at: www.rumberger-soundproducts.com or in well-as- 


sorted tool shops).

  7

  Try on the sleeve without glue.

  8

  Apply a bit of 2-component adhesive (no superglue!) to the front  


third of the thread of the sleeve.

  9

  Screw the sleeve into the inside of the thread at maximum flush  


with the mouthpiece (to be on the safe side, we recommend that  


it is set back 1mm) and allow the adhesive to harden (Fig. 5).

  10

  Remove any excess adhesive.

  11

  Carefully insert the pickup together with the union nut and tigh 


ten the union nut by approx. one turn. Press the pickup lightly  


onto the female connector to center it.

  12

  Tighten the union nut hand-tight.

  13

  After correct installation, the pickup should be at maximum flush  


with the mouthpiece on the inside (to be on the safe side, we  


recommend that it is set back 1mm).

Installation in mouthpieces made out of glass, wood, metal etc. possible 
on request. If you have any questions about installation, please contact us: 
+49 (0)8036 3034570

Содержание WP-1X

Страница 1: ...Montageanleitung Mounting instructions WP 1X WP 1Xa high end pickup for clarinet saxophone Vor Inbetriebnahme unbedingt lesen Please read this manual before use ...

Страница 2: ...rWP 1X vor der Montage anzusehen Einbau in Mundstücke aus Kunststoff oder Kautschuk für Klarinette 1 Vor dem Anzeichnen der Bohrposition Blattschraube mit Blatt montieren 2 Bohrposition wie in der Grafik Abb 1und Abb 2 markieren damit evtl entstehende Feuchtigkeit besser ablaufen kann den WP 1X WP 1Xa vorzugsweise seitlich links oder rechts mon tieren auf keinen Fall unten 3 Bei seitlicher Montage...

Страница 3: ...nabnehmer samt Überwurfmutter vorsichtig einsetzen und die Überwurfmutter ca eine Umdrehung zuschrauben Tonabnehmer durch leichten Druck auf die Anschlussbuchse eindrücken damit dieser zentriert wird 12 Überwurfmutter handfest anziehen 13 Nach richtigem Einbau sollte nun derTonabnehmer mit der Hülse und dem Mundstück innen bündig sein Einbau in Mundstücke aus Glas Holz usw auf Anfrage möglich Bei ...

Страница 4: ...sätzliche Punkte zu beachten Die Einbauposition des Tonabnehmers sollte möglichst so gewählt werden dass ein einfaches Anbringen der Blatt schraube gewährleistet ist Vor dem Anzeichnen der Bohrposition verwendete Blattschraube mit Blatt montieren Schieben Sie den S Bogen so weit wie möglich in das Mundstück umdengeeignetenEinbaubereich nachdemEndedesS Bogens für den Tonabnehmer zu ermitteln Abb 4 ...

Страница 5: ...ekundenkleber auf das vordere Drittel des Gewindes der Hülse auftragen 9 Hülse in das Gewinde maximal innen bündig mit dem Mundstück eindrehen wir empfehlen sicherheitshalber 1mm zurückgesetzt und Kleber aushärten lassen Abb 5 10 Gegebenenfalls überstehende Kleberreste entfernen 11 Tonabnehmer samt Überwurfmutter vorsichtig einsetzen und die Überwurfmutter ca eine Umdrehung zuschrauben Tonabnehmer...

Страница 6: ...Einbau in Klarinettenmundstücke Abb 1 Abb 2 Abb 3 Abb 4 Abb 5 Einbau in Saxophonmundstücke ...

Страница 7: ...nstallation video Rumberger WP 1X before mounting Installation in mouthpieces made of plastic or rubber for clarinet 1 Before marking the drilling position mount the ligature with reed 2 Mark the drilling position as you can see in the diagram fig 1 fig 2 in order that arising moisture can run off install the pickup on the side of the mouthpiece left or right under no circumstances on the bottom 3...

Страница 8: ...arefully insert the pickup together with the union nut and tigh ten the union nut by approx one turn Press the pickup lightly onto the female connector to center it 12 Tighten the union nut hand tight 13 After correct installation the pickup should now be flush with the inside of the sleeve and the mouthpiece Installation in mouthpieces made out of glass wood etc possible on request If you have an...

Страница 9: ...ber for saxophone 1 When fitting into saxophone mouthpieces additional points must be observed The mounting position of the pickup should be chosen in such a way that the ligature can be easily attached Before marking the drilling position mount the ligature used with the reed Slide the S neck at most into the mouthpiece to determine the possible mounting range after the end of the S neck for the ...

Страница 10: ... the front third of the thread of the sleeve 9 Screw the sleeve into the inside of the thread at maximum flush with the mouthpiece to be on the safe side we recommend that it is set back 1mm and allow the adhesive to harden Fig 5 10 Remove any excess adhesive 11 Carefully insert the pickup together with the union nut and tigh ten the union nut by approx one turn Press the pickup lightly onto the f...

Страница 11: ...Mounting in clarinet mouthpieces fig 1 fig 2 fig 3 Mounting in saxophone mouthpieces fig 4 fig 5 ...

Страница 12: ...Service Support Rumberger Musikinstrumente Vertriebs GmbH Ried 2 D 83134 Prutting 49 0 8036 3034570 49 0 8036 3034571 info rumberger soundproducts com www rumberger soundproducts com Made in Germany ...

Отзывы: