Rugged CCTV Workhorse 120-8 Скачать руководство пользователя страница 95


94 


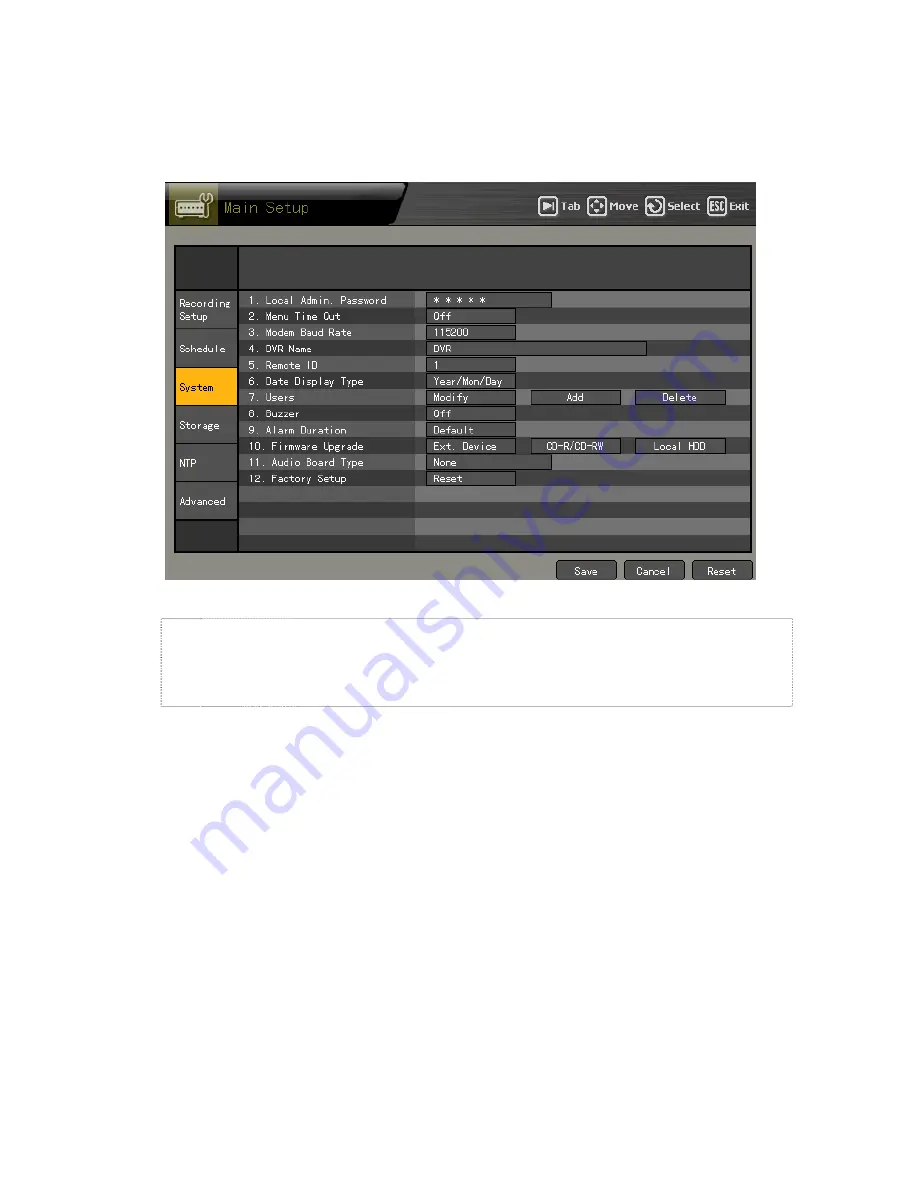
(1) Selecting the System menu 


On the 

{Main Setup}

 menu, select 

{System}

 and press the 

[Select]

 button. 


(2) Local administrator password 


Local 
admin 

ƒ

The local system administrator’s default password is “00000.” 

ƒ

The local administrator can use all features including System Setup, 

System Power ON/OFF, Monitoring, and Viewing Recorded Video. 

Remote access is not supported, however.Recorded Video. 

Содержание Workhorse 120-8

Страница 1: ......

Страница 2: ...and peripheral devices connect and disconnect the cables as instructed in this manual All cables must be connected to grounded outlets 2 Install the DVR such that it is easy to disconnect the power co...

Страница 3: ...nnect the power cable and turn off the power of the DVR completely 2 Keep the product away from heat sources such as heaters 3 Do not use a damaged power cord 4 To prevent and minimize trouble due to...

Страница 4: ...model the product without permission IT WILL VOID YOUR WARRANTY 10 Incorrect system setup may cause undesirable effects 11 Shut down the system properly as instructed in this manual 12 The UPS power s...

Страница 5: ...a D RW 17 Chapter 3 Operation and Setup Tools 18 3 1 Front Buttons 18 3 2 Remote Control 19 3 3 Mouse 21 Chapter 4 System Operation 22 4 1 Starting and Shutting down the System 22 4 1 1 Starting the S...

Страница 6: ...4 Starting and Stopping Record All 41 4 7 5 Watermark 42 4 8 Search 43 4 8 1 Selecting Search Mode 43 4 8 2 Search Method 44 4 8 3 Selecting the Search Tool 44 4 8 4 Multi channel 47 4 8 5 Multi hour...

Страница 7: ...Access 128 1 2 Description of the Basic Features 130 1 3 Audio 131 1 4 Color Adjust 131 1 5 DVR Network Setting 132 1 6 Viewing a Divided Screen 133 1 7 Search and Playback 136 Search Method 137 Sear...

Страница 8: ...splay 120fps recording z Resolution NTSC 320 240 640 240 640 480 PAL 320 288 640 288 640 576 z Compression type MPEG4 video G 726 audio z Backup Copy Ethernet IEEE1394 USB2 0 Built in CD RW DVD RW z S...

Страница 9: ...nts After unpacking the product check whether the following accessories are included 1 Basic panels 2 Optional panels Rack Mounting Handle DIO Sensor Relay Extension Module DIO Sensor Relay Extension...

Страница 10: ...ght is ON when the remote control is accessing the DVR 2 Network The green light is ON when the DVR is being accessed through the network 3 Backup The green light is ON when the DVR is making a backup...

Страница 11: ...tion for system upgrade Interface with POS ATM MTRIX D SUB 9 pIN 6 RS485 PTZ camera control cable connection RJ 11 6 pin 7 TV CCTV monitor connection BNC 8 Spot SPOT monitor output connection BNC 9 Li...

Страница 12: ...extension board DIO 7 IEEE1394 device IEEE1394 1 The inputted video type must be either NTSC or PAL these two types must not be used together 2 The inputted video type NTSC PAL is automatically recogn...

Страница 13: ...type extension cable A External sensor connection option The sensor relay extension board consists of 16 sensor input ports and 4 relay output ports Sensor Relay extension board Sensor input port Up 1...

Страница 14: ...vice Output Port Ground Port Relay 1 R1 R1_COM Relay 2 R2 R2_COM Relay 3 R3 R3_COM Relay 4 R4 R4_COM Relay types include Normal Close NC or Normal Open NO For more information on relay setting select...

Страница 15: ...FF the DVR and disconnect the power cord 2 Never touch a grounded metallic object when installing the HDD may cause the body to absorb static electricity which in turn can cause problems in the DVR 3...

Страница 16: ...ng OFF the power shut down the system first Unscrew and open the upper case Unscrew the hard drive bay using a screwdriver and separate the hard drive bay from the body Insert the hard drives into the...

Страница 17: ...nector 0 Connector 1 2 Installing two HDDs System Master Slave Primary Master E IDE Connector 0 Connector 1 2 Connecting two hard drive connection cables 1 Installing three HDDs System Master Slave Pr...

Страница 18: ...3 Manage Local Storage Device For more information see 5 System Setup 5 1 Main Setup 5 1 5 Storage Device 2 2 3 Installing a CD RW Unscrew and open the upper case Screw in the CD RW DVD RW on the fron...

Страница 19: ...Backup The green light is ON when the DVR is making a backup 4 HDD The green light is turned ON when the hard drive is operating 5 Alarm The red light is ON when an alarm is triggered 6 CD RW DVD RW C...

Страница 20: ...up the recording recording schedule and system APP SETUP APP setup Used to set up the PTZ and network PTZ PTZ Changes the PTZ camera control mode SEARCH Search Searches recorded images Move Moves an...

Страница 21: ...Record Used to record all channels or stop recording all channels BACKUP Backup Used to back up the stored video data in Search mode STATUS Status Used to view system information or change the displa...

Страница 22: ...tup Sets the data recording status and system 3 Additional setup Used to set the PTZ and network 4 PTZ Changes the PTZ camera control mode 5 Search Searches recorded images 6 Log Used to view the syst...

Страница 23: ...s password using the numeric buttons Once the correct password is inputted the system is initialized and the initial screen appears After the system is initialized and started the video of all connec...

Страница 24: ...all lights on the front panel blink and a warning sound is generated for approximately 20 seconds before the system shuts down If an incorrect password is inputted a warning message is displayed follo...

Страница 25: ...eo Download network file Network access File download Main setup Additional setup Data setup Recording schedule System Storage device NTP Advanced setting PTZ camera Network setup Network PTZ control...

Страница 26: ...hown below Select the login account and enter the password using the numeric buttons on the remote control 1 The default password of the local administrator is 00000 2 Go to the ID selection box and p...

Страница 27: ...he arrow up button each time causes the next screen to be selected Double click the desired video on the channel Double click any area on the View All window to convert into a 9 divided screen 4 divid...

Страница 28: ...e corresponding numeric buttons enables viewing the main channel 9 divided screen 1 screen Press the button on the remote control On the 9 divided screen double click the channel to convert into a ful...

Страница 29: ...ogin account enter the password using the numeric buttons on the remote control and click OK 1 The default password of the local administrator is 00000 2 Go to the ID selection box and press the Arrow...

Страница 30: ...p Data 1 4 Recording Audio and choose the desired channel Afterward click the Select button On the channel selection box select the audio channel and save it 4 4 2 Audio Live Select the Audio button o...

Страница 31: ...with the voice set on the real time monitoring window as shown below Change the window using the arrow STW X buttons and click the Select button to select an audio channel The real time monitoring scr...

Страница 32: ...owing setup menus to be displayed Channel selection window Activation mode The channel selection window can be moved At this time the border of the channel screen is displayed in orange Selection mode...

Страница 33: ...ware version equipment type 5 Front firmware version Firmware version on the front panel 6 Video mode Video mode NTSC PAL 7 HDD information Hard drive Total space Total space Used space Used space Fre...

Страница 34: ...rast To shift to contrast control mode press the Status button as shown below Select the channel on the monitoring screen to adjust the contrast Adjust the contrast using the arrow W X buttons Go to t...

Страница 35: ...the CCTV monitor screen up down right or left as shown below Press the Status button to shift to TV control mode as shown below Adjust the CCTV monitor screen using the arrow buttons as shown below A...

Страница 36: ...ss transparency and color To display hide the border press the Status button as shown below Press the Select button On the setting menu select the desired item using the arrow ST buttons After selecti...

Страница 37: ...5 9 Reset Resets the Status settings Press the Status button to shift to reset mode as shown below Press the Select button On the message window select Yes or No using the arrow STW X and Select butt...

Страница 38: ...event Logs related to recording such as detection of motions sensor and sound 3 Network Logs related to network operations such as network login network logout and network live 4 Failure Logs related...

Страница 39: ...time On the other hand a blue triangular icon is displayed on the date each time a change is made in the date on the calendar window Otherwise a red triangular icon is displayed on the unchanged date...

Страница 40: ...ge using the TAB buttons Press the Play button on the selected log to play the recorded video for the corresponding time On the recorded video screen press the Play button Recorded video is played eac...

Страница 41: ...the event frame setting in case of input signal from an external sensor Sound Recording is done based on the event frame setting in case sound is detected 4 7 2 Recording Setup Go to the Main Setup Da...

Страница 42: ...press the Record button on the remote control or on the Record menu in real time monitoring mode 1 Stopping All Recordings Press the Record button on the remote control or on the menu On the login wi...

Страница 43: ...y is used Fragile Watermark technology detects the locations and types of counterfeited or altered video It has been designed for purposes of authentication and to guarantee integrity or the video In...

Страница 44: ...initial menus of the search mode are then displayed as shown below Activation mode and Selection mode Activation mode The field can be moved or selected on the OSD menu At this time the border or the...

Страница 45: ...video of multiple channels for a defined time Multi date Searches the video of one channel for multiple dates in a certain time zone Multi hour Searches the video of one channel for the multiple time...

Страница 46: ...wn below Green Continuous recording is done Red Motion is recorded Blue Sensor signals are recorded Yellow Sound is recorded Light blue This shows that recording was done before the time was changed C...

Страница 47: ...hannel using the arrow WXST buttons 2 Search using the file list Select the search date The list of recorded one hour videos is then displayed as shown below Navigate on the screen using the arrow WXS...

Страница 48: ...deo file recorded based on the current system time Old_NUM Video file recorded based on the old system time 4 8 4 Multi channel Search the video of multiple channels for the defined time 1 Date search...

Страница 49: ...the changed folder is searched by the status bar the bar for the corresponding time zone is displayed in light blue as shown below 2 Selecting a changed time causes a list including the updated folder...

Страница 50: ...d channel Select the date The time and channel of the selected date are then displayed as shown below Define the time and channel using the arrow STWX buttons 3 Minute The video recorded by the hour o...

Страница 51: ...me and channel Select the date The date list time and channel are then sorted in descending order Set the start time and channel using the arrow STWX buttons 3 Minute The recorded video of the selecte...

Страница 52: ...search and play however either Multi channel Multi date or Multi hour mode may be used Search In Search mode select Multi channel Multi date or Multi time To play in Search mode set the date time or...

Страница 53: ...52 1 Multi channel Multi time...

Страница 54: ...tial playback screen in Multi channel mode is then displayed 3 Hot playback Press the HOT PB button on the remote control or click Play on the real time monitoring screen Press the HOT PB button on th...

Страница 55: ...se Used to play backward x1 and to rewind x30 Speed down Used to decrease the playing speed Speed up Used to increase the playing speed 2 Controlling the playing speed A Increasing Decreasing the spee...

Страница 56: ...ub screens Press the button on the remote control Pressing this button enables changing the screen Double click the desired channel for a full screen view Double click any area on the View All window...

Страница 57: ...udio symbol is then displayed for the channel with the voice recording set together with an orange colored activation window Drag the cursor to the upper right corner On the popup menu select the Audi...

Страница 58: ...o recorded on the selected channel is then played 4 9 5 Mute Use Mute to block the sound of the selected channel In Play mode press the Mute button on the remote control Drag the cursor to the upper r...

Страница 59: ...e button The Audio Output icon is then changed as shown below 4 9 6 Smart Search Use Smart Search to search the motion of objects in a certain zone quickly In Play mode select the Search button on the...

Страница 60: ...59 Drag the cursor to the upper right corner On the popup menu select the Smart button Select the channel to be searched...

Страница 61: ...one press the Select button The user can set up to four search zones Right click the green zone or press the Main Setup button on the remote control to set the motion degree There are five motion degr...

Страница 62: ...ch zone where motion is detected turns green The user can play the video searched via Smart Search using the following Search buttons 4 9 7 Digital Zoom in The user can enlarge a certain panel of the...

Страница 63: ...a channel using the arrow WX buttons and press the Select button The selected channel is then displayed The user can zoom in out the video from X2 X4 up to X by pressing the Zoom button The user can s...

Страница 64: ...B2 0 or IEEE1394 interface an external CD RW DVD RW or any other storage device to the USB2 0 port on the front side Refer to the appendix for the list of supported external devices Select Search Mult...

Страница 65: ...ow WX buttons or pressing the Select button Note To back up a channel or cancel backup go to the backup channel by using the arrow buttons and press the Select button The backup channel is then displa...

Страница 66: ...corresponding backup information is then displayed Check the backup information and click Yes on the message window as shown below If the backup device is not formatted or in case the storage space is...

Страница 67: ...s after the following message appears After backup is completed press the Select button on the message window as shown below Once the following message appears separate the backup device from the USB...

Страница 68: ...annel selection window as shown below If the PTZ camera is not set for the channel the following message window appears Channel selection window Activation mode The channel selection window can be mov...

Страница 69: ...the right left Tab buttons 4 Preset Use Preset to save the horizontal vertical extended focus settings of a PTZ camera In horizontal vertical rotation zoom or focus control mode press the Select butto...

Страница 70: ...ue in horizontal vertical rotation zoom or focus control mode In horizontal vertical rotation zoom or focus control mode press the numeric buttons 9 0 on the remote control The current screens are the...

Страница 71: ...g system environment and other major features 5 6 1 Starting the Main Setup In real time monitoring mode select the Main Setup button on the remote control The login window is then displayed as shown...

Страница 72: ...Recording Setup supports two modes data mode and channel mode A Selecting the menu type Navigate by pressing the TAB and arrow WX buttons on the remote control Select the Change button of the data mod...

Страница 73: ...l mode The user can set the data of Channel Nos 1 4 based on four channel groups as shown below 2 Saving the recording setting Set each menu in Recording Setup and save the new setting before exiting...

Страница 74: ...to Data 4 The selected data are then displayed in green and others in blue D Saving on the message window Closing the window without saving the new setting causes a warning message to appear as shown...

Страница 75: ...nputting the data select Save and Exit using the arrow STWX buttons or Tab button and save the setting by pressing the Select button 4 Hiding a channel Hides the channel video on the real time monitor...

Страница 76: ...Select button To set all channels at the same time select Title and press the Select button On the selection box select On or Off and press the Select button On Connects the inputted video of the came...

Страница 77: ...y using the arrow and Select buttons Resolution by video type Type Resolution NTSC PAL CIF 320x240 320x288 Field 640x240 640x288 Full 640x480 640x576 B Recorded video quality Sets the quality of the r...

Страница 78: ...ting Motion Recording done based on the event frame setting in case motion is detected Sensor Recording done based on the event frame setting in case of inputted signal from an external sensor Sound R...

Страница 79: ...ct Mode and press the Select button On the selection box set the recording frame using the arrow ST and Select buttons D Recording frame Recording frames include the normal type and event type Normal...

Страница 80: ...cting audio input from an external device connected to the system On the Main Setup Data 1 4 Recording Audio menu select the desired channel and press the Select button On the selection box select the...

Страница 81: ...press the Select button To set all channels at the same time select Motion and press Select On the selection box select Full using the arrow ST and All buttons Partial Used to detect motion only in a...

Страница 82: ...rrow ST and Select buttons The user can cancel the selected areas Put blue focus on motion detection zone and double click it Set up a portion of motion zone to delete and click it Select the zone and...

Страница 83: ...west Low Medium High and Highest the levels are decided based on the proportion of pixels with motion detected to the entire block The higher the grade the more accurate the detection of motion is B S...

Страница 84: ...ion box set the sensor type using the arrow ST and Select buttons Normal Close NC Opens in case of incoming signal when closed normally Normal Open NO Closes in case of incoming signal when opened nor...

Страница 85: ...channel using the arrow ST and Select buttons To adjust the audio sensitivity of each channel select Sound and press the Main Setup button On the selection box select the audio channel using the arro...

Страница 86: ...the selection box set the time using the arrow ST and Select buttons 8 Alarm generation Used to generate alarms through the buzzer mail or relay in case of an event A Buzzer Used to sound the buzzer...

Страница 87: ...f an alarm or an event On the Data Setup Data 1 4 Generate Alarm Mail menu select the desired channel using the arrow STW X buttons and press the Select button To set all channels at the same time sel...

Страница 88: ...he selection box set the event type and turn it ON or OFF using the arrow ST buttons and Select button D Relay Runs the alarm device connected to the DIO board in case of an alarm or an event Relay se...

Страница 89: ...the arrow STW X buttons and press the Main Setup button To set all channels at the same time select Relay and press the Select button On the selection box set the server type using the arrow ST and S...

Страница 90: ...ing Schedule menu select the date and time using the arrow STW X or numeric buttons on the remote control Input numbers that are less than ten in two digits using the numeric buttons e g 01 for 1 and...

Страница 91: ...ion a Clicking the Main Setup button causes the data to be set only for the selected time b Clicking the Select button causes the data to be set for all the times after the selected time B Setting by...

Страница 92: ...the Select button or double click the corresponding button on the menu On the selection box select the data using the arrow ST buttons and press the Select button Data is set based on the buttons pre...

Страница 93: ...are marked with a red tag Holiday list The list of all defined holidays is displayed 15 holidays are displayed on each page Holiday information Page displays the list of holidays Holiday No denotes t...

Страница 94: ...ry features 1 Local administrator password Used to set the password of the local administrator 2 Menu Time Out Used to set the time to exit the System Setup menu automatically and to go to the real ti...

Страница 95: ...button 2 Local administrator password Local admin The local system administrator s default password is 00000 The local administrator can use all features including System Setup System Power ON OFF Mon...

Страница 96: ...n up to five digits BS Backspace Cancel Used to cancel Save and exit Used to save and exit After inputting the data select Save and Exit using the Tab button or arrow ST buttons and press the Select b...

Страница 97: ...Enter the time using the arrow STW X buttons and Select buttons or the numeric buttons on the remote control After inputting the data select Save and Exit using the Tab or arrow ST buttons and press...

Страница 98: ...After inputting the data select Save and Exit using the Tab or arrow ST buttons and press the Select button After setting the remote control ID of the DVR apply the new setting Select the ID button a...

Страница 99: ...al setup PTZ camera Network setup Network PTZ control PTZ camera control Network backup Backup feature Remote upgrade Remote upgrade A Users On the System menu select 6 Users Edit using the arrow ST b...

Страница 100: ...u select 6 Users Add using the arrow ST buttons and press the Select button On the user registration window go to the ID input field and press the Select button 7 Gives the user the authority to use t...

Страница 101: ...er from using the feature On the password input window enter the password using the numeric buttons on the remote control or the arrow STW X and Select buttons The password may contain up to 30 digits...

Страница 102: ...ON or OFF using the arrow ST buttons or Select button Use the Buzzer menu to run the buzzer inside the system in case of HDD Failure Backup Failure Network Failure Fan Failure Power Failure or Signal...

Страница 103: ...ce is disconnected from the port while the upgrade file is being copied the DVR system may not automatically recognize the file Upgrading cannot proceed if no HDD is installed Connect the storage devi...

Страница 104: ...the system restarts Select Status Product Information 3 Software Version 11 Saving the system configuration After changing the system configuration on the System menu save the new configuration befor...

Страница 105: ...save the new setting Update Used to read local storage device management information again Save Saves the settings Cancel Exits without saving the settings Reset Resets the settings 2 Maximum Archivin...

Страница 106: ...ding stops 4 Management and configuration of the local storage device Model Storage device model Serial Serial number of the storage device Location Physical location of the storage device Capacity T...

Страница 107: ...n the active storage an alarm message is displayed on the upper left corner After the user views the messages in Log mode the alarm message is deleted 5 Operation of the local storage On the Storage m...

Страница 108: ...he selection box select ON or OFF using the arrow ST buttons or Select button Selecting ON or Test causes a test to run as shown below 3 ID Go to the 2 ID menu using the arrow ST buttons and press the...

Страница 109: ...w STW X and Select buttons After inputting the data select Save and Exit using the arrow STW X buttons or Tab button and save the setting by pressing the Select button 7 Execution time Go to the 6 Exe...

Страница 110: ...the NTP server Time is synchronized with the NTP server by the hour A Automatic setting Connection with the server nearest to the user defined zone is attempted or the next nearest server if connectio...

Страница 111: ...t setting however the user can only read the time but not change it 2 Selecting the NTP menu Select Main Setup and Storage 3 NTP mode On the NTP menu select 1 NTP Mode using the arrow ST buttons and p...

Страница 112: ...lection box set the server URL using the arrow ST and Select buttons The user can enter the IP only when the server type is DVR For the NTP server Automatic IP or URL should be selected Automatic Atte...

Страница 113: ...ne Used to set the standard time A Daylight saving time Used to apply the daylight saving time system This field is enabled only when the selected region supports the DST On the NTP menu select 3 1 DS...

Страница 114: ...Advanced menu A Selecting the menu type Advanced menu configuration 2 Advanced option setting per channel A Filter On the Filter menu press the Select button using the arrow ST buttons B Average filt...

Страница 115: ...ttons or Tab button and save the setting by pressing the Select button D H anti aliasing Go to the H Anti Aliasing menu and press the Select button using the arrow ST buttons E V anti aliasing Go to t...

Страница 116: ...low this means that the resulting image is close to the original image The default setting is 1 2 1 Maximum Bit Rate This refers to the maximum size unit for the streaming of moving images H Anti ali...

Страница 117: ...ttings and resets the setup 5 7 1 Selecting Additional Setup On the real time monitoring screen select the Additional Setup button on the remote control The login window is then displayed as shown bel...

Страница 118: ...to set the Tour feature Tour 1 and Tour 2 1 PTZ protocol setting The PTZ protocol is used for communicating with the PTZ camera On the PTZ Setup menu select a channel using the arrow STW X buttons an...

Страница 119: ...d of the PTZ camera Different methods are used to set the address of the PTZ camera depending on the camera manufacturer or model See the camera manual for reference On the PTZ Setup menu select the c...

Страница 120: ...gs may be defined Setting numbers between 1 and 8 may be selected Tour Automatically controls the preset PTZ camera according to the predefined order Tour 1 is set as 9 and Tour 2 as 0 Preset maintena...

Страница 121: ...itional Setup mode select Network and press the Select button 2 Ethernet Used to set a fixed IP in the LAN environment Select Ethernet using the arrow W X buttons and press the Select button To select...

Страница 122: ...Backspace Cancel Used to cancel Save and exit Used to save and exit B IP address setup On the Ethernet Setup menu go to the IP address input box using the arrow ST buttons and press the Select button...

Страница 123: ...ndow enter the default gateway using the numeric buttons on the remote control or the arrow STW X and Select buttons After inputting the data select Save and Exit using the Tab or Arrow ST buttons and...

Страница 124: ...er the default DNS using the numeric buttons on the remote control or the arrow STW X and Select buttons After inputting the data select Save and Exit followed by the Select button using the Tab or ar...

Страница 125: ...lect button To select 1 2 or 3 use the Tab button For others use the arrow W X buttons Enter the user ID and password and save them 5 Alarm Use this menu to generate alarms in case of an event To use...

Страница 126: ...er using the Tab and arrow W X buttons 7 DDNS As part of the DNS system the Dynamic Domain Name System DDNS service dynamically updates the IP addresses of the host names and allocates fixed domain na...

Страница 127: ...server After accessing the DDNS server register the domain name and enter a unique URL For more information on adding a domain please contact tech support at 866 301 2288 Enter the DDNS access passwo...

Страница 128: ...127...

Страница 129: ...user can access the DVR system through the web Enter the IP of the DVR system on the address field of the web browser The ID and password must be the same as those set in the DVR system After logging...

Страница 130: ...129 Click Install on the message window as shown below After installing ActiveX the user can use Plus Viewer on the web browser...

Страница 131: ...screen by clicking any of the following numbers Zoomed in view of Channel No 2 Clicking Live screen causes the channel to be selected and the border of the corresponding screen to be displayed in a d...

Страница 132: ...nnel 1 3 Audio Click the Audio button to control the volume After adjusting the volume click the Close button to exit the menu 1 4 Color Adjust Click Color Adjust to adjust the display colors After ad...

Страница 133: ...ting to set the resolution video quality and frame speed Picture resolution Used to adjust the resolution the lower the resolution the higher the transmission speed CIF Field Full Picture quality Used...

Страница 134: ...displayed on the monitoring window the user can view video on a divided screen by clicking the Division mode button To view one channel on full screen double click any area on the channel window To re...

Страница 135: ...134 6 division mode 8 division mode...

Страница 136: ...135 9 division mode 10 division mode...

Страница 137: ...136 13 division mode 1 7 Search and Playback Searches and plays the video recorded in a remote place in real time Click the Search and Playback tab...

Страница 138: ...ys the recorded video in the form of a file list Search and Play On the Search window select the search type by clicking the or button Select the date from the calendar The date with the recorded vide...

Страница 139: ...t the minute and click The following screen is then displayed Playback screen Playback Control The user can select the screen division and adjust the playback speed using the control at the lower righ...

Страница 140: ...o Displays the audio events General images are displayed in green bars and events in red bars DVR Setup The remote DVR setup screen includes Graphic User Interfaces GUIs such as DVR OSD Clicking DVR S...

Страница 141: ...ter 2 Quick Viewer When recorded data is backed up from the DVR system a new folder as well as QuickViewer exe and mwmp4dec dll files are created The operator can run QuickViewer by executing QuickVie...

Страница 142: ...2 2 Description of Buttons Fast backward play Fast backward play Backward play General backward play Previous frame Backward search frame by frame Next frame Forward search frame by frame Forward pla...

Страница 143: ...ALONE Standard A P P E N D I X A P P E N D I X 143 1 PTZ Camera Protocol 144 2 Recommended HDD 144 3 Recommended USB2 0 Device 145 Memory Stick 145 2 5 Portable USB HDD 145 CD RW DVD RW 145 IEEE1394 D...

Страница 144: ...O Manufacturer Model Capacity Buffer RPM 1 Western Digital WD WD1200 WD WD2500 WD WD2500 120GB 250GB 250GB 2M 2M 8M 7200 7200 7200 2 Seagate SEAGATE BARRACUDA 7200 9 ST3120213A SEAGATE BARRACUDA 7200...

Страница 145: ...LG Xtick USB Drive 256MB 4 AL Tech ANYDRIVE mini USB 256MB 5 Kingston DataTraveler USB FLASH DRIVE 256MB 6 Sarotech FLEX FD 03U1 128MB 8 Scandrive Cruzer Mini 128M 10 Samsung PLEOMAX 128MB 11 Sony Mic...

Отзывы: