


ROYAL ENFIELD WORKSHOP MANUAL
PAGE 75
K5
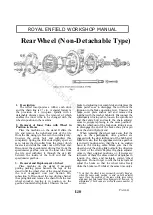
latter once more in the hub at the end from which
it was removed. Now drive the spindle through
the hub the other way, when it will bring out the
remaining bearing.
6. Hub Bearings
These are deep-groove single-row journal ball
bearings,
5
/
8
in. i/d by 1
9
/
16
in. o/d by
7
/
16
in.
wide. The Skefko Part No. is RLS5. Equivalent
bearings of other makes are Hoffmann LS7,
Ransome and Marles LJ J in.. Fischer LS7.
7. Fitting Limits for Bearings
The fit of the bearings in the hub barrel is
important. The bearings are locked on the spindle
between shoulder and the distance pieces, which
in turn are held up by the nuts on the spindle. In
order to prevent endways preloading of the
bearings it is essential that there is a small
clearance between the inner edge of the outer race
of the bearing and the back of the recess in either
end of the barrel. To prevent any possibility of
sideways movement of the hub barrel on the
bearings it is, therefore, necessary for the bearings
to be a tight fit in the barrel, but this fit must not
be so tight as to close down the outer race of the
rearing, and thus overload the balls. The following
are the manufacturing tolerances which control
the fit of the bearings. The figures for the bearings
themselves are for SKF Bearings, but other
manufacturers' tolerances are similar.
Bearing o/d, 1.5622/1.5617 in.
Housing bore, 1.5620/1.5616in
Bearing bore, .6252/.6247 in.
Shaft diameter, .6252/.6248 in.
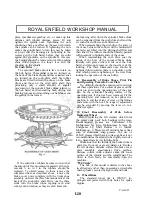
8. Refitting Ball Bearings
To refit the bearings in the hub, two hollow
drifts are required, as shown in Fig. 2. One
bearing is first fitted to one end of the spindle by
means of the hollow drift ; the spindle and bearing
are then entered into one end of the hub barrel,
which is then supported on one of the hollow
drifts. The other bearing is then threaded over
the upper end of the spindle and driven home by
means of the second hollow drift either under a
press, or by means of a hammer, which will thus
drive both bearings into position simultaneously.
In order to make quite sure that there is clearance
between the inner faces of the outer bearing races
and the bottom of the recesses, fit the distance
washers, cover plate, dust excluder and the nuts
on the spindle. Tightening the nuts should not
have any effect on the ease with which the spindle
can be turned. If tightening the nuts makes the
spindle hard to turn this may be taken as proof
that the bearings are bottoming in the recesses in
the hub barrel before they are solid against the
shoulders on the spindle. In this case, the bearing
should be removed and a thin packing shim fitted
between the inner race and the shoulder on the
spindle.
9. Re-assembly of Brake Shoes and Operating
Cam into Cover Plate
No difficulty should be experienced in carrying
out these operations. Put a smear of grease on the
pivot pin and on the operating face of the cam ;
also on to the cylindrical bearing surface of the
operating cam. Fit the operating lever on its
splines in a position to suit the extent of wear on
the linings and secure with the nut and washer.
Note that the position of the operating lever may
have to be corrected when adjusting the brake
after refitting the wheel. The range of adjustment
can be extended by moving this lever on to a
different spline. Limit of wear is reached when the
cam is turned through nearly 90° with the brake
hard on, so that there is a danger that the
operating springs cannot return the brake to the
off position.
10. Final Assembly of Hub before Replacing
Wheel
Before replacing the felt washers which form
the grease seals, pack all bearings with grease.
Recommended greases are Castrolease LM,
Mobilgrease MP, Esso Multipurpose Grease H,
Energrease L2 or Shell Retinax A. The use of
H.M.P. greases which have a soda soap base is not
recommended, as these tend to be slightly
corrosive if any damp finds its way into the hubs.
Make sure that the inside of the brake drum is
quite free from oil or grease, damp, etc. Replace
the felt washers, distance collars, dust excluder and
brake cover plate and securely tighten the spindle
nuts.
11. Wheel Rim
The wheel rim is WM2-17 in., (and for the
Continental GT, WM1-18 in.), plunged and
pierced with forty holes for spoke nipples. The
spoke holes are symmetrical, i.e., the rim can be
assembled to the hub either way round. The rim
diameter after building is 17.062 in., the
tolerances on the circumference of the rim
shoulders where the tyre fits being 53.642/53.582
in. The standard steel measuring tape for
checking rims is
5
/
16
in. wide, .011 in. thick, and
its length is 53.676/53.616 in.
12. Spokes
The spokes are of the single-butted type 8-10
gauge, with 90° countersunk heads, thread
diameter .144 in., 40 threads per inch, thread
form British Standard Cycle. All the spokes are
initially identical, 5
5
/
16
in. long with an angle of
bend of approximately 100°. After building the
wheel but before it is finally trued the spokes
from the outside of the spoke flanges are
straightened by hitting them with a wooden or
hide mallet thus giving them a more acute angle
of bend of about 80°.
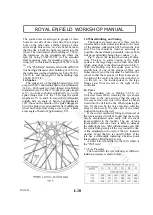
13. Wheel Building and Truing
The spokes are laced one over two, and the
wheel rim must be built central in relation to the
faces of the nuts on the spindle. The rim should
be trued as accurately as possible, the maximum
permissible run-out both sideways and radially
being plus or minus
1
/
32
in.
14. Tyre
The standard tyre is Dunlop 3.25-17 in.
Ribbed, (3.00-18 for the “Continenetal GT”).
When removing the tyre always start close to the
valve, see that the edge of the cover at the other
side of the wheel is pushed down into the well in
the rim.
When replacing the tyre fit the part by the
valve last, also with the edge of the cover at the
other side of the wheel pushed down into the
well.
If the correct method of fitting and removal of
the tyre is adopted it will be found that the covers
can be manipulated quite easily with the small
lever supplied in the tool-kit. The use of long
levers and/or excessive force is liable to damage
the walls of the tyre. After inflation, make sure
that the tyre is fitting evenly all the way round the
rim. A line moulded on the wall of the tyre
indicates whether or not the tyre is correctly fitted.
If the tyre has a white mark indicating a balance
point, this should be fitted near the valve.
15. Tyre Pressure
The recommended pressure for the front tyre
is 18 lb. per sq. in.
16. Lubrication
Grease the bearings by packing them with
grease after dismantling the hub as described
above.
Note that the brake cam is drilled for a grease
passage but the end of this is stopped up with a
countersunk screw instead of being fitted with a
grease nipple. This is done to prevent excessive
greasing by over-enthusiastic owners. If the cam is
smeared with grease on assembly it should require
no further attention but in case of necessity, it is
possible to remove the screw, fit a grease nipple in
its place and grease the cam by this means.
www.hitchcocksmotorcycles.com
Содержание 250 CLIPPER
Страница 24: ...ROYAL ENFIELD WORKSHOP MANUAL PAGE 24 OLYMPIC w w w h i t c h c o c k s m o t o r c y c l e s c o m ...
Страница 26: ...ROYAL ENFIELD WORKSHOP MANUAL PAGE 26 D6A w w w h i t c h c o c k s m o t o r c y c l e s c o m ...
Страница 27: ...ROYAL ENFIELD WORKSHOP MANUAL PAGE 27 D6A w w w h i t c h c o c k s m o t o r c y c l e s c o m ...
Страница 28: ...ROYAL ENFIELD WORKSHOP MANUAL PAGE 28 D6A w w w h i t c h c o c k s m o t o r c y c l e s c o m ...
Страница 30: ...ROYAL ENFIELD WORKSHOP MANUAL PAGE 30 SUPER FIVE w w w h i t c h c o c k s m o t o r c y c l e s c o m ...
Страница 32: ...ROYAL ENFIELD WORKSHOP MANUAL PAGE 32 E11 w w w h i t c h c o c k s m o t o r c y c l e s c o m ...
Страница 33: ...ROYAL ENFIELD WORKSHOP MANUAL PAGE 33 E11 w w w h i t c h c o c k s m o t o r c y c l e s c o m ...
Страница 34: ...ROYAL ENFIELD WORKSHOP MANUAL PAGE 34 E11 w w w h i t c h c o c k s m o t o r c y c l e s c o m ...
Страница 36: ...ROYAL ENFIELD WORKSHOP MANUAL PAGE 36 E11 w w w h i t c h c o c k s m o t o r c y c l e s c o m ...
Страница 37: ...ROYAL ENFIELD WORKSHOP MANUAL PAGE 37 E11 w w w h i t c h c o c k s m o t o r c y c l e s c o m ...
Страница 40: ...ROYAL ENFIELD WORKSHOP MANUAL PAGE 40 w w w h i t c h c o c k s m o t o r c y c l e s c o m ...
Страница 43: ...ROYAL ENFIELD WORKSHOP MANUAL PAGE 43 F4 w w w h i t c h c o c k s m o t o r c y c l e s c o m ...
Страница 45: ...ROYAL ENFIELD WORKSHOP MANUAL PAGE 45 F4 w w w h i t c h c o c k s m o t o r c y c l e s c o m ...
Страница 46: ...ROYAL ENFIELD WORKSHOP MANUAL PAGE 46 w w w h i t c h c o c k s m o t o r c y c l e s c o m ...
Страница 52: ...ROYAL ENFIELD WORKSHOP MANUAL PAGE 52 w w w h i t c h c o c k s m o t o r c y c l e s c o m ...
Страница 59: ...ROYAL ENFIELD WORKSHOP MANUAL PAGE 59 H6 w w w h i t c h c o c k s m o t o r c y c l e s c o m ...
Страница 62: ...ROYAL ENFIELD WORKSHOP MANUAL PAGE 62 w w w h i t c h c o c k s m o t o r c y c l e s c o m ...
Страница 72: ...ROYAL ENFIELD WORKSHOP MANUAL PAGE 72 w w w h i t c h c o c k s m o t o r c y c l e s c o m ...
Страница 76: ...ROYAL ENFIELD WORKSHOP MANUAL PAGE 76 w w w h i t c h c o c k s m o t o r c y c l e s c o m ...
Страница 88: ...ROYAL ENFIELD WORKSHOP MANUAL PAGE 88 w w w h i t c h c o c k s m o t o r c y c l e s c o m ...
Страница 90: ...ROYAL ENFIELD WORKSHOP MANUAL PAGE 90 M7 w w w h i t c h c o c k s m o t o r c y c l e s c o m ...
Страница 91: ...ROYAL ENFIELD WORKSHOP MANUAL PAGE 91 M7 w w w h i t c h c o c k s m o t o r c y c l e s c o m ...
Страница 94: ...ROYAL ENFIELD WORKSHOP MANUAL PAGE 94 P1 w w w h i t c h c o c k s m o t o r c y c l e s c o m ...
Страница 96: ...ROYAL ENFIELD WORKSHOP MANUAL PAGE 96 NOTES w w w h i t c h c o c k s m o t o r c y c l e s c o m ...


