


ROYAL ENFIELD WORKSHOP MANUAL
PAGE 69
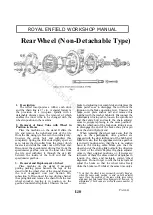
Front Wheel
With Single 6 in. Brake
1. Removal from Fork
To remove the front wheel from the fork place
the machine on the centre stand with sufficient
packing (about 2 in.) beneath each side of the
stand to lift the wheel clear off the ground when
tilted back on to the rear wheel. Slacken the brake
cable adjustment and disconnect the cable from
the handlebar lever and from the operating cam
lever on the hub. Unscrew the four nuts securing
the fork leg caps and allow the wheel to drop
forward out of the front fork. Make sure that the
machine stands securely on the rear wheel and
centre stand. If necessary place a weight on the
saddle or a strut beneath the fork to ensure this.
2. Removal of Brake Cover Plate Assembly
Lock the brake "on" by pressure on the
operating lever and unscrew the cover plate nut.
The cover plate assembly can then be withdrawn
from the brake drum.
3. Removal of Brake Shoes for Replacement,
Fitting New Linings, etc.
The brake shoes can be removed after
detaching the return springs. Brake linings are
supplied either in pairs ready drilled complete with
rivets, or ready fitted to service replacement brake
shoes. When riveting linings to shoes secure the
two centre rivets first so as to ensure that the
linings lie flat against the shoe. Standard linings are
Ferodo AM2 which are drilled to receive cheese
headed rivets.
A number of early "Crusader 250" models
were fitted with brake linings bonded to the shoes.
These should be returned for servicing when
necessary.
4. Removal of Brake Operating Cam
To remove the operating cam unscrew the nut
which secures the operating lever to the splines on
the cam. A sharp tap on the end of the cam spindle
will now free the lever, after which the cam can be
withdrawn from its housing. Do not try and
remove the brake shoe pivot pin; it is cast into
the brake cover plate and cannot be removed.
5. Removal of Hub Spindle and Bearings
To remove the hub spindle and bearings having
first removed the brake cover plate, unscrew the
retaining nut and remove the dust excluder from
the non-brake side of the hub. Now remove the
felt washers and the distance washer from the
brake side and hit one end of the spindle with a
copper hammer or mallet, thus driving it out of the
hub, bringing one bearing with it and leaving the
other in position in the hub. Drive the bearing off
the spindle and insert the latter once more in the
hub at the end from which it was removed. Now
drive the spindle through the hub the other way,
when it will bring out the remaining bearing.
K4
www.hitchcocksmotorcycles.com
Содержание 250 CLIPPER
Страница 24: ...ROYAL ENFIELD WORKSHOP MANUAL PAGE 24 OLYMPIC w w w h i t c h c o c k s m o t o r c y c l e s c o m ...
Страница 26: ...ROYAL ENFIELD WORKSHOP MANUAL PAGE 26 D6A w w w h i t c h c o c k s m o t o r c y c l e s c o m ...
Страница 27: ...ROYAL ENFIELD WORKSHOP MANUAL PAGE 27 D6A w w w h i t c h c o c k s m o t o r c y c l e s c o m ...
Страница 28: ...ROYAL ENFIELD WORKSHOP MANUAL PAGE 28 D6A w w w h i t c h c o c k s m o t o r c y c l e s c o m ...
Страница 30: ...ROYAL ENFIELD WORKSHOP MANUAL PAGE 30 SUPER FIVE w w w h i t c h c o c k s m o t o r c y c l e s c o m ...
Страница 32: ...ROYAL ENFIELD WORKSHOP MANUAL PAGE 32 E11 w w w h i t c h c o c k s m o t o r c y c l e s c o m ...
Страница 33: ...ROYAL ENFIELD WORKSHOP MANUAL PAGE 33 E11 w w w h i t c h c o c k s m o t o r c y c l e s c o m ...
Страница 34: ...ROYAL ENFIELD WORKSHOP MANUAL PAGE 34 E11 w w w h i t c h c o c k s m o t o r c y c l e s c o m ...
Страница 36: ...ROYAL ENFIELD WORKSHOP MANUAL PAGE 36 E11 w w w h i t c h c o c k s m o t o r c y c l e s c o m ...
Страница 37: ...ROYAL ENFIELD WORKSHOP MANUAL PAGE 37 E11 w w w h i t c h c o c k s m o t o r c y c l e s c o m ...
Страница 40: ...ROYAL ENFIELD WORKSHOP MANUAL PAGE 40 w w w h i t c h c o c k s m o t o r c y c l e s c o m ...
Страница 43: ...ROYAL ENFIELD WORKSHOP MANUAL PAGE 43 F4 w w w h i t c h c o c k s m o t o r c y c l e s c o m ...
Страница 45: ...ROYAL ENFIELD WORKSHOP MANUAL PAGE 45 F4 w w w h i t c h c o c k s m o t o r c y c l e s c o m ...
Страница 46: ...ROYAL ENFIELD WORKSHOP MANUAL PAGE 46 w w w h i t c h c o c k s m o t o r c y c l e s c o m ...
Страница 52: ...ROYAL ENFIELD WORKSHOP MANUAL PAGE 52 w w w h i t c h c o c k s m o t o r c y c l e s c o m ...
Страница 59: ...ROYAL ENFIELD WORKSHOP MANUAL PAGE 59 H6 w w w h i t c h c o c k s m o t o r c y c l e s c o m ...
Страница 62: ...ROYAL ENFIELD WORKSHOP MANUAL PAGE 62 w w w h i t c h c o c k s m o t o r c y c l e s c o m ...
Страница 72: ...ROYAL ENFIELD WORKSHOP MANUAL PAGE 72 w w w h i t c h c o c k s m o t o r c y c l e s c o m ...
Страница 76: ...ROYAL ENFIELD WORKSHOP MANUAL PAGE 76 w w w h i t c h c o c k s m o t o r c y c l e s c o m ...
Страница 88: ...ROYAL ENFIELD WORKSHOP MANUAL PAGE 88 w w w h i t c h c o c k s m o t o r c y c l e s c o m ...
Страница 90: ...ROYAL ENFIELD WORKSHOP MANUAL PAGE 90 M7 w w w h i t c h c o c k s m o t o r c y c l e s c o m ...
Страница 91: ...ROYAL ENFIELD WORKSHOP MANUAL PAGE 91 M7 w w w h i t c h c o c k s m o t o r c y c l e s c o m ...
Страница 94: ...ROYAL ENFIELD WORKSHOP MANUAL PAGE 94 P1 w w w h i t c h c o c k s m o t o r c y c l e s c o m ...
Страница 96: ...ROYAL ENFIELD WORKSHOP MANUAL PAGE 96 NOTES w w w h i t c h c o c k s m o t o r c y c l e s c o m ...


