background image

Windows


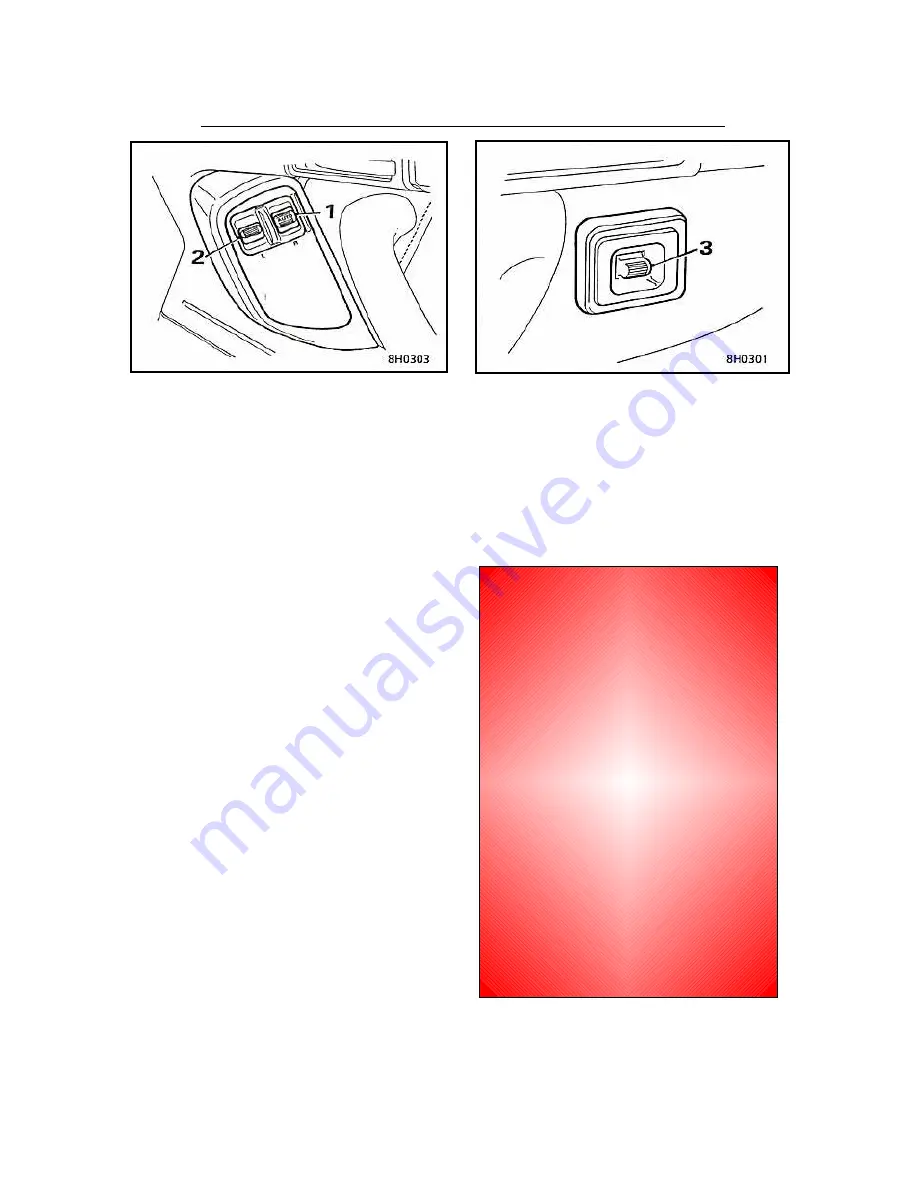
ELECTRIC WINDOW SWITCHES

                                                                     Press down to lower and up to raise.


1.  Driver's Window  


     3.  Individual Passenger Window Switch


 2.  Front Passenger Window


OPERATING ELECTRIC WINDOWS

The electric windows can be operated when the         
starter switch is turned to position 

'II'.

Ensure that the windows are not obstructed during

operation. In particular, keep children away when
raising or lowering.

Do not attempt to raise or lower a window when it

is held or jammed by ice. Should a window be
obstructed during operation, a cut-out will render

the window inoperative. Clear the obstruction and
wait 15 seconds before re-operating the window.


Driver's Window Switch

The driver's window has a one-touch facility. Press
the switch down fully and hold for a second before

releasing; the window will then continue opening
until it is stopped by LIGHTLY pressing the switch

fr a second time.

WARNING!

Accidental closing of an electrically
Operated window on fingers, hands or on
Any other vulnerable parts of the body,
Can result in serious injury!

Always heed the following precautions:

- ISOLATE the rear window switches
   when carrying children.

- ENSURE children are kept clear whilst
   raising or lowering windows.

- ALWAYS remove the starter key when
   leaving children alone in the car.

- ENSURE that all adult passengers are
   familiar with the controls and the
   potential dangers of electrically
   operated windows.

Содержание 200 coupe

Страница 1: ...Edited by Vilislav Pankov 2010...

Страница 2: ...fuses or changing a wheel Technical Data here you will find details of Tyre pressures fuel and engine oil specifications useful reminders when you stop at the garage forecourt to fill up Note Items id...

Страница 3: ...g column locking lever 5 Clock 16 Door mirror switches 6 Electric window switches 17 Coin tray 7 Electric window switch 18 Front seat release bar 8 Glovebox 19 Ashtray 9 Heater controls 20 Seat belt l...

Страница 4: ...ys The front doors and luggage compartment may be which operate all locks unlocked or locked with either of the keys The key number is stamped on the metal tag Door locks can also be operated from ins...

Страница 5: ...oor in case it is broken by the impact of the door Even when you have done all these things closing there is still much you can do to make your car a less inviting target for the thief WARNING It is u...

Страница 6: ...d button briefly to lock the Indicator light flashes RED slowly In certain circumstances the infra red signal can Be successfully transmitted from twenty feet or More However when locking it is wise t...

Страница 7: ...he passenger compartment is detected If necessary the ultrasonic space protection can be switched off without affecting the reminder of the alarm system as follows Remove the key from the starter swit...

Страница 8: ...ease support to the motion or allow a front seat passenger to lumbar region of your back Travel with the seat steeply reclined REAR SEAT ACCESS LEVER Lift the lever to fold the front seat backrest for...

Страница 9: ...ime These are concealed behind a protective doors as follows flap to the left of the lock face When entering the car the interior light will remain NOTE The clock will need to be if the battery illumi...

Страница 10: ...the neck and the edge of the remain securely locked shoulder Front seat travellers should set the anchorage to its top position and adjust it 2 Unfasten the seat belt and unreel the webbing downwards...

Страница 11: ...ross the abdomen progressively collapse on impact DO make sure there is no slack in the DO NOT carry large or sharp pointed items webbing A snug fit is safest of luggage unsecured inside the car In a...

Страница 12: ...the lever at the bottom of the mirror forward you can eliminate dazzle from vehicles following behind In some circumstances the view reflected in a dipped mirror can confuse the driver as to the preci...

Страница 13: ...e locking lever down to free the steering column Hold the lever down while moving the steering wheel up or down into the desired position Firmly return the lever to its locked position when adjustment...

Страница 14: ...conds before re operating the window Driver s Window Switch The driver s window has a one touch facility Press the switch down fully and hold for a second before releasing the window will then continu...

Страница 15: ...bodies through the roof aperture while the car is moving they could be injured by branches of trees or other obstructions ALWAYS close and secure the roof when the car is unattended Removing a Glass P...

Страница 16: ...g the panel forward into position 3 Attach the handle linkage and close the panel Removing the T Bar If both glass panels are to be removed the T Bar can also be removed simultaneously press both on t...

Страница 17: ...return the control to fresh air intake To prevent the windscreen from misting Move control to the left to permit flow of fresh unheated air Move control to the right to permit flow of fan assisted ai...

Страница 18: ...f air entering the car is dependent on Driving speed alone and that full heating is not Available until the engine has reached its normal Operating temperature NOTE Foot well ducts beneath the front s...

Страница 19: ...ine press the A C switch to operate the air conditioner Set the heating and ventilation controls as shown open the centre face level vents and vary the blower speed to suit your requirements Rapid Coo...

Страница 20: ...lease Plate Open ashtray fully and depress release plate to remove CIGAR LIGHTER Always hold the cigar lighter by the handle to avoid injury To avoid any risk of overloading the electrical circuit acc...

Страница 21: ...e In car Entertainment book COMPACT DISC CHANGER UNIT The compact disc changer unit is located beneath the front passenger s seat RADIO AERIAL The radio aerial must be in place whenever the radio is t...

Страница 22: ...g equipment and given in Technical Data and must include the can advise you of the most suitable type weight of the roof rack within the load All loads should be evenly distributed properly secured an...

Страница 23: ...nsure the rear seat belts are not trapped behind the backrest when it is returned to its normal position Push the backrest firmly into place to fully engage the retaining catch Increasing the Load Car...

Страница 24: ...should attach to the warning light RED Warning ORANGE Caution BLUE or GREEN Unit operating Side and Headlights Dip Beam Direction Indicators Rear Screen Wiper and Washer Horn Fuel Level Fuel Filler Re...

Страница 25: ...og light switch 11 Fuel cut off switch 4 Rear fog guard lights switch 12 Horn push 5 Instrument and warning light panel 13 Starter switch steering lock 6 Windscreen and rear screen wiper washer 14 Fus...

Страница 26: ...journey distances cold and H hot segments If the pointer enters the HOT segment stop the engine and 6 Trip Recorder Reset Button seek qualified assistance Press reset button to return trip recorder to...

Страница 27: ...s whilst 10 Oil pressure driving there is a fault in the system On If light illuminates whilst driving a serious completion of your journey seek advise from fault is indicated Stop the engine and seek...

Страница 28: ...journey distances cold and H hot segments If the pointer enters the HOT segment stop the engine and 6 Trip Recorder Reset Button seek qualified assistance Press reset button to return trip recorder to...

Страница 29: ...ult is indicated Stop the engine and seek switched on and extinguishes when the engine qualified assistance is started If the light illuminates whilst driving there is a fault in the system On 10 Dire...

Страница 30: ...ights and electrical circuits are now operational III Starter Motor Operates Release the key as soon as the engine has started The key will automatically return to position II STEERING LOCK To unlock...

Страница 31: ...and operate the starter again RUNNING IN Gradually release the accelerator as The engine gearbox brakes and tyres need soon as the engine is running time to bed in and adjust to the demands smoothly...

Страница 32: ...may run erratically up the engine with the vehicle stationary immediately after starting This is caused by vaporisation and is only likely to occur when Harsh acceleration or labouring of the engine i...

Страница 33: ...ween 3rd and 4th gears Reverse Gear To select reverse gear ensure the vehicle is stationary fully depress the clutch pedal and pause briefly before moving the gear lever into position DO NOT rest your...

Страница 34: ...r once a drive position has been selected an automatic will After starting the engine KEEP THE FOOT AND tend to creep forward or backward HANDBRAKE APPLIED while moving the gear selector to the requir...

Страница 35: ...rom 3rd to 4th at 27 mph 43 km h If steep gradients are encountered or a great deal of low speed driving is anticipated the D3 position is most suitable For example on long inclines the gearbox may at...

Страница 36: ...n 2 and release must always be used 4 Headlight Main and Dipped Beams Lights On Warning Buzzer Pull lever fully towards the steering wheel to If any exterior lights are left on when the ignition is ch...

Страница 37: ...n the position II and the sidelights are switched on Demister will switch off automatically DO NOT stick labels over heating elements 3 Rear Fog Guard Lights Use ONLY when normal visibility is severel...

Страница 38: ...conds before switching off 4 Single Wipe Move the lever down and release 8 Rear Screen Intermittent Wash Wipe Rotate switch forward to position 8 and hold for 5 Windscreen Washer duration of wash wipe...

Страница 39: ...r to reduce the braking effort should exceed the available adhesion between the tyres and the road then the An indication that a brake pad has worn down to system will automatically come into the mini...

Страница 40: ...D 91 RON minimum Do not try to fill the tank quickly and only fill the 2 0 models tank until the filler nozzle automatically shuts off Premium UNLEADED 95 RON minimum DO NOT fill the tank beyond this...

Страница 41: ...engine Do not use a naked flame or light DO not smoke Take care not to spill fuel Do not overfill the tank FUEL CUT OFF SWITCH The fuel cut off switch is a safety device which automatically cuts off t...

Страница 42: ...r value from your motoring FUEL CONSUMPTION All figures shown are in miles per gallon and litres per 100 kilometres and are from officially approved tests carried out under the Passenger Car Fuel Cons...

Страница 43: ...drive the car if a misfire is suspected seek qualified assistance Driving the Car If an engine misfire is suspected or the car lacks power while driving continued use of the vehicle will damage the c...

Страница 44: ...r reservoir level Condition and pressure of tyres SAFETY IN THE GARAGE If you need to carry out maintenance on your Poisonous Liquids vehicle the following safety precautions Most liquids used in moto...

Страница 45: ...LS 1 Fusebox engine compartment 6 Power steering reservoir 2 Anti lock braking system fluid reservoir 7 Cooling system reservoir 3 Brake fluid reservoir 8 Engine oil dipstick 4 Engine oil filler cap 9...

Страница 46: ...1 Engine oil dipstick 6 Cooling system reservoir 2 Washer reservoir non Turbo models 7 Fusebox engine compartment 3 Power steering reservoir 8 Battery 4 Brake fluid reservoir 9 Washer reservoir Turbo...

Страница 47: ...ty catch 4 Support Stay Cut out 5 Support Stay Stowage Clip CLOSING THE BONNET Stow the support stay in its clip then lower the bonnet allowing it to drop for the last 12 inches 300 milimetres approx...

Страница 48: ...tion RES 22 or Unscrew to remove CCMC G4 or API SG or API SG CD OIL LEVEL CHECK TOP UP Oil within these specifications are suitable for Check the oil level every week In the temperature range 20 C to...

Страница 49: ...sure 2 Maximum Coolant Level Indicator Coolant should not be above indicator when cold 3 Minimum Coolant Level Indicator Top up coolant if level falls below indicator 4 Top up Indicator 1 6 models onl...

Страница 50: ...until the system is cold and unscrew Anti Freeze and Summer Coolant If this is not the filler cap slowly to gradually release any available use an ethylene glycol based anti freeze pressure in the res...

Страница 51: ...r both must be checked and topped up similarly and with the same Topping up frequency and fluid as already described Always prevent dirt from entering the reservoir by wiping the filler cap clean befo...

Страница 52: ...cap clean before removing and top up with a fluid meeting Dexron II D specification to bring the level to the upper or maximum mark DO NOT OVERFILL and ensure no dirt enters the reservoir EMERGENCY OP...

Страница 53: ...amaged tyres MUST be permanently repaired or replaced AS SOON AS POSSIBLE Replacement Tyres Wheel rims and tyres are matched to suit the handling characteristics of the vehicle To be safe fit replacem...

Страница 54: ...wiper arm and Check that it is secure Always fit replacement Wiper blades that are identical to the original Specification WASHER JET ADJUSTMENT Insert a needle into the hole in the jet and lever Gen...

Страница 55: ...ns the recommended quantities of screenwash shown in the table will help to disperse ice and snow For 1 6 and 2 0 non Turbo models 2 0 Turbo models Reservoir Temperature Capacity 3 C 7 C 12 C 3 1 litr...

Страница 56: ...reconnecting make sure the battery leads cannot be damaged through chafing against other engine components Battery Charging Batteries generate explosive gases contain corrosive acid and supply levels...

Страница 57: ...could penetrate the seals Windscreen In particular ALWAYS clean the screen AFTER using wash and wax types of car care products and also BEFORE fitting replacement wiper blades Clean the rear window w...

Страница 58: ...operation using a Glass Cleaner GAC 2066 clean cloth and water flooding the area Liquid Polish GAC 2075 Dry and polish the leather with a dry clean Liquid Polish Metallic lint free cloth Paint GAC 20...

Страница 59: ...ction indicators to operate Place the gear lever in neutral N for automatic transmission and release the handbrake Do not exceed 30mph 50km h and always remember without the engine running the brake s...

Страница 60: ...itch on the hazard warning lights and use any other warning devices available to alert other road users ALWAYS ensure the jack is positioned on firm level ground but not on metal gratings or manhole c...

Страница 61: ...page Ensure the jack fits under the CENTRE of the Remove the wheel nuts and then the wheel to jacking point with the cut out of the jack head avoid damaging the surface of alloy wheels do fitting snug...

Страница 62: ...pull to remove the stainless steel nut cover 2 Fit the key socket over the locking wheel nut then fit the wheel nut spanner over the key socket and unscrew 3 A code number is stamped on the face of th...

Страница 63: ...er NOTE Five spare fuses are provided inside the fuse box These are not numbered in the illustration Fuse Rating These units not operating No amps 1 10 Direction indicators instrument panel clock illu...

Страница 64: ...d pull Always replace a fuse with another with the same value 2 0 models Fuse Rating These units not operating No amps 1 20 Central door locking 2 3 10 Hazard warning lights 4 20 Cooling fan 5 15 Air...

Страница 65: ...ove cover Pull connectors from bulb Release wire clips to remove bulb NOTE Do not touch headlight bulb with fingers Clean bulb with methylated spirits BULB REPLACEMENT Watts Part No Headlight dip main...

Страница 66: ...ection indicators Remove screw to Glovebox light Remove screws disconnect plug release lamp Turn bulb holder Push and twist Depress lug arrowed to open light Remove bulb bulb to remove Luggage compart...

Страница 67: ...r light Prise the lens from the light Spread lens and seal Release bulb from clips the bulb holders to release the bulb Fog light Remove screws to release lamp Remove rubber cover from base of light a...

Страница 68: ...IFICATION NUMBERS Whenever you communicate with your Dealer Engine Number you must quote the Vehicle Identification Stamped on the front face of the cylinder block Number and Engine Number If your adj...

Страница 69: ...engine Type Programmed ignition system Spark plugs GSP 6662 Gap 0 85mm 0 035 in Electrical Circuit polarity and voltage Negative earth 12V Battery type Sealed for life Wheels and tyres Wheel size 6x1...

Страница 70: ...2205 ib 1 6 automatic models 500kg 1100 ib 1 6 automatic models with accessory fit oil cooler 1000kg 2205 ib 2 0 models 1000kg 2205 ib Towing hitch downward load 70kg 155 ib Consult your dealer for i...

Страница 71: ...ty required to raise level from MIN to MAX 1 6 engines 1 0 litre 1 8 pt 2 0 engines 0 5 litre 0 8 pt TYRE PRESSURES cold front rear bar ibf in 185 55 R15V Normal driving conditions 2 2 32 1 6 models S...

Отзывы: