background image


Technical Handbook 

Rev. 1.6 


WWW.ROTREX.COM


Page 12 of 41 

Designing and handling interfaces 

4.2 Belt drives 

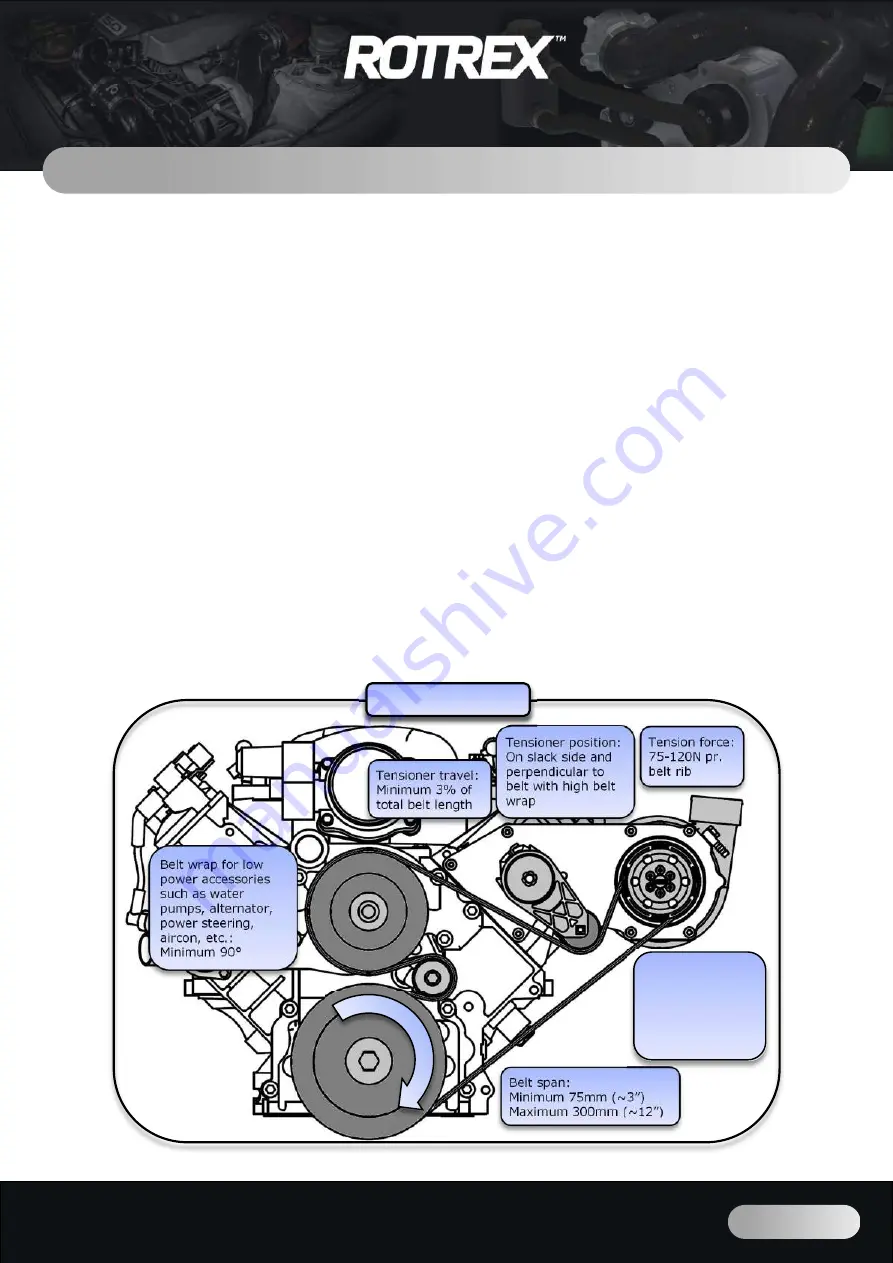
4.2.1 Belt routing 

 
Due to the apparent simplicity of the belt drive, installers and designers tend to disregard 
its importance. The single most frequent source of supercharger installation problems can 
be traced back to the belt drive or design and manufacturing of belt drive components 
such as brackets, tensioners, pulleys and mounting points. 

Paying special attention to the 

belt  drive  can  improve  performance,  durability,  service  life  and  ease  of  service 
significantly.


To  analyse  a  belt  drive  properly  you  should  contact  a  belt  manufacturer  with  detailed 
information of all the components in the drive and the conditions it will be run under. From 
this,  an  estimated  lifetime  and  frequency  analysis  can  be  made  to  give  a  reasonable 
evaluation of the durability of the belt drive. 

A more simplistic approach can be taken for prototype work. These guidelines are rule of 
thumb  only  and  must  be  accompanied  by  many  hours  of  extensive  testing  on  multiple 
installations to get a true picture of the rigidity of the belt drive. 

It is advisable to run the supercharger from a separate belt and crank pulley. Leaving the 
vehicle’s existing belt drive untouched reduces the risk of wear and failure of the belt and 
subcomponents. For twin charger applications we advise to run each supercharger on a 
separate belt to maximize durability. 


Belt wrap for low 

power accessories 

such as water 

pumps, alternator, 

power steering, 

aircon, etc.: 

Minimum 90° 

Belt span: 

Minimum 75mm (~3”) 

Maximum 300mm (~12”) 

Tensioner position:  

On slack side and 

perpendicular to 

belt with high belt 

wrap 

Tension force: 

75-120N pr. 

belt rib 

Tensioner travel: 

Minimum 3% of 

total belt length 

Clockwise 

example 

Belt wrap for high 

power pulleys 

such as crank and 

supercharger: 

Optimum 180° 

Minimum 120° 

Содержание C15-16

Страница 1: ...WWW ROTREX COM...

Страница 2: ...p and maintenance 19 4 5 Air ducting 23 4 5 1 Compressor house adjustment 23 4 5 2 Ducting 24 5 IMPORTANT NOTES AND INFO SOURCES 27 5 1 Testing and verification 27 5 2 Installer and end user documenta...

Страница 3: ...bracket design guides for the C8 C15 C30 and C38 Version 1 5 Released 12 04 2019 o Updated chapter 4 5 2 Air ducting recirc inlet restrictors o Updated chapter 6 4 2 C15 bracket drawing o New pulley r...

Страница 4: ...ation Section 2 Rotrex technology basics provides essential information on how a Rotrex unit works and the benefits it brings to you and your customers Section 3 Choosing the right Rotrex provides a u...

Страница 5: ...egic perspectives the viability of the project The outcome can lead to approval revision or dismissal Phase 3 Design verification Takes the revised base specification from phase 2 and verifies the des...

Страница 6: ...Inform your Rotrex supplier of the outcome of your technical and market analysis The purpose is to revise key assumptions to provide constructive feedback aimed to prevent quality and operational issu...

Страница 7: ...location Supercharger Centrifugal air compression through high speed traction drive featuring internal dry sump dual action oil vane pump Oil cooler Acting as main cooling element Canister Oil reserv...

Страница 8: ...n vane pump sucks oil from the canister pumps it into the traction drive sucks oil from the unit sump and pumps it back out into the canister through the cooler B Traction drive Multiplying input spee...

Страница 9: ...uid momentarily increases viscosity under high surface pressure enhancing the traction drive performance by securing the optimum friction between rolling elements while cooling and protecting the syst...

Страница 10: ...w this will be affected under boost conditions This can very well be modelled using advanced engine calculation tools and theory However using a simple rule of thumb along with the information provide...

Страница 11: ...he expected flow Flow kg s hpsupercharged 1200 Since the target power in this example is 150hp we have the following flow 150 1200 0 125 The approximate pressure ratio needed to produce this power on...

Страница 12: ...e internal thread connection resulting in supercharger damage Never use an impact wrench when mounting or changing pulleys Section 6 3 of this document explains the procedure for assembling and disass...

Страница 13: ...e a reasonable evaluation of the durability of the belt drive A more simplistic approach can be taken for prototype work These guidelines are rule of thumb only and must be accompanied by many hours o...

Страница 14: ...e same method can be used to install a supercharger in a mirrored position compared to the other front end components so that a clockwise rotating engine drives a supercharger mounted in a mirrored po...

Страница 15: ...or several seconds then returns louder a misalignment problem is likely If the noise immediately increases after the belt is sprayed slip is likely Besides noise belt dust and burnt rubber smell are o...

Страница 16: ...tability and durability Include a minimum of 3 strong fixing points to help prevent excessive vibration and bending during operation Remember to avoid materials that will corrode when mounted onto alu...

Страница 17: ...everything needed hoses fittings filter cooler and canister for your application development and commercialization We strongly recommend using these oil sets as they have gone through extensive testi...

Страница 18: ...percharger must be positioned above all oil system components filter canister oil cooler and oil lines to prevent any potential oil leakage from the supercharger Remember that the canister needs to be...

Страница 19: ...kinks in the oil lines Engine vibration and movement must be considered when routing the oil lines It is important to place the oil cooler where the risk of clogging debris stones sand etc can is mini...

Страница 20: ...fitting to prevent leaks 2 Mount the oil cooler in front of other coolers in a location with good air flow Place the oil cooler below or level with the supercharger s shaft The threads for the fitting...

Страница 21: ...e of the supercharger must be installed facing downwards and horizontal within 15 Mounting the supercharger outside this tolerance will prevent the scavenge side of the pump to work properly and jeopa...

Страница 22: ...ing the engine within 5 seconds top up traction fluid before the oil level reaches the bottom of the canister Check that the oil level is between the min and the max indicators on the dipstick while t...

Страница 23: ...this document and check the oil level 7 Remove the canister cap 2 Slide away the two hose clamps on the oil filter and remove the oil filter 1 To avoid traction oil spilling into the engine compartmen...

Страница 24: ...he torque stated in the respective datasheet Tightening of the two large counter bore bolts must be done incrementally turning each bolt a couple of turns making sure the compressor housing is not mou...

Страница 25: ...er To prevent surge it is necessary to relieve the system from excessive pressure through re circulation or blow off A BOV will prevent surge by allowing air to circulate from outlet to inlet of the s...

Страница 26: ...ate dynamic forces applied directly to the rotating impeller wheel and may cause damage to the supercharger and or reduce lifetime Using custom inlet restrictors voids warranty In case it is deemed ma...

Страница 27: ...e oil maintenance interval found in Section 4 4 2 Do not make unnecessary sharp bends in the air ducting as bends will cause pressure drop resulting in loss of output Using a minimum of bends in the i...

Страница 28: ...nd level are verified it is necessary to check that the oil remains below the maximum temperature during harsh climate and operating conditions Dedicated desert hot climate testing is highly recommend...

Страница 29: ...nd thoroughly as well as other engine parameters affected by supercharging Perform dyno tests to monitor performance variations across vehicles and environments during the DVT phase If a problem is id...

Страница 30: ...corrective action Important notes on claim handling Contact the company who sold you the Rotrex supercharger to ask what to do next If asked to return the claimed unit then always return it with the...

Страница 31: ...Technical Handbook Rev 1 6 WWW ROTREX COM Page 30 of 41 Important notes and info sources 6 Support material 6 1 Pulley ring design guide for C15 C30 and C38...

Страница 32: ...urements in mm Not specified tolerances 0 1mm Surface finish in Ra Not specified surface 3 2 Ra Angles in Not specified angle tolerance 0 1 Not specified edge corner tolerances 0 3 Update ERP Released...

Страница 33: ...Technical Handbook Rev 1 6 WWW ROTREX COM Page 32 of 41 Important notes and info sources 6 3 Pulley ring design guide for C38R...

Страница 34: ...Technical Handbook Rev 1 6 WWW ROTREX COM Page 33 of 41 Important notes and info sources 6 4 Pulley ring drawing for C38R...

Страница 35: ...e bolts and old pulley 3 Mount the new pulley and screw the bolts in 4 Tighten the 6 bolts in a cross pattern to 10 Nm 7 4 ft lbs Make sure the mounting surfaces between the pulley and pulley adapter...

Страница 36: ...Technical Handbook Rev 1 6 WWW ROTREX COM Page 35 of 41 Important notes and info sources 6 5 2 Steel pulleys Up to dec 2021...

Страница 37: ...Technical Handbook Rev 1 6 WWW ROTREX COM Page 36 of 41 Important notes and info sources 6 6 Bracket design guide 6 6 1 Bracket design guide for C15...

Страница 38: ...Technical Handbook Rev 1 6 WWW ROTREX COM Page 37 of 41 Important notes and info sources 6 6 2 Bracket design guide for C30...

Страница 39: ...Technical Handbook Rev 1 6 WWW ROTREX COM Page 38 of 41 Important notes and info sources 6 6 3 Bracket design guide for C38...

Страница 40: ...Technical Handbook Rev 1 6 WWW ROTREX COM Page 39 of 41 Important notes and info sources 6 6 4 Bracket design guide for C38R...

Страница 41: ...information Company Date Address Engineering contact Tel Email Purchasing contact Tel Email General project information Vehicle brand model and code Engine code and description Expected yearly sales v...

Страница 42: ...vehicle S C mileage when problem first encountered Something out of the ordinary was observed at S C mileage S C mileage when claimed Claim at S C mileage May be same as above Climate conditions State...

Отзывы: