Rosewill RNX-N300UBv2 Скачать руководство пользователя страница 9

16

17

Wireless N300 Mini USB Wi-Fi Adapter

Wireless N300 Mini USB Wi-Fi Adapter

User Manual

User Manual

RNX-N300UBv2

RNX-N300UBv2

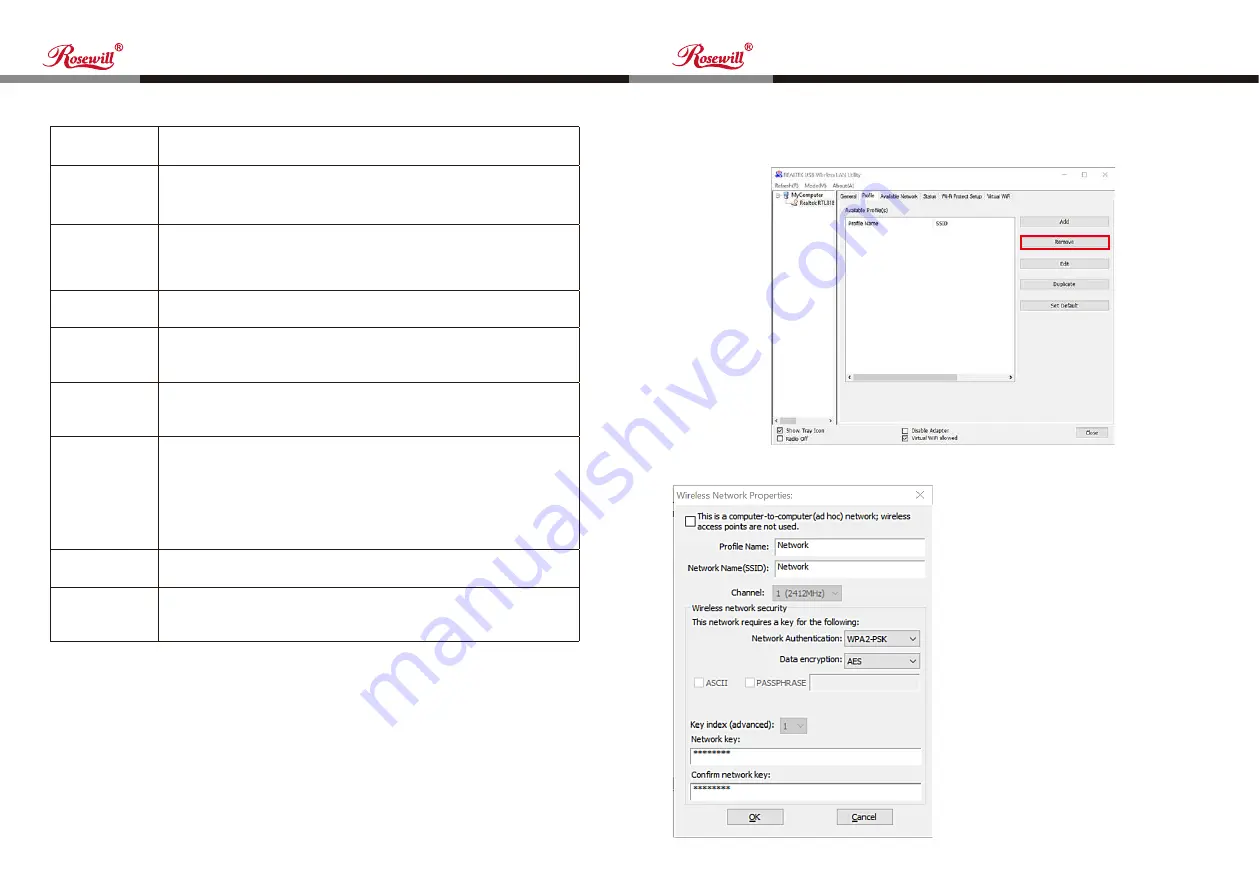
Please click “OK” when ready.

Profile Name

You can give a name to this profile, so you can remember its 

purpose easily. It can be any phrase to help you remember.

Network Name 

(SSID)

The SSID (Service Set Identifier, i.e. access point’s name). This must 

be identical with the SSID of the access point you wish to connect.

This is a

computer-to-

computer (ad 

hoc) network

Check this box if you wish to connect to another computer/network 

device by ad hoc method. When not accessing wireless access 

point, you have to check this box.

Channel

Select wireless channel for ad hoc connection. This option only 

appears when you’re using ad hoc connection.

Network 

Authentication

Select the network authentication type from drop-down menu. This 

setting must be identical with the setting of wireless access point you 

wish to connect.

Data Encryption

Select the data encryption type from drop-down menu. This setting 

must be identical with the setting of wireless access point you with to 

connect.

ASCII / 

PASSPHRASE

When the encryption type is “WEP”, it’s required to input a 

set of “PASSPHRASE” to connect to wireless access point. 

Check “ASCII” or “PASSPHRASE”, depending on the security 

setting of access point, and input into the box; if you select  

“PASSPHRASE”, you also need to select the length of the key. The 

passphrase must be identical with the setting of wireless access 

point you wish to connect.

Key Index

Select WEP key index. For most access points you can select “1”, 

but please refer to the setting of the access point.

Network Key 

/ Confirm 

Network Key

When the encryption type is “WPA” or “WPA2-PSK”, it’s required to 

input a set of “PASSPHRASE” to connect to wireless access point. 

Please input the same passphrase in two boxes for confirmation.

Required Parameters:

You can remove existing profile when you no longer need it. Click “Profile” 
menu, select an existing profile which you wish to remove, and then click 
“Remove”.

To change the content of a profile, select 
a profile from the list first and click “Edit”. 
You’ll be provided with the contents 
of selected profile. Click “OK” to save 
changes, or click “Cancel” to discard 
changes.

4.1.2 Remove an Existing Profile

4.1.3 Edit an Existing Profile

Figure 4-5

Figure 4-6

Содержание RNX-N300UBv2

Страница 1: ...User Manual RNX N300UBv2 Wireless N300 Mini USB Wi Fi Adapter...

Страница 2: ...allation This equipment generates and uses and can radiate radio frequency energy and if not installed and used in accordance with the instructions may cause harmful interference to radio communicatio...

Страница 3: ...Contents SECTION 1 Introduction 1 1 Product Features Complies with IEEE 802 11n IEEE 802 11g and IEEE 802 11b standards Supports USB 2 0 interface Provides 300 Mbps receiving rate and 300 Mbps sendin...

Страница 4: ...k 802 11g 54 48 36 24 18 12 9 6 Mbps Auto Fallback 802 11n up to 300 Mbps Downlink and 300 Mbps Uplink Modulation 11b DQPSK DBPSK DSSS CCK 11g BPSK QPSK 16QAM 64QAM OFDM 11n BPSK QPSK 16QAM 64QAM with...

Страница 5: ...ake 1 3 minutes Do not click the Cancel button otherwise the installation will stop After the driver and utility are installed successfully you must reboot your computer Select Yes I want to restart m...

Страница 6: ...ystem tray lower right corner The utility will display any available wireless networks in your area Highlight the wireless network displayed using the SSID to be connected and then click Connect Click...

Страница 7: ...t network Figure 3 5 Figure 3 7 Figure 3 8 Figure 3 9 Figure 3 6 Windows 10 users may use the built in wireless utility Follow the steps below 3 4 In Windows 10 1 2 3 Click the icon at the bottom of y...

Страница 8: ...cess point To manage profiles right click on the Client Configuration Utility icon located in the lower right corner of computer desktop click Open Config Utility and select the Profile menu With this...

Страница 9: ...ing of wireless access point you with to connect ASCII PASSPHRASE When the encryption type is WEP it s required to input a set of PASSPHRASE to connect to wireless access point Check ASCII or PASSPHRA...

Страница 10: ...Copy of Existing Profile 4 1 5 Set as Default Profile Figure 4 7 Figure 4 8 Figure 4 9 Figure 4 10 The configuration utility provides information about network link status If you want to know how your...

Страница 11: ...is function the wireless access point you wish to connect to must support WPS functions Please follow the instructions below to establish secure connection between WPS enabled wireless access point an...

Страница 12: ...tAP Function This wireless adapter can act as a wireless service provider You can switch this wireless adapter s operating mode to AP mode to simulate the function of a real wireless access point by s...

Страница 13: ...eave this menu and keep settings untouched 5 1 1 Configure SSID and Channel 5 1 2 Set Up Soft AP Security Figure 5 5 Figure 5 6 Figure 5 7 Network Name SSID Input the SSID the name used to identify th...

Страница 14: ...f every item back to 0 5 2 Advanced Settings 5 3 Wireless Statistics Figure 5 8 Figure 5 9 Description of Setup Items Beacon Interval Input wireless beacon time interval here DTIM Period Input DTIM De...

Страница 15: ...t 4 Remove the driver and re install 5 Contact the dealer of purchase for help I cannot establish connection with a certain wireless access point 1 Click Add to Profile 2 If the SSID of access point y...

Отзывы: