background image

Note: 

  If you wish to change the Favorite registered, once delete the corresponding telephone number 

from the current Favorite, and then add your desired telephone number again. 

  To delete the Favorite telephone number 

1. Touch the [

Delete

] key to delete the telephone number.


Answering to an incoming call 

When a call comes in, the following Telephone Interrupt screen appears. 
You can answer to the incoming call on this system by the following operation. 
1. Touch the [

] (Send) key to answer the call. 

2. When the call is finished, touch the [

] (End) key to hang up. 


Bluetooth Audio Player Operations 

Some Bluetooth cellular phones have audio features, and some portable audio players support the 

Bluetooth feature. These  devices will be called as “Bluetooth audio players” in this manual. This 

system can play audio data stored in a Bluetooth audio player. 

Note: 


• This system will not operate or may operate improperly with some Bluetooth audio players. 

•  For  detailed  information  on  the  playable  Bluetooth  audio  players,  see  our  home  page: 

www.clarion.com 

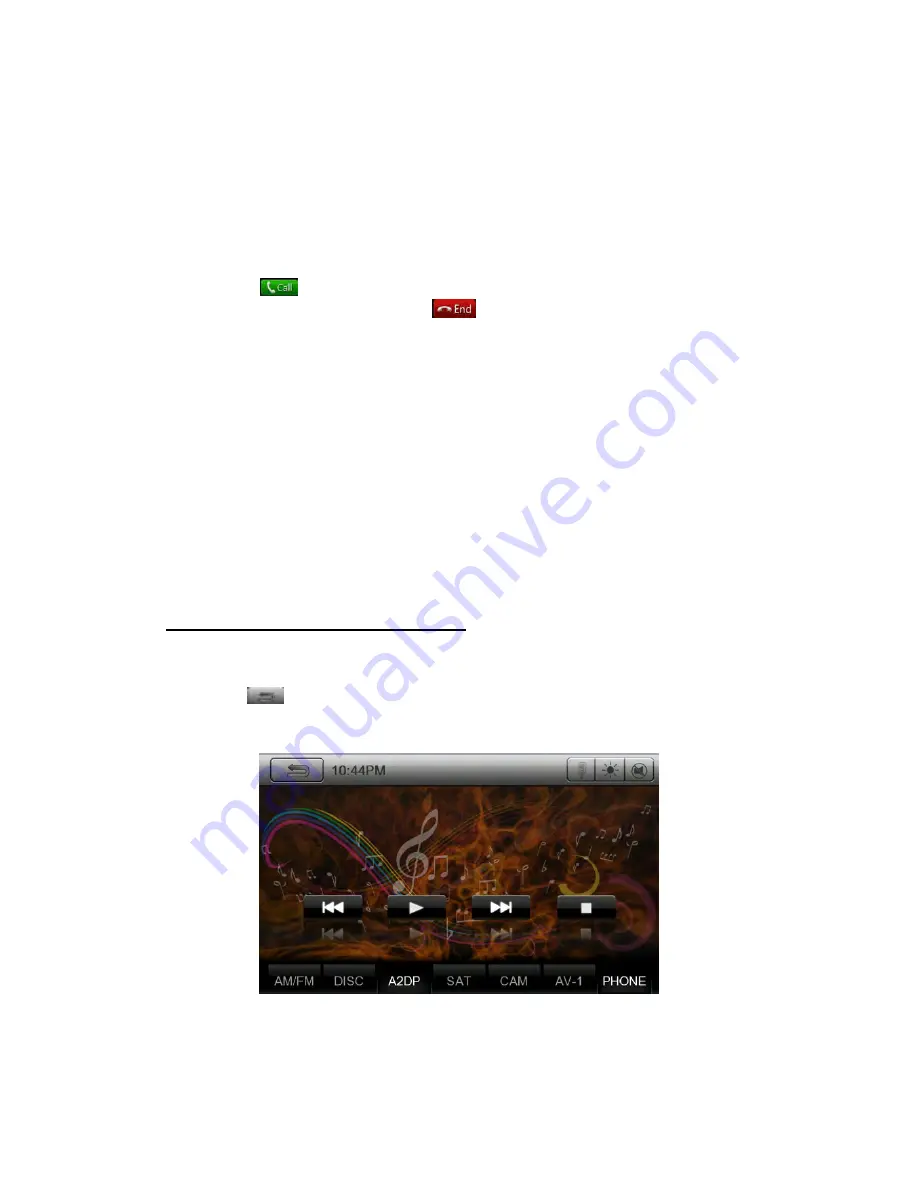
Selecting the Bluetooth Audio mode 

1. Touch the [

Menu

] key to return to the Main Menu. 

2. Touch the [

A2DP

] key to select the Bluetooth Audio mode.   

3. Touch the [

] key to

 return to the previous source mode. 

The  system  changes to  the  Bluetooth  mode.  If the  connection  with  a  Bluetooth  audio  player  has 

been already established, you may select the Music function. 


Содержание PR-UN1370-US

Страница 1: ...ready Play DVDs Audio CDs MP3 Discs Supports steering wheel controls HD Radio Technology Customizable backgrounds and illumination Satellite Radio ready Bluetooth Phonebook and favorites Multimedia Na...

Страница 2: ...HD Radio Technology manufactured under license from iBiquity Digital Corporation U S and Foreign Patents HD Radio and the HD HD Radio and Arc logos are proprietary trademarks of iBiquity Digital Corp...

Страница 3: ...again to return current source 4 PWR VOL Knob Press this knob to turn on the unit Long press this knob to turn off the unit Rotate the knob to increase or decrease the volume Press this knob in radio...

Страница 4: ...lide the battery tray back in the remote control the same direction that you removed it Please ensure the tray is inserted in the correct direction Note Using batteries improperly can cause them to ex...

Страница 5: ...wer on 0 9 Buttons Use in the Key Pad screen to select the radio or satellite radio Use to select the track in the track list screen Press to enter DVD video chapters titles in the Key Pad screen VOLU...

Страница 6: ...ct the next higher or lower chapter number in DVD video mode Press to select the next higher or lower track in DVD Audio USB Video USB Audio mode Press for movement of background source in Navigation...

Страница 7: ...11 025 or 12 kHz For WMA files 32 44 1 or 48 kHz Set the Bit Rate to For MP3 files MPEG1 Layer3 32 to 320 kbps VBR MPEG2 Layer3 16 to 160 kbps VBR MPEG2 5 Layer3 16 to 160 kbps VBR For WMA files 32 48...

Страница 8: ...from the previous position or from the beginning NOTE If you reconnect the same device that you disconnected last the system will play back where it left off The Audio Video and Picture root screen 1...

Страница 9: ...ightness button 11 Mute button 12 Track list button 13 Current ID3 info area 14 Elapsed playing time indicator Seek bar 15 Source shortcut buttons 16 Album Art Play Pause Playback 1 Touch button to pa...

Страница 10: ...off the feature Note The repeat in all USB files function is not available Shuffle Playback 1 Touch button to shuffle the tracks in playing folder during playback 2 Touch this button again to turn off...

Страница 11: ...merical keypad will appear on the screen 2 Input the track number that you want to play back with 0 to 9 key Playback starts from the track of the input track number If the input track number does not...

Страница 12: ...and folders in selected folder Select a track on the display List This function allows you to select tracks from a displayed list 1 Touch the track title on the display list The selected track will st...

Страница 13: ...hanges to the SD USB Video mode and starts playback from the previous position or from the beginning NOTE If you reconnect the same device that you disconnected last the system will play back where it...

Страница 14: ...at 8x Release the button will continue playback with normal speed Progress bar Press on seek bar and drag it to any position where you want to start playback Screen brightness button The screen is dim...

Страница 15: ...le of the display list on the screen the screen will display videos and folders in selected folder Select a video on the display List This function allows you to select videos from a displayed list 1...

Страница 16: ...ome SD USB memory Files protected with any DRM cannot be played Notes on using SD USB memories When no support files the file list display nothing If there is nothing in SD USB memories the device mem...

Страница 17: ...ess or button during playback to play previous next file Screen brightness button The screen is dimming while first press button on top right Second press button the screen is off Touch the screen any...

Страница 18: ...to turn to previous page 4 Touch to turn to next page Exit Picture list Press button to exit from picture list Press the any video title can exit from list Select a folder on display list Touch the fo...

Страница 19: ...ck is started playback The numerical keypad screen Searching with the Picture Number This operation allows searching with the picture numbers in playing folder 1 Touch button The numerical keypad will...

Страница 20: ...le 7 Change the back ground light 8 Mute button 9 Tune backward 10 Tune forward 11 ST flag 12 HD Radio logo when audio is digital 13 Title Genre Artist Text display area The string will roll from left...

Страница 21: ...ality audio 2 FM multicasting 3 Data service Seek Tuning 1 Press the FM AM UI button to select the radio band FM1 FM2 FM3 AM 2 Press the or key on the unit panel to automatically seek a station When t...

Страница 22: ...quency one by one step When touching the key the frequency will go higher with one step When touching the key the frequency will go lower with one step When digital audio is acquired will change to SP...

Страница 23: ...like a CD Program Service Data Contributes to the superior user experience of HD Radio Technology Presents song name artist station IDs HD2 HD3 Channel Guide and other relevant data streams Adjacent t...

Страница 24: ...lay The system changes to the Satellite Radio mode The SAT mode screen is displayed 1 Return to the Main Menu button 2 System time 3 Category Scan Button 4 Chanel name 5 Keypad Button 6 Voice dialing...

Страница 25: ...r later recall Preset Store 1 The preset list is blank by default 2 If a channel is your favorite touch and hold the corresponding preset key for more than 2 seconds to save the current channel 3 Touc...

Страница 26: ...er is not allowed the screen image will not change Touch or button will close the numerical keypad 21 Settings Operation Press Settings button on the Main menu screen The Setting menu screen will be d...

Страница 27: ...e status of the illumination wire except if manually set by the user short pressing the power knob Illumination Off CPM lights off always backlight follows the status of the illumination wire except i...

Страница 28: ...hone but in this case you can enjoy its audio sound only To enjoy video movies stored in the iPod iPhone with video displaying them on this unit it is required to use the special connector cable separ...

Страница 29: ...run down this function may not operate correctly You must connect the iPod iPhone after charging the battery if it has run down Selecting the iPod mode Connect your iPod iPhone to the USB connector T...

Страница 30: ...the key to choose the next track b Touch and hold the key to fast forward 6 REPART a Touch the key to repeat the selected track b Touch once to start a single track repeat touch again repeat off 7 SHU...

Страница 31: ...3 INFORMATION 14 PROCESS BAR a Touch the on seek bar and drag it to any position where you want to start playback 15 SOURCE SHORTCUT KEY 16 ALBUM ART WORK a Touch the area of the Album art work to dis...

Страница 32: ...t list 5 LIST Touch the key to return to ID3 information display 6 LIST UP DOWN Touch list up and down to scroll the list iPod Video mode screen Touch the screen to show the operation key bar during t...

Страница 33: ...OPERATION BAR Touch the key to hide the operation key bar Note Video playback is not available on all iPod iPhone devices Please contact your Rosen dealer for details An optional connection cable or...

Страница 34: ...cellular phones may not be able to transfer the Phone Book data to head unit The Phone Book data transmission may take a long time The operations of sending calls are disabled during the data transmis...

Страница 35: ...OFF Selecting Microphone You can select the microphone to be used The factory default setting is Internal Touch the or key of the Microphone Select item to set the function External or Internal Settin...

Страница 36: ...the device Select the cellular phone To change the current cellular phone to the other device which is already registered perform the following operation 1 Touch the Devices key to display the Device...

Страница 37: ...ansfer Some cellular phones may transfer Phone Book data automatically Telephone operations Making a call using the Ten Key pad 1 Touch the key to display the Ten Key pad screen 2 Enter the telephone...

Страница 38: ...touch the End key to hang up Making a call using the History The system will memorize the Dialed Received calls record data in the memory You can confirm it and use it to make a call from this unit 1...

Страница 39: ...luetooth cellular phones have audio features and some portable audio players support the Bluetooth feature These devices will be called as Bluetooth audio players in this manual This system can play a...

Страница 40: ...ring playback Playback pauses 2 To resume playback touch the key Playback resumes Skipping a track searching 3 Press the or button during playback Tracks are skipped Stopping playback 4 Press the butt...

Страница 41: ...load a disc Insert the disc into the center of the insertion slot the label side facing up Note Never insert foreign objects into the disc insertion slot If the disc is not inserted easily there may b...

Страница 42: ...mode will remain in the Tuner mode Note If you force a disc into before auto reloading it may damage a disc DVD Player Operations Selecting DVD Set Up Menu 1 Touch the button or button on the Main Me...

Страница 43: ...again to return the playback screen The display will return to the playback screen if you do not touch the screen for 10 seconds 1 Return to the Main Menu button 2 Next Track Fast Forward Button 3 Pla...

Страница 44: ...ton and hold 2 seconds to start fast backward or fast forward during playback Release the button will continue playing with normal speed 2 or button on remote control can also be used to start fast ba...

Страница 45: ...creen appears Depending on the disc the title menu may not be called 2 Touch the title menu screen 3 Select the items in the title menu screen by and button Depending on the disc items may not be sele...

Страница 46: ...the audio languages during playback 1 Touch button Each time you touch the button you can switch among audio languages It may take time to switch among audios Depending on the disc up to 8 kinds of au...

Страница 47: ...r switch with a momentary still image Depending on the disc switching may be completely impossible or impossible on some scenes Depending on the disc scenes recorded in two or more angles may be playe...

Страница 48: ...ayback Release the button will continue playback with normal speed 2 or button on remote control can also be used to start fast backward or fast forward during playback Note The fast forward and fast...

Страница 49: ...ton 7 Shuffle button 8 Direct Searching button 9 Voice dialing button 10 Screen brightness button 11 Mute button 12 Track list button 13 Current ID3 info area 14 Elapsed playing time indicator Seek ba...

Страница 50: ...at All Touch the button once for Repeat Track again for Repeat All Shuffle Playback 1 Touch button to shuffle the tracks in playing folder during playback 2 Touch this button again to turn off the fea...

Страница 51: ...ck with 0 to 9 key Playback starts from the track of the input track number If the input track number does not exist or searching with a track number is not allowed the screen image will not change To...

Страница 52: ...play List This function allows you to select tracks from a displayed list 1 Touch the track title on the display list The selected track will start playing 2 Touch the desired track title key The corr...

Страница 53: ...ss button The screen is dimming while first press button on top right Second press button the screen is off Touch the screen anywhere can be on Enter Picture list Press button to display picture list...

Страница 54: ...tle on the display list The selected picture will show 2 Touch the desired picture title key The corresponding picture is started playback The numerical keypad screen Searching with the Picture Number...

Страница 55: ...media cables Switching to AV1 AV2 mode 1 Touch or button on Main Menu to select desired mode when unit is reading 2 Touch or button in other source to select desired mode If the external device connec...

Страница 56: ...VD output using the rear zone remote control See Multi Zone Remote Control for instructions Rear Source includes DVD Auxin1 Auxin2 and iPod Video Selecting the REAR mode User can select REAR through t...

Страница 57: ...Video Setup Menu TV Shape Set TV Shape Normal or Cinema Set Day Set Day value from 0 to 20 Set Nigh Set Nigh value from 0 to 20 Auto Choose ON or OFF...

Страница 58: ...tivate Audio Setup Menu This menu includes EQ Speaker Sub Out Volume EQ EQ Select the audio EQ value User Flat Jazz Pop Classic Rock News Urban Rave Movie Techno Balance Choose the desired volume from...

Страница 59: ...Mid Crossover 0 5KHZ 1KHZ 2KHZ Bass Crossover Choose the Bass Crossover 50HZ 100HZ 200HZ Speaker Fader Choose the desired volume from 9 to 9 Balance Choose the desired volume from 9 to 9 Sub Out Leve...

Страница 60: ...ume TA Volume mode Set TA Volume NAV Volume mode Set NAV Volume Tuner Preamp Disc Preamp USB SD iPod Preamp A V Preamp Start Volume mode Choose the Start Volume mode Set or Last Set Start Volume When...

Страница 61: ...e the Set TA Volume from 0 to 40 NAV Volume mode Choose the NAV Volume mode Set or Last Set NAV Volume when Choose the TA Volume mode Set It can Choose the Set NAV Volume from 0 to 40 Tuner Preamp Cho...

Отзывы: