16
Operation
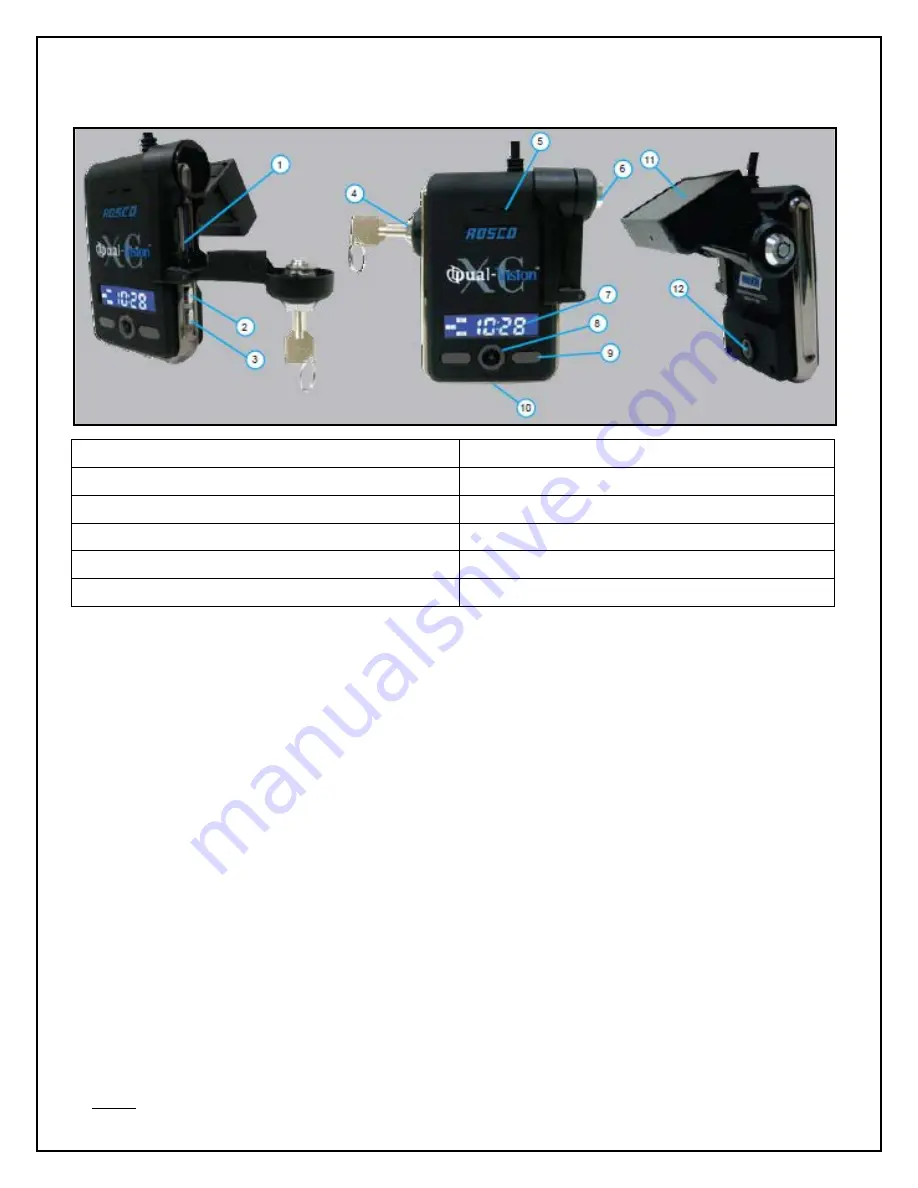
1. SD Card Port
7. LCD Display
2. Event Release Button*
8. Rear Camera (Interior View)
3. Driver Event Button
9. Infrared Illuminators
4. Windshield Mount Push Lock
10. Microphone
5. Speaker
11. Windshield Mount with built-in GPS Module
6. SD Card Security Lock
12. Front Camera (Exterior View)
*
Event Release Button has two functions. When enabled in the Configuration menu within the Player program, it
would allow drivers to remove protection on Event files. This permission, however, is disabled in most applications.
The second function is for powering down the Recorder as follows:
For SD Card removal when Parking Surveillance is enabled, turn ignition off and wait for few
seconds until the LCD display begins blinking. Then press and hold the Event Release Button for 3
seconds. The LCD will turn off following a chime, indicating that Power is OFF. It is safe to remove
the SD card after the display turns off.
Preparation to Start Video Recording
• With new or freshly formatted SD Card inserted into Recorder, turn ignition on. “Init” will
appear on the LCD display indicating that the Recorder is initializing. Approximately one
minute after powering on, the unit should complete initializing and a “ding-dong” chime will
sound. Although GPS still may not be active, recording begins.
• LCD Display will indicate the number of G-force or Driver-Button Events recorded since last
reset. This alphanumerical code (ex. E001) will remain displayed for 10 seconds. Next, a
similar display (ex. S002) will indicate the number of times the speed limit was exceeded.
• The LCD Display will show four dashes (----), indicating that GPS satellite signal is being
acquired. This may take up to 5 minutes on initial startup, quicker on subsequent vehicle
starts. When “GPS“ icon is lit, GPS location data is now being embedded into the recording
along with vehicle speed and direction.
NOTE: When vehicle is in motion, LCD displays vehicle speed. When vehicle is stopped, LCD displays local time.


