


46
© ROPOX 2014
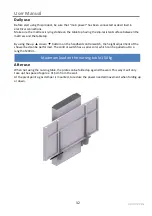
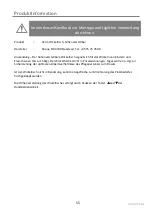
Labelling
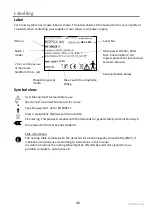
Label
Each nursing table has its own label as shown. The label contains information which is very important
to specify when contacting your supplier. It also shows main power supply.
Symbol view:
User Manual must be read before use
Waste must be sorted. Most parts for re-use.
Type B equipment. As for EN 60601-1
Class 2 equipment. Without earth connection.
CE-marking. This product complies with the demands for general safety and functionality in
the relevant EU directives and standards.
EMC information
The nursing table complies with the demands for electromagnetic compatibility (EMC), if
installation and daily use is according to instructions in this manual.
In seldom situations the nursing table might be affected by electronic signals from ex.
portable computers, cell phones etc.
i
135KG
Serial No.
Main power 230Vac, 50Hz
Max. Consumption 2,0 A
Ingress protection class for dust
& water intrusion
Item no.
Name /
model
2 min. continous use
at max. load-
herafter 18 min. rest
Production year &
month
Max. Load of nursing table
150kg
See explanation below
150KG
N41-1671
+45
IPX6
Содержание Vario 40-306 Series
Страница 10: ...10 ROPOX 2014 Montageanvisning Forberedelse af montage Fjern afd kningspladen p toppen af l fteenheden...
Страница 13: ...13 ROPOX 2014 Montageanvisning Monter l fteenheden til v ggen med skruer i top og bund...
Страница 14: ...14 ROPOX 2014 Montageanvisning Skyd frontpladen tilbage i l fteenheden...
Страница 15: ...15 ROPOX 2014 Montageanvisning Monter afd kningspladen p toppen af l fteenheden...
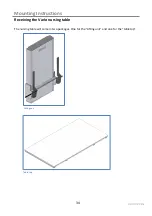
Страница 16: ...16 ROPOX 2014 Montageanvisning Montage af liggeflade Skyd liggefladen ned mellem l fteenhed og de 2 arme...
Страница 17: ...17 ROPOX 2014 Montageanvisning Monter liggefladen til l fteenhedens 2 arme Der bruges 4stk M8x12...
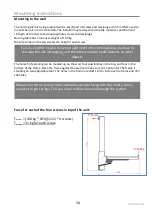
Страница 39: ...39 ROPOX 2014 Mounting Instructions Mount the lifting unit to the wall with screws at the top and buttom...
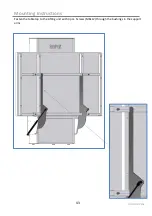
Страница 40: ...40 ROPOX 2014 Mounting Instructions Slide the front plate back into the Lifting unit...
Страница 41: ...41 ROPOX 2014 Mounting Instructions Mount the cover plate on the top of the lifting...
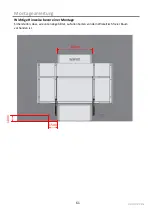
Страница 65: ...65 ROPOX 2014 Montageanleitung Die Hebeneinheit oben und unten mit Schrauben an der Wand montieren...
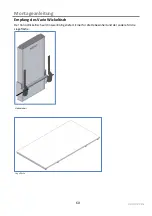
Страница 66: ...66 ROPOX 2014 Montageanleitung Die Frontplatte in der Hebeeinheit schieben...
Страница 67: ...67 ROPOX 2014 Montageanleitung Die Abdeckplatte oben auf die Hebeneinheit monteren...
Страница 69: ...69 ROPOX 2014 Montageanleitung Die Liegefl che an den St tzarmen der Hebeneinheit mit 4 Stck M8x12 befestigen...


