


32
© ROPOX 2014
User Manual
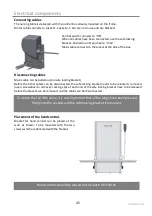
Daily use
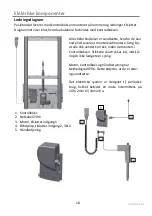
Before start using this product, be sure that “main power” has been connected as described in
electrical connections.
Make sure the mattress is lying stabile on the tabletop having the slip-resistant surface between the
mattress and the tabletop.
By using the up
▲
down
▼
bottom on the handheld control switch, the height adjustment of the
shower bed can be performed. The control switch has a spiral cord, which can be pulled out to a
length of 200cm.
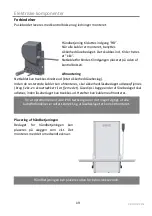
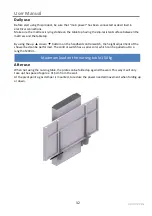
After use
When not using the nursing table, the plate can be folded up against the wall. This way it will only
take up the space of approx. 31,5cm from the wall.
At the pivot point a gas damper is mounted, to reduce the power needed movement when folding up
or down.
Maximum load on the nursing table 150 kg.
Содержание Vario 40-306 Series
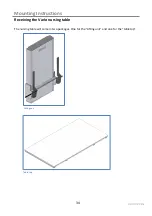
Страница 10: ...10 ROPOX 2014 Montageanvisning Forberedelse af montage Fjern afd kningspladen p toppen af l fteenheden...
Страница 13: ...13 ROPOX 2014 Montageanvisning Monter l fteenheden til v ggen med skruer i top og bund...
Страница 14: ...14 ROPOX 2014 Montageanvisning Skyd frontpladen tilbage i l fteenheden...
Страница 15: ...15 ROPOX 2014 Montageanvisning Monter afd kningspladen p toppen af l fteenheden...
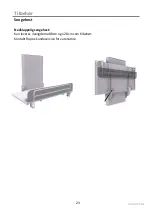
Страница 16: ...16 ROPOX 2014 Montageanvisning Montage af liggeflade Skyd liggefladen ned mellem l fteenhed og de 2 arme...
Страница 17: ...17 ROPOX 2014 Montageanvisning Monter liggefladen til l fteenhedens 2 arme Der bruges 4stk M8x12...
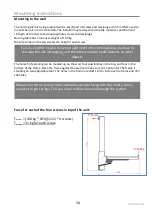
Страница 39: ...39 ROPOX 2014 Mounting Instructions Mount the lifting unit to the wall with screws at the top and buttom...
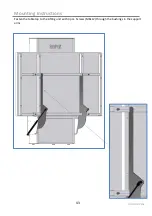
Страница 40: ...40 ROPOX 2014 Mounting Instructions Slide the front plate back into the Lifting unit...
Страница 41: ...41 ROPOX 2014 Mounting Instructions Mount the cover plate on the top of the lifting...
Страница 65: ...65 ROPOX 2014 Montageanleitung Die Hebeneinheit oben und unten mit Schrauben an der Wand montieren...
Страница 66: ...66 ROPOX 2014 Montageanleitung Die Frontplatte in der Hebeeinheit schieben...
Страница 67: ...67 ROPOX 2014 Montageanleitung Die Abdeckplatte oben auf die Hebeneinheit monteren...
Страница 69: ...69 ROPOX 2014 Montageanleitung Die Liegefl che an den St tzarmen der Hebeneinheit mit 4 Stck M8x12 befestigen...


