


44
© ROPOX 2014
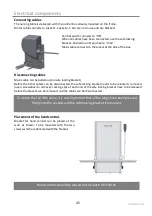
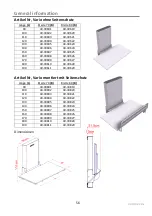
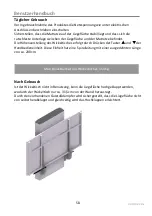
Electrical components
Wire diagram
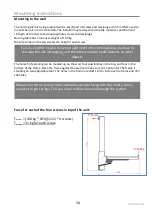
The nursing table is delivered with the control box already mounted on the frame. The diagram
shows how the cables are connected to the control box.
All the plugs are water tight, and therefore they can be a
little tricky to connect / disconnect. Make sure that the
plugs are positioned correctly before they are pushed
into the sockets at the control box. The plugs must be
pushed into the sockets until the “O-ring” is no longer
visible.
Motor, control box and control switch apply to IPX6. This
means that they are dustproof and water resistent.
The electronic system is designed for periodical use only,
this means a max. duty cycle of 10%; 2min on /18min off.
1.
Control box
2.
Mains cable 230V
3.
Motor, connects to socket 1
4.
End plugs, connects to socket 2, 3 & 4
5.
Hand control, connects to HB socket
4
5
2
3
1
Содержание Vario 40-306 Series
Страница 10: ...10 ROPOX 2014 Montageanvisning Forberedelse af montage Fjern afd kningspladen p toppen af l fteenheden...
Страница 13: ...13 ROPOX 2014 Montageanvisning Monter l fteenheden til v ggen med skruer i top og bund...
Страница 14: ...14 ROPOX 2014 Montageanvisning Skyd frontpladen tilbage i l fteenheden...
Страница 15: ...15 ROPOX 2014 Montageanvisning Monter afd kningspladen p toppen af l fteenheden...
Страница 16: ...16 ROPOX 2014 Montageanvisning Montage af liggeflade Skyd liggefladen ned mellem l fteenhed og de 2 arme...
Страница 17: ...17 ROPOX 2014 Montageanvisning Monter liggefladen til l fteenhedens 2 arme Der bruges 4stk M8x12...
Страница 39: ...39 ROPOX 2014 Mounting Instructions Mount the lifting unit to the wall with screws at the top and buttom...
Страница 40: ...40 ROPOX 2014 Mounting Instructions Slide the front plate back into the Lifting unit...
Страница 41: ...41 ROPOX 2014 Mounting Instructions Mount the cover plate on the top of the lifting...
Страница 65: ...65 ROPOX 2014 Montageanleitung Die Hebeneinheit oben und unten mit Schrauben an der Wand montieren...
Страница 66: ...66 ROPOX 2014 Montageanleitung Die Frontplatte in der Hebeeinheit schieben...
Страница 67: ...67 ROPOX 2014 Montageanleitung Die Abdeckplatte oben auf die Hebeneinheit monteren...
Страница 69: ...69 ROPOX 2014 Montageanleitung Die Liegefl che an den St tzarmen der Hebeneinheit mit 4 Stck M8x12 befestigen...


