Step 2 - Wall Profile Positioning
NOTE: Placing some masking tape on the tiled wall in the position where the wall profile is to go will not only
help with marking out, but will also help protect the tiles when drilling.
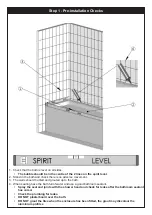
1. Take the bottom rail and place it so it runs inline with the inner edge of the bath, leaving a 40mm gap
from the wall to allow for the damn joint to be fitted.
2.
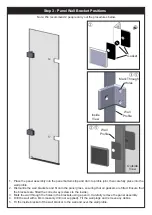
Place the wall profile against the wall. Fit the dam to profile joint and bottom rail to the bottom of the wall
profile. Ensure that the bottom rail is still inline with the inner edge of the bath.
3.
Mark the wall up the wall profile using a pencil.
4.
Mark the wall through the holes in the wall profile.
5.
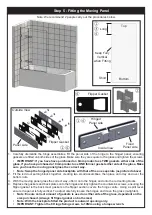
Disassemble the wall profile, joint and bottom rail. Apply a bead of silicon the width of the wall profile
where it meets the top of the bath and the tiled wall.
6.
Drill the wall with a 6mm masonry drill (not supplied). Remove the masking tape and fit the wall plugs
and remove any debris.
7.
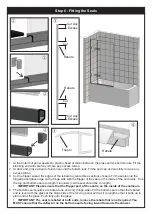
Place the wall fixing screws into the holes in the wall profile.
8. Line up the screws with the holes in the wall and tighten all the screws.
• NOTE: Tighten the screws evenly.
• Reccomend using a screw drive rather than electric drill in order to not bald the screws.
Inner Edge
Dam to Profile Joint
↓
①
②
② ③
⑤
⑦
Mark
Wall
⑦


