Step 7 - Bracing and Sealing
1.
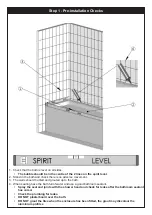
Put the bracing on the top of the fixed panel glass and up to the tiled walls, use a spirit level to keep it the bracing
horizontal.
2. Lightly mark the tiles around the wall brackets of the brace and eemove the bracing.
• NOTE: Place masking tape where the bracket is to go as it will protect the tiles and aid in marking.
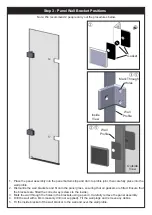
3. Remove the wall bracket from the bracing assembly. Place over the pencil mark and mark the hole position
4.
Drill the hole positions using a 6mm masonry drill (not supplied) and fit the wall plug.
5. Fit the Wall Bracket to the tiled wall using the screws supplied.
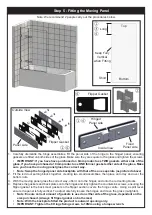
6.
Place the Bracing onto the top of the fixed panel glass and into the wall brackets and re-assemble.
7.
Ensure the gaskets are between the glass and bracing, fully tighten all screws. fit the cover cap.
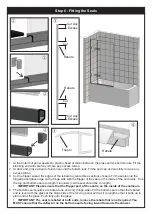
8.
Place a bead of silicon around the top and up the sides of the dam to profile joints and door bottom joint.
9.
Seal the wall profile up from the bath top on the
inside and outside.
10. Seal the base of the enclosure horizontally on the outside only and around the end cap.
11.
Seal up from the top of the Dam to Profile joint where the Glass meets the Wall Profile up to the first Bracket on the
outside only.
•
IMPORTANT: Failure to follow stages 8,9 ,10 & 11 may result in serious water damage and is not covered under
the terms of the guarantee.
• Please allow 24 hours for the sealant to fully cure before using the enclosure.
• Do not seal along the base on the inside.
12.
Fit branding clip on top of the fixed panel glass and top cap on top of the wall profile.
①
⑨
⑧
Branding Badge
Silicon
Wall
Bracket
②
③
⑩
⑩
Silicon
⑪
⑫


