rollibot ROLLICOOL 014DJ Скачать руководство пользователя страница 20

20

RolliBot RolliCOOL 208-20V2 Portable AC User Manual

Cleaning the Filter

1. Reach under the notch and remove the filter.
2. Soak the filter in lukewarm water (mild detergent 

may be used, if necessary) or use a hand vacuum to 

clean the filter. 

3. After the filter has completely dried, reinstall it. 

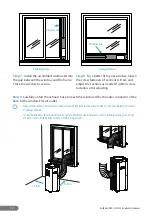
6.2 – How to Drain the Unit

In most cases, the lower overflow reservoir will 

not require draining. In the event that draining is 

necessary, the unit will sound an alarm and the “water 

full” light will turn on and/or an E7 error code will 

appear on the display. This indicates the reservoir 

inside is full and should be drained from the 

lower drainage opening

•   

Make sure your AC unit is completely powered off and unplugged before performing any type of maintenance. 

•  If relocating the unit before draining, move it carefully so as not to spill the water inside the reservoir.
•  Make sure the drainage pipe has adequate space underneath for draining and there is a suitable area for water runoff. 

Always fetch a container for water runoff 

before

 connecting the pipe.

•  Keep the drainage cover and the water plug on at all times when not draining the unit.
•  When draining the unit, do not allow the power cord to come in contact with water.
•  While draining, slightly tilt the unit backward to promote faster drainage.
•  Keep in mind the unit may hold more water than expected. Do not use a small container to drain. Or drain the RolliCool 208-

20V2 outdoors.

Using the Lower Drainage Opening

1. Turn off and unplug the unit. If necessary, carefully move it 

to a suitable location for drainage. 

2. Set a container near the unit for water runoff, then place 

the end of the draining tube in the container.

3. Remove the cap from the lower drainage opening and 

connect the draining tube to the unit via the opening.

  If the draining tube is too stiff and/or cannot be attached, try soaking the end in 

hot water to soften it first.

4. Allow the water to drain. 

  After draining is complete, it is recommended to turn the unit on and run it in 

Fan Mode at the lowest speed for at least two hours in order to ensure the unit 
dries inside.

5. Detach the tube and reinstall the cap.

Notch

Filter

Содержание ROLLICOOL 014DJ

Страница 1: ...UTUREREFERENCE In order to continue serving our customers and providing the best products our product information including our user manuals may receive updates from time to time Please check our webs...

Страница 2: ...www rollibot com Customer Service 1 844 585 6295...

Страница 3: ...y to use in your home The RolliCool 208 20V2 is designed for indoor use and can be used in differently sized spaces Casters make it easy to move the unit from room to room so you can stay comfortable...

Страница 4: ...r Optimal Use 10 Section 3 Setting Up the Unit 11 Section 4 Wireless Setup 16 4 1 App Installation 16 4 2 App Pairing 16 4 3 Amazon Alexa Setup 17 Section 5 How to Use the RolliCool 18 5 1 Timer 18 5...

Страница 5: ...on Overall Usage Do not insert objects into the product The product is not a toy Do not leave children unsupervised around the product The product is designed for indoor use only Keep the product upri...

Страница 6: ...na Increase the separation between the equipment and receiver Connect the equipment into an outlet on a circuit different from that to which the receiver is connected Consult the dealer or an experien...

Страница 7: ...onnector 1x Exhaust Hose Inner Connector 1x Window Kit 2x Screw Fastener 2x Screw Base 2x Screw Head 2x Washers RolliCool208 20V2PortableACunit DrainingTube ExhaustHose ExhaustHoseOuterConnector Screw...

Страница 8: ...re and other information 2 Power Button Press to turn the unit on or off 3 Down Button Press to lower temperature or adjust timer duration 4 Oscillate Button Press to turn on or off oscillate function...

Страница 9: ...Theoutervents openandcloseonlyandareprimarilyusedfordustprotectionduringstorage High This icon will light up when the speed is high Low This icon will light up when the speed is low Water Full This i...

Страница 10: ...uately cooled 3 Make sure the AC unit is standing on a flat level surface 4 Do not cover the AC unit or block the air intake outlets DO NOT COVER Never obstruct the air outlet or intake grilles DO NOT...

Страница 11: ...a grounded outlet do not use an extension cord carefully unfurl the exhaust hose and adjust its length to reach the window Keeptheexhausthoseasshortandfreeofcurvesaspossible Makesuretheexhausthoserem...

Страница 12: ...windowkitforproperventilation Makesurethattheunitisplacedinaflatpositionandairventsarenotblockedorobstructed Step 1 Insert the connectors into both ends of the exhaust hose Rotate the connectors clock...

Страница 13: ...sections Tighten sections A B together using a washer and screw head B B B A A A C C C B A A C Screw Base B B B A A A C C C B A A C Screw Base B B B A A A C C C B A A C Washer Screw Head B B B A A A C...

Страница 14: ...after adjusting Sliding Window Hung Window Window Kit Slide Window Hung Window Window Kit Step 9 Carefully unfurl the exhaust hose to reach the window Affix the outer connector of the hose to the wind...

Страница 15: ...to the window kit Good Hose Position Bad Hose Position Donotskipthisstep Youmustattachtheexhausthosetothewindowkitforproperventilation Makesuretheexhausthoseisnotbentorkinkedasthismayinhibitairflowan...

Страница 16: ...rminatedorfailtoworkproperlyiftheconnecteddevicesaretoofarapart Step 1 Turn on the AC unit then turn on your smartphone s Bluetooth Open the Rollicool app Step 2 Register for an account Then sign in w...

Страница 17: ...otuse AC A C A C orsimilariterations inthenameasthiswillinterfere withsomeAlexafeatures Mostfeaturescanbeusedbypressingthebuttonsontheunit scontrolpanel throughAlexavoicecommands orviatheRollicoolapp...

Страница 18: ...illturntimermodeoffandcancelanydurationsetting To Set a Turn On Time 1 When the unit is OFF press the timer button on the control panel 2 Use the up and down buttons to select the time the AC unit wil...

Страница 19: ...panel until the display s DEHUM light turns on Youmustattachthedrainagetubetotheupperdrainingopeningwhenusingdehumidifymode Indehumidifymode thefanspeedisautomaticallysettolowandcannotbeadjusted Sect...

Страница 20: ...ingandthereisasuitableareaforwaterrunoff Alwaysfetchacontainerforwaterrunoffbeforeconnectingthepipe Keepthedrainagecoverandthewaterplugonatalltimeswhennotdrainingtheunit Whendrainingtheunit donotallow...

Страница 21: ...n 8 Troubleshooting Problem Possible Cause s Solution s The unit does not power on There is no electricity Turn it on after connecting it to a socket with electricity The overflow indicator is on Drai...

Страница 22: ...vertical and should be moving If not power the unit off and then back on Outer air vent is closed Open the outer air vent The oscillating louvers are inside the outer air vent and are vertical When th...

Страница 23: ...y call WP s toll free number at 1 844 585 6295 for a service request When a product or part is exchanged any replacement item becomes your property and the replaced item becomes WP s property This war...

Страница 24: ...Copyright 2021 Rollibot LLC All Rights Reserved...

Отзывы: