


12
RolliBot RolliCOOL 208-20V2 Portable AC User Manual
B
C
A
Sections
The window kit contains three adjustable
sections (A, B, C) that thread together.
Screw Fastener
The screw fasteners are used to secure the
sections together. They can be loosened or
tightened to adjust the window kit according
to the window size.
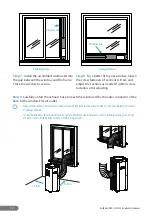
Installation – Part 3 of 4: Exhaust Hose
Do not skip this step. You must attach the exhaust hose to the window kit for proper ventilation.
Make sure that the unit is placed in a flat position and air vents are not blocked or obstructed.
Step 1.
Insert the connectors into both ends of the exhaust hose. Rotate the connectors
clockwise to tighten.
B
B
B
A
A
A
C
C
C
B
A
A
C
B
B
B
A
A
A
C
C
C
B
A
A
C
Inner Connector
Outer Connector
Step 2.
Slide the exhaust hose onto the air vent on the back of the unit. Make sure to use the
inner connector.
Keep the exhaust hose as short and free of curves as possible. Make sure it is free from sharp bends and kinks, as this may
inhibit air flow and/or damage the unit.
Installation – Part 4 of 4: Window Kit
Window Kit Parts
Screw Base x 2
Screw Head x 2
Washer x 2


