background image

12

Rollerdor RD77 Installation Guide,  Edition 2022/01

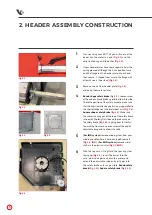
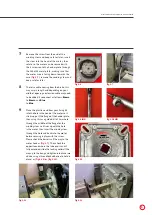
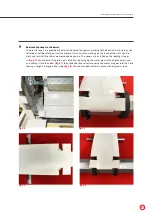
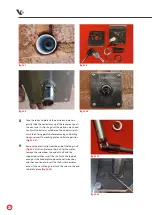
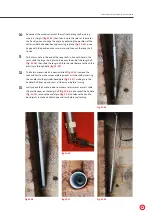
fig.6.8

fig.6.5

fig.6.7

fig.6.6

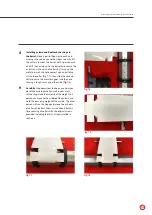
Reattach the straps to the barrel;  

The plastic covers are provided to add extra protection against marking to the back of the curtain as the 
roller door will be rolling on itself, sometimes this can cause marking on the back of the slats. You Do 
Not have to install these but we would advise you do. The covers are installed on the locking strap as 
in 

(fig.6.6)

. Secure each strap into a pair of collars by lining up the metal pin with the hole nearest you 

and sliding it into the collar 

(fig.6.7)

 then slide the second collar over so the metal pin goes into the hole 

leaving a rough 2mm gap either side 

(fig.6.8)

, then secure both collars in place with original screws.

Содержание RD77

Страница 1: ...Rollerdor RD77 Installation Guide Edition 2022 01 Installation Guide Rollerdor RD77 Edition 2022 01...

Страница 2: ...4 INSTALLING HEADER ASSEMBLY 10 5 INSTALLING CONTROL SYSTEM 11 6 INSTALLING CURTAIN TO BARREL CURTAIN ROLLED SO BASE RAIL IS SEEN 13 7 INSTALLING CURTAIN TO BARREL CURTAIN ROLLED SO TOP RAIL IS SEEN...

Страница 3: ...Silicone Gun Silicone Sealer Rivet Gun 4mm Rivets ROLLERDOR COMPONENT CHECKLIST Door Curtain consisting of slats endlocks and base rail with rubber safety edge will be on base rail if purchased Barrel...

Страница 4: ...3 Prior to installing please remove any items of loose clothing to avoid any risk of entanglement or injury 4 Your RD77 comes complete with a 3 pin plug as standard this is supplied and must be fitte...

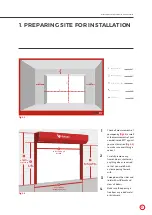
Страница 5: ...ing Height Headroom Height mm 4 Side Room R 4 Side Room L mm mm mm mm Requirements For The Opening Taking Measurements All measurements should be taken from multiple places and the smallest size used...

Страница 6: ...sure that the big silver allen key bolt is running parallel to the shortest edge near the inlet wheel as in fig 2 5 Square shape safety brake fig 2 6 Make sure the cable is coming out of the top of th...

Страница 7: ...if so connect as follows Brown to Brown and Blue to Blue 9 Place the plastic wand from your fixing kit into the hole in the head of the motor so it sticks up past the flange of the header plate then u...

Страница 8: ...s against the floor 3 Offer both cut guide runners up against the walls they will be fixed to and mark the fixing points either on the flat face for a behind fixing fig 3 3 or for a between fixing in...

Страница 9: ...TEL LINTEL ROOF OR JOISTS Behind lintel fixing 3 Limited opening fixing 2 Below lintel fixing 1 300 MM 300 MM 300 MM ROOF OR JOISTS 1 2 3 FIXING OPTIONS Below Lintel Fixing Cut guide runners to measur...

Страница 10: ...e guide runners and secure into place fig 4 3 5 Check the case and guide runners are still level and square then proceed to drill your remaining fixings remembering to check the guide runners are squa...

Страница 11: ...instructions or you can type the link straight into your internet browser RD3X2 A RD20X2ELL RD3X2 B RD20X2SOM RD10X2ELL RD20X2ANSA RD1X2 https rollerdor net wp content uploads 2022 01 Installation Gu...

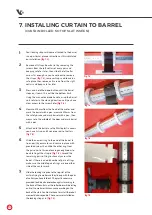
Страница 12: ...n then measure to the middle of the door and mark barrel with a pen 5 Attached to the barrel are the White plastic covers you have 1 strap and 1 cover per pair of collars fig 6 4 6 Slide the nearest r...

Страница 13: ...es this can cause marking on the back of the slats You Do Not have to install these but we would advise you do The covers are installed on the locking strap as in fig 6 6 Secure each strap into a pair...

Страница 14: ...h a pen then measure to the middle of the door and mark barrel with a pen 5 Attached to the barrel are the White plastic covers you have 1 strap and 1 cover per pair of collars fig 7 5 6 Slide the nea...

Страница 15: ...and sliding it into the collar fig 7 7 then slide the second collar over so the metal pin goes into the hole leaving a rough 2mm gap either side fig 7 8 9 Carefully Step down from the hop ups and as...

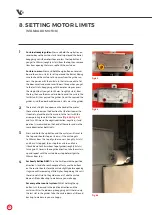
Страница 16: ...n to the limit with the arrow pointing towards the front case fig 8 1 fig 8 2 and turn 10 times in the negative direction negative and positive are marked on the head of the motor and are the same dir...

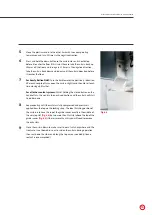
Страница 17: ...then close it each time closing a bit further For all other control systems Whilst holding the closed button on the handset turn the wand in the positive direction and the curtain will start to judder...

Страница 18: ...e receiver box again so the curtain goes up Stop the curtain when 1 full slat is left in the guide runners 4 Using a screw driver press in and release the coloured limit for the open up direction as p...

Страница 19: ...18 Rollerdor RD77 Installation Guide Edition 2022 01 fig 9 7 fig 9 6 fig 9 5...

Страница 20: ...case up as close to the winding stem and gland as possible hook the back case into the top lip where the two cases meet fig 10 5 and slide across to go all the way to the edge of the header plate mak...

Страница 21: ...oint fig 11 4 so it is 120mm shorter than this measurement then slide the cylindrical attachment back on the bar but only 20mm before securing in place with 2 grub screws fig 11 6 remaining 2 grub scr...

Страница 22: ...locking plate and fix into position fig 11 10 9 Remove the plastic clip from the end of the long shaft fig 11 11 this will release the shaft for the motor remove the screw from the end of shaft and th...

Страница 23: ...le in the joint slide the large short plastic tube over the end of the long shaft fig 11 14 then slide the long shaft into the joint before reattach the plastic pic through hole fig 11 15 12 The Exter...

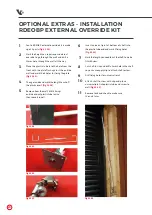
Страница 24: ...12 20 4 Then go inside and mark the length to cut off the plastic insert fig 12 18 5 Remove from the wall drill 4 fixings outside and cut plastic tube to size then reinsert in wall 6 Insert universal...

Страница 25: ...se coming from the motor when you activate it If so then check the security straps if these are disconnected or broken you will need to contact the office to purchase some more 4 Can it be opened by u...

Страница 26: ...ose button on the handset 1 Check the batteries in your safety edge device as they may need replacing make sure to replace them with a like for like battery and to check the polarity until you have re...

Страница 27: ...orwich Norfolk NR5 9JD 44 0 1603 743215 sales rollerdor net www rollerdor net Company Registration Number 10676267 Registered Office Address Rollerdor Ltd Bankside 300 Peachman Way Broadland Business...

Отзывы: