background image


rolleaseacmeda.com 

© 2020 Rollease Acmeda Group 

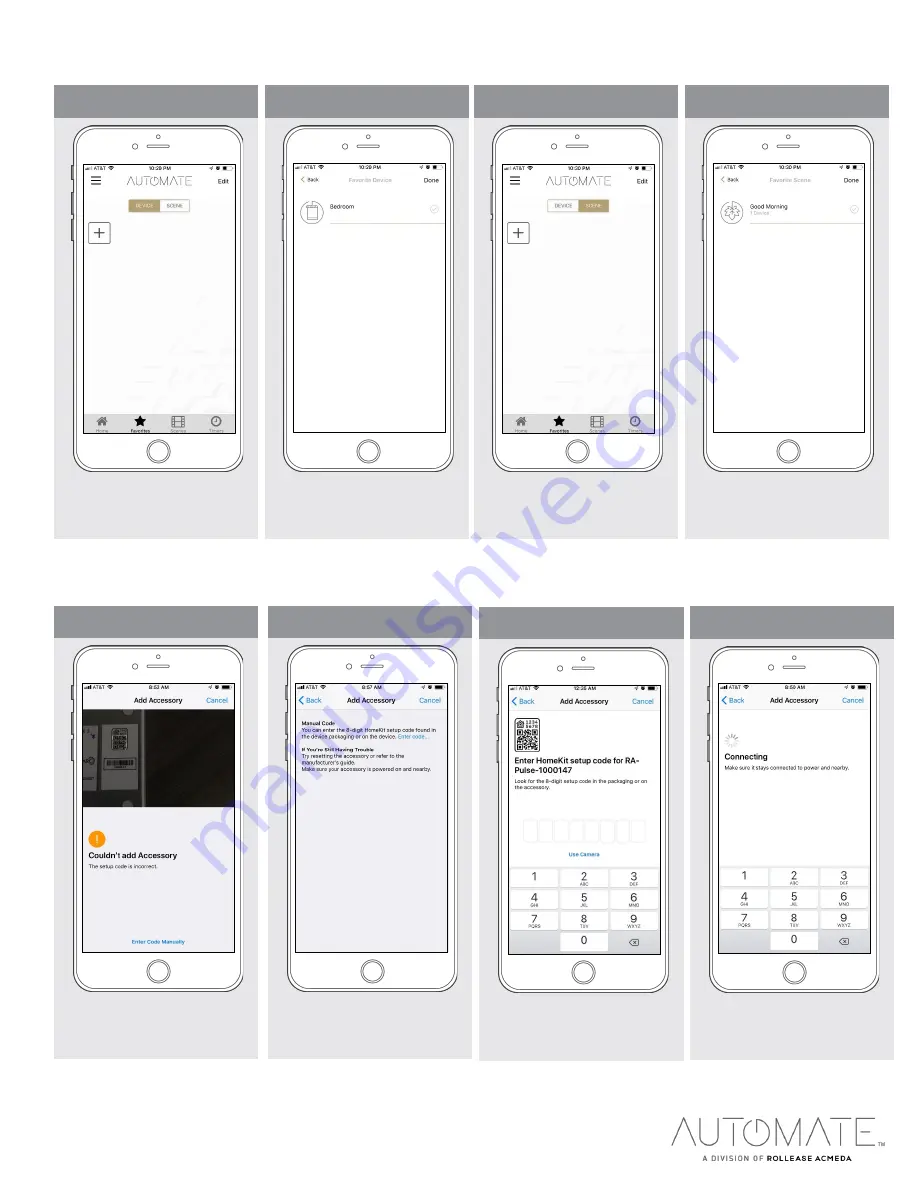
HOW TO CREATE FAVORITE: 


MANUAL HUB CONFIGURATION: 


STEP 1 - Configure a Hub 

If the App doesn’t recognize the QR 

Code, you should enter code 

manually. 

STEP 2 - Configure a Hub 

Select ‘Enter Code’ to enter the 

Homekit code manually 

STEP 4 - Configure a Hub 

Wait while the hub syncs with 

Homekit. 

STEP 3 - Configure a Hub 

Type the code on the label. 

STEP 1 – Create a Favorite Device 

Select the “Plus” icon to add a 

favorite device to your ‘Favorites’ . 


STEP 2 – Edit a Favorite Device


Select ‘EDIT’ in the upper right corner 

to remove the favorite device from 

your screen. 


STEP 3 – Create a Favorite Scene


Select the “Plus” icon to add a 

favorite scene to your ‘Favorites’ 


STEP 4 – Create a Favorite Scene


Select ‘EDIT’ in the upper right corner 

to remove the favorite scenes from 

your screen. 


Содержание Automate Pulse 2 Hub

Страница 1: ...STARTED In order to experience automated shade control through the Automate Pulse 2 app you will need to have Downloaded the free app via the Apple App Store available under iPhone apps or iPad apps...

Страница 2: ...a list of scenes created Timers Show a list of scene timers Menu Rooms Locations Devices Home Favorites Scenes Timers A Automate Pulse 2 Hub B USB Power Supply C 32 80cm USB Power Cord E Quick Start G...

Страница 3: ...k then Done STEP 7 Toggle Location If you have setup multiple locations select the Location icon in the upper right corner to toggle between locations STEP 1 Open App Open the Automate Pulse 2 mobile...

Страница 4: ...s to setting up your HUB on the App STEP 11 Configure a Hub Pressing the P button for 2secs until the Blue LED begins flashing This indicates the hub is in pairing mode STEP 12 Configure a Hub From th...

Страница 5: ...EP 18 Configure a Hub Wait as the hub finalizes the setup STEP 19 Configure a Hub The Hub is ready to be used Press DONE to start the Application STEP 20 Pair a motor On the home screen select DEVICES...

Страница 6: ...hold the P1 button on the motor head 2 seconds The motor will jog up and down once and you will hear one audible beep Press PAIR on the app screen STEP 27 Pair a motor Wait as the app searches for th...

Страница 7: ...pressing the Down Arrow icon or scrolling the black line to the bottom STEP 4 Move a shade Move the shade to the position desired by scrolling the black line to any position STEP 4 Create a Room Sele...

Страница 8: ...the same time STEP 11 Operate a Room Operate all shades in the Room with the three button options available Open Close and move 50 STEP 5 Create a Room Select the appropriate icon for the Room STEP 6...

Страница 9: ...customize the name of your scene STEP 3 Create a Scene Input your scene name STEP 4 Create a Scene Select SCENE PICTURE to customize the icon for your scene STEP 8 Create a Scene Set the shade height...

Страница 10: ...9 Create a Scene Wait as the app creates your new scene STEP 10 Activate a Scene To activate your custom scene just press GO next to the desired scene name STEP 1 Create a Timer Select TIMERS then ADD...

Страница 11: ...icon for the Timer STEP 6 Create a Timer Select the TIMER SCENE to choose the scene you wish the timer to activate STEP 9 Create a Timer Select the days you wish the timer to operate STEP 10 Create a...

Страница 12: ...the hub syncs with Homekit STEP 3 Configure a Hub Type the code on the label STEP 1 Create a Favorite Device Select the Plus icon to add a favorite device to your Favorites STEP 2 Edit a Favorite Dev...

Страница 13: ...ust Limits Select Edit on the top right to open the shades settings page STEP 5 Setting Limits To move your shade a little bit press the arrow buttons or slide the double arrow button Press SET TOP PO...

Страница 14: ...a Hub In the Add a Hub Screen it is possible to connect to a shared hub STEP 2 Share a Hub The HUB must have been shared from another account STEP 3 Share a Hub The shared Hub will be listed on the s...

Страница 15: ...ate Pulse 2 is Connected to Wi Fi Blue LED short blinks five times Automate Pulse 2 is getting a Firmware Updating Blue LED is solid ON App is connected to Automate Pulse 2 Hub Red LED short blink Aut...

Страница 16: ...The Shade is connected to the HUB and works properly Battery Icon Green The Battery Level is over 70 Battery Icon Yellow The Battery Level is between 50 and 70 Battery Icon Red The Battery Level is le...

Страница 17: ...does not currently support operation over a 5GHz network It operates on a 2 4GHz network or using a LAN CONNECTION CAT 5 Most routers are dual band and can support both network configurations Please m...

Отзывы: