21
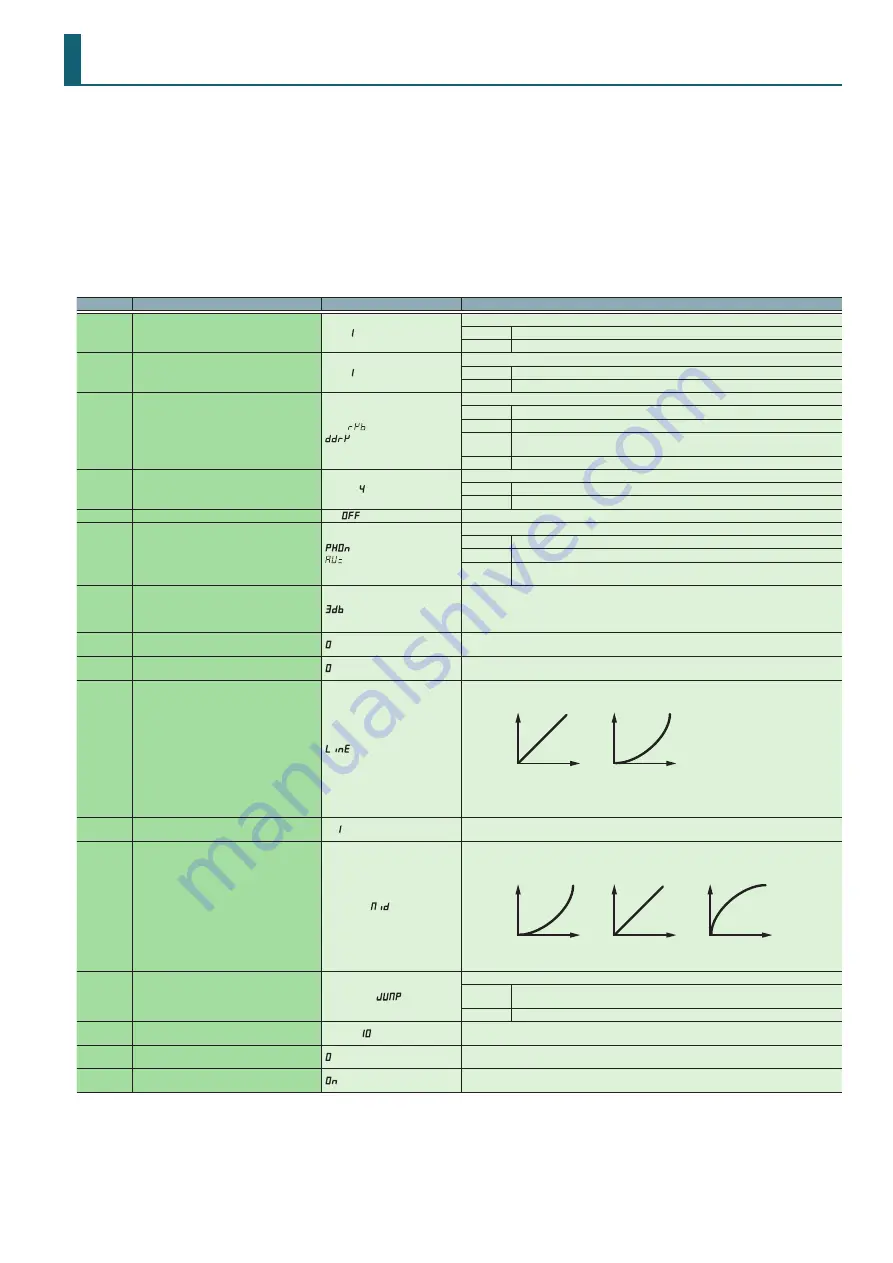
System Settings
1
While holding down the [LOAD] button in the right side (R channel) of the browser section, and press the [POWER] switch to turn on the
power.
The DJ-505 is in system setting mode, and the [START/STOP] button of the TR-S section is blinking.
2
Press the TR-S pad or button that corresponds with the setting you want to make.
The display shows the current value.
3
Use the [VALUE] knob to change the value of the setting.
4
When you’ve finished making settings, press the blinking [START/STOP] button.
After a few seconds, the display shows “
CONp
.”
5
Turn the DJ-505’s power off and then on again.
TR-S Pad
Item
Value (Bold: default)
Explanation
[1]
Mic audio low cut filter setting
OFF
,
1
–
10
Adjusts the strength of the low cut filter applied to the mic audio.
1–10
Higher values produce a stronger effect.
OFF
The low cut filter is not applied.
[2]
Mic audio noise gate setting
OFF
,
1
–
10
Specifies the strength of the noise gate applied to the mic audio.
1–10
As the value increases, even higher-level sound will be cut.
OFF
The noise gate is not applied.
[3]
Mic input effect selection
OFF
,
(Reverb),
dLy
(Delay),
(Delay + Reverb)
Specifies the effect that is applied to the mic audio.
Reverb
Reverb is applied.
Delay
Delay is applied.
Delay +
Reverb
Delay and reverb are applied simultaneously.
OFF
No effect is applied.
[4]
Mic input effect setting
OFF
,
1
–
4
–
10
Adjusts the depth of the effect that is applied to the mic audio.
1–10
Higher values apply the effect more deeply.
OFF
No effect is applied.
[5]
BOOTH OUT jack setting
On
,
OFF
Specifies whether the mic audio is output (On) or is not output (OFF) from the BOOTH OUT jacks.
[6]
DVS input selection
PHOn
(PHONO),
Line
(LINE),
(AUX)
Selects the input signal when using DVS.
Phono
The phono-level (a connected turntable without an EQ amp) input is the source.
Line
The line-level (a connected DJ player or turntable with an EQ amp) is the source.
Aux
DVS is not used; rather, the input to the INPUT (CH 1, CH 2) jacks is used as the AUX
signal.
[7]
EQ ([HI]/[MID]/[LOW] knobs) maximum value
3db
,
6db
Specifies the maximum value of the equalizer.
When the [HI]/[MID]/[LOW] knobs of each channel are turned all the way to the right, they have the
value specified here.
* This setting is effective only in stand-alone mode.
[8]
Master output attenuator level
0
,
-3
,
-6
,
-12
,
-18
(dB)
Specifies the attenuation level of the master output. The master output level decreases by the
amount of this value.
[9]
BOOTH OUT attenuator level
0
,
-3
,
-6
,
-12
,
-18
(dB)
Specifies the attenuation level of the booth output. The booth output level decreases by the
amount of this value.
[10]
Cross fader curve
Line
(Linear),
poU
-
(Power)
Specifies the curve of the cross fader.
left/right
center
low
high
Position of fader
Level
Linear
Power
* This setting is effective only in stand-alone mode.
[11]
Margin at both ends of cross fader
0
,
1
–
10
Specifies the margin at both ends of the cross fader. Higher values increase the margin, providing
more play at each end of the cross fader.
[12]
Performance pad velocity curve
LoU
-
(Low),
Nid
(Mid),
Hi
(Hi)
Specifies the velocity curve of the performance pads (the way in which the level changes in
response to the strength of your strike on the pad).
strong
weak
low
high
Strength of pad strike
Level
Low
Mid
Hi
[13]
TR-S section knob mode
Picc
W
(Pick),
JUNP
(Jump)
Specifies how the knobs in the TR-S section operate.
Pick
If there is a discrepancy between the recalled value and the position of the knob, data
is output only after you turn the knob to the position that matches the value.
Jump
Data is always output according to the position of the knob.
[14]
Demo mode time setting
OFF
,
1
–
10
–
30
Specifies the time (minutes) from when the DJ-505 was last operated until it enters demo mode.
If this is OFF, demo mode will not operate.
[15]
LED brightness adjustment
0
–
3
Adjusts the brightness when a button, pad, or indicator is lit.
Higher values decrease the brightness.
[16]
Auto Off function (p. 10) setting
On
,
OFF
When no operation has been performed for a certain length of time, the power turns off
automatically. If you don’t want the power to turn off automatically, set this “OFF.”


