background image

19

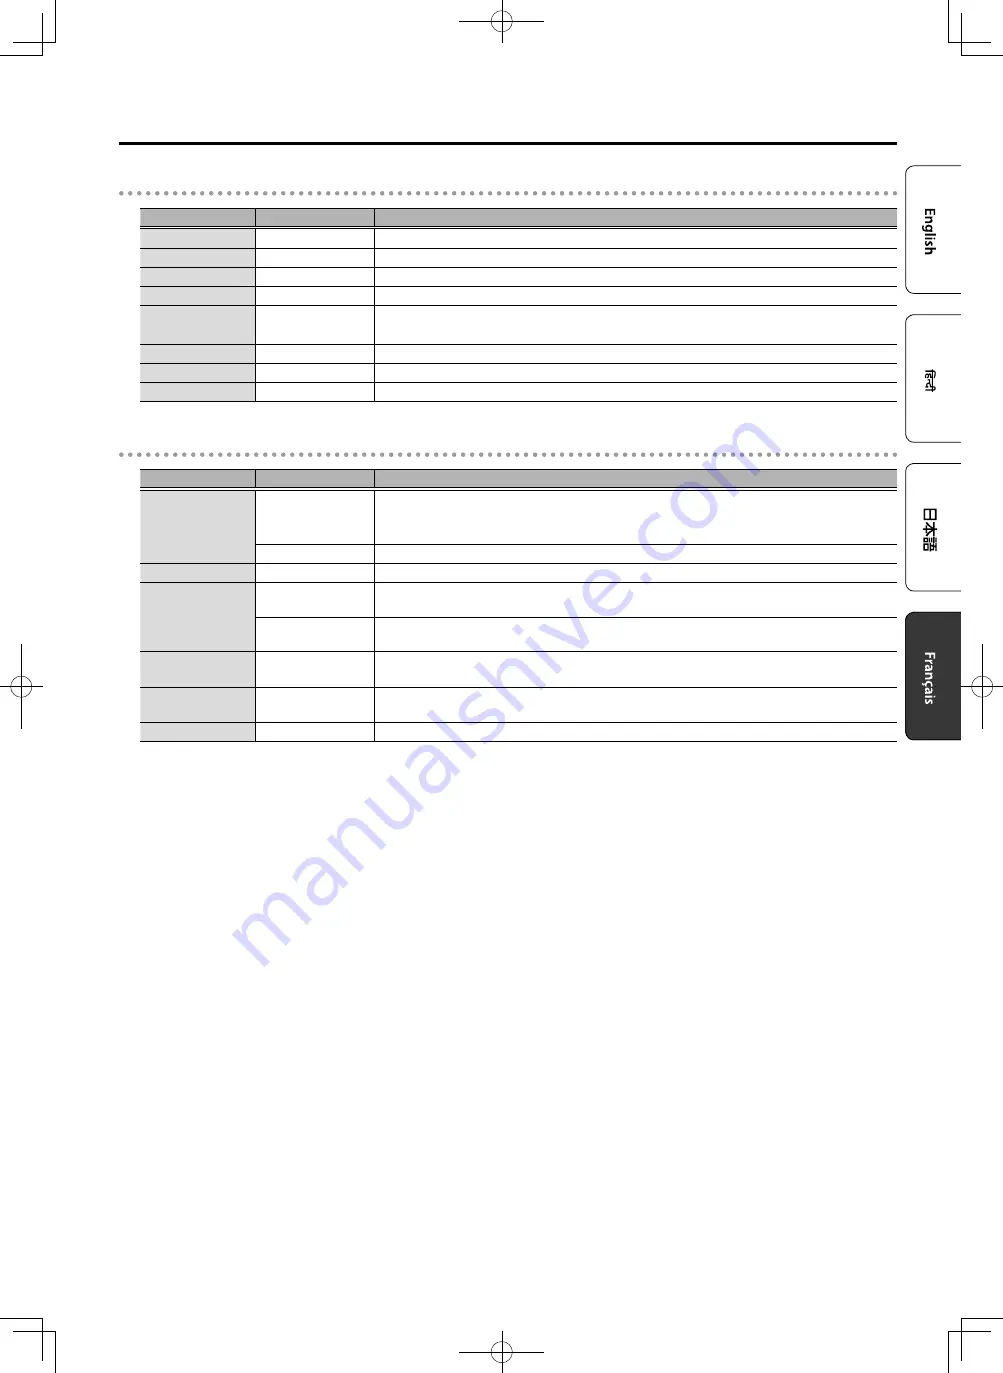
Création d’un kit

Paramètres KIT EQ

Paramètre

Valeur

Description

ON/OFF

ON, OFF

Permet d’activer ou de désactiver l’effet KIT EQ.

LoFrq

20 Hz à 1 kHz

Spécifie la fréquence centrale de la gamme des basses fréquences.

LoGain

-12 à +12 dB

Amplification ou atténuation des basses fréquences.

MidFrq

20 Hz à 16 kHz

Permet de régler la fréquence centrale de la gamme des moyennes fréquences.

Mid Q

0,5 à 8,0

Largeur de la gamme des moyennes fréquences
Des valeurs plus élevées réduisent cette largeur.

MidGain

-12 à +12 dB

Règle la quantité d’amplification ou d’atténuation des moyennes fréquences.

HiFrq

1 à 16 kHz

Spécifie la fréquence centrale de la gamme des hautes fréquences.

HiGain

-12 à +12 dB

Règle la quantité d’amplification ou d’atténuation des hautes fréquences.

Réglages MIDI du KIT

Paramètre

Valeur

Description

Note#

0 (Do -) à 127 (Sol 9)

Numéro de note MIDI transmise ou reçue par chaque pad.
* Si vous spécifiez un numéro de note identique au numéro de note spécifié pour un autre pad, 

un «*» s’affiche à la fin.

OFF

Remarque : les messages de note ne sont ni reçus ni transmis

GateTime

0,1 à 8,0 s

Durée de la note transmise par chaque pad

Channel

CH1 à CH16

Canal MIDI utilisé par chaque pad pour transmettre ou recevoir des messages de note ou 

contrôler les messages de changement

GLOBAL

Pour émettre ou recevoir en utilisant le canal d’émission ou de réception spécifié dans SYSTEM 

(p. 26)

HClNote (*)

(Hi-Hat Closed Note)

0 (Do -) à 127 (Sol 9), 

OFF

Numéro de note MIDI transmis et reçu pour le charleston fermé

HPedal (*)

(Hi-Hat Pedal)

0 (Do -) à 127 (Sol 9), 

OFF

Numéro de note MIDI transmise et reçue pour la pédale du charleston

INITIALIZE

-

Ramène les réglages MIDI du KIT à leur état de sortie d’usine.

(*) Valable uniquement pour le pad contrôlé par charleston ouvert/fermé (p. 25).

Содержание OCTAPAD SPD-20 PRO

Страница 1: ...is document Read this first It explains the basic things you need to know in order to use the SPD 20 PRO PDF Manual download from theWeb 5 5 Data List This explains the parameters and sound of the SPD...

Страница 2: ...tings 17 Editing the Sound of the Overall Kit 18 Recalling Kits in a Specific Order 20 Creating a Kit Chain 20 Using a Kit Chain 20 Specifying the Pad Sensitivity 21 Connecting External Devices 22 Con...

Страница 3: ...hakiness or are Placed in a poorly ventilated location WARNING Use only the stand that is recommended This unit should be used only with a stand that is recommended by Roland Do not place in a locatio...

Страница 4: ...lectric shock At regular intervals be sure to pull out the power plug and using a dry cloth wipe away any dust or foreign objects that may have accumulated Disconnect the power plug whenever the unit...

Страница 5: ...concerning the restoration of any stored content that has been lost Use a reasonable amount of care when using the unit s buttons sliders or other controls and when using its jacks and connectors Roug...

Страница 6: ...H Volume Playing Dynamics Sub Main Volume Playing Dynamics When the layer type is FADE2 Sub Main What Is a Kit All instruments assigned to the eight pads and four external pads as well as the effects...

Страница 7: ...Main Sub PAD2 Main Sub PAD3 Main Sub PAD4 Main Sub PAD5 Main Sub PAD6 Main Sub PAD7 Main Sub PAD8 Main Sub EXT1 R EXT2 R EXT3 R EXT4 R EXT1 H Main Sub EXT2 H Main Sub EXT3 H Main Sub EXT4 H Main Sub E...

Страница 8: ...u can stop all currently heard sound p 11 8 ENTER button By pressing this when the display indicates ENTER you can execute an operation or access a screen with detailed settings By pressing the SHIFT...

Страница 9: ...4 jacks HH CTRL jack p 22 Connect pads or pedals to the 1 4 external trigger input jacks To make this connection use the cable that is included with each pad All pads and pedals are sold separately To...

Страница 10: ...10 old model When turning the unit over be careful so as to protect the buttons and pads from damage Also handle the unit carefully do not drop it 1 Using the screws on the bottom of the OCTAPAD attac...

Страница 11: ...steps of ten About the icons shown in the upper right of the screen Icon Meaning Shown if the kit s MFX is on p 17 Shown if the kit s ambience is on p 17 Button operation is disabled Disabling Button...

Страница 12: ...his is shown only if PAD LINK p 14 is on Layer icon Layer type Icon Layer OFF Main Sub Other than OFF Main Sub Basic Editing Operation 2 4 1 5 1 Select a kit p 11 2 Press a button to select the type o...

Страница 13: ...e connected pad or pedal You can also select by holding down the ENTER button and using the K J buttons Making settings common to all pads SET ALL Here s how to set the currently edited parameter to t...

Страница 14: ...is hi hat control HC Pan L30 CENTER R30 Specifies the instrument s panning the position from which the sound is heard from the left and right speakers Output MFX DRY MFX Selects whether the sound of...

Страница 15: ...strikes that are weaker than the Fade Point and the sound switches to Inst Sub for pad strikes that are stronger XFADE Volume Playing dynamics This is essentially the same as FADE2 with the differenc...

Страница 16: ...ntil compression starts Release 10 1000ms Time until compression returns to the original state PAD MUTE GROUP and PAD LINK settings 1 From the OTHER button items select PAD MUTE GROUP or PAD LINK and...

Страница 17: ...N OFF ON OFF Turns ambience on off TYPE ROOM1 ROOM2 HALL1 HALL2 PLATE Selects the type of reverberation PreDelay 0 100ms Specifies the delay time from the original sound until the reverb is heard Time...

Страница 18: ...en using KIT COMP For details refer to KIT EQ settings p 19 KIT NAME Edits the name of the kit Use the K J buttons to select the character that you want to edit and use the buttons to edit it KIT MIDI...

Страница 19: ...e 0 C 127 G 9 MIDI note number transmitted received for each pad If you specify a note number that is the same as the note number specified for a different pad an is shown at the end OFF Note messages...

Страница 20: ...STEP3 STEP16 STEP1 STEP2 STEP3 STEP16 Kit Chain Kit Chain BANK B Creating a Kit Chain 1 Hold down the SHIFT button and press the KIT CHAIN button The KIT CHAIN button blinks 2 Use the K J buttons to...

Страница 21: ...e a determined force level velocity This can be used to prevent a pad from sounding because of vibrations from other pads In the following example B will sound but A and C will not sound Check this an...

Страница 22: ...parameters such as cross stick cancel are set to optimal values These values are only general guidelines you can make fine adjustments as appropriate according to how you attach the pad and how you u...

Страница 23: ...ncreasing this value makes it more likely that a note played in rapid succession will drop out Set this to as low a value as possible MEMO If two or more sounds are being produced when you strike the...

Страница 24: ...gs 2 Select this if you attach an RT 30H to the snare 3 Select this if you attach an RT 30H to a tom VH SET setting Here s how to adjust the offset of the hi hat VH 10 VH 11 This can be set only if TY...

Страница 25: ...PAD5 EXT1 H EX1 R PAD1 PAD5 EXT1 H EXT1 R PAD2 PAD6 EXT2 H EX2 R PAD2 PAD6 EXT2 H EXT1 R PAD3 PAD7 EXT3 H EX3 R PAD3 PAD7 EXT3 H EXT3 R PAD4 PAD8 EXT4 H EX4 R PAD4 PAD8 EXT4 H EXT4 R MAIN LAYER High p...

Страница 26: ...m the pads is not connected to the OCTAPAD s sound generator section DeviceID 17 32 When transmitted or receiving system exclusive messages set this to match the device ID numbers of the two units Par...

Страница 27: ...R button U User P Preset Pad number 4 Use the buttons to select the copy source kit From 5 5 Use the K button to move the cursor to U or P and then use the buttons to select either U user or P preset...

Страница 28: ...ion SaveAll Backs up all of the OCTAPAD s settings to the USB flash drive LoadAll Loads previously saved backup data from the USB flash drive into the OCTAPAD DelAll Deletes individual items of previo...

Страница 29: ...o delete the data If you decide to cancel press the EXIT button SaveKit 1 Access the USB MEMORY screen p 28 2 Select SaveKit and then press the ENTER button 3 Use the buttons to select the kit that yo...

Страница 30: ...tton once again 4 Press the ENTER button to format the USB flash drive If you decide to cancel press the EXIT button Other Functions Adjusting the Display Contrast 1 Press the SYSTEM button 2 Use the...

Страница 31: ...o not want the power to be turned off automatically disengage the Auto Off function To restore power turn the power on again p 11 1 Press the SYSTEM button 2 Use the cursor buttons to select OPTION an...

Страница 32: ...t data from the USB flash drive and then use the OCTAPAD to format the USB flash drive p 30 If this does not solve the problem try using a different USB flash drive Failed to Clear Failed to format th...

Страница 33: ...k Stereo 1 4 inch phone type EXTERNAL TRIGGER INPUT Jack 1 4 inch TRS phone type x 4 HH CTRL Jack 1 4 inch phone type FOOT SW Jack 1 4 inch TRS phone type MIDI IN OUT Connectors USB MEMORY port USB A...

Страница 34: ......

Страница 35: ...2020 Roland Corporation 3 5 SPD 20 PRO PDF 5 5 SPD 20 PRO 5 5 MIDI MIDI PDF 1 URL http www roland com manuals I 2 SPD 20 PRO...

Страница 36: ...t 6 Inst 6 Layer 6 Kit 6 Ambience MFX 6 7 8 8 9 10 11 11 11 11 11 12 12 12 14 17 MFX 17 AMBIENCE 17 18 20 20 20 21 22 22 22 25 MIDI 26 MIDI OCTAPAD 26 27 27 USB 28 28 USB 30 30 30 30 OUTPUT PHONES 31...

Страница 37: ...3 Auto Off Auto Off 31 Roland Roland Roland Roland Roland Roland Roland 10 AC AC AC AC AC Roland Roland AC Roland Roland Roland...

Страница 38: ...4 Roland Roland Roland Roland Roland Roland PDS 10...

Страница 39: ...5 AC AC Roland Roland SPD 20 PRO PDS 10 PDS 20 SPD 20 PRO PDS 10 Roland Corporation eSOL Co Ltd eParts eParts eSOL Co Ltd T Engine www tron org T License 2 0 T Kernel Roland OCTAPAD Roland Corporation...

Страница 40: ...6 OCTAPAD Kit Inst Inst OCTAPAD INST Layer Main Sub Layer Type SWITCH FADE2 Kit Kit 11 20 7 Ambience MFX Ambience MFX OCTAPAD MFX Ambience MFX 7...

Страница 41: ...Sub EXTERNAL TRIGGER INPUT PAD 1 8 MFX1 MFX2 MFX3 AMBIENCE KIT COMP KIT EQ KitVolume PedalHHVol KitTempo PAD MUTE GROUP PAD LINK KIT MIDI KIT NAME PAD1 8 EXT1 4 Sub Main INST Volume Curve FixedValue...

Страница 42: ...HIFT KIT 11 4 K J 5 6 SHIFT 7 EXIT SHIFT EXIT 11 8 ENTER ENTER SHIFT ENTER 13 9 INST 14 10 LEVEL 11 LAYER TYPE LAYER MAIN SUB 12 PITCH 13 OTHER 14 MFX 17 15 KIT COMMON 18 16 AMBIENCE 17 17 COPY EXCHAN...

Страница 43: ...S PHONES OUTPUT FOOT SW 25 BOSS FS 5U FS 6 OUTPUT MONO L MONO DC IN AC EXTERNAL TRIGGER INPUT1 4 HH CTRL 22 1 4 HH CTRL FD 8 FD 9 VH 10 VH 11 USB MEMORY 28 USB USB OCTAPAD VOLUME OUTPUT L R PHONES POW...

Страница 44: ...10 OCTAPAD PDS 10 PDS 20 OCTAPAD PDS 10 1 OCTAPAD PDS 10 PDS 20 OCTAPAD 2 OCTAPAD...

Страница 45: ...11 1 POWER 9 Auto Off Auto Off 31 1 KIT 2 SHIFT MFX 17 17 1 SHIFT KIT SHIFT KIT 1 SHIFT EXIT KIT CHAIN 20 25...

Страница 46: ...12 C A K J SPD 20 OFF Main Sub OFF Main Sub 2 4 1 5 1 11 2 3 13 4 K J ENTER ENTER 5 SHIFT...

Страница 47: ...13 1 2 INST 3 LAYER MAIN SUB 4 SPD 20 K J EXTERNAL TRIGGER INPUT 1 4 ENTER K J SET ALL 1 12 2 SHIFT ENTER 3 ENTER EXIT...

Страница 48: ...oarseTune 24 24 FineTune 50 50 1 100 PedalBend 24 24 OTHER Decay 1 100 DECAY Fixed HH NORMAL CLOSE HALF OPEN NORMAL HC Pan L30 CENTER R30 Output MFX DRY MFX MFX MFX MFX MFX MFX DRY MFX MFXSelect MFX1...

Страница 49: ...APAD Layer Type OFF MIX FADE1 FADE2 SWITCH XFADE FADE2 Fade Point 1 127 LAYER EQ ON OFF ON OFF EQ LoFrq 20Hz 1kHz LoGain 15 15dB MidFrq 20Hz 16kHz Mid Q 0 5 8 0 MidGain 15 15dB HiFrq 1 16kHz HiGain 15...

Страница 50: ...TER Gain 24 0 24 0dB Thre 48 0dB Ratio 1 1 2 1 3 1 4 1 8 1 16 1 32 1 100 1 Knee HARD SOFT1 SOFT2 SOFT3 Attack 0 1 100ms Release 10 1000ms PAD MUTE GROUP PAD LINK 1 OTHER PAD MUTE GROUP PAD LINK ENTER...

Страница 51: ...MFX3 K J 3 4 ENTER K J MFX PDF MEMO MFX 14 AMBIENCE AMBIENCE ON OFF ON OFF TYPE ROOM1 ROOM2 HALL1 HALL2 PLATE PreDelay 0 100ms Time 0 1 10 0s Density 0 127 Diffusion 0 127 LF Damp 0 100 HF Damp 0 100...

Страница 52: ...18 KIT EQ LOW MID HIGH KIT COMP KIT EQ 19 KIT NAME K J KIT MIDI MIDI KIT MIDI 19 KIT RESET KIT001 KIT200 KIT COMP ON OFF ON OFF KIT COMP TYPE SOFT HARD LIMITER KIT COMP Gain 24 0 24 0dB Thre 48 0dB Ra...

Страница 53: ...dFrq 20Hz 16kHz Mid Q 0 5 8 0 MidGain 12 12dB HiFrq 1 16kHz HiGain 12 12dB KIT MIDI Note 0 C 127 G 9 MIDI OFF GateTime 0 1 8 0s Channel CH1 CH16 MIDI GLOBAL 26 HClNote Hi Hat Closed Note 0 C 127 G 9 M...

Страница 54: ...6 16 A P BANK A STEP1 STEP2 STEP3 STEP16 BANK P STEP1 STEP2 STEP3 STEP16 STEP1 STEP2 STEP3 STEP16 BANK B 1 SHIFT KIT CHAIN KIT CHAIN 2 A P K J 3 ENTER 4 1 16 K J 5 16 END 1 KIT CHAIN KIT CHAIN 2 A P K...

Страница 55: ...ING K J ENTER 3 ENTER K J 4 K J 5 Sens 1 0 32 0 Threshold 0 31 B A C Curve LINEAR LINEAR EXP1 EXP2 EXP2 EXP1 EXP2 EXP1 LINEAR LOG1 LOG2 LOG2 LOG1 LOG2 LOG1 LINEAR SPLINE SPLINE LOUD1 LOUD2 LOUD2 LOUD1...

Страница 56: ...4 1 SYSTEM 2 EXT TRIG K J 3 ENTER 4 EXTERNAL TRIGGER INPUT 1 4 ENTER K J 5 K J 6 Type 24 EXTERNAL TRIGGER INPUT 1 4 MEMO Sens 1 0 32 0 21 Threshold 0 31 Curve LINEAR EXP1 EXP2 LOG1 LOG2 SPLINE LOUD1...

Страница 57: ...ancel MEMO MaskTime 0 64ms double trigger Mask Time Mask Time Mask Time MEMO 0 3 2 H R Head Rim Adjust 0 80 MEMO Head Rim Adjust NoiseCnl Ext Noise Cancel OFF 1 5 RT 30K RT 30HR EXTERNAL TRIGGER IN RT...

Страница 58: ...X8 PDX 6 PDX6 PD 8 PD8 VH 11 VH11 VH 10 VH10 CY 16RT CY16RT CY 15R CY15R CY 14CT CY14CT CY 14C CY14C CY 13R CY13R CY 12C CY12C CY 12R C CY12R C CY 8 CY8 CY 5 CY5 BT 1 BT1 BT1 SENS 1 PAD1 PAD2 PAD3 RT...

Страница 59: ...EXT3 R PAD4 PAD8 EXT4 H EX4 R PAD4 PAD8 EXT4 H EXT4 R MAIN LAYER SUB LAYER EX1 H EXTERNAL TRIGGER INPUT 1 HEAD EX1 R EXTERNAL TRIGGER INPUT 1 RIM FOOT SW 1 SYSTEM 2 SOUND CTRL K J 3 ENTER 4 FSw1 FSw2...

Страница 60: ...N OFF MIDI Thru OFF ON ON MIDI IN MIDI OUT LocalCtrl Local Control OFF ON OCTAPAD ON OFF OCTAPAD DeviceID 17 32 ID HH CC HiHat Pedal Control OFF 1 MOD 2 BERATH 4 FOOT 11 EXP 16 GEN1 17 GEN2 18 GEN3 19...

Страница 61: ...27 1 COPY EXCHANGE 2 K J COPY KIT COPY PAD EXCHANGE KIT FROM TO EXCHANGE PAD FROM TO EXCHANGE LAYER 3 ENTER U P 4 5 5 U P K U P P 5 5 J 5 ENTER 6 J 7 ENTER 8 ENTER 9 ENTER EXIT...

Страница 62: ...MEMORY K J 3 ENTER USB MEMORY 4 K J SaveAll USB OCTAPAD LoadAll USB OCTAPAD DelAll SaveKit USB OCTAPAD LoadKit USB OCTAPAD 30 DelKit Format USB SaveAll 1 USB MEMORY 28 2 SaveAll ENTER 3 ENTER 4 K J EN...

Страница 63: ...EXIT NOTE OCTAPAD DelAll 1 USB MEMORY 28 2 DelAll ENTER 3 ENTER ENTER 4 ENTER EXIT SaveKit 1 USB MEMORY 28 2 SaveKit ENTER 3 ENTER 4 ENTER ENTER 5 ENTER EXIT LoadKit 1 USB MEMORY 28 2 LoadKit ENTER 3...

Страница 64: ...ENTER 3 ENTER ENTER 4 ENTER EXIT USB NOTE USB USB 1 USB MEMORY 28 2 Format ENTER 3 ENTER 4 USB ENTER EXIT 1 SYSTEM 2 OPTION K J ENTER 3 LcdContrast K J 4 1 SYSTEM 2 FACTORY RESET K J ENTER 3 FACTORY R...

Страница 65: ...S 1 SYSTEM 2 SOUND CTRL K J ENTER 3 OutGain K J 4 OutGain AUTO OFF Auto Off Auto Off 11 1 SYSTEM 2 OPTION ENTER 3 AutoOff K J 4 OFF 4 HOURS 4 HOURS Turn Off If Not Used for 4 Hours ENTER 1 SYSTEM 2 VE...

Страница 66: ...DI BufferFull MIDI OCTAPAD MIDI OCTAPAD MIDI USB Memory No Backup File USB No USB Memory USB USB USB Memory Full USB Incorrect File Media Error USB USB USB OCTAPAD 30 USB Failed to Clear USB USB OCTAP...

Страница 67: ...16 2 LCD 7 3 LED PHONES 1 4 OUTPUT L MONO R 1 4 MIX IN 1 4 EXTERNAL TRIGGER INPUT 1 4 TRS x 4 HH CTRL 1 4 FOOT SW 1 4 TRS MIDI IN OUT USB MEMORY USB A AC DC 12 V 500 mA 450 x 350 x 72 3 7 kg AC PD PD...

Страница 68: ......

Страница 69: ...2020 Roland Corporation PDF Web 5 5 SPD 20 PRO 5 5 MIDI MIDI PDF 1 URL http www roland co jp manuals I 2 SPD 20 PRO P 3 P 5...

Страница 70: ...NST 6 LAYER 6 KIT 6 AMBIENCE MFX 6 7 8 8 9 10 11 11 11 11 11 12 12 12 14 17 MFX 17 AMBIENCE 17 18 20 20 20 21 22 22 22 25 MIDI 26 OCTAPAD MIDI 26 27 27 USB 28 28 USB 30 30 30 30 OUTPUT PHONES 31 AUTO...

Страница 71: ...3 Auto Off Auto Off Auto Off P 31 PDS P 10 PDS P 10 AC AC100V AC AC100V AC AC...

Страница 72: ...4 PDS P 10...

Страница 73: ...5 AC AC 6 SPD 20 PRO PDS 10 PDS 20 SPD 20 PRO PDS 10 eParts T Engine www tron org T License 2 0 T Kernel Roland OCTAPAD...

Страница 74: ...6 OCTAPAD INST OCTAPAD Inst LAYER 1 2 Main Sub Layer Type SWITCH Sub Main FADE2 Sub Main KIT 8 4 Kit P 11 P 20 P 7 AMBIENCE MFX OCTAPAD MFX OCTAPAD 1 3 MFX MFX P 7 Sub Main...

Страница 75: ...AL TRIGGER INPUT 1 8 MFX1 MFX2 MFX3 AMBIENCE KIT COMP KIT EQ KitVolume PedalHHVol KitTempo PAD MUTE GROUP PAD LINK KIT MIDI KIT NAME 1 8 EXT1 4 Sub Main INST Volume Curve FixedValue CoarseTune FineTun...

Страница 76: ...SHIFT EXIT P 11 8 ENTER ENTER SHIFT ENTER P 13 9 INST P 14 10 LEVEL 11 LAYER TYPE LAYER MAIN SUB 12 PITCH 13 OTHER 14 MFX P 17 15 KIT COMMON P 18 16 AMBIENCE AMBIENCE P 17 17 COPY EXCHANGE P 27 18 SYS...

Страница 77: ...HONES OUTPUT FOOT SW P 25 BOSS FS 5U FS 6 OUTPUT L MONO DC IN AC EXTERNAL TRIGGER INPUT1 4 HH CTRL P 22 1 4 HH CTRL FD 8 FD 9 VH 10 VH 11 USB MEMORY P 28 USB OCTAPAD USB VOLUME OUTPUT L R PHONES POWER...

Страница 78: ...10 OCTAPAD PDS 10 PDS 20 OCTAPAD PDS 10 1 OCTAPAD PDS 10 PDS 20 OCTAPAD 2 OCTAPAD...

Страница 79: ...11 1 POWER P 9 Auto Off Auto Off P 31 1 KIT 2 SHIFT 10 MFX P 17 P 17 1 SHIFT KIT SHIFT KIT 1 SHIFT EXIT All Sound Off P 20 P 25...

Страница 80: ...12 PAD LINK PAD LINK 2 3 SPD 20 C A K J PAD LINK PAD LINK P 14 OFF Main Sub OFF Main Sub 2 4 1 5 1 P 11 2 3 P 13 4 K J ENTER ENTER 5 SHIFT...

Страница 81: ...13 1 2 INST 3 LAYER MAIN SUB Main Sub 4 K J SPD 20 EXTERNAL TRIGGER INPUT 1 4 ENTER K J SET ALL 1 P 12 2 SHIFT ENTER 3 ENTER EXIT 8 4...

Страница 82: ...1 100 PedalBend 24 24 OTHER Decay 1 100 DECAY Fixed HH NORMAL CLOSE HALF OPEN NORMAL HC Pan L30 CENTER R30 Output MFX DRY MFX MFX MFX MFX MFX MFX DRY MFX MFXSelect MFX1 MFX2 MFX3 3 1 Main Sub MFXSend...

Страница 83: ...1 Inst Sub Fade Point FADE2 Fade Point Inst Main Inst Sub SWITCH Fade Point Inst Main Inst Sub XFADE FADE2 Fade Point Inst Main Fade Point 1 127 Inst Sub LAYER EQ ON OFF ON OFF EQ LoFrq 20Hz 1kHz LoGa...

Страница 84: ...ack Release Gain 24 0 24 0dB Thre 48 0dB Ratio 1 1 2 1 3 1 4 1 8 1 16 1 32 1 100 1 Knee HARD SOFT1 SOFT2 SOFT3 Attack 0 1 100ms Release 10 1000ms PAD MUTE GROUP PAD LINK 1 OTHER PAD MUTE GROUP PAD LIN...

Страница 85: ...F 4 ENTER K J MFX PDF MFX Main Sub P 14 AMBIENCE AMBIENCE ON OFF ON OFF AMBIENCE TYPE ROOM1 ROOM2 HALL1 HALL2 PLATE PreDelay 0 100ms Time 0 1 10 0s Density 0 127 Diffusion 0 127 LF Damp 0 100 HF Damp...

Страница 86: ...KIT COMP P 18 KIT EQ 3 LOW MID HIGH KIT COMP KIT EQ P 19 KIT NAME K J KIT MIDI MIDI KIT MIDI P 19 KIT RESET KIT001 KIT200 KIT COMP ON OFF ON OFF KIT COMP TYPE SOFT HARD LIMITER KIT COMP Gain 24 0 24 0...

Страница 87: ...16kHz Mid Q 0 5 8 0 MidGain 12 12dB HiFrq 1 16kHz HiGain 12 12dB KIT MIDI Note 0 C 127 G 9 MIDI OFF GateTime 0 1 8 0s Channel CH1 CH16 MIDI GLOBAL SYSTEM P 26 HClNote Hi Hat Closed Note 0 C 127 G 9 O...

Страница 88: ...Kit Chain 1 16 16 A P A STEP1 STEP2 STEP3 STEP16 P STEP1 STEP2 STEP3 STEP16 STEP1 STEP2 STEP3 STEP16 B 1 SHIFT KIT CHAIN KIT CHAIN 2 K J A P 3 ENTER 4 K J 1 16 5 16 END 1 KIT CHAIN KIT CHAIN 2 K J A P...

Страница 89: ...SETTING ENTER 3 ENTER K J 4 K J 5 Sens 1 0 32 0 Threshold 0 31 B A C Curve LINEAR LINEAR EXP1 EXP2 EXP2 EXP1 EXP2 EXP1 LINEAR LOG1 LOG2 LOG2 LOG1 LOG2 LOG1 LINEAR SPLINE SPLINE LOUD1 LOUD2 LOUD2 LOUD1...

Страница 90: ...TEM 2 K J EXT TRIG 3 ENTER 4 EXTERNAL TRIGGER INPUT 1 4 ENTER K J 5 K J 6 Type Trig Type P 24 EXTERNAL TRIGGER INPUT 1 4 Sens 1 0 32 0 Sens Threshold Curve P 21 Threshold 0 31 Curve LINEAR EXP1 EXP2 L...

Страница 91: ...2 MaskTime 0 64ms 2 1 2 1 2 Rim Gain 0 3 2 H R Adjust Head Rim Adjust 0 80 H R Adjust NoiseCnl Ext Noise Cancel OFF 1 5 EXTERNAL TRIGGER IN RT 30K RT 30HR Trig Type RT 30H XTalkCnl 0 80 2 PDF VH SET V...

Страница 92: ...DX12 PDX 8 PDX8 PDX 6 PDX6 PD 8 PD8 VH 11 VH11 VH 10 VH10 CY 16RT CY16RT CY 15R CY15R CY 14CT CY14CT CY 14C CY14C CY 13R CY13R CY 12C CY12C CY 12R C CY12R C CY 8 CY8 CY 5 CY5 BT 1 BT1 BT1 SENS 1 PAD1...

Страница 93: ...D3 PAD7 EXT3 H EXT3 R PAD4 PAD8 EXT4 H EXT4 R PAD4 PAD8 EXT4 H EXT4 R MAIN LAYER SUB LAYER EXT1 H EXTERNAL TRIGGER INPUT 1 HEAD EXT1 R EXTERNAL TRIGGER INPUT 1 RIM FOOT SW 1 SYSTEM 2 K J SOUND CTRL 3...

Страница 94: ...MIDI ON OFF MIDI Thru OFF ON ON MIDI IN MIDI OUT LocalCtrl Local Control OFF ON ON OFF ON OFF DeviceID 17 32 ID HH CC HiHat Pedal Control Change OFF 1 MOD 2 BERATH 4 FOOT 11 EXP 16 GEN1 17 GEN2 18 GE...

Страница 95: ...E 2 K J COPY KIT From To COPY PAD From To EXCHANGE KIT From FROM TO To EXCHANGE PAD From FROM TO To EXCHANGE LAYER Main Sub Main Sub 3 ENTER U P 4 From 5 5 K U P U P P 5 5 J 5 ENTER 6 To J 7 ENTER 8 E...

Страница 96: ...RY 3 ENTER USB MEMORY 4 K J SaveAll OCTAPAD USB LoadAll USB OCTAPAD DelAll USB 1 SaveKit OCTAPAD USB LoadKit USB OCTAPAD P 30 DelKit USB 1 Format USB SaveAll 1 USB MEMORY P 28 2 SaveAll ENTER 3 ENTER...

Страница 97: ...USB MEMORY P 28 2 DelAll ENTER 3 ENTER ENTER 4 ENTER EXIT SaveKit 1 USB MEMORY P 28 2 SaveKit ENTER 3 ENTER 4 ENTER ENTER 5 ENTER EXIT LoadKit 1 USB MEMORY P 28 2 LoadKit ENTER 3 ENTER 4 ENTER ENTER 5...

Страница 98: ...TER ENTER 4 ENTER EXIT USB USB USB 1 USB MEMORY P 28 2 Format ENTER 3 ENTER 4 ENTER EXIT 1 SYSTEM 2 K J OPTION ENTER 3 K J LcdContrast 4 1 SYSTEM 2 K J FACTORY RESET ENTER 3 ENTER FACTORY RESET EXIT U...

Страница 99: ...T PHONES 1 SYSTEM 2 K J SOUND CTRL ENTER 3 K J OutGain 4 OutGain AUTO OFF P 11 1 SYSTEM 2 OPTION ENTER 3 K J AutoOff 4 OFF 4 HOURS 4 4 HOURS Turn Off If Not Used for 4 Hours ENTER 1 SYSTEM 2 K J VERSI...

Страница 100: ...DI MIDI BufferFull MIDI MIDI MIDI USB No Backup File USB No USB Memory USB USB MEMORY USB USB Memory Full USB Incorrect File Media Error USB USB USB P 30 USB Failed to Clear USB USB OCTAPAD AC OCTAPAD...

Страница 101: ...2 1 2 2 1 5 3 38 16 2 LCD 7 3 LED PHONES OUTPUT L MONO R MIX IN EXTERNAL TRIGGER INPUT TRS 4 HH CTRL FOOT SW TRS MIDI IN OUT USB MEMORY USB A AC DC12V 500mA 450 350 72 mm 3 7kg AC AC PD PDX BT CY KD V...

Страница 102: ...431 1304 2036 1 20 04 01 050 3000 9230 Roland http roland cm roland_support 10 00 17 00 Q A BOSS http roland cm boss_support...

Страница 103: ...pr sent document Lisez ceci en premier Il explique les bases de ce que vous devez savoir pour utiliser le SPD 20 PRO Manuel PDF t l charger sur leWeb 5 5 Liste des donn es Explique les param tres et l...

Страница 104: ...MFX 17 Param tres AMBIENCE 17 Modification du son global du kit 18 Rappel de kits dans un ordre sp cifique 20 Cr ation d une cha ne de kits 20 Utilisation d une cha ne de kits 20 R glage de la sensib...

Страница 105: ...t install il peut en r sulter une instabilit susceptible d entra ner la chute de l appareil ou le basculement du support et de provoquer des blessures Utilisez uniquement l adaptateur secteur fourni e...

Страница 106: ...oquer un incendie ou une lectrocution Vous devez r guli rement d brancher la fiche lectrique et la nettoyer l aide d un chiffon sec afin de la d barrasser de toute poussi re et autres d p ts accumul s...

Страница 107: ...de contenu enregistr qui aurait t perdu Manipulez avec suffisamment de pr cautions les boutons curseurs et autres commandes de l appareil ainsi que les prises et les connecteurs Une manipulation trop...

Страница 108: ...que le type de superposition est sur SWITCH Volume Dynamique de jeu Sub Main Volume Dynamique de jeu Lorsque le type de superposition est sur FADE2 Sub Main Qu est ce qu un Kit Tous les instruments af...

Страница 109: ...001 PAD1 Main Sub PAD2 Main Sub PAD3 Main Sub PAD4 Main Sub PAD5 Main Sub PAD6 Main Sub PAD7 Main Sub PAD8 Main Sub EXT1 R EXT2 R EXT3 R EXT4 R EXT1 H Main Sub EXT2 H Main Sub EXT3 H Main Sub EXT4 H...

Страница 110: ...8 Bouton ENTER En appuyant sur cette touche lorsque l affichage indique ENTER vous pouvez ex cuter une op ration ou acc der un cran avec des param tres d taill s En appuyant sur la touche SHIFT ENTER...

Страница 111: ...s pads ou les p dales aux prises d entr e de d clenchement externe 1 4 Pour effectuer les connexions utilisez le c ble fourni avec chaque pad Tous les pads et p dales sont vendus s par ment la prise H...

Страница 112: ...n mod le Lorsque vous retournez l appareil veillez prot ger les boutons et pads pour ne pas les endommager Veillez aussi manipuler l appareil avec soin Ne le laissez pas tomber 1 l aide des vis situ e...

Страница 113: ...de l cran Ic ne Signification S affiche si le MFX du kit est activ p 17 S affiche si l ambiance du kit est activ e p 17 Le fonctionnement des boutons est d sactiv D sactivation du fonctionnement des b...

Страница 114: ...de superposition Ic ne Superposition OFF Main Sub Autre que OFF Main Sub Op rations d dition de base 2 4 1 5 1 S lectionnez un kit p 11 2 Appuyez sur un bouton pour s lectionner le type d l ment que...

Страница 115: ...ez sur le pad ou la p dale connect Vous pouvez galement le s lectionner en maintenant enfonc le bouton ENTER et en utilisant les boutons K J Unifier les r glages pour tous les pads SET ALL Voici comme...

Страница 116: ...le panoramique de l instrument la position partir de laquelle le son est entendu par les haut parleurs gauche et droit Output MFX DRY MFX Choisit si le son de l instrument est mis uniquement vers MFX...

Страница 117: ...on passe sur Inst Sub pour les frappes de pad plus fortes XFADE Volume Dynamique de jeu Il s agit essentiellement de la m me chose que FADE2 la diff rence que les frappes de pad plus fortes que le Fad...

Страница 118: ...Release 10 1000 ms Temps jusqu ce que la compression revienne son tat d origine Param tres PAD MUTE GROUP et PAD LINK 1 partir des l ments du bouton OTHER s lectionnez PAD MUTE GROUP ou PAD LINK et a...

Страница 119: ...NCE ON OFF ON OFF Permet d activer ou de d sactiver l effet Ambience TYPE ROOM1 ROOM2 HALL1 HALL2 PLATE S lectionne le type de r verb ration PreDelay 0 100 ms Sp cifie le temps de retard entre le son...

Страница 120: ...e l utilisation de KIT COMP Pour plus d informations consultez Param tres KIT EQ p 19 KIT NAME Permet de d finir le nom du kit Utilisez les boutons K J pour s lectionner le caract re que vous souhaite...

Страница 121: ...MIDI du KIT Param tre Valeur Description Note 0 Do 127 Sol 9 Num ro de note MIDI transmise ou re ue par chaque pad Si vous sp cifiez un num ro de note identique au num ro de note sp cifi pour un autr...

Страница 122: ...EP2 STEP3 STEP16 Cha ne de kits Cha ne de kits BANK B Cr ation d une cha ne de kits 1 Maintenez le bouton SHIFT enfonc et appuyez sur le bouton KIT CHAIN Le bouton KIT CHAIN clignote 2 Utilisez les bo...

Страница 123: ...rieur un niveau dynamique donn v locit Il est ainsi possible d emp cher un pad d mettre un son cause des vibrations provenant d autres pads Dans l exemple qui suit B va mettre un son mais pas A ni C...

Страница 124: ...lation de cross stick sont d finis sur des valeurs optimales Ces valeurs ne sont que des directives g n rales vous pouvez effectuer des ajustements pr cis selon vos besoins en fonction de la fa on don...

Страница 125: ...e jou e en succession rapide soit limin e Choisissez la valeur la plus basse possible REMARQUE Si deux sons ou plus sont mis lorsque vous frappez la peau une seule fois vous devez r gler le param tre...

Страница 126: ...RT 30H la caisse claire 3 S lectionnez cette option si vous connectez un RT 30H un tom R glageVH SET Voici comment r gler le d calage du charleston VH 10 VH 11 Celui ci ne peut tre d fini que si le T...

Страница 127: ...EXT1 H EXT1 R PAD2 PAD6 EXT2 H EX2 R PAD2 PAD6 EXT2 H EXT1 R PAD3 PAD7 EXT3 H EX3 R PAD3 PAD7 EXT3 H EXT3 R PAD4 PAD8 EXT4 H EX4 R PAD4 PAD8 EXT4 H EXT4 R SUPERPOSITION PRINCIPALE Haute priorit Basse...

Страница 128: ...ation des pads ne sont pas connect es la section g n rateur de sons du OCTAPAD DeviceID 17 32 Lors de la transmission ou de la r ception de messages du syst me exclusif d finissez ce param tre pour qu...

Страница 129: ...Utilisez les boutons pour s lectionner le kit source de copie De 5 5 Utilisez le bouton K pour d placer le curseur sur U ou P puis utilisez les boutons pour s lectionner U utilisateur ou P pr r gl Si...

Страница 130: ...ns K J pour s lectionner une fonction Fonction Description SaveAll Sauvegarde tous les param tres du OCTAPAD sur la cl USB LoadAll Charge les donn es de sauvegarde pr c demment enregistr es sur la cl...

Страница 131: ...TER pour supprimer les donn es Pour annuler appuyez sur le bouton EXIT SaveKit 1 Acc dez l cran USB MEMORY p 28 2 S lectionnez SaveKit puis appuyez sur le bouton ENTER 3 Utilisez les boutons pour s le...

Страница 132: ...le bouton ENTER pour formater la cl USB Pour annuler appuyez sur le bouton EXIT Autres fonctions R glage du contraste de l cran 1 Appuyez sur le bouton SYSTEM 2 Utilisez les boutons K J pour s lectio...

Страница 133: ...d sactivez la fonction Auto Off Pour restaurer l alimentation mettez nouveau l appareil sous tension p 11 1 Appuyez sur le bouton SYSTEM 2 Utilisez les boutons curseurs pour s lectionner OPTION puis...

Страница 134: ...la cl USB p 30 Si cela ne r sout pas le probl me essayez d utiliser un autre lecteur flash USB Failed to Clear Impossible de formater le lecteur flash USB Veillez ce que la cl USB soit correctement in...

Страница 135: ...Prises OUTPUT L MONO R Type casque 6 35 mm Prise MIX IN Type casque st r o 6 35 mm Prise EXTERNAL TRIGGER INPUT Type casque 6 35 mm x 4 Prise HH CTRL Type casque 6 35 mm Prise FOOT SW Type casque TRS...

Страница 136: ......

Отзывы: