background image

81

Information

Factory reset

If you wish to completely reset your audio system to its initial state this may be 

performed by following this procedure. By performing a factory reset, all user 

entered settings will be erased.

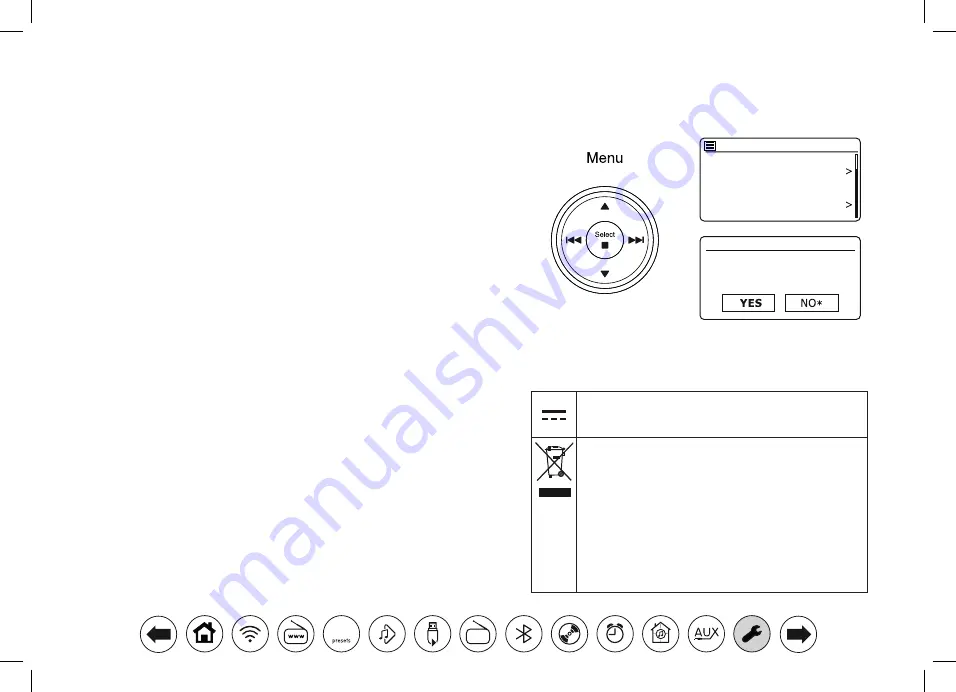
1.  With your audio system switched on, Press 

Menu

2.  Choose 

'Main menu',


'System settings'

'Factory reset'

  and  then  'YES'  to 

proceed.


If you do not wish to carry out a system reset, highlight 

'NO'

 and then press 

Select

. The display will revert to the previous menu.

3.  With 

'YES'

 highlighted, press 

Select

. A full reset will be performed and the 

audio system will restart as if first plugged in. The DAB stations list together 

with any preset stations will be erased and your wireless network connection 

details will be lost. All configuration settings will be restored to their defaults, 

the clock and alarms will be reset.

Factory reset

Proceed?

Factory Reset

Software update

Setup wizard

Info

Multi-room

Subwoofer

System settings

Electro-magnetic compatibility advice

In the event of a malfunction due to electrostatic discharge, mains power supply 

transients or short interruptions, reset the product as above to resume normal 

operation. If you are not able to perform the reset operation as above, removal 

and reconnection of the power supply may be required.

If  the  product  is  used  in  an  environment  with  any  ESD  Immunity  /  Radiated 

Immunity / Conducted Immunity disturbance, the product may malfunction. It will 

automatically recover to normal when the ESD Immunity / Radiated Immunity / 

Conducted Immunity disturbance is stopped.

Product markings


USB output 5V / 1A

Recycling

This  product  bears  the  selective  sorting  symbol  for 

Waste  Electrical  and  Electronic  Equipment  (WEEE). 

This  means  that  this  product  must  be  handled 

pursuant  to  European  directive  2012/19/EU  in  order 

to be recycled or dismantled to minimize its impact on 

the environment.

The  user  has  the  choice  to  give  the  product  to  a 

competent  recycling  organization  or  to  the  retailer 

when buying a new electrical or electronic equipment.

DAB

30

Содержание Stream 67

Страница 1: ...Internet Radio DAB DAB FMRDS Bluetooth CD USB with Spotify Deezer TIDAL Amazon Prime Music with Multi room and Works with Alexa and remote control from iPhone and Android using UNDOK Please read this manual before use Stream67 ...

Страница 2: ...ts Stream 67 Smart Audio System features 2 Before you can use this product 3 About this instruction manual 4 Controls and connections 5 Remote control 7 Navigation controls 9 Configuration 10 Plugging in and language selection 10 Clock and time settings 11 Connecting to your computer network 12 Configuration Using the UNDOK app 18 Network remote control options 21 Internet Radio 22 Internet Radio ...

Страница 3: ...ll radio station presets network configuration details and user settings are retained in the event of a power failure Spotify Connect allows your Spotify selections to be played through the audio system remotely controlled from your iPhone iPad Android device or any Desktop Supports remote control and plays music from Apple iPhone iPad and Android devices using the UNDOK app Your audio system may ...

Страница 4: ... for encryption so that you can get the audio system to communicate with the network or your router needs to offer WiFi Protected Setup WPS If you choose to connect the audio system to your network using a wired Ethernet connection then an Ethernet cable of the appropriate length will be needed If it is intended to listen to FM radio extensively then there may be a benefit in using a shielded Ethe...

Страница 5: ...io system in conjunction with the Spotify internet based music streaming service The two sections for DAB and FM Radio describe how to use the radio to listen to conventional radio broadcasts The Bluetooth section describes how to use your Stream 67 to play audio files or video soundtracks directly from your smartphone tablet or similar devices The CD MP3 WMA section describes how to play digital ...

Страница 6: ...on 6 Preset button 7 On Standby Sleep button 8 Info button 9 Alarm button 10 CD slot 11 Volume control 12 Repeat Shuffle BluetoothPair button 13 Previous button 14 Next button 15 Play Pause button 16 Stop Eject button 17 Tuning Select Snooze control 18 Mid treble speakers x 2 11 12 13 14 15 16 17 3 4 5 6 7 1 2 10 18 18 9 8 DAB 30 ...

Страница 7: ...ontrols and connections cont Rear view 19 USB playback Charge socket 20 Auxiliary input socket 21 Headphone socket 22 Ethernet RJ 45 socket 23 Mains input socket 23 24 25 22 21 20 19 24 DAB FM telescopic aerial 25 WiFi antenna 26 Bass speakers x 2 27 Bass ports x 2 26 26 27 27 DAB 30 ...

Страница 8: ...button 17 Sleep button 18 Bluetooth Pair button 19 Info button 20 Volume Down button 21 Menu Right Next button 22 Volume Up button 23 Play Pause button 24 Subwoofer Up Down buttons Remote control functions Most of the functions of the Stream 67 audio system can be controlled using either the product or the remote control However there are a few functions which are more easily accessible using the ...

Страница 9: ...r an extended period of time it is recommended that the batteries are removed IMPORTANT The batteries should not be exposed to excessive heat such as sunshine fire or the like After use disposable batteries should if possible be taken to a suitable recycling centre On no account should batteries be disposed of by incineration Do not leave batteries within reach of young children They can be a chok...

Страница 10: ...r Menu Down buttons on the remote control or the Tuning Select control on the unit Press Select to select that item If there are more than six items in a menu then the display will automatically scroll up or down so that the additional items become visible A sliding bar on the right will give an indication showing the current portion of the menu that is displayed If there are many items in a menu ...

Страница 11: ... system must remain accessible during normal use In order to disconnect the audio system from the mains the mains plug should be removed from the mains socket outlet completely 4 When you apply power the display on the audio system will light up and show a start up screen for a few seconds If this is the first time that you use your audio system or after a Factory Reset the display will show the l...

Страница 12: ...you will first need to select the correct time zone and daylight savings setting see the next steps If you choose No update you will need to set the clock manually later see page 60 Press Select to confirm your choice 4 PressMenuUporDowntohighlightthetimezoneforyourcurrentlocation Press Select to enter the setting 5 You will then need to set the Daylight Savings option according to your location D...

Страница 13: ...tware such as the UNDOK app Press Menu Left or Right to highlight the required option and then press Select to make the selection After setting the Keep Connected option the display will show a list of supported WiFi regional options Press Menu Up or Down to highlight the required region for the UK choose Europe and then press Select to make the selection Do this even if you are planning to use th...

Страница 14: ...e screen This is a name that is allocated to the access point in your router by the person who set up the network for example Jones family or Paul s network Routers supplied by Internet Service Providers often have the default name of the WiFi network provided on a label or card for easy reference e g BTHub 1234 virginmedia1234567 If the router supports WiFi Protected Setup then WPS will be shown ...

Страница 15: ...ices should then connect with the encryption key sent automatically to the audio system Skip WPS if you wish to enter the encryption key yourself or if it was previously entered If you chose Push Button or PIN the screen will then show Connecting and then Setup wizard completed Press Select to exit the setup wizard and then go to paragraph 10 on the next page 7 If your network is configured withou...

Страница 16: ...t as needed select to erase a character just entered long press to clear Info again to continue select when the complete key has been entered select to cancel and re run the Network Wizard If a WEP or WPA key has previously been entered for the selected SSID then the display will show Key Set If you have previously entered a different key you must clear this by selecting the symbol This will remov...

Страница 17: ...ing Menu Down to the desired network name Press Select to select this network The audio system will then use its WiFi system to communicate with the network Depending on the settings for the new network you may need to enter an encryption key see pages 14 15 By default the audio system will then acquire an IP address and other network settings from the network s router using DHCP Dynamic Host Conf...

Страница 18: ...ay If you choose Wired there are five screens and the progress marker will reflect this although the steps to set up the network parameters are basically the same 2 The subsequent menus allow configuration of the following parameters DHCP On or Off IP address e g 192 168 1 25 Subnet mask e g 255 255 255 0 Gateway adress e g 192 168 1 1 DNS address primary and secondary addresses SSID needed for Wi...

Страница 19: ...his app may have been changed slightly since these instructions were written Please refer to the Roberts Radio website for guidance on how to use the latest version Note At the time of writing Android version 4 0 3 and later or iOS version 9 or later are required to use UNDOK Configuration Using the UNDOK app Download the UNDOK app Download and install the UNDOK app on to your Android or iOS devic...

Страница 20: ...s WiFisettingstoconnect to your audio system 4 Select your Stream 67 audio system Once your device has connected to the audio system return to the UNDOK app 5 Use the app to complete thesetup includinggiving the unit a name whether it is connected by WiFi or Ethernet If you wish to connect using an ethernet cable please see page 10 6 For a WiFi connection the app will ask you to choose a WiFi netw...

Страница 21: ...s iOS please see page 19 The UNDOK app has a setup wizard to help configure suitable audio devices to connect to your home WiFi network 4 Your audio system will normally appear in this listasStream67 Itmay appear in the list below calledOther Selectthe unit to be setup 6 Choose whether it is connected via WiFi or Ethernet If you wish to connect using an ethernet cable please see page 10 7 For a Wi...

Страница 22: ... updated PIN should then be used in the UNDOK app to allow the app to reconnect to the audio system The app will prompt you for the PIN as needed Network remote control options Network PIN setup PIN number Control via the UNDOK app Keep network connected Your audio system has the option to shut down its WiFi or Ethernet connection when it is in Standby This minimises power consumption but it does ...

Страница 23: ...on by Location If you know the name of the station and the country from which a station is broadcast this may be the easiest method to find a station It is also a great way to experience radio from other parts of the world You may also search for an Internet radio station by Genre If you prefer a particular type of music Blues for example you may search for a radio station that broadcasts that typ...

Страница 24: ...red genre 2 Choose either All Stations or a list of countries 3 Highlight your chosen radio station Press Select Searching for a radio station by name 1 Press Menu 2 Choose Station list Stations then Search stations 3 To enter the search word s press Menu Up or Down Left or Right to highlight each character for the search in turn and press Select to enter If you make an error use Info to access th...

Страница 25: ...dio station 3 Stations which enable you to listen to previously broadcast programmes may allow you to fast forward rewind to any point within a programme and play or pause Note These features are dependent on the programme or podcast and will not always be available Last Listened The Last Listened feature provides you with quick access to the ten most recently listened to radio stations or podcast...

Страница 26: ...trol 1 Switch on your audio system and tune to the required Internet Radio DAB or FM station 2 Apply a long press on the required Preset button 1 10 on the remote control until the display shows Preset stored Repeat this procedure as needed for the remaining presets 3 Stations which are already stored in the presets may be over written by following the procedure above Recalling a preset 1 10 using...

Страница 27: ...t Preset stored will be shown on the display Repeat this procedure as needed for the remaining presets 4 Stations which are already stored in the presets may be over written by following the procedure above Recalling a preset 1 10 using the menu 1 Select the required mode Internet Radio DAB or FM using the Mode button 2 Press and release the Preset button to display the Recall from Preset menu 3 U...

Страница 28: ... accessible by you using your PC or your audio system You can choose the stations which will appear in the My Favourites menu from the large selection already listed Additionally if you find a radio station that is not listed then you may also add the Internet address URL of the station s audio stream to your selection It will then appear on your audio system via the My Added Stations menu item 4 ...

Страница 29: ... on the web site use the link My added stations in the My account area To delete an added radio station click on the icon with a heart and minus symbol Customising your radio cont Configuring My Favourite Stations 1 Using the web site at http www wifiradio frontier com it is possible to search among the many radio stations that are available by location genre orlanguage Youmayalsochoosefromneworpo...

Страница 30: ... always on line Selecting your added stations 1 When in Internet radio mode press Menu 2 Choose Station list and then My Added Stations 3 Highlight the required station and then press Select to confirm your selection The display will show Connecting while it finds the new station In addition as mentioned on page 28 it is possible to specify audio streams for My added stations which are not compati...

Страница 31: ... graph shows the minimum signal level required for satisfactory reception If a DAB radio broadcast provides a slideshow image this may be viewed full screen by pressing Select Press Select again to exit FM Radio display options Station name scrolling text frequency program type and date In FM mode your radio can use the Radio Data System RDS to display the radio station name and additional text wh...

Страница 32: ...s inALACandFLACformatswillonlyplayonthegroupmaster seepage86 Music Player Use with Windows Apple Mac Linux USB memory The Music Player allows you to play audio files which are stored on a another device connected to your network or which are held on a USB memory device plugged into your audio system Networked devices that could hold audio files can include computers smartphones tablets NetworkAtta...

Страница 33: ...the media files available to it on your PC To add new media files to the library select Library then Music then All music or Artist Album etc This will show you the current library contents You may then simply drag and drop files from other locations into the library Alternatively with media files or folders on the screen you may right click on the file or folder and select Include in library and ...

Страница 34: ...has been a connection to your UPnP server Whether prompted or not in order that the audio system may access the music files you will need to click the Library tab in WMP 12 and select the Stream item to open the Media Streaming window Select Automatically allow devices to play my media then select Automatically allow all computer and media devices Alternatively select More Streaming options to ena...

Страница 35: ...keyword for searching for content to play When you first set up sharing with a UPnP server not all of your files will be available immediately The UPnP server must look inside each file to identify the artist and album information from tags embedded in them The server may also need time to access the Internet to obtain additional information such as album art which it can display when you examine ...

Страница 36: ... or folder as described on the preceding pages 2 Press Menu Up or Down until the required track is highlighted 3 Press Select The track will begin playing The audio system will then play subsequent tracks from the same album or folder Controlling playback 1 Press Pause to pause playback of the current track 2 If you press Play playback will resume from the point where it was paused 3 Press Previou...

Страница 37: ...able or disable the Shuffle option press the Repeat Shuffle button The shuffle icon will show on the display when shuffle is enabled You may also control the options from the Main Music Player menu 2 Press Menu Up or Down until Shuffle play is highlighted 3 To activate the shuffle option press Select so that On appears on the display Your selected tracks will be played in random order and the Shuf...

Страница 38: ...essional norfilesofanyformatwhichhaveDRMprotection Recommendations Unless you have only a few files on the USB memory device do not place all files in the root folder The number of items files sub folders in any folder should be less than 2000 Searching and playback will be more responsive if the number of files in any one folder is limited we suggest not more than 250 It is recommended that the U...

Страница 39: ... press Mode as needed until the Music Player mode is selected If needed press Menu 3 Press Menu Up or Down until USB playback is highlighted on the display and press Select The audio system will now list the content stored on the USB memory device If there are many files or folders this may take a few seconds 4 Press Menu Up or Down to highlight the required folder and press Select to enter the cu...

Страница 40: ... name and USB tracks will show their file name Erasing a track from the playlist 1 Press Menu and then choose My Playlist 2 Press Menu Up or Down until the track you wish to erase is highlighted Apply a long press on Select 3 To delete the track highlight YES then press Select to confirm the deletion If you do not wish to delete the track from the list highlight NO and press Select to cancel the o...

Страница 41: ...d that there are servers listed by the audio system that you are no longer interested in The prune servers function allows only active UPnP servers on the currently connected network to be shown when selecting Shared Media from the Music Player menu 1 Press Menu Choose Prune servers To remove servers that are no longer required choose YES If you do not wish to prune servers choose NO Wake On LAN I...

Страница 42: ...ed Cast to Device in Windows 10 Similar functionality is available for handheld devices usingApple s iOS or Android operating systems by using the UNDOK app To use this feature choose the Local Music source option in the UNDOK app When used in this way the playing screen on the audio system will show the current operating mode as Local Music In this mode the audio system operates as a DLNA Digital...

Страница 43: ...ou may select additional content within Windows and again use the Play to Cast to Device function see steps 3 5 The additional tracks will be added to the playlist in the current Play to Cast to Device window You may also delete or change the order of tracks within the Play to Cast to Device window 9 When you wish to exit Local Music mode simply either switch off your audio system or select a diff...

Страница 44: ...ntrol the music from any mobile tablet or computer using the Spotify app Nonstop tunes Make calls watch videos go out of range The music keeps flowing Bring the party Readymade playlists for every mood and moment Connect to better sound Higher sample rates make the most of your music Spotify Connect A better way to listen at home Listen on your speakers or TV using the Spotify app as a remote Enjo...

Страница 45: ...ithin the current Spotify app 6 Press the Info button to step through the available display options Using the Mode button to select Spotify If you have previously connected using the Spotify Connect app you may select Spotify using the mode button on your audio system 1 Press the Mode button to select the Spotify mode Please note if the power is removed you will need to re connect Spotify with you...

Страница 46: ... tunes Use the Volume controls to set the sound level as needed 5 If the station list is still empty after the scan the display will show Service not available If no stations are found it may be necessary to relocate your audio system to a position giving better reception Selecting a DAB radio station 1 When playing a DAB radio station press Menu Up or Down to access the radio station list and to ...

Страница 47: ...o be used to assist the positioning of the telescopic aerial or the audio system to optimise reception for a specific channel or frequency 1 When in DAB mode press Menu Choose Manual tune 2 Choose the required DAB channel Press Select When the radio has tuned the display shows the channel number and frequency and the name of the DAB multiplex found if any A bar graph shows the signal strength and ...

Страница 48: ...d shows only those stations for which a signal can be found Prune stations If you move to a different part of the country some of the stations which were listed may no longer be available Also from time to time some DAB services may stop broadcasting or may change location or frequency Stations which cannot be found or which have not been received for a very long time are shown in the station list...

Страница 49: ... or interference apply a long press on Menu Up to scan further Your radio may have found a spurious interference signal 5 To scan down in frequency apply a long press on the Menu Down button on the remote control or rotate the Tuning control anti clockwise on the unit and then press the control Your audio system will scan down the FM band from the currently displayed frequency and will stop scanni...

Страница 50: ...sions 4 Alternatively to set your audio system so that all available stations are found during scanning local and distant transmissions choose NO Note The initial setting out of the box or after a System Reset causes the audio system to ignore weaker or more distant signals Stereo Mono switching FM Your audio system will play stereo FM broadcasts in stereo provided that the received signal is of a...

Страница 51: ...en the audio system is already connected to another device To cause the audio system to become discoverable press the Bluetooth Pair button on the remote or apply a long press on the Bluetooth Pair button on the unit Your Stream 67 will become discoverable by other devices 4 Using the Bluetooth settings of your phone tablet or PC direct it to search for discoverable devices After a few seconds you...

Страница 52: ... affected by the volume settings on the audio system and also on the connected Bluetooth device If you adjust the volume control on the audio system but you find that the volume from the audio system is not sufficient it may be that the volume setting of the connected device needs to be increased 3 The audio player in your phone tablet or PC may be able to respond to the Play Pause Next track Prev...

Страница 53: ...Bluetooth Pair button on the unit The Bluetooth indicator flashes blue Your Stream 67 audio system will become discoverable by other devices 2 You can now pair the audio system with a new device using its Bluetooth settings the audio system will be listed as Stream 67 When the new Bluetooth connection has been established the Bluetooth indicator will remain steady You may then play music from the ...

Страница 54: ...sitionyourBluetooth devices closer to each other if you observe communication difficulties WiFinetworksandcordlessphonesgenerallyusesimilarradiofrequencies to Bluetooth and may interfere with one another If any interference is noticed then try relocating the audio system or one of the other devices The Bluetooth capabilities of your audio system enable it to receive audio from many Bluetooth capab...

Страница 55: ...ays be playable You may have to specifically enable the finalising step with some CD writing software Your audio system may fail to play some CD R CD RW discs due to poor recording and wide variation in quality of the CD R CD RW disc MP3 WMA CD Mode The Stream 67 audio system is able to play CD R and CD RW discs containing MP3 and WMA files It is assumed in this section that a file is equivalent t...

Страница 56: ... will check the CD type and load its track list The display will show Loading and then Reading as the information is read 5 If you load a disc containing MP3 or WMA files your audio system will enter the MP3 WMA mode Playing a CD 1 Press the Play Pause button to start playing the disc Audio CD the display will show the first track number MP3 WMA CD the display will show the first folder and file n...

Страница 57: ...s buttons release the button when the desired track is displayed 3 Press the Play Pause button to play the selected track Selecting a track 1 For track numbers 1 10 simply press the corresponding digit button on the remote control For track numbers ten and above press the required digits using the 10 0 button to enter the digit zero 2 If the track number exceeds the number of tracks on the CD then...

Страница 58: ... While the CD is playing press the Repeat button until the repeat single track symbol 1 appears in the display The current track will be repeated Repeat a folder 1 While the CD is playing press the Repeat button until the repeat folder symbol Folder appears in the display The current folder will be repeated Repeat all tracks 1 While the CD is playing press the Repeat button until the repeat all tr...

Страница 59: ...menu CD Browse CD files Alternatively when playing MP3 and WMA CD files there is a browse option in the Menu 1 Press Menu to access the CD browse option 2 Press Menu Up or Down to select the desired folder or file 3 Press Select to begin playing from the highlighted file Shuffle tracks 1 While the CD is playing press the Shuffle button until the shuffle symbol appears in the display The tracks wil...

Страница 60: ...k or No update as required Setting the clock format The clock display used in Standby mode and on the playing mode screens can be set to 12 or 24 hour format The selected format is then also used when setting the alarms 1 With your audio system switched on press Menu 2 Choose System settings Time Date Set format and then select either 12 or 24 hour The current clock display format is marked with a...

Страница 61: ...ct day month year hour and minute digits To change the time zone setting go to step 5 To change from winter to summer time go to step 6 4 The display will then return to the previous menu 5 Select Set timezone and choose the time zone which is applicable to your location 6 Select Daylight savings The asterisk shows the current setting In the UK ON is equivalent to British Summer Time OFF is equiva...

Страница 62: ...low or alternatively press Menu Choose Main menu 4 Choose Alarms the current alarm settings will be displayed If no change is required press the Menu button to exit 5 Choose alarm 1 or 2 6 Choose Time and then choose the alarm hour and then the alarm minute If the audio system has been set to use a 12 hour clock format there will also be an option here for setting AM or PM for the alarm time 7 The...

Страница 63: ...to store the alarm settings select the Save option Press Select Your audio system will show Alarm Saved and will then go back to the list of alarms with the new alarm setting shown in the display If you decide not to save the settings press Menu or the Back button The display will show Save changes with a YES or NO option Choose NO Alarm not saved will show on the display Active alarms are shown u...

Страница 64: ...oozed will set the available snooze time to 5 10 15 or 30 minutes 2 While the snooze timer is active the remaining snooze time is shown next to the flashing alarm icon on the clock display 3 In order to cancel the Snooze timer while the alarm is suspended press On Standby The display will briefly show an Alarm Off message Disabling alarms 1 To disable an alarm while the audio system is in standby ...

Страница 65: ...choose Main menu Sleep and the required sleep time Press Select to confirm the setting 5 Your audio system will switch into Standby mode after the preset time has elapsed 6 An active sleep timer is shown using a small timer indicator at the bottom of the playing displays This indicator also shows the sleep time remaining before the audio system switches itself into Standby mode 7 To cancel the sle...

Страница 66: ...em s controls Each group that you configure may contain up to five compatible products Typically as many as 16 products may operate together on a single network The maximum number of products that will work together reliably is dependent upon the reliability and capability of the network Compatible products from Roberts also allow content from other sources to be shared with all of the products in...

Страница 67: ...ected to your network will be shown 3 Select the edit group icon 4 UNDOK will show the group setup screen and a list of the products available for grouping 5 Select the audio products that you wish to add into your group a maximum of four additional products You may add or remove products as needed 6 You may rename your group for example Family Room or Down Stairs etc 7 Confirm your selection 8 Yo...

Страница 68: ...will be shown in the source menu 3 Select Now Playing or Browse as needed to access content for the selected source Volume control using UNDOK UNDOK allows you to control the volume of a group of products and the volume of individual products within the group 1 Usethemultipleproductsicontoaccesstheindividualvolumecontrols 2 You may also mute either the group or products within the group using the ...

Страница 69: ...ntent from one of the other products in the group it is said to be acting as a Client please also see next page In this situation the audio system s display will show that the audio system is active but is playing as part of the group It will not be able to display additional information about the content being played in this mode 4 While playing as a group client the volume control buttons on the...

Страница 70: ...Press Menu Up or Down until View details is highlighted on the display Press Select Your audio system s multi room details will be shown on the display Ungrouped The product is not part of a group Server The product sends audio content to other group members Client The product receives audio from another product in the group 6 Press the Back button to exit the menu CD Bluetooth Aux in Sleep Alarms...

Страница 71: ...e text You can quickly access the three symbols on the right by pressing the Info button and then use the Menu Up or Down and Select buttons as needed The next screen will prompt you to add other connected multi room products to the current group 6 If you wish to add a product from the list to the new group highlight the product using the Menu Up or Down buttons and press the Select button to conf...

Страница 72: ... group highlight the product using the Menu Up or Down buttons and press the Select button to confirm The screen will show Added Products already added to the group are marked with an asterisk If the adding process displays Failed itisusuallybecausetheStream67isnotyetcontrolling a group see Creating new multi room group page 70 7 If you do not wish to add another product to the current group press...

Страница 73: ... Press Select A list of current connected audio products will show on the display 6 If you wish to remove a product from the current group highlight the product using the Menu Up or Down buttons and press the Select button to confirm The screen will show Removed 7 If you do not wish to remove the product from the current group press the Back button to exit Removed Remove from group R100 002261e808...

Страница 74: ...n until Leave group is highlighted on the display Press Select 6 Your Stream 67 will be removed from the current group If your Stream 67 was previously sending audio to other products in the group that will cease The other products will remain in the group and must then be operated separately Left Group CD Bluetooth Aux in Sleep Alarms System settings Main menu Factory Reset Software update Setup ...

Страница 75: ...multi room group then the audio system will remove itself from that group when the audio system switches itself on as a result of an alarm having been set This is so that an alarm sounding on one audio system will not cause all of the other products in the group to be activated at the same time If you wish to use your audio system as part of a multi room group after using the alarm function you wi...

Страница 76: ... bass mid range and treble setting Sleep timer Your audio system can be set to turn off after a preset time has elapsed The sleep setting can be adjusted as follows 1 Set the sleep timer using the UNDOK app 2 Your audio system will switch off after the preset sleep timer has elapsed Friendly name Your audio system is identified within the UNDOK app using its Friendly Name By default your audio sys...

Страница 77: ... setting as follows 1 Follow steps above in order to enter the Equaliser menu 2 Choose My EQ profile setup then Bass Mid Treble or Width 3 Choose the desired level The sound will change as you adjust the setting Press Select when you are happy with the setting 4 Press Menu as needed and the display will prompt you to save the changes If you wish to save the changes choose YES If you do not wish to...

Страница 78: ...er level setting in the system settings menu can be used to adjust the subwoofer level Note When listening on headphones the subwoofer control has no effect Subwoofer Subwoofer 4 Mute function Pressing the Mute button will mute the output from the loudspeakers 1 Press the Mute button on the remote control to mute the sound output 2 Press the Mute button again or one of the volume buttons to un mut...

Страница 79: ...ss when the audio system is in standby select Standby level Press Select The current setting will be marked with an asterisk 4 Choose either the High Medium or Low setting If setting the standby brightness level there is also an option to set the brightness to Very low Press Select to set the level If the audio system is playing then the chosen brightness will be applied immediately If the audio s...

Страница 80: ...tastereoleadfromtheheadphoneoutputofyourMP3orCDplayer to the Aux In socket located on the rear of the audio system Typically this lead will have a 3 5mm stereo plug at both ends 2 Switch on your audio system and press the Mode button until AUX in mode is shown on the display 3 Press play on the connected audio device If you are using its headphone output for the connection set its volume control t...

Страница 81: ...ff will disable this feature USB socket for smartphone or tablet charging Your audio system has a USB socket which can be used for charging a smartphone tablet or other similar devices Charge time may vary and in some cases may take longer to charge than when using the manufacturers charging unit supplied with the device 1 Ensure your audio system is plugged in 2 Connect your device to the USB cha...

Страница 82: ...ti room Subwoofer System settings Electro magnetic compatibility advice In the event of a malfunction due to electrostatic discharge mains power supply transients or short interruptions reset the product as above to resume normal operation If you are not able to perform the reset operation as above removal and reconnection of the power supply may be required If the product is used in an environmen...

Страница 83: ...nnection 3 Once the software update is completed the product will prompt you to press Select to restart Press Select and your product will then restart You may find that you will need to reconfigure your network connection following an update You may also need to re enter all radio station presets alarm settings and configuration options VERY IMPORTANT Do not switch off the power to the audio syst...

Страница 84: ...play This is the local IP address used by your audio system on your network In the example screen to the right the IP address is 192 168 1 27 Make a note of the IP address shown on your audio system s display for the next stage 3 Ensure that your computer is on the same network as the audio system On your computer enter the IP address noted above into the address bar of your web browser For exampl...

Страница 85: ...figured using the menu items Main Menu System settings Network Manual settings This will ask first whether you wish to configure a wired or a wireless connection For either wired or wireless you then need to choose DHCP enable or DHCP disable If you enable DHCP then the audio system will negotiate with your router or DHCP server and will be provided with an IP address as well as the other settings...

Страница 86: ...stem although the Stream 67 does play the most popular formats used by regular broadcasters Try using a PC to listen via the broadcaster s web site or via the radio station database web site at http www wifiradio frontier com If you can play the station with a PC it may be that the internet feed or local networkconnectionispoor However somebroadcasters suchastheBBC provide different data streams f...

Страница 87: ... following table summarises the maximum supported bit rates for the various audio formats that are playable on your audio system Higher rates may be playable in some cases but performance of the product may be affected Codec Maximum supported data rate AAC LC HE HE V2 320 kbits sec ALAC 1 1 5 Mbits sec FLAC 2 1 5 Mbits sec LPCM 3 1 536 Mbits sec MP3 320 kbits sec WAV 3 1 536 Mbits sec WMA 4 320 kb...

Страница 88: ...it with items such as newspapers tablecloths curtains etc No naked flame sources such as lighted candles should be placed on the product It is recommended to avoid using or storing the product at extremes of temperature Avoid leaving the unit in cars on window sills in direct sunlight etc The mains lead and audio system must be used in a moderate climate There are no user serviceable parts inside ...

Страница 89: ...mpany reserves the right to amend the specification without notice Frequency Coverage FM 87 5 108MHz DAB 174 928 239 200MHz Bluetooth 2 402 2 480GHz This symbol indicates AC voltage This symbol indicates Class II equipment Hereby Roberts Radio declares that this product is in compliance with the essential requirements and other relevant provisions of Directive 2014 53 EU The full text of the EU de...

Страница 90: ...onetheless the mains plug is cut off remove the fuse and dispose of the plug immediately to avoid a possible shock hazard by inadvertent connection to the mains supply If this product is not supplied with a mains plug or one has to be fitted then follow the instructions given below IMPORTANT DO NOT make any connection to the larger terminal which is marked with the letter E or by the safety earth ...

Страница 91: ...iis fraunhofer de amm Microsoft Windows Media Audio decoder WMA This product is protected by certain intellectual property rights of Microsoft Use or distribution of such technology outside of this product is prohibited without a license from Microsoft Microsoft Real Time Streaming Protocol RTSP This product is protected by certain intellectual property rights of Microsoft Use or distribution of s...

Страница 92: ... B Damaged or broken aerials will not be replaced under guarantee Procedure Any claim under this guarantee should be made through the dealer from whom the product was purchased It is likely that your Roberts dealer will be able to attend to any defect quickly and efficiently but should it be necessary the dealer will return the product to the company s service department for attention In the event...

Отзывы: