background image

If you need any further advice, please call our Technical Helpline on :-
020 8758 0338 (Mon-Fri)

20

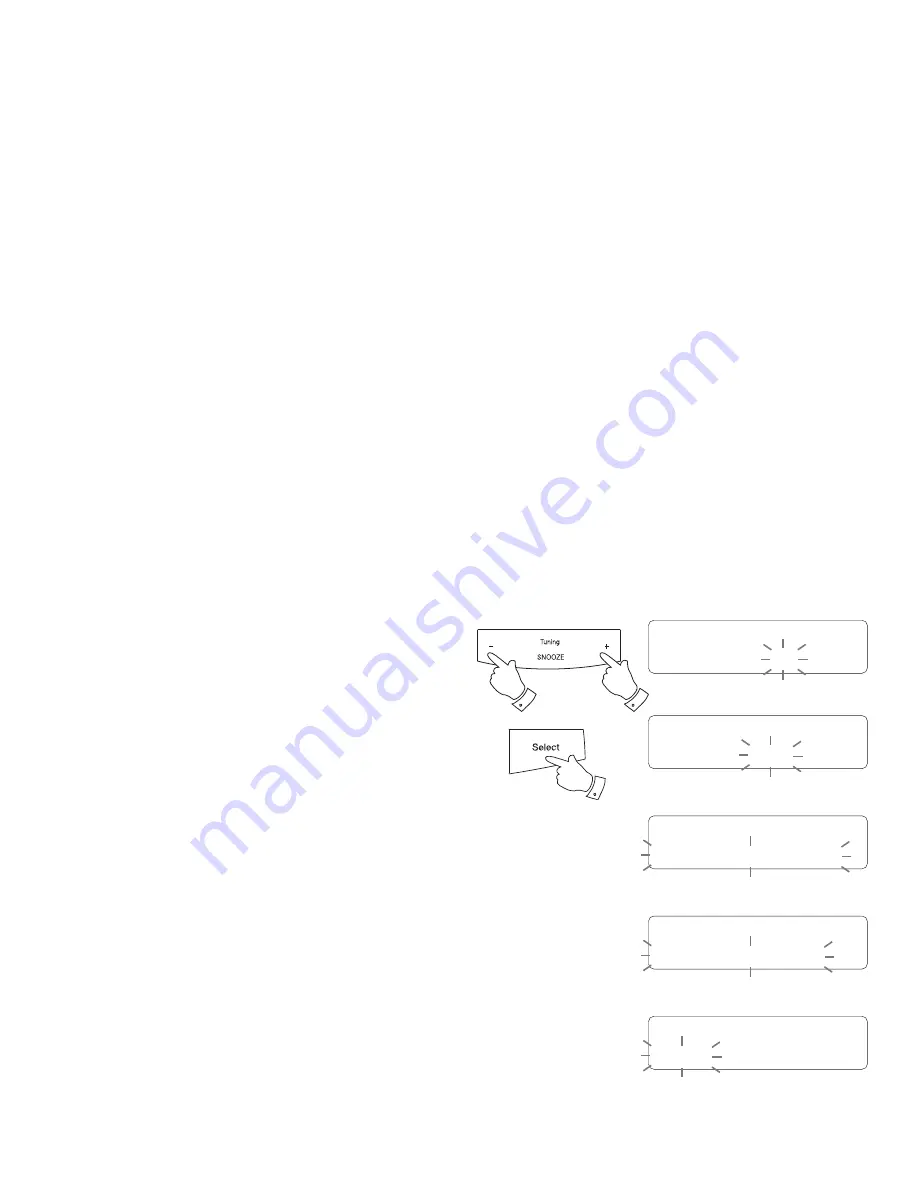
6.  Repeatedly press and release the 

Tuning Up 

or

 Down 

buttons


to choose 

the desired minute for the alarm and then press the 

Select 

button. 

• 

If the clock radio has been set to use a 12 hour clock format, there will 
be an option here for setting AM or PM for the alarm time.

7.    The alarm duration will 

fl

 ash on the display. Press the 

Tuning Up 

or


Down 

buttons to choose the alarm duration. Choose between 15, 30, 

45, 60 or 90 minutes.

8.  Press and release the 

Select

 button to enter the alarm duration. The 

alarm source option will 

fl

 ash on the display.

9.  Repeatedly press and release the 

Tuning Up 

or

 Down 

buttons


to 

choose the desired source for the alarm (DAB, FM or Buzzer). Press 
the 

Select 

button when the desired source alarm is highlighted on the 

display. For which ever radio mode is selected, the radio alarm may be 
set to any of the stations which have been stored as presets or to the 
station most recently listened to.

10.  If setting the alarm to a radio option, press the 

Tuning Up 

or

 Down 

buttons


to choose either last listened or from presets 1-10.


Note:

 that you can only set the alarm to use a preset which as already 

been stored (see page 17).

11.  Press and release the 

Select

 button to con

fi

 rm the selection. The alarm 

day option will 

fl

 ash on the display.

12. Your alarm can be set to sound once, daily, weekdays and weekends.
 

 Daily   

- Will sound every day.


Once  

- Will sound at one time only.


Weekends 

- Will sound only on weekends. 


Weekdays 

- Will sound only on weekdays.

Alarm 1 Wizard

Duration 15

Alarm 1 Wizard

DAB

Source

Alarm 1 Wizard

1: BBC Radio 2

Alarm 1 Wizard

Last listened

Alarm 1 Wizard

Once

6-11

6-10

6-10

Содержание ecologic 16

Страница 1: ...DAB FM RDS digital clock radio with analogue clock Please read this manual before use ROBERTSEnjoy Listening...

Страница 2: ...anual tuning FM 13 Display options FM 14 Stereo Mono setting FM headphones only 15 Scan sensitivity setting FM 16 Presetting stations DAB and FM 17 18 Alarms 19 23 Contents 1 Snooze 23 Sleep function...

Страница 3: ...l Helpline on 2 Controls front view 9 Dimmer button 10 Info Menu button 11 Select button 5 Preset button 6 Sleep button 7 LCD display 8 Alarm button 1 Analogue clock face 2 Tuning Up Down Snooze butto...

Страница 4: ...Controls rear 12 Volume control 13 DAB FM wire aerial 14 USB socket for software upgrades only 15 DC input socket 3 13 14 15 16 17 12 16 Auxiliary input socket 17 Headphone socket 18 Loudspeaker 18...

Страница 5: ...AB signals and if a DAB signal is found it will then set the current time and date This will be displayed if you return the clock radio to standby The clock hands will then move to show the correct ti...

Страница 6: ...t station in the list of stations found will be played The display will show the station name on the upper line of the text display and broadcast information on the lower line 6 If the station list is...

Страница 7: ...djust the Volume control to the required setting Note If after selecting a station the display shows Service not available it may be necessary to relocate your clock radio to a position giving better...

Страница 8: ...signal blocks will go up or downshowingthechangingsignalstrength as you adjust the wire aerial or the clock radio position c Programme type Displays the type of station being listened to e g Pop Clas...

Страница 9: ...stations may become available Or you may have moved to a different part of the country In this case you may need to cause your radio to scan for new stations 1 Press and hold the Menu button 2 Press t...

Страница 10: ...on The open block in the signal strength graph shows the minimum signal strength needed for good DAB reception The signal blocks will go up and down showing the changing signal strength as you adjust...

Страница 11: ...button until the DAB mode is selected 3 Press and hold the Menu button 4 Press the Tuning Up or Down buttons until DRC appears on the display Press and release the Select button The display will show...

Страница 12: ...lease the Band button until the DAB mode is selected 3 Press and hold the Menu button 4 Press the Tuning Up or Down buttons until Prune appears on the display Press and release the Select button 5 Pre...

Страница 13: ...s RDS data present then the radio may display the station name 6 To find other stations press and hold the Tuning Up button as before 7 Press and hold down the Tuning Down button for 2 3 seconds to ca...

Страница 14: ...ficient signal strength with RDS information present then the display may change to show the station name 5 When the waveband end is reached the radio will recommence tuning from the opposite waveband...

Страница 15: ...crolling text Displays scrolling text messages such as artist track name phone in number etc b Programme type Displaystypeofstationbeinglistenedto e g Pop Classic News etc c Frequency Displays the fre...

Страница 16: ...no to reduce the hiss from a weak FM signal press the Tuning Up or Down buttons until Forced mono appears on the display Press and release the Select button to confirm the setting Forced mono is a tem...

Страница 17: ...se the Band button until the FM mode is selected 3 Press and hold the Menu button 4 Press the Tuning Up or Down buttons until Scan setting shows on the display Press and release the Select button to e...

Страница 18: ...the DAB or FM mode 3 Tune to the required station as previously described 4 Press and hold the Preset button The display will show for example 1 Empty if no station has been stored to that preset 5 Us...

Страница 19: ...Thedisplaywillshow forexample 1 Empty if no station has been stored to that preset If a preset has been stored then the display will show either the station name for DAB stations or the frequency for...

Страница 20: ...ress and release the Alarm button Alarm 1 Setup will show on the display 2 Repeatedly press the Alarm button to choose the desired alarm 1 4 and then press the Select button Alarm Wizard shows on the...

Страница 21: ...the Select button when the desired source alarm is highlighted on the display For which ever radio mode is selected the radio alarm may be set to any of the stations which have been stored as presets...

Страница 22: ...Select button to confirm the setting 17 Press the Tuning Up or Down button to select the correct year 18 Press and release the Select button to confirm the alarm settings Your clock radio will show Al...

Страница 23: ...u may use the Tuning Up or Down buttons to modify any particular setting if desired using the Select button to enter the modification Alarm 1 Setup 1 2 3 3 3 Note It is not possible to lower the volum...

Страница 24: ...release the On Off button 1 09 30 08 Snooze 4 59 3 When the alarm sounds The alarm will sound at the selected times for up to 90 minutes unless cancelled The alarm duration used for the alarm will be...

Страница 25: ...will cancel the sleep function Alternatively the Tuning Up or Down buttons may be used 3 Press the Select button to confirm the setting The display will exit the sleep options 4 Your clock radio will...

Страница 26: ...he Tuning Up or Down buttons until System appears on the display Press and release the Select button 5 Press the Tuning Up or Down buttons until Time appears on the display Press and release the Selec...

Страница 27: ...Press the Tuning Up or Down buttons to change the day as needed 13 Press and release the Select button The month will flash on the display 14 Press the Tuning Up or Down buttons to set the current mo...

Страница 28: ...lect button 5 Press the Tuning Up or Down buttons until Time appears on the display Press and release the Select button 6 Press the Tuning Up or Down buttons until Time 12 24 hour appears on the displ...

Страница 29: ...ng Up or Down buttons until Time appears on the display Press and release the Select button 6 Press the Tuning Up or Down buttons until Auto update appears on the display Press and release the Select...

Страница 30: ...d the Menu button 4 Press the Tuning Up or Down buttons until System appears on the display Press and release the Select button 5 Press the Tuning Up or Down buttons until SW version appears on the di...

Страница 31: ...require The dimmer button will cycle through the different intensity settings 2 There are four dimmer brightness levels available as well as an off setting should you wish to turn off the dimmer back...

Страница 32: ...o not wish to carry out a system reset highlight No and then press the Select button The display will revert back to the previous display 6 With Yes highlighted press and release the Select button Afu...

Страница 33: ...unit from an external audio device such as an iPod MP3 or CD player 1 Connect a stereo or mono audio source for example iPod MP3 or CD player to the Auxiliary input socket marked Aux In 2 Press the On...

Страница 34: ...level before connecting headphones to the clock radio IMPORTANT Excessivesoundpressurefromearphonesandheadphones can cause hearing loss Note If using the alarm clock function the radio or buzzer alarm...

Страница 35: ...recommended that the DAB band be used wherever possible as better results in terms of quality andfreedomfrominterferencewillusuallybeobtainedthanontheFMband The name plate is located underneath the u...

Страница 36: ...he dealer from whom the instrument was purchased It is likely that your Roberts dealer will be able to attend to any defect quickly and efficiently but should it be necessary the dealer will return th...

Отзывы: