background image

11

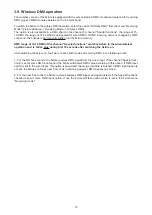
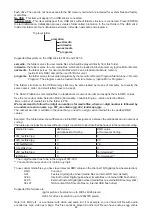
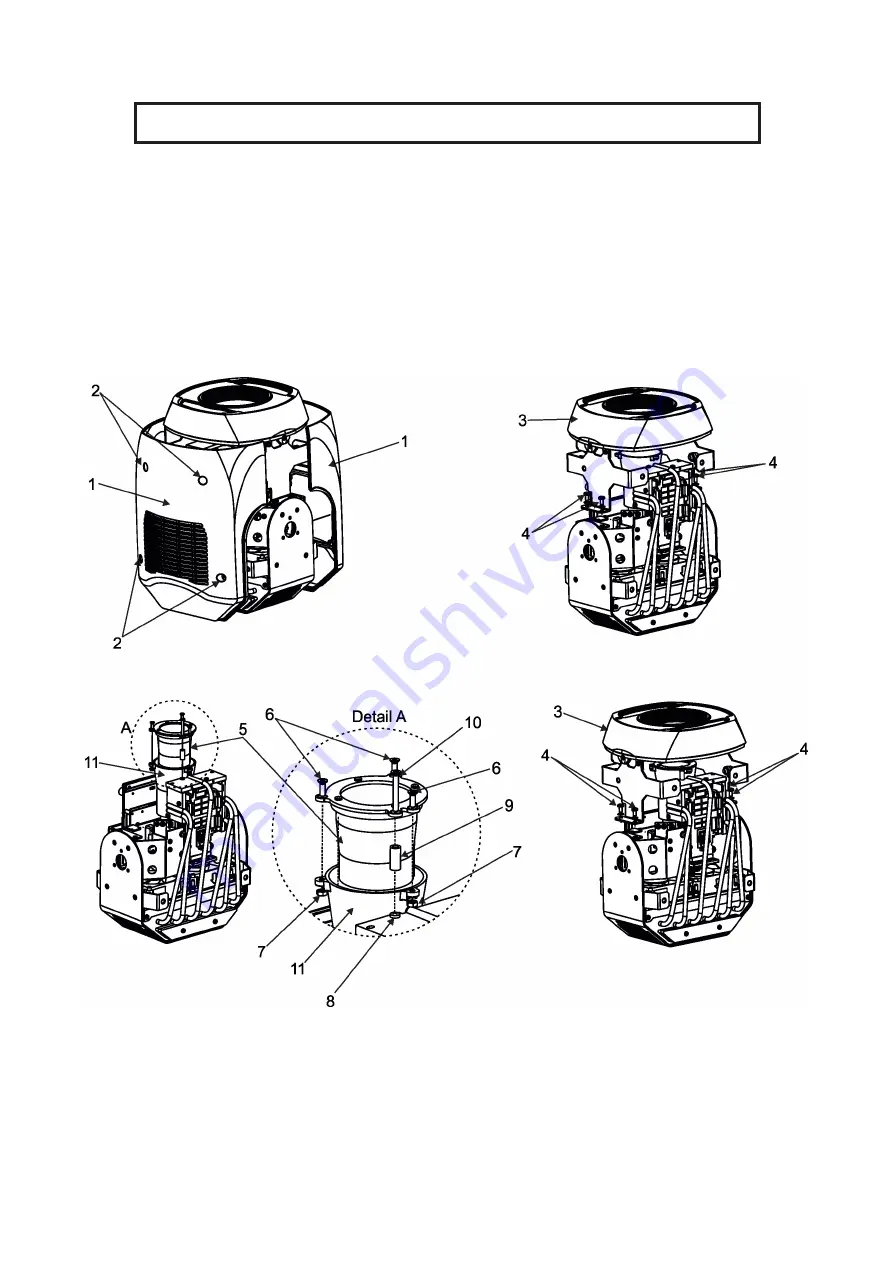
3.5 Installing the wide-angle lens 

Disconnect the fixture from mains before the wide-angle module installing.


To install the wide-angle lens:

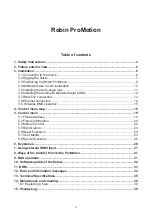
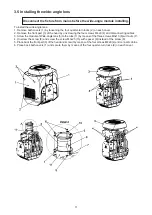
1. Remove both covers (1) by loosening the four quarter-turn locks (2) on each cover.

2. Remove the front part (3) of the head by unscrewing the four screws M4x8 (4) and disconnecting cables.

3. Screw the module of Wide-angle lens (5) to the tube (11) by means of the three screws M3x10 (6) with nuts (7).

4. Unscrew the screw (8) and screw the screw M3x25 (10) with spacer (9) instead of the screw (8).

5. Place back the front part (3) of the head and screw it by means of the four screws M4x8 (4) and connect cables.

6. Place back both covers (1) and secure them by means of the four quarter-turn locks (2) on each cover. 

Содержание Robin ProMotion ADM

Страница 1: ...1 Version 1 7 ...

Страница 2: ...nnection 14 3 9 Wireless DMX operation 15 4 Control menu map 16 5 Control menu 19 5 1 Fixture Address 19 5 2 Fixture information 20 5 4 Manual Control 22 5 5 Stand alone 23 5 6 Reset Functions 23 5 7 User Media 23 5 8 Special functions 25 6 Keystones 26 7 Using external HDMI input 27 8 Ways of file transfer from to the ProMotion 27 9 NAS operation 31 10 Software update of the fixture 32 11 RDM 33 ...

Страница 3: ...r installing the fuses or any part The power plug has to be accessible after installing the fixture Do not overload wall outlets and extension cords as this can result in fire or electric shock Do not allow anything to rest on the power cord Do not locate this fixture where the cord may be damaged by persons walking on it Make sure that the power cord is never crimped or damaged by sharp edges Che...

Страница 4: ...d modifications on the fixture are forbidden due to safety reasons If this device will be operated in any way different to the one described in this manual the product may suffer damages and the guarantee becomes void Furthermore any other operation may lead to dangers like short cir cuit burns electric shock crash etc Immunity of the equipment is designed for electromagnetic environments E1 E2 E3...

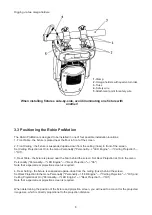
Страница 5: ...rCon True 1 1 Moving head 2 Arm 3 Base 4 Display 5 Pan lock 6 Tilt lock The head has to be locked for transportation the pan lock 5 and the tilt lock 6 have to be in locked positions To unlock the head move these latches to unlock positions before operating the fixture Note the Robin Promotion ADM is equipped with an automatic distance meter which enables autofocus of the fixture ...

Страница 6: ...th This device falls under class one and must be earthed grounded Design of the Robin ProMotion allows to connect several fixtures to AC mains power in one interconnected daisy chain using power input and output connectors Needed daisy chain cords are stated in the chapter Technical specifications The max number of connected fixtures depends on the AC mains power voltage and fixture version CE cET...

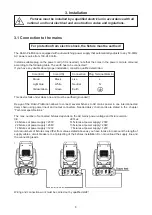
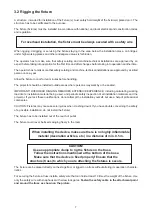
Страница 7: ...NCE including calculating working load limits installation material being used and periodic safety inspection of all installation materials and the projector If you lack these qualifications do not attempt the installation yourself but use a help of professional companies CAUTION Fixtures may cause severe injuries when crashing down If you have doubts concerning the safety of a possible installati...

Страница 8: ...nu Personality Personality LED Engine Ceiling Projection On 3 Rear Table the fixture is placed near the floor behind the screen Set Rear Projection at On in the menu Personality Personality LED Engine Rear Projection On Note that a special rear projection screen is required 4 Rear Ceiling the fixture is suspended upside down from the ceiling truss behind the screen Set Rear Projection in the menu ...

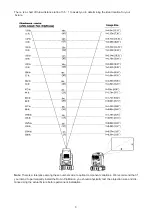
Страница 9: ...nd that if you intend to permanently install the Robin ProMotion you should physically test the projection size and dis tance using the actual fixture before permanent installation There is a chart of throw distance ratio of 3 5 1 to assist you in determining the ideal location for your fixture ...

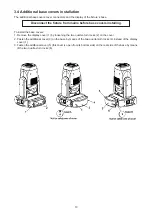
Страница 10: ...installing To install the base covers 1 Remove the display cover 1 by loosening the two quarter turn locks 2 on the cover 2 Fasten the additional cover 3 on the base by means of the two quarter turn locks 4 instead of the display cover 1 3 Fasten the additional cover 5 this cover is open from its bottom side on the rear side of the base by means of the two quarter turn locks 6 ...

Страница 11: ... by unscrewing the four screws M4x8 4 and disconnecting cables 3 Screw the module of Wide angle lens 5 to the tube 11 by means of the three screws M3x10 6 with nuts 7 4 Unscrew the screw 8 and screw the screw M3x25 10 with spacer 9 instead of the screw 8 5 Place back the front part 3 of the head and screw it by means of the four screws M4x8 4 and connect cables 6 Place back both covers 1 and secur...

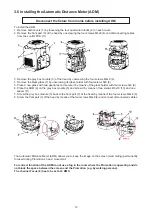
Страница 12: ...cure it by means of the glass holder with four screws 3x8 8 6 Place the ADM 9 on the grey box module 5 and screw it by means of two screws M3x18 10 and one spacer 11 7 Screw the grey box module 5 back to the front part 3 of the head by means of the four screws M4x8 6 8 Screw the front part 3 of the head by means of the four screws M4x8 4 and connect disconnected cables The Automatic Distance Meter...

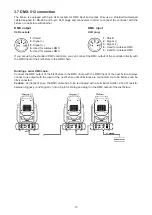
Страница 13: ...first fixture in the DMX chain Building a serial DMX chain Connect the DMX output of the first fixture in the DMX chain with the DMX input of the next fixture Always connect one output with the input of the next fixture until all fixtures are connected Up to 32 fixtures can be interconnected Caution At the last fixture the DMX cable has to be terminated with a terminator Solder a 120 Ω resistor be...

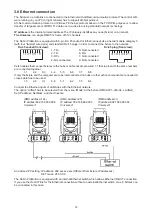
Страница 14: ...d 4 Not connected 8 Not connected Patch cables that connect fixtures to the hubs or LAN sockets are wired 1 1 that is pins with the same numbers are connected together 1 1 2 2 3 3 4 4 5 5 6 6 7 7 8 8 If only the fixture and the computer are to be interconnected no hubs or other active components are needed A cross cable has to be used 1 3 2 6 3 1 4 8 5 7 6 2 7 5 8 4 Connect the Ethernet inputs of ...

Страница 15: ...ches fixture to the wired wireless operation and is active only during first 10 seconds after switching the fixture on After switching the fixture on the fixture checks both modes of receiving DMX in the following order 1 For the first five seconds the fixture receives DMX signal from the wired input If the channel Special func tions is set at some DMX input option the fixture will receive DMX val...

Страница 16: ... DMX Values Pan 0 255 Dimmer 0 255 Temperatures Current CPU Head Projector Highest CPU Head Projector High Res CPU Head Projector Power Channel State Software Versions Graphic Engine Module Pan Tilt Module Optics Module Display Space Usage Free Used Product IDs Wireless State Signal Quality Unlink Wireless Personality Pan Reverse On Off Tilt Reverse On Off Pan Tilt Mode Speed Mode Time Mode Pan Ti...

Страница 17: ...o High Stand Alone Input Overtake Off On WEB Server Activate Password Off On Set Password 2479 Wifi Access Point Activate Off On Channel ID 1 9 NAS Client Activate Off On IP Address Synchro Time 10 600 On PowerUp Sync Off No Wait For Sync Wait For Sync Reset to Defaults Manual Control Manual DMX Control Pan 0 255 Dimmer 0 255 LED Engine External Input On Off Keystone Horizontal 0 128 255 Keystone ...

Страница 18: ... Grap Engine Reset Pan Tilt Reset Focus Reset All User Media Initiaize USB Mirror Media Mirror Program Re encode Internal Media Delete Internal Media Special Functions Reinit Inner Flash Drive Calibration Pan Calibration 0 255 Tilt Calibration 0 255 Focus Calibration 0 255 Grey Box calibration 0 255 Store ...

Страница 19: ... you set for example the address 26 the Robin ProMotion will use channels 26 50 for control Please be sure that you do not have any overlapping channels in order to control each Robin ProMotion correctly and independently from any other fixture on the DMX data link ArtNet Universe Use the menu item to set desired ArtNet Universe 0 255 sACN Universe Use the menu item to set desired sACN Universe 1 ...

Страница 20: ...ture of the Raspberry since the fixture has been fabricated Head Amaximum temperature in the fixture head since the fixture has been fabricated Projector A maximum temperature in the projector since the fixture has been fabricated High Res CPU A maximum temperature of the Raspberry since the counter was last reset Head A maximum temperature in the fixture head since the counter was last reset Proj...

Страница 21: ...es from current orientation ScreenSaver Delay The item allows you to keep the screen on or to turn it off automatically after 1 10 minutes after last touch of the screen Intensity Use this function to adjust intensity of the display 0 min intensity 9 max intensity LED Engine Use the menu if you want to set special options for LEDs engine Ceiling Projection This function enables to project image on...

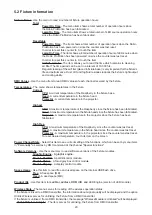
Страница 22: ...ntended Promotion and allows synchronization of NAS client with the NAS server IP Address The menu item allows you to set an IP address of the Promotion which serves as the NAS server Synchro Time The menu item allows you to set a time period 1 minute 600 minutes after which media content of the NAS client will be synchronized with the NAS server If the item is set at 0 no synchronization will run...

Страница 23: ...gram can have up to 999 steps After entering the menu Edit Program select desired program 1 9 and enter it Select desired step and enter it Now use menu items to set fixture channels to desired values The item Step Time means a step time 0 1 999 9 seconds The item Add New Step inserts a new step behind the current step The item Delete Step deletes the current step Note DMX values are displayed at ...

Страница 24: ...ection Mode Max number of media files in the folder is 250 We recommend to follow the 3 digit conventions for media files where a 3 digit number is followed by an underscore and a name e g 001_mountains jpg 002_landscape jpg The numerical order is suitable in the case that you need to assign certain media files to specified DMX values Example The table below show differences in file DMX assignment...

Страница 25: ...oad programs from the USB memory stick folder programs into the fixture and vice versa From Light the option copies created programs from the fixture to the USB memory stick To Light the option copies programs from the USB memory drive folder programs into the fixture Warning Created programs in the fixture will be overwritten Note There is 29 GB of free space in the fixture available for custom m...

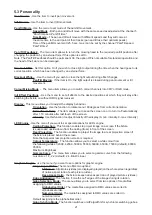
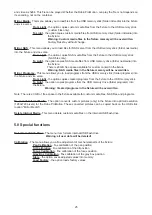
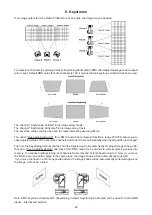
Страница 26: ... you to save adjusted values of the keystone channels and correct them automatically when head position is changed First use the Keystoning Vertical channel and the Kyestoning Horizontal channel to adjust image shape after that go to Save AutoKeystoning and stay at this DMX range for 3 seconds to write keystoning values into memory To activate AutoKeystoning set channels Horizontal and Vertical Ke...

Страница 27: ...nitialize USB 3 Plug the USB stick into computer 4 Upload content into the folder intmedia nasmedia for NAS files programs for programs and unplug the USB stick from computer 5 Plug the USB stick back into the ProMotion 6 Copy files into the ProMotion via the menu item Mirror Media Mirror NAS for NAS files Mirror Programs for program files 7 Unplug the USB stick from the ProMotion To copy custom f...

Страница 28: ...ll appear System directory folder for system files and factory media files The folder is inaccessible for user User directory folder for user media files NAS server folder for NAS media files If the fixture runs as a NAS server media files from this folder are copied to the folder NAS client in the client fixtures NAS client folder for client NAS media files After clicking on desired folder you wi...

Страница 29: ...e phone connected to the fixture by means of Wi Fi The Wi Fi access point in the fixture has to be activated WifiAccess Point TurnAP On Off Access Point On Wifi network name PromotionAP Password promotion Note If you have more Robin Promotions only one fixture may work as a Wi Fi access point at the same time In this case is more advantageous to connect fixtures to the Ethernet network and one fix...

Страница 30: ...ill need install FTP client on your laptop PC Login entry for ftp relation Host name IP address of the fixture User name ftp Password ftp The FTP can be also used on the PC or mobile phone with installed FTP client connected to the fixture by means of Wi Fi The Wi Fi access point in the fixture has to be activated Wifi Access Point Activate On Wifi network name PromotionAP Password promotion ...

Страница 31: ...ntended for NAS operation have to be copied to the folder NAS server on the NAS server fixture to the NAS client fixtures will be copied automatically by means of synchronization between NAS server and NAS clients folders The NAS server fixture does not need another settings The NAS client fixtures require correct settings of items in the menu NAS Client Activate On IP address address of NAS serve...

Страница 32: ...hes the ProMotion to update mode automatically Please see https www robe cz robe uploader for more information about the ROBE Uploader and control PC setting Example of connection It is important to note that Ethernet network connection Local LAN typically needs to be set to 2 x x x address for example 2 0 0 10 assuming that no other computer on the network contains such an address whi le keeping ...

Страница 33: ...commands to and receive messages from specific moving lights RDM allows explicit commands to be sent to a device and responses to be received from it The list of commands for Robin ProMotion is the following Parameter ID Discovery command SET command GET command DISC_UNIQUE_BRANCH DISC_MUTE DISC_UN_MUTE DEVICE_INFO SUPPORTED_PARAMETERS SOFTWARE_VERSION_LABEL DMX_START_ADDRESS IDENTIFY_DEVICE DEVIC...

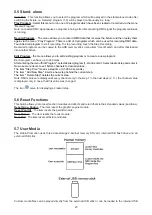
Страница 34: ...right corner of the screen In this case the following menu items will appear after touching the screen DMX address blinks It means that no DMX signal is received Check DMX connectors and cables check connection between the fixture and the control desk Main menu standard main menu Display errors touch the item to see error message s ...

Страница 35: ...deos Gobo rotation and indexing Video speed control RGB or CMY colour mixing Virtual colour wheel with pre programmed 234 colours including white Colour effect wheel with wide range of built in colour effects colour transitions and cross fades multiple colour images rainbow effects Effect wheel with wide range of graphic effects Effect speed control Horizontal Vertical keystoning Smooth dimmer Shu...

Страница 36: ...t ready for ACN Recommended and supported filesystem on USB memory devices FAT16 FAT 32 External Wireless DMX RDM module optional Compliance with USITT DMX 512 1986 1990 and 512 A Full DMX fidelity and frame integrity Auto sensing of DMX frame rate and frame size 5ms DMX latency Operational frequency range of 2402 2480 MHz Producer LumenRadio Connection DMX data in out Locking 5 pin XLR 2 x USB 2 ...

Страница 37: ...Base Covers for Robin ProMotion black P N 10980548 Distance meter for Robin ProMotion P N 10980549 Installation base covers black P N 10980548 Ceiling mounting kit for Robin ProMotion black P N 10980551 Daisy Chain powerCON TRUE1 In Out EU 2m Indoor P N 13052439 Daisy Chain powerCON TRUE1 In Out US 2m Indoor P N 13052440 Daisy Chain powerCON TRUE1 In Out EU 5m Indoor P N 13052444 Safety wire 35 kg...

Страница 38: ...t solution and lint free small cloth for further cleaning of front glass The cooling fans should be cleaned according to the situation at least annually The interior of the base should be cleaned at least annually using a vacuum cleaner or an air jet More complicated maintenance and service operations are only to be carried out by authorized distributors Important Check the air filters periodicall...

Страница 39: ...Install the new fuse to the fuse holder only the same type and rating 7 Screw the display panel 3 and the front plastic cover 3 back on the base 15 ChangeLog This section summarizes all types of changes in the user manual Version of the manual Date of issue Description of changes 1 1 25 09 2020 DMX chart ver 1 2 1 2 27 10 2020 DMX chart ver 1 3 1 3 04 12 2020 DMX chart ver 1 4 1 4 09 12 2020 DMX c...

Страница 40: ...4 DMX input Wired DMX step 15 19 DMX input Wireless DMX step 20 24 Graphic display On step 25 29 Graphic display Off step 30 31 Colour temperature 3200K step 32 33 Colour temperature 4200K step 34 35 Colour temperature 5000K step 36 37 Colour temperature 5500K step 38 39 Colour temperature 5600K step 40 41 Colour temperature 6500K step 42 43 Colour temperature 7500K step 44 45 Colour temperature 8...

Страница 41: ... ADM Focus has to be set at 0 DMX 9 Keystoning Vertical 0 255 Vertical keystoning 128 Default proportional 10 Keystoning Horizontal 0 255 Horizontal keystoning 128 Default proportional 11 Cyan Red 0 255 Cyan 0 100 0 default for CMY mixing mode proportional 0 255 Red 0 100 255 default for RGB mixing mode proportional 12 Magenta Green 0 255 Magenta 0 100 0 default for CMY mixing mode proportional 0 ...

Страница 42: ...de green white step 19 Horizontal linear shade white blue step 20 Horizontal Linear shade blue white step 21 Vertical linear shade blue white step 22 Vertical linear shade white blue step 23 Diagonal shade white blue step 24 Diagonal shade blue white step 25 Horizontal linear shade white cyan step 26 Horizontal Linear shade cyan white step 27 Vertical linear shade cyan white step 28 Vertical linea...

Страница 43: ...vice versa fast step 74 Diagonal shade black white and vice versa slowly step 75 Diagonal shade black white and vice versa fast step 76 Shade black white slow rotation clockwise step 77 Shade black white fast rotation clockwise step 78 Shade black white slow rotation anticlockwise step 79 Shade black white fast rotation anticlockwise step 80 Horizontal linear shade white red and vice versa slowly ...

Страница 44: ... fast rotation anticlockwise step 120 Horizontal linear shade white magenta and vice versa slowly step 121 Horizontal linear shade white magenta and vice versa fast step 122 Vertical linear shade white magenta and vice versa slowly step 123 Vertical linear shade white magenta and vice versa fast step 124 Diagonal shade magenta white and vice versa slowly step 125 Diagonal shade magenta white and v...

Страница 45: ...corners slow rotation anticlockwise step 167 Random colour in four corners fast rotation anticlockwise step 168 Horizontal colour transition slowly random step 169 Horizontal colour transition fast random step 170 Vertical colour transition slowly random step 171 Vertical colour transition fast random step 172 Diagonal colour transition slowly step 173 Diagonal colour transition fast step 174 Hori...

Страница 46: ...ly 1 4 Transition from right left horizontally 1 5 Stripe transition from left right horizontally 1 6 Stripe transition from right left horizontally 1 7 3 stripe transition from left right horizontally 1 8 3 stripe transition from right left horizontally 1 9 6 stripe transition from left right horizontally 1 10 6 stripe transition from right left horizontally 1 11 Transition up down vertically 1 1...

Страница 47: ...on 1 48 Zoom transition in vertical direction 1 49 79 Reserved Effects applied at one gobo picture 80 Kaleidoscope 1 3 81 Kaleidoscope 2 3 82 Kaleidoscope 3 3 83 Kaleidoscope 4 3 84 Kaleidoscope 5 3 85 Sunflower Kaleidoscope coarse 3 86 Sunflower Kaleidoscope soft 3 87 Sunflower kaleidoscope slow 4 88 Sunflower kaleidoscope faster 4 89 Sunflower kaleidoscope fastest 4 90 99 Reserved 100 Circle Iri...

Страница 48: ...esentation time 0 8 sec step 1 126 Time from 0 1 sec to 12 6 sec proportional 127 128 Stop step 129 254 Time from 12 6 sec to 0 1 sec opposite direction proportional 255 Stop step Type of control 3 0 Presentation step 1 255 Effect speed from min to max proportional Type of control 4 0 Presentation 4 corners step 1 255 Number of corners from min to max proportional Type of control 5 0 Open step 1 2...

Страница 49: ...6 127 Shutter open step 128 143 Opening pulse in sequences from slow to fast proportional 144 159 Closing pulse in sequences from fast to slow proportional 160 191 Shutter open step 192 223 Random strobe effect from slow to fast proportional 224 255 Shutter open step 25 Dimmer 0 Dimmer closed LEDs Off 0 default step 1 255 Dimmer intensity from min to max LEDs On proportional function is active onl...

Страница 50: ...40 ...
Отзывы: